Webex App is a persistent messaging and video calling application available to CSIRO staff on Windows, Mac, Linux, iPhone, iPad, and Android devices. Webex App has the same functionality when working from home as it does when working in the office.
Install
Webex App comes pre-installed on CSIRO Windows and Mac machines. If you would like to install it on your personal Windows or Mac machine, or your iPhone / iPad or Android device, you can do so by clicking the appropriate icon below.
Operate
Select your operating system or device.
Windows
Mac OS X
Linux
iPhone / iPad / Android
Click on each heading to expand a section and learn more.
https://conferencing.csiro.au/webex-app.php?ref=buyingBuying a computer headset>
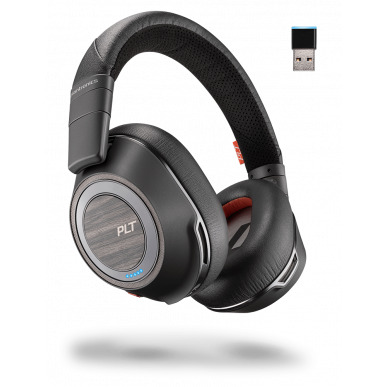
Your office headset can be taken home to help you work efficiently and reduce background noise for you and your colleagues. If you are planning to purchase a headset (and your manager has approved this), there are a wide range of computer headsets that will work well with Webex App. The four headsets shown below have been used by CSIRO staff in the past with success and can be purchased from a number of suppliers. Please note that in the current environment IMT does not recommend one headset vendor over another, nor one headset supplier over another. IMT is also unable to purchase and distribute headsets centrally due to logistical challenges.
Given the recent demand for headsets, some suppliers are experiencing long delays in shipping times. It is recommended that you check with your supplier of choice how long you can expect to wait to receive your headset before placing an order. Some example headset suppliers include Simply Headsets, The Telecom Shop, and Telephones Online.
Click one of the headsets below to learn more.
To learn about the full range of IMT supported headsets and ordering methods, visit the MyCSIRO - Webcams and Headsets (Citrix/VPN required) page.
Login>
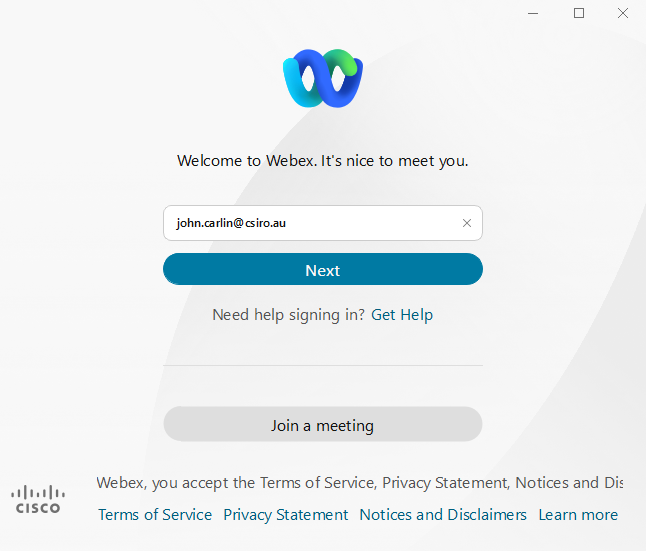
To login to Webex App (MFA required):
-
Open the 'Webex' app
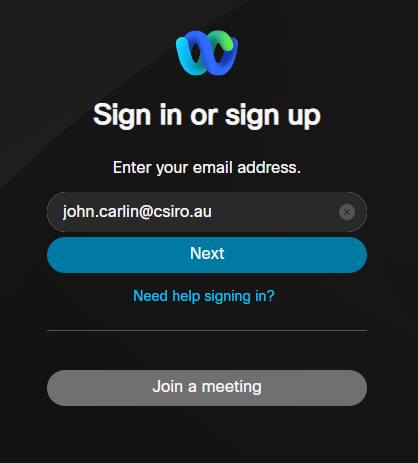
- Enter your CSIRO email address and click 'Next'.
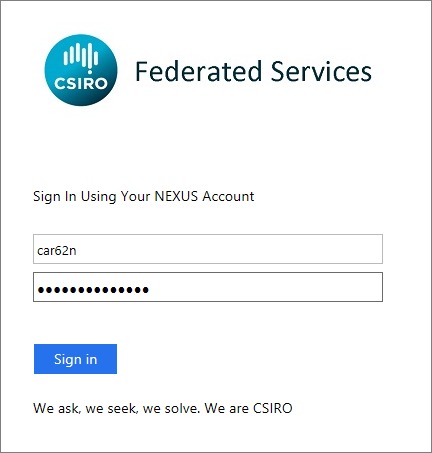
- Enter your CSIRO ident and password and click 'Sign in'
-
Respond to the MFA prompts as required.
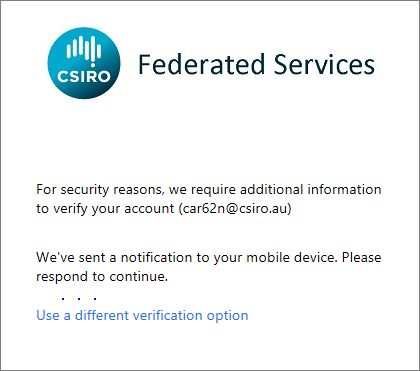
To login to Webex App (MFA required):
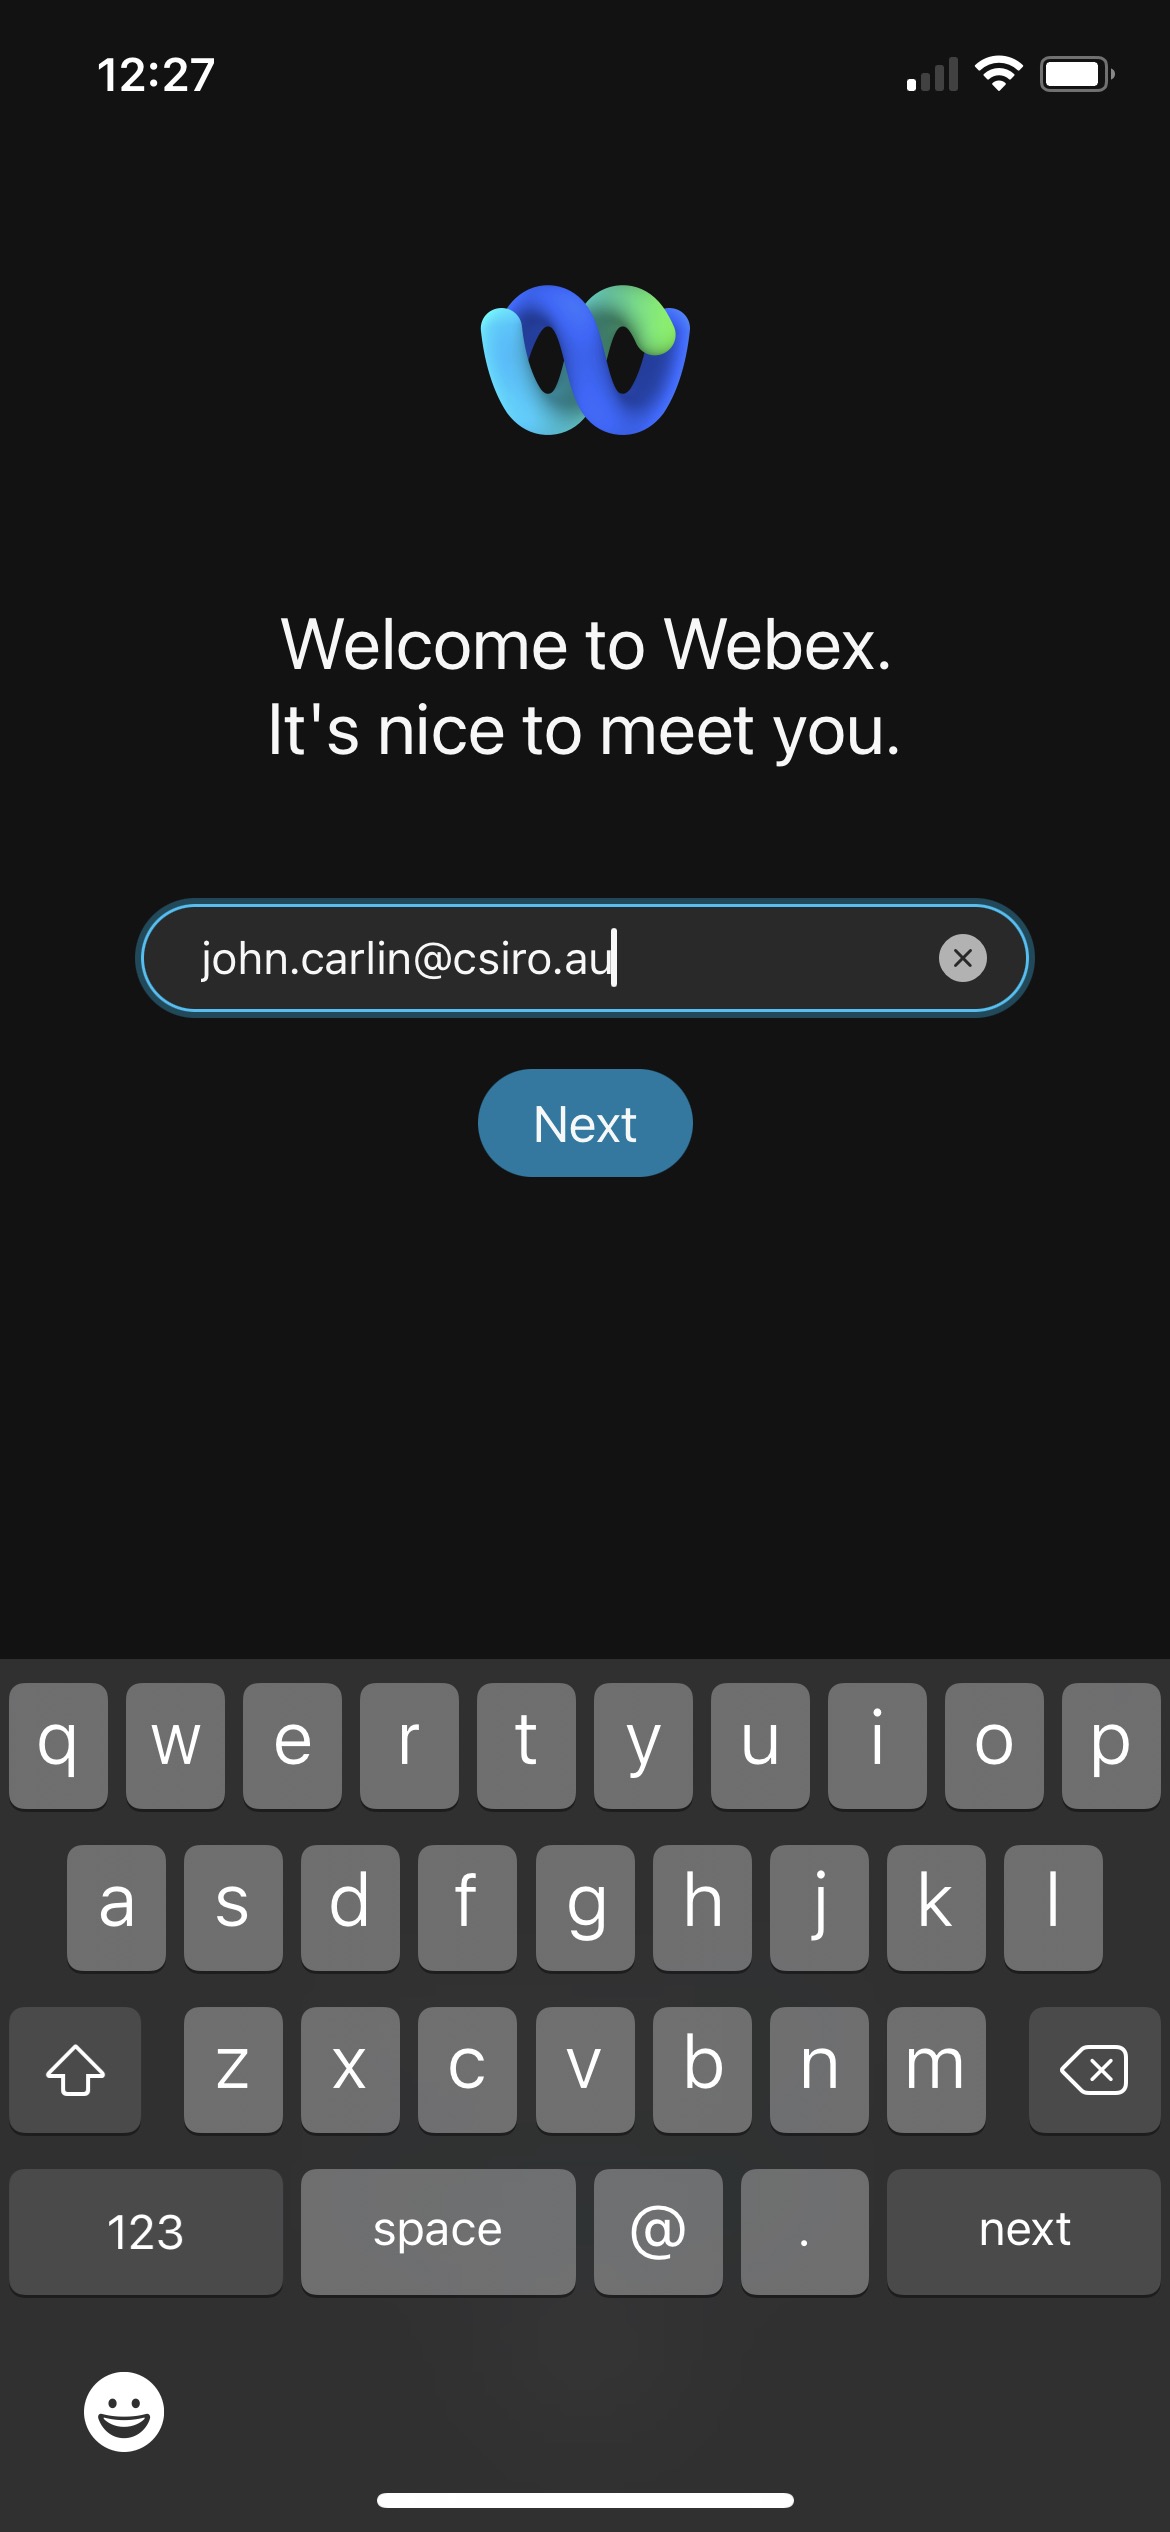
- Open the 'Webex' app
- Enter your CSIRO email address and click 'Next'.
- Enter your CSIRO ident and password and click 'Sign in'
- Respond to the MFA prompts as required
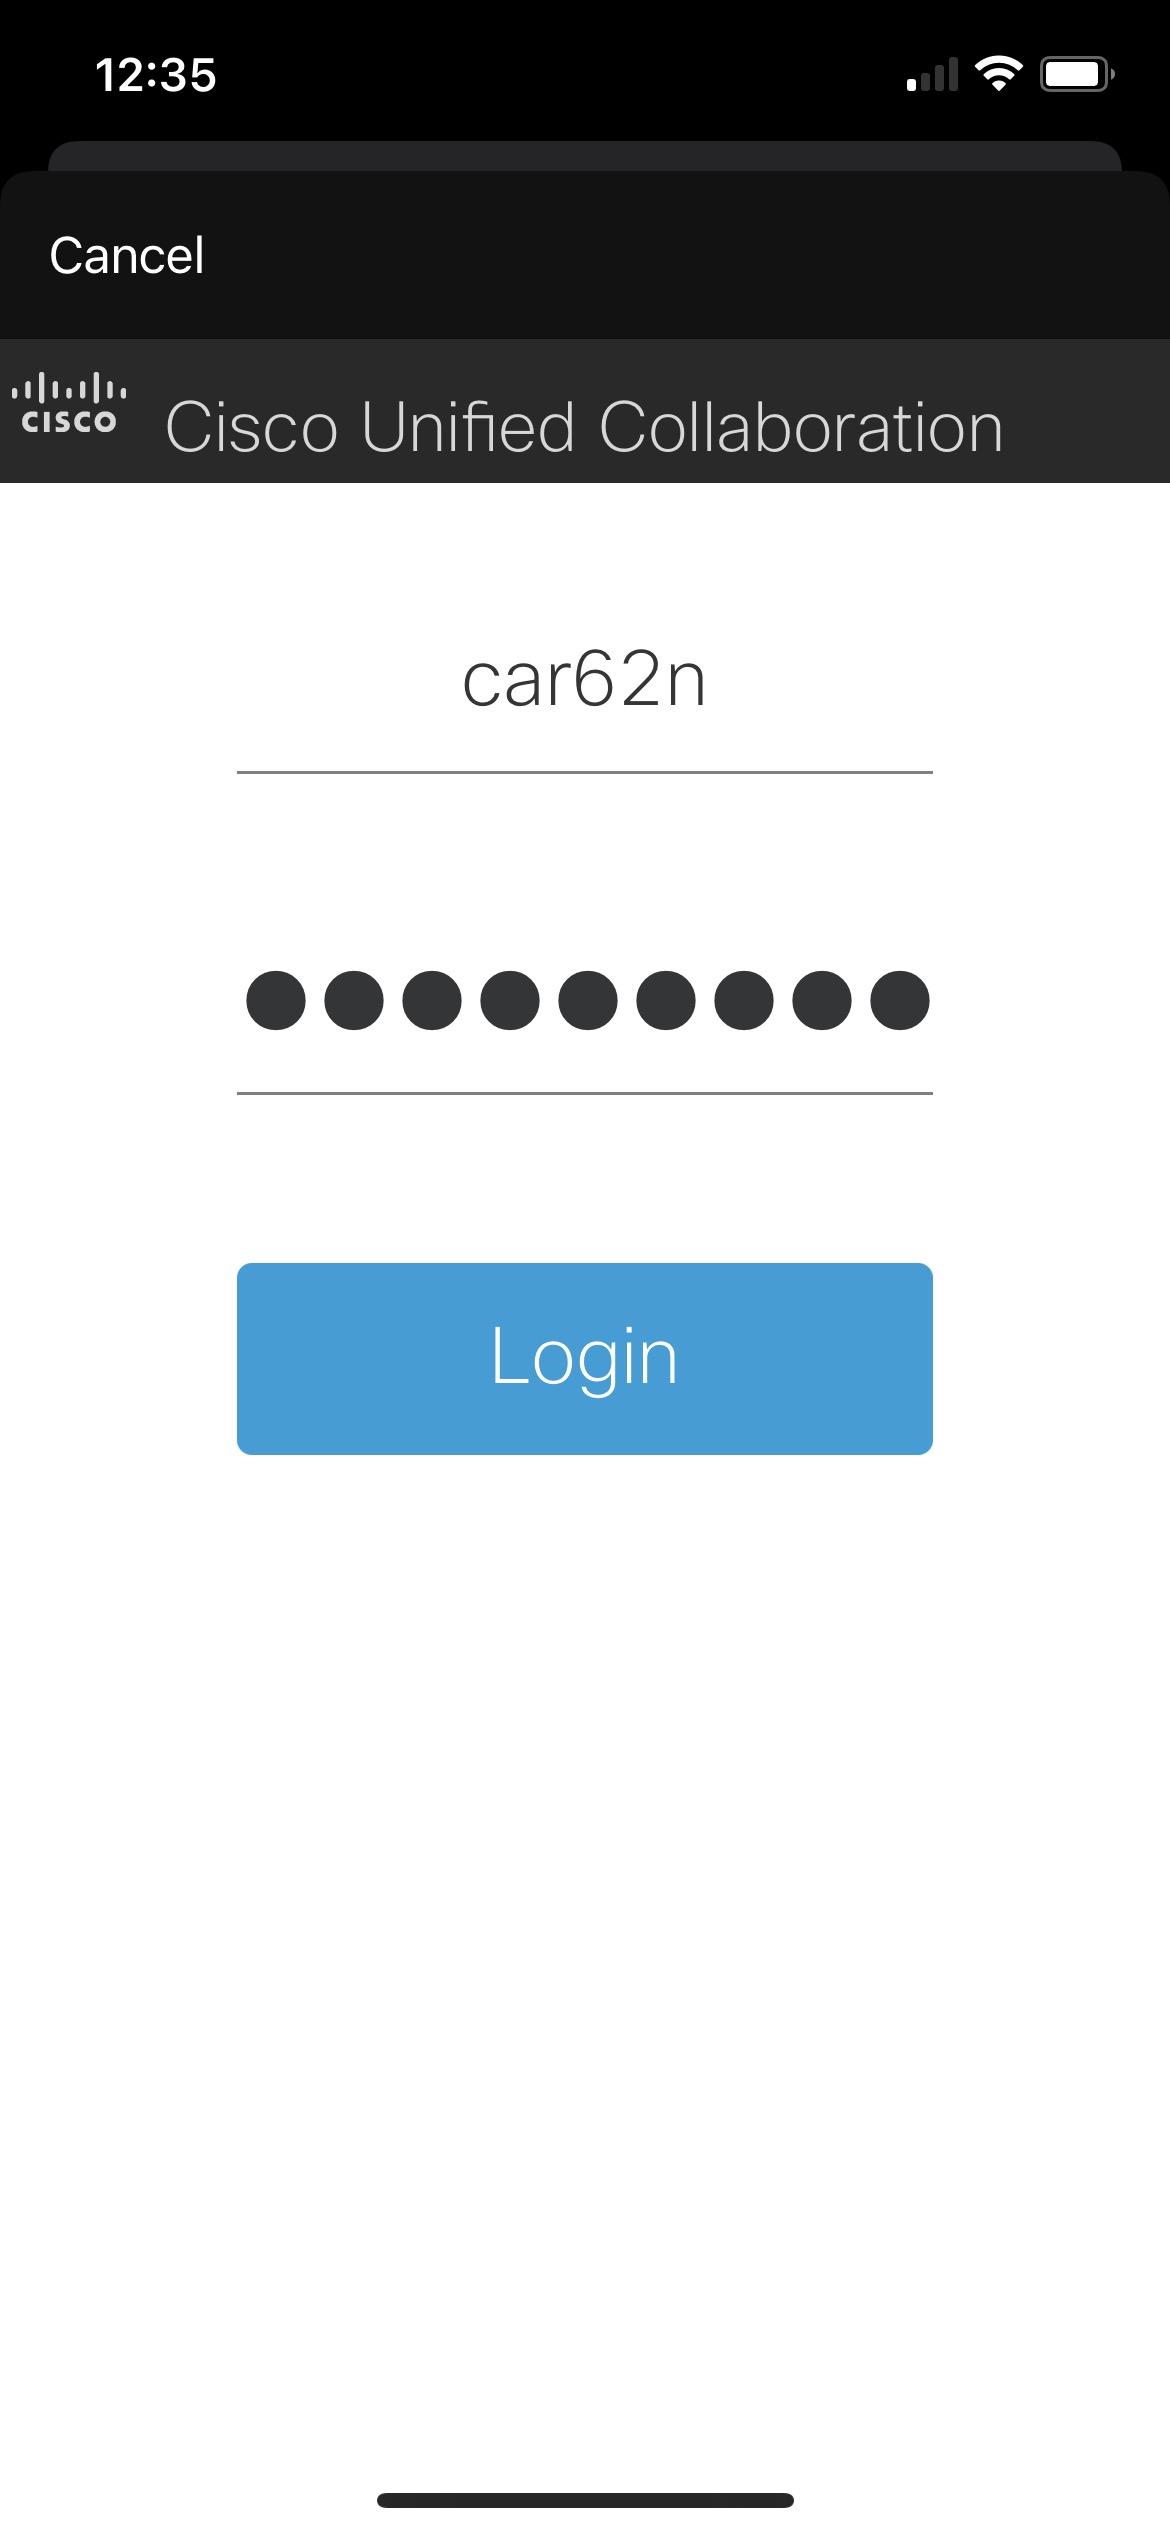
-
On the 'Cisco Unified Collaboration' screen enter your CSIRO ident and password again, then click 'Login'.


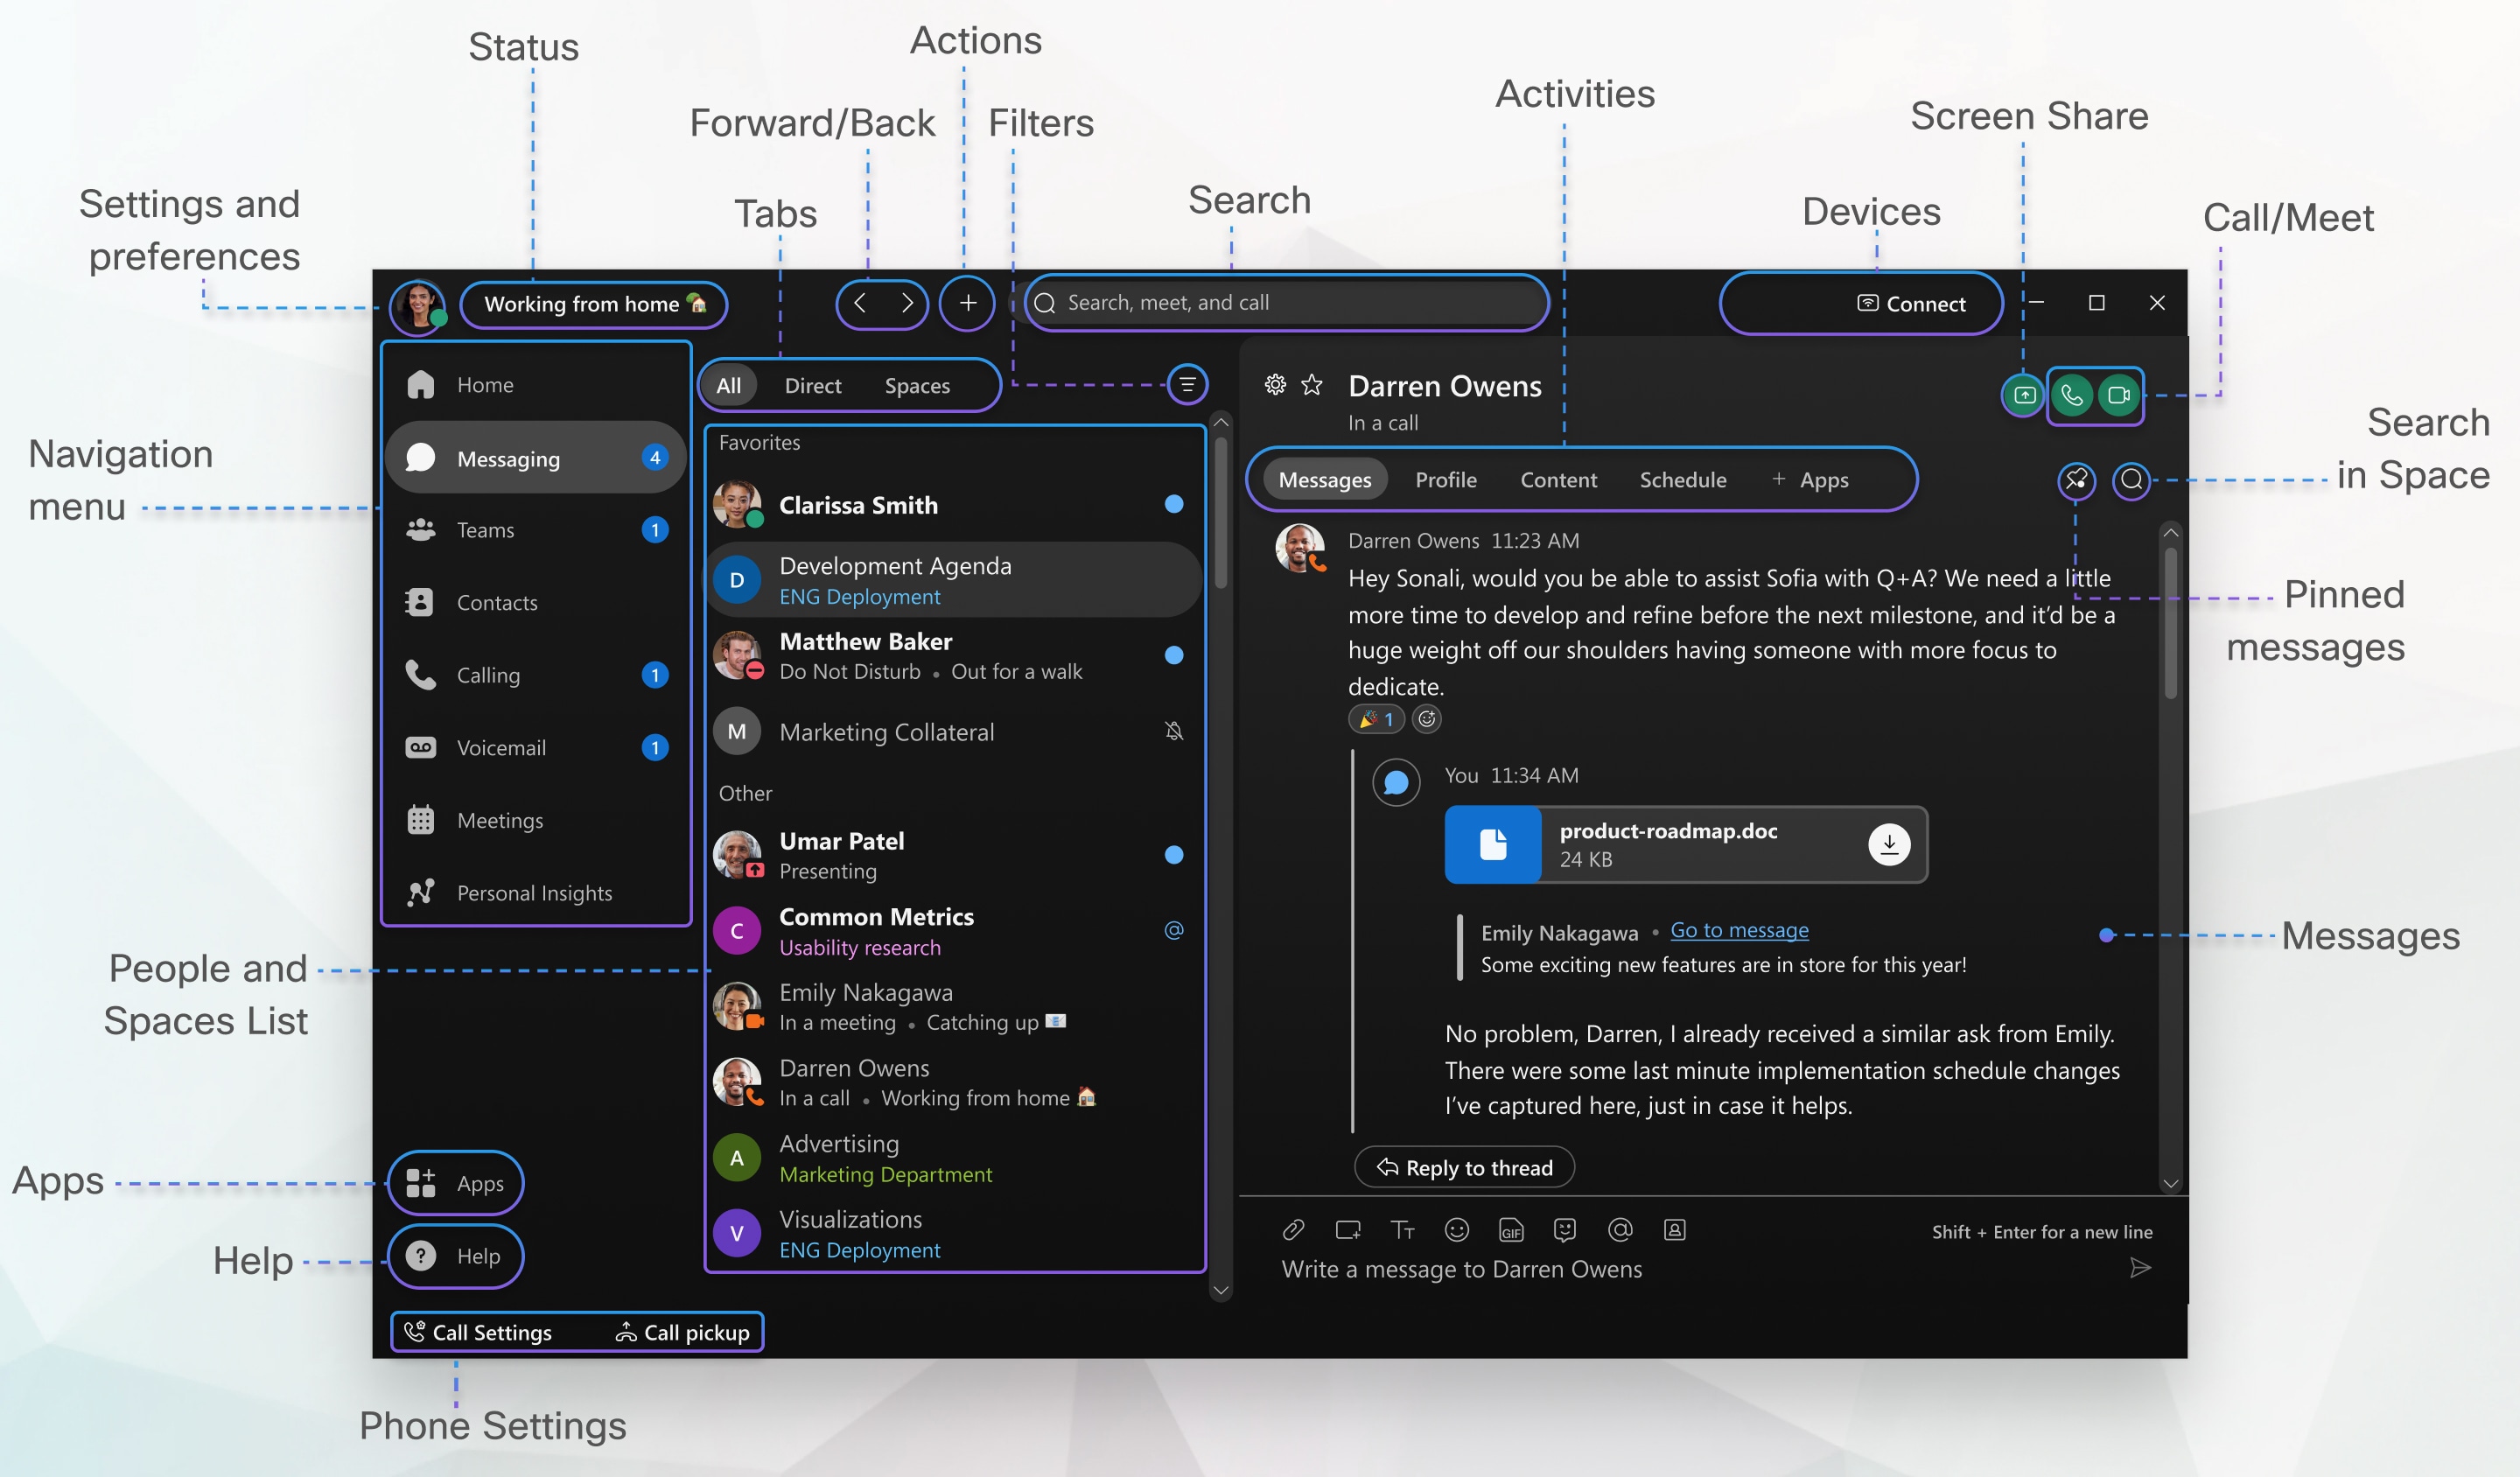
User interface at a glance>
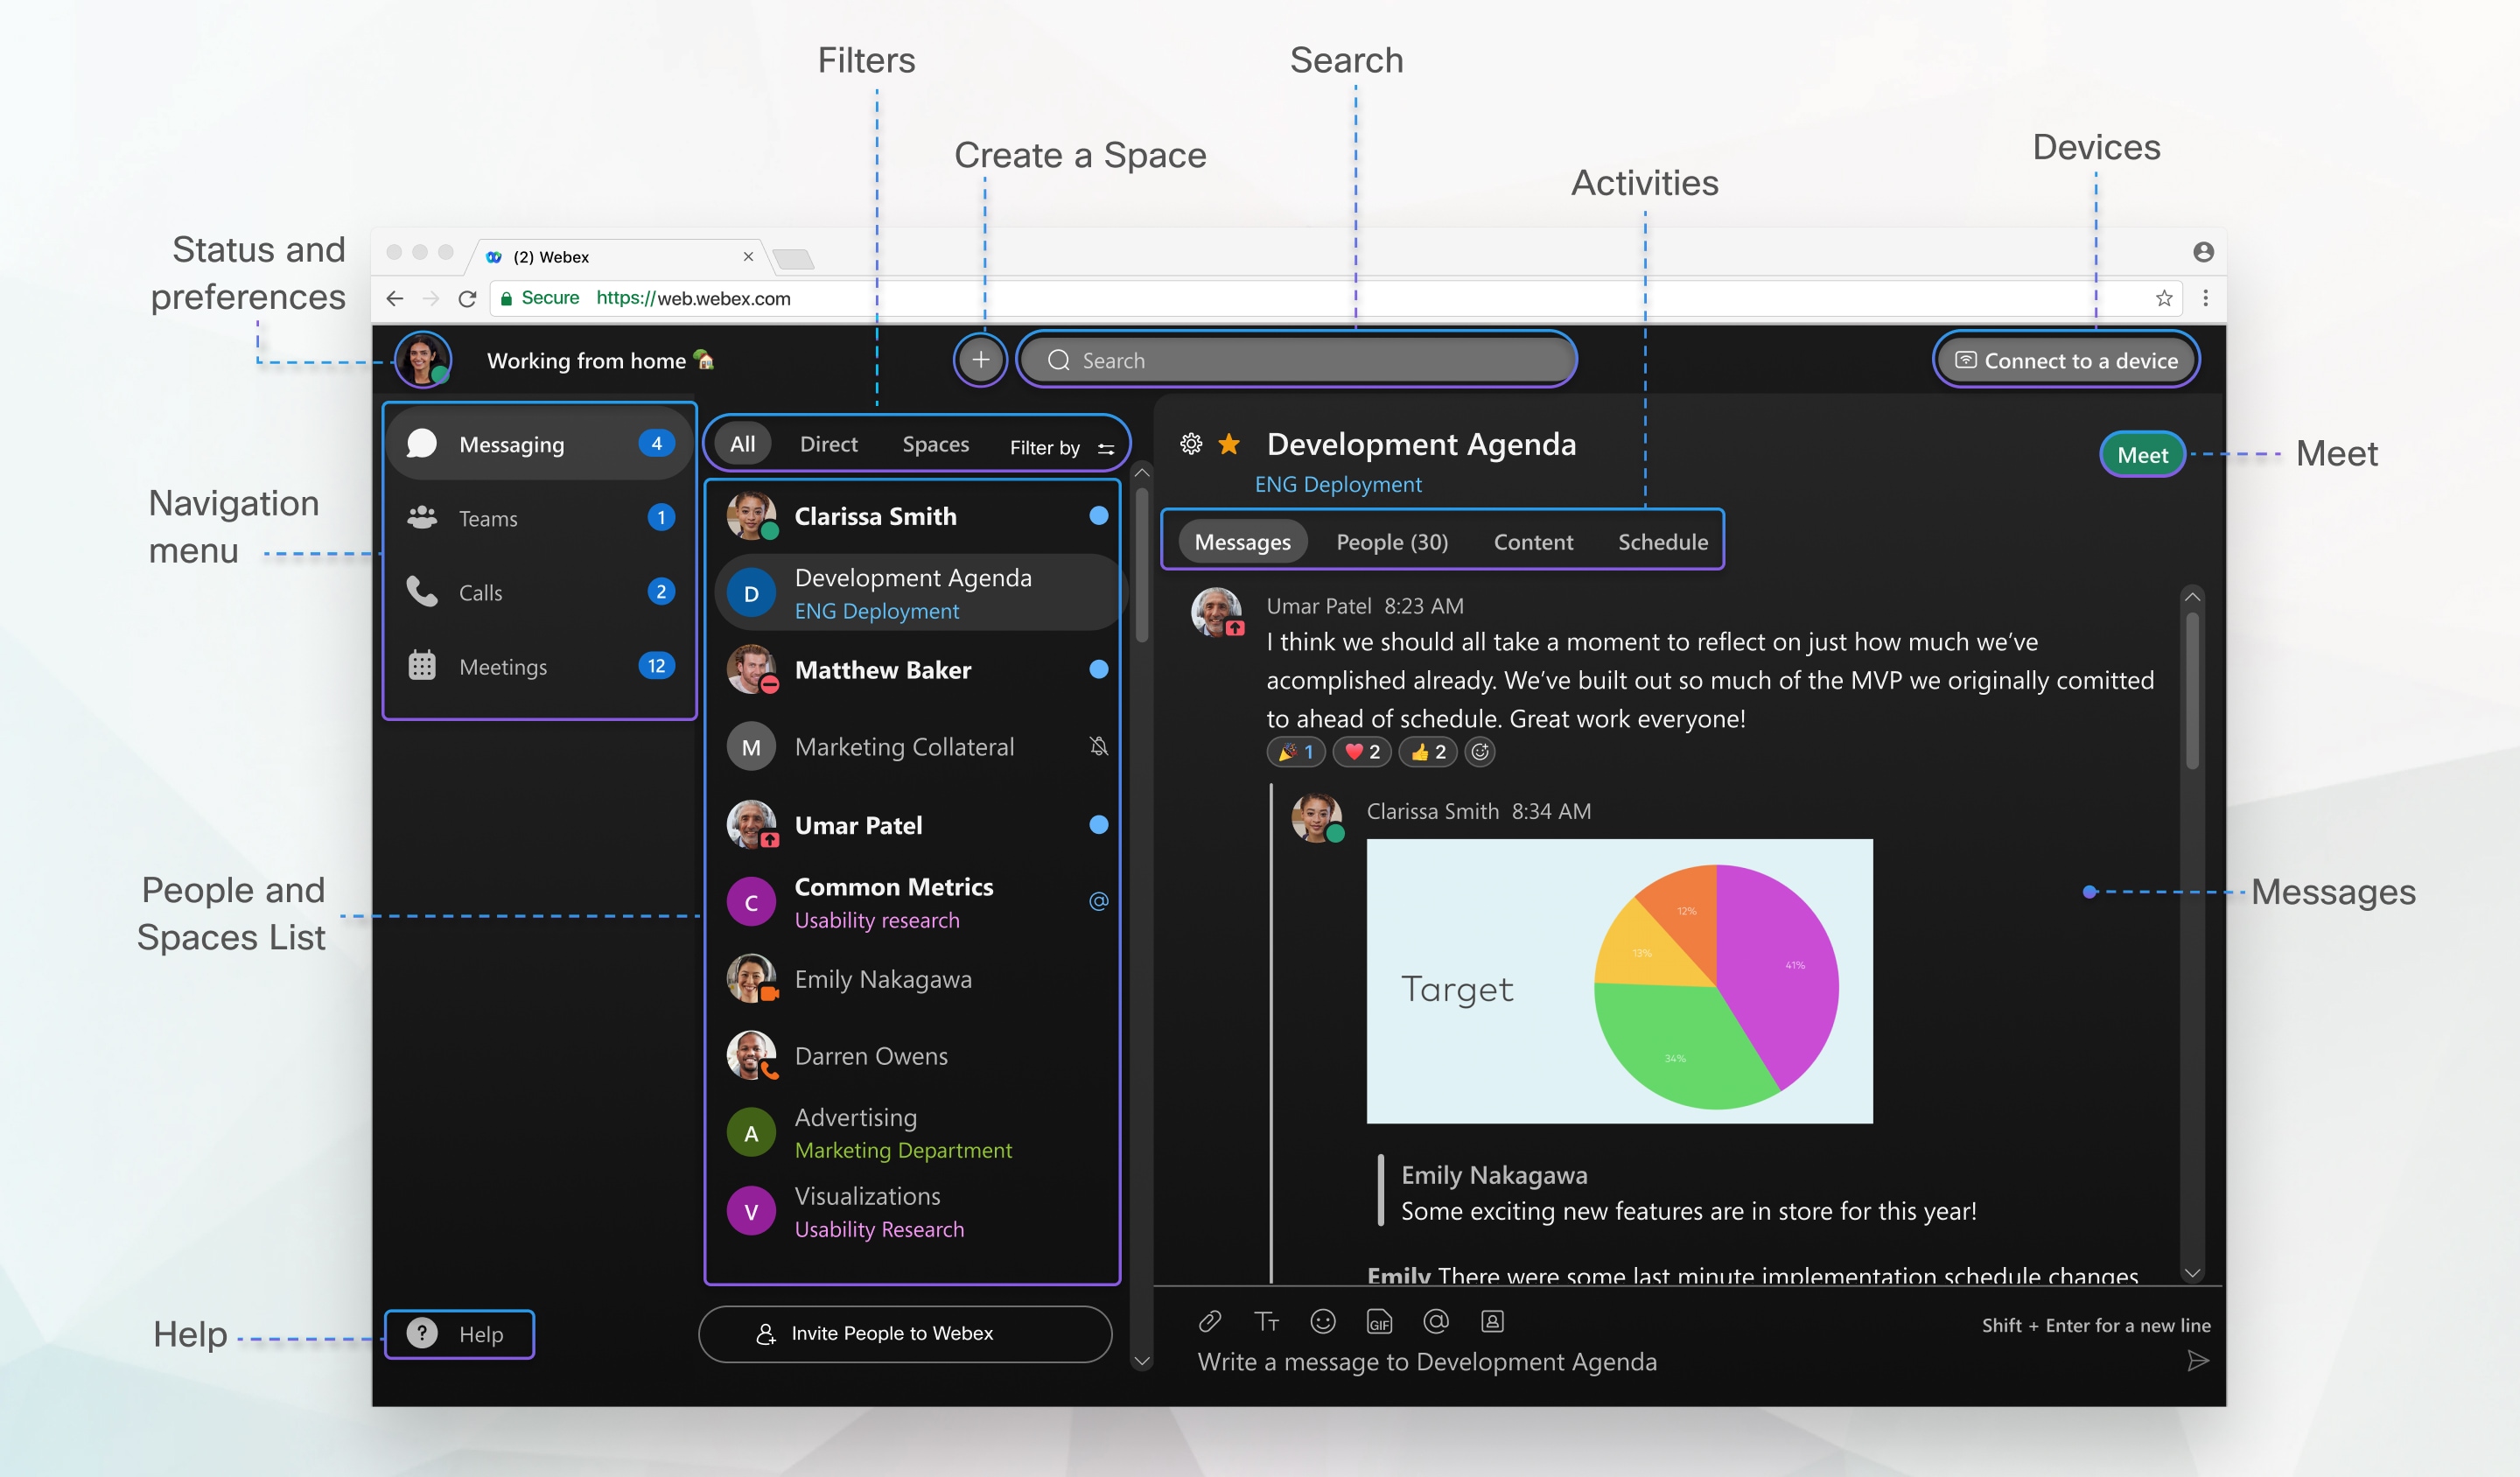
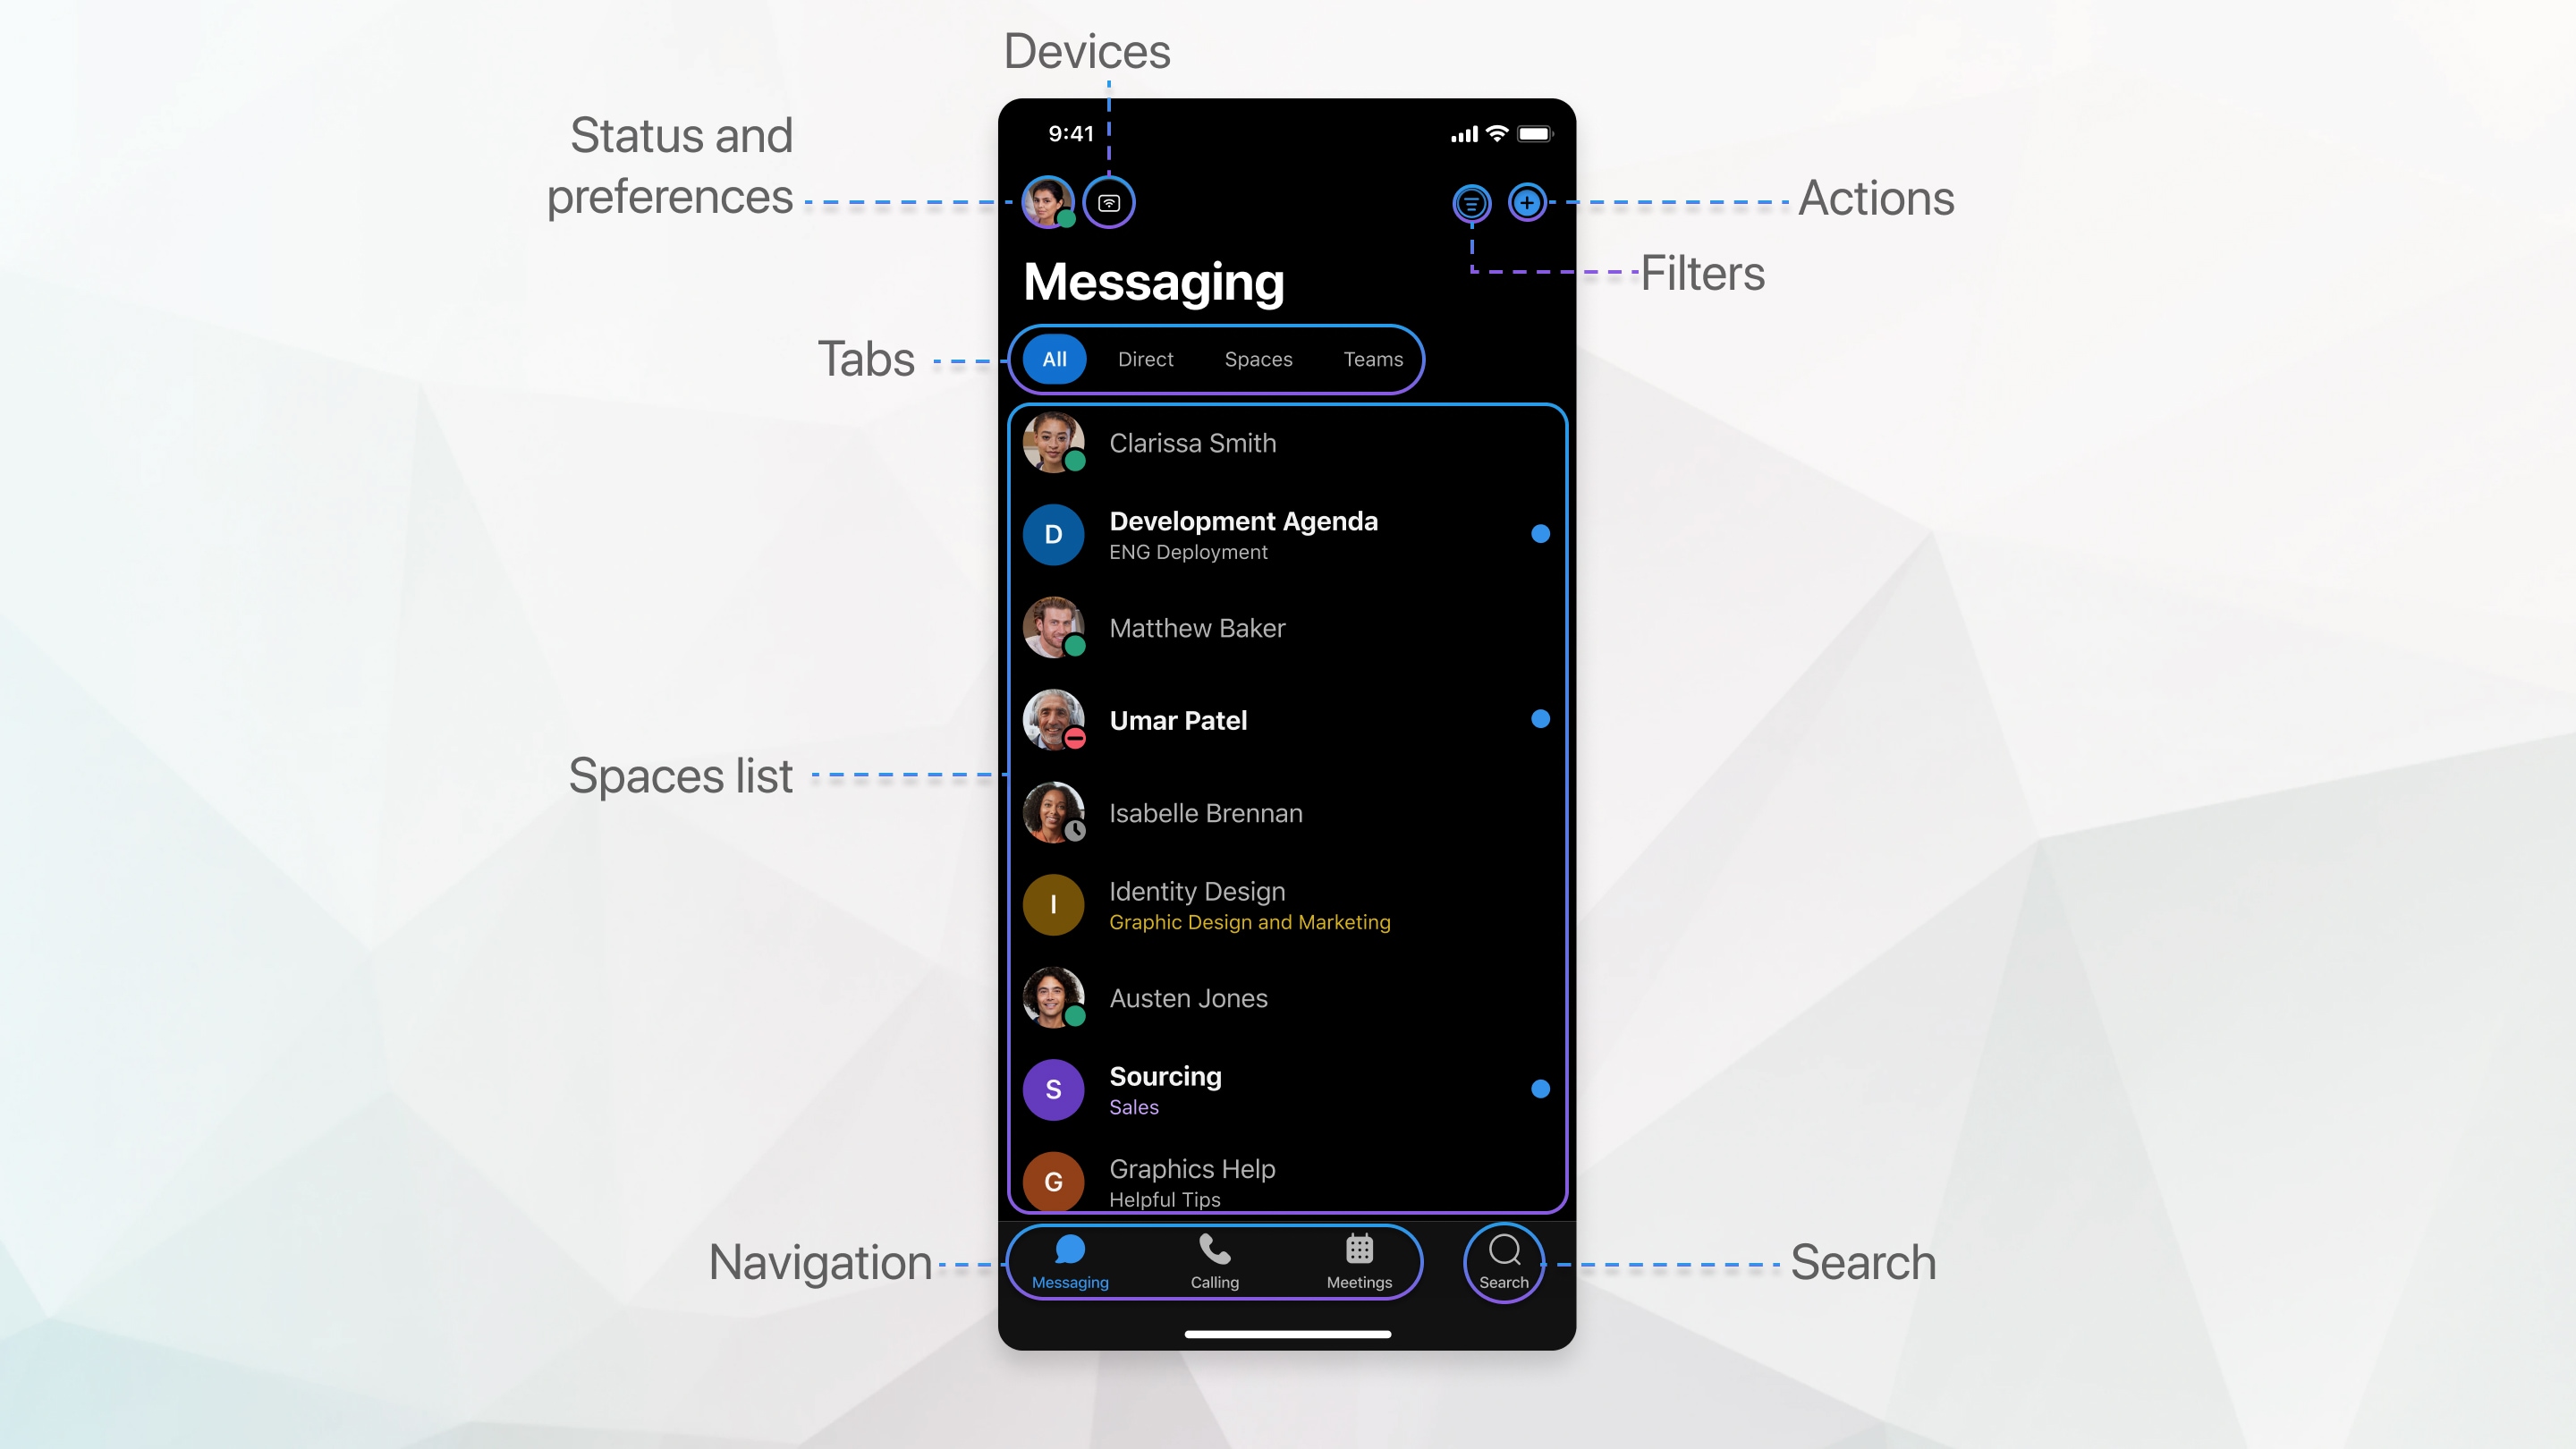
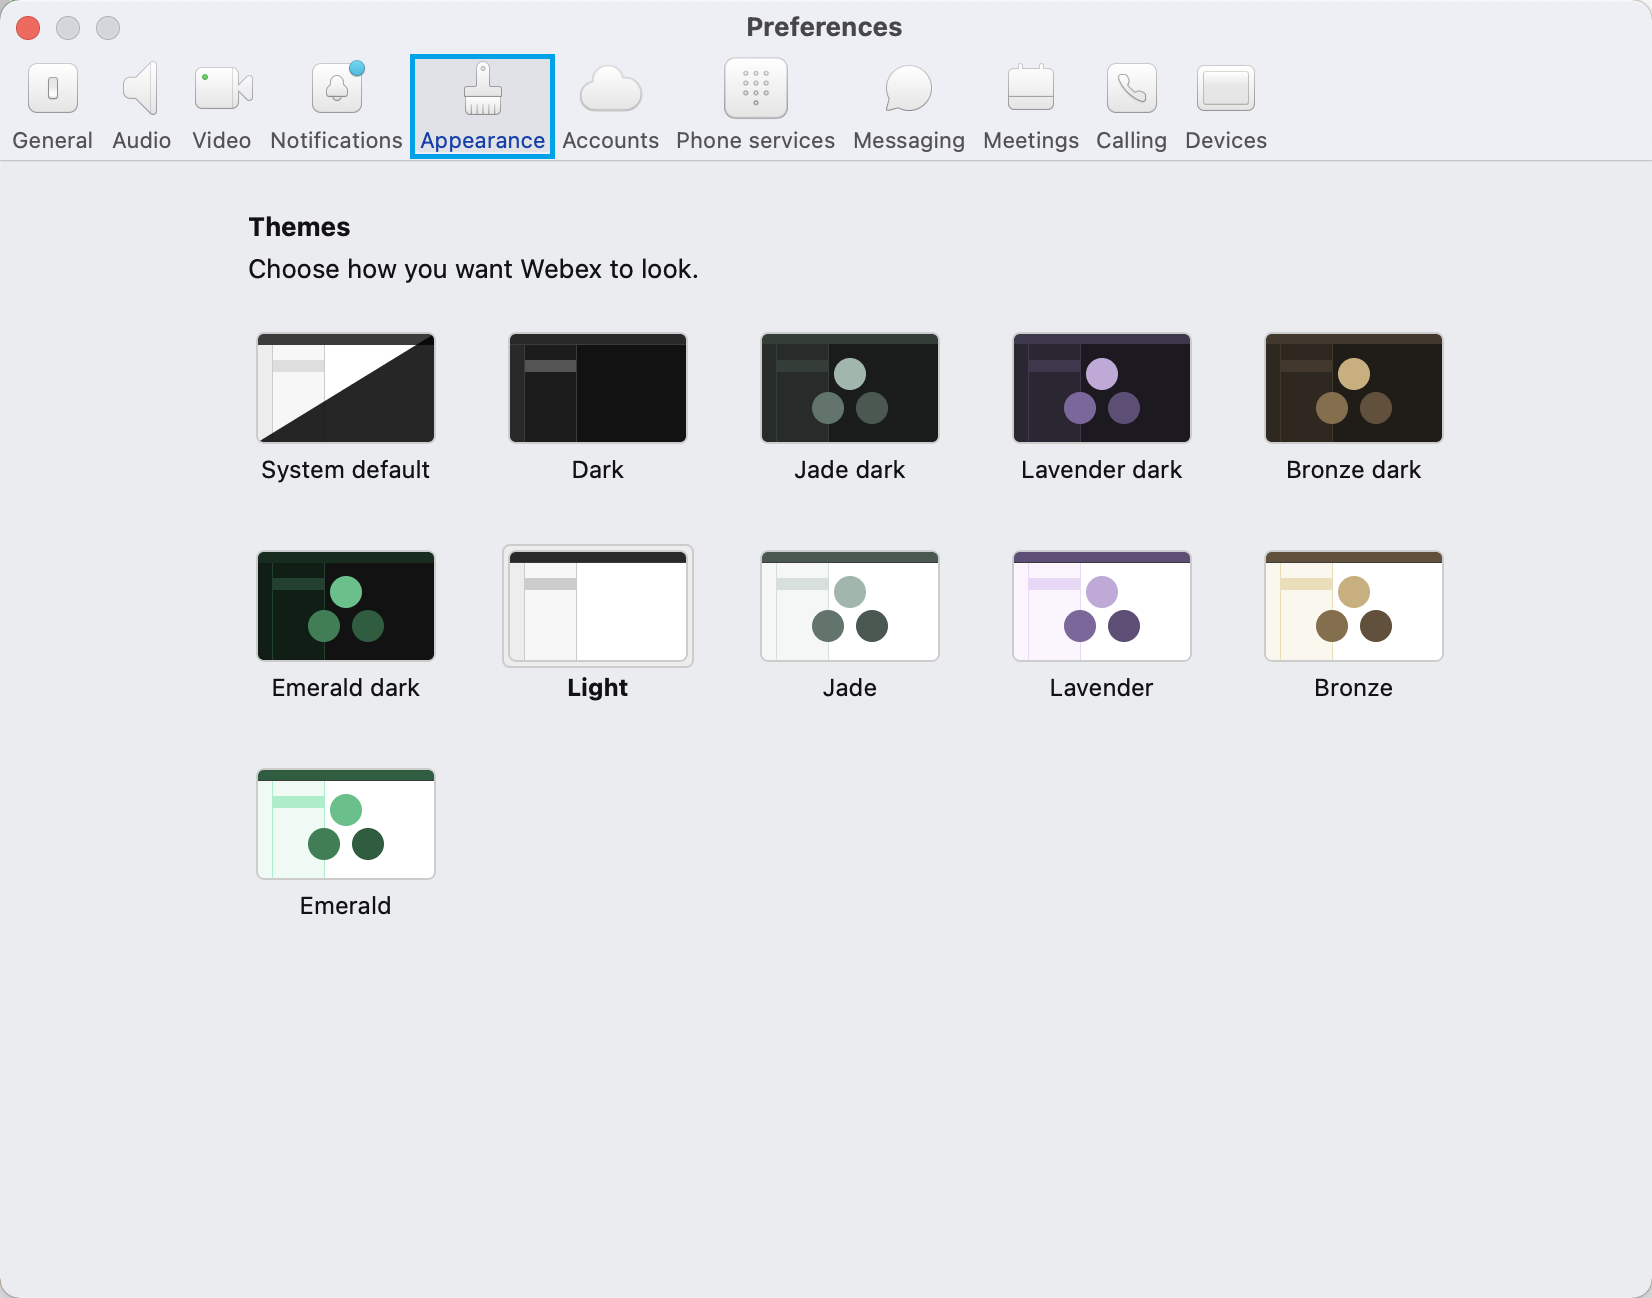
Appearance>
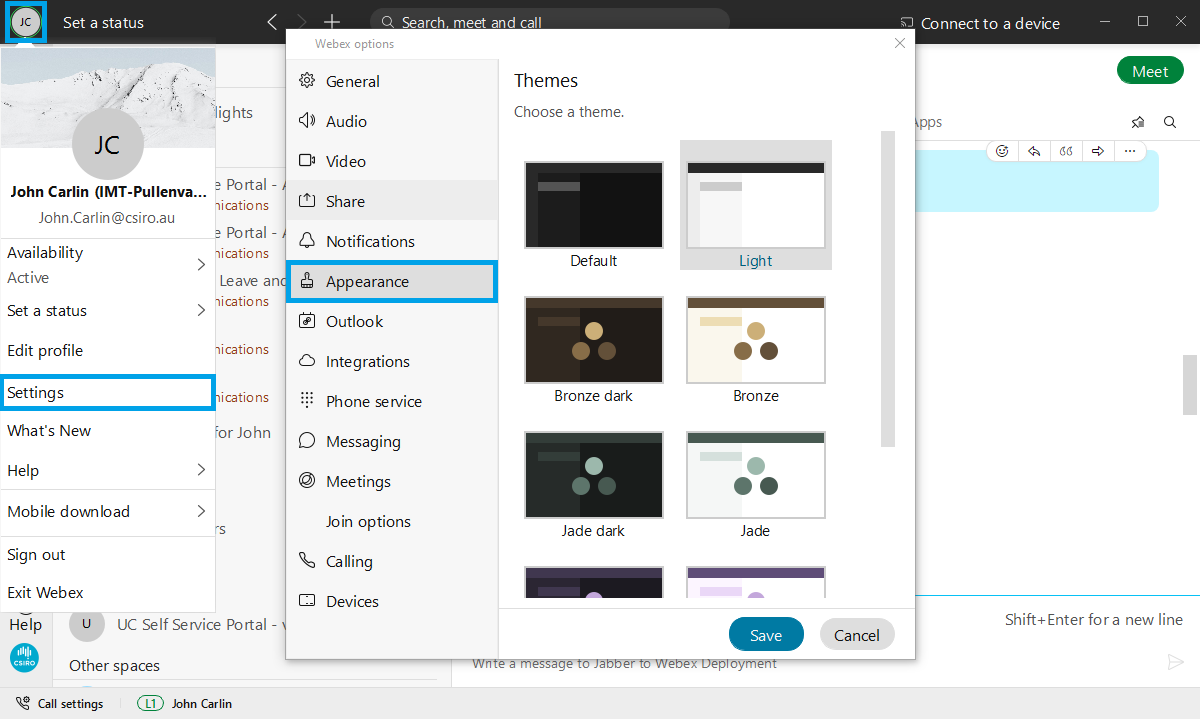
Webex App allows you to personalise the appearance of your app by choosing from one of several colour schemes. To adjust the appearance of your Webex App:
- Click your profile icon in the top left corner
- Click 'Settings'
- Click 'Appearance'
-
Select your preferred colour scheme and then click 'Save'.
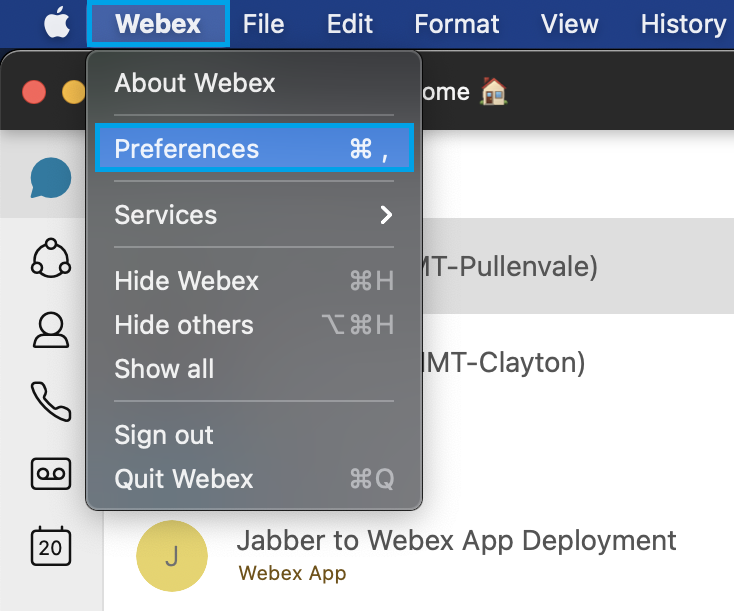
Webex App allows you to personalise the appearance of your app by choosing from one of several colour schemes. To adjust the appearance of your Webex App:
- Click 'Webex' and then click 'Preferences'
- Click 'Appearance'
-
Select your preferred colour scheme.
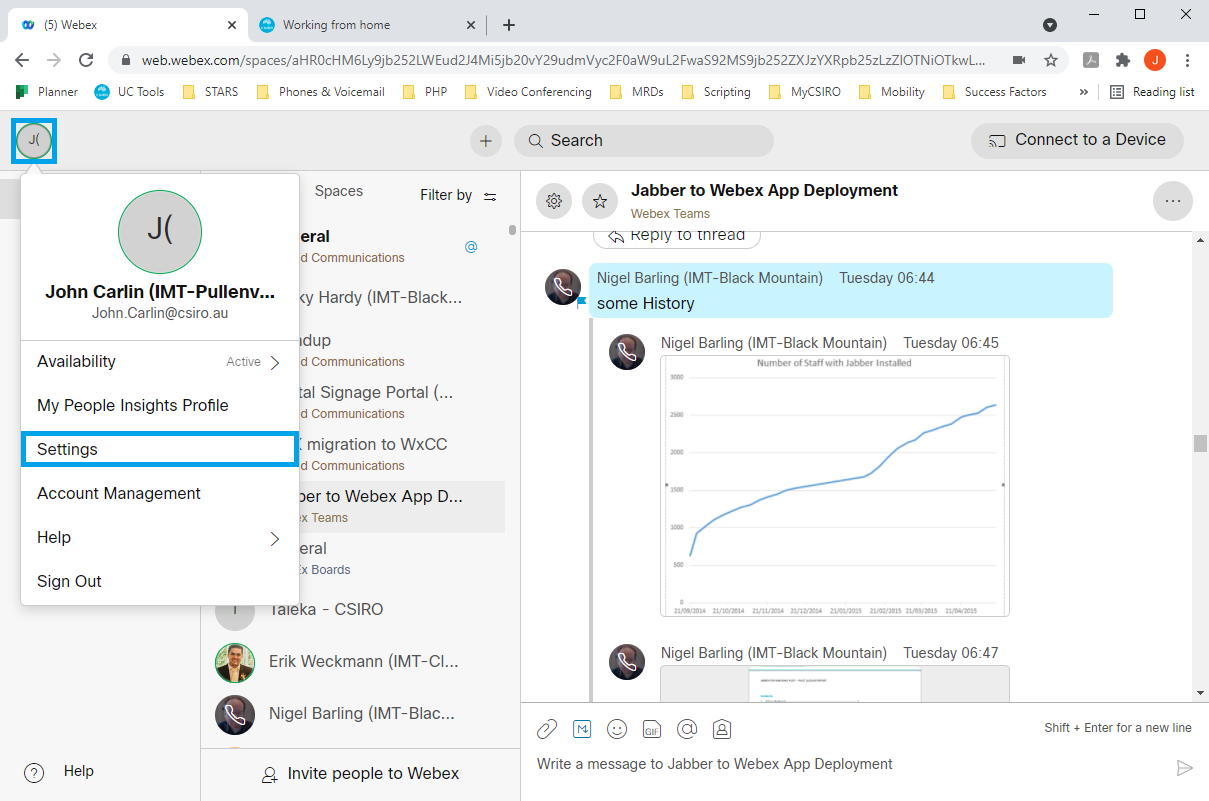
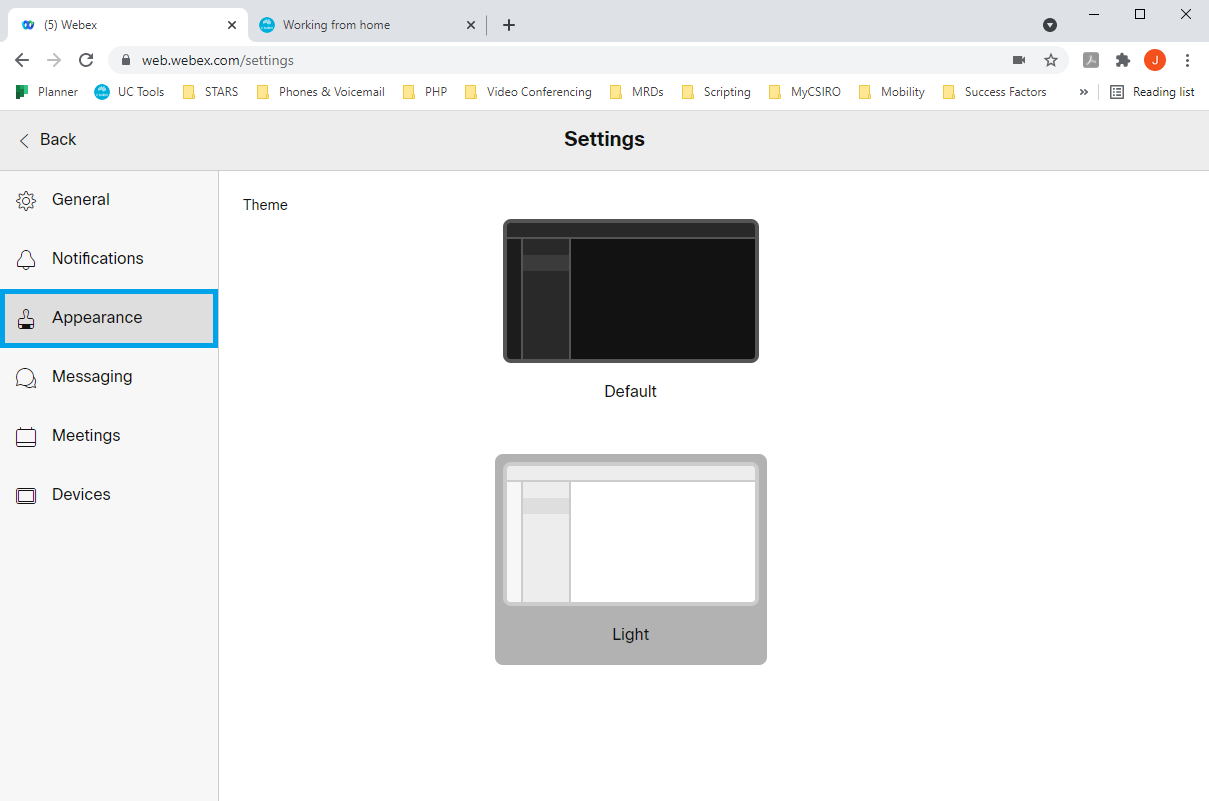
Webex App allows you to personalise the appearance of your app by choosing between dark and light colour schemes. To adjust the appearance of your Webex App:
- Click your profile icon in the top left corner
- Click 'Settings'
- Click 'Appearance'
-
Select your preferred colour scheme.
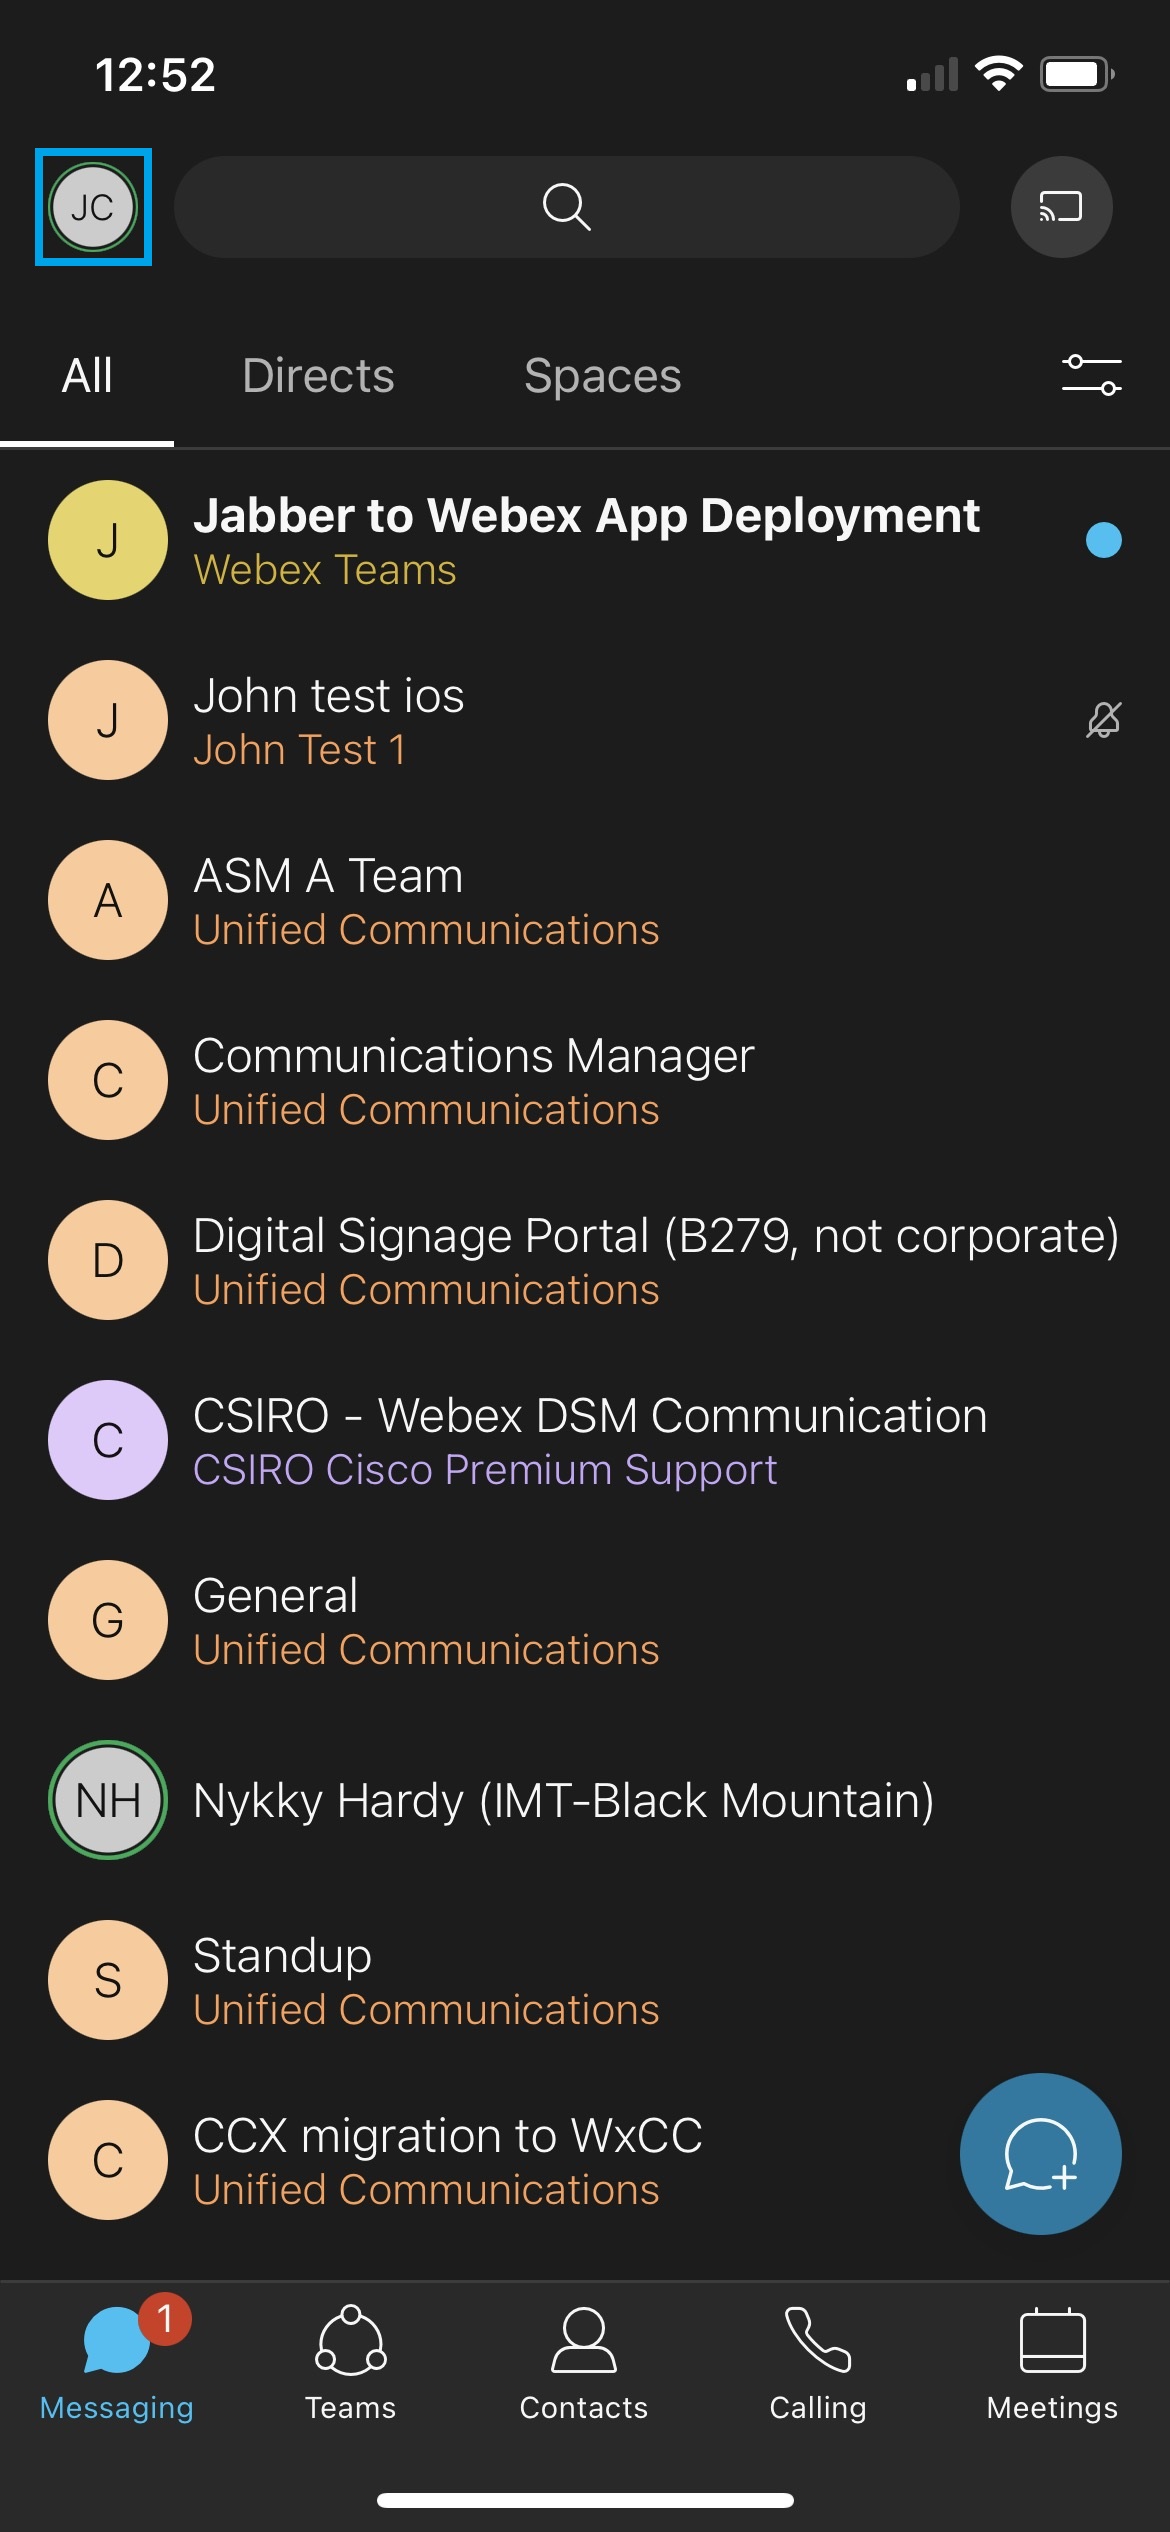
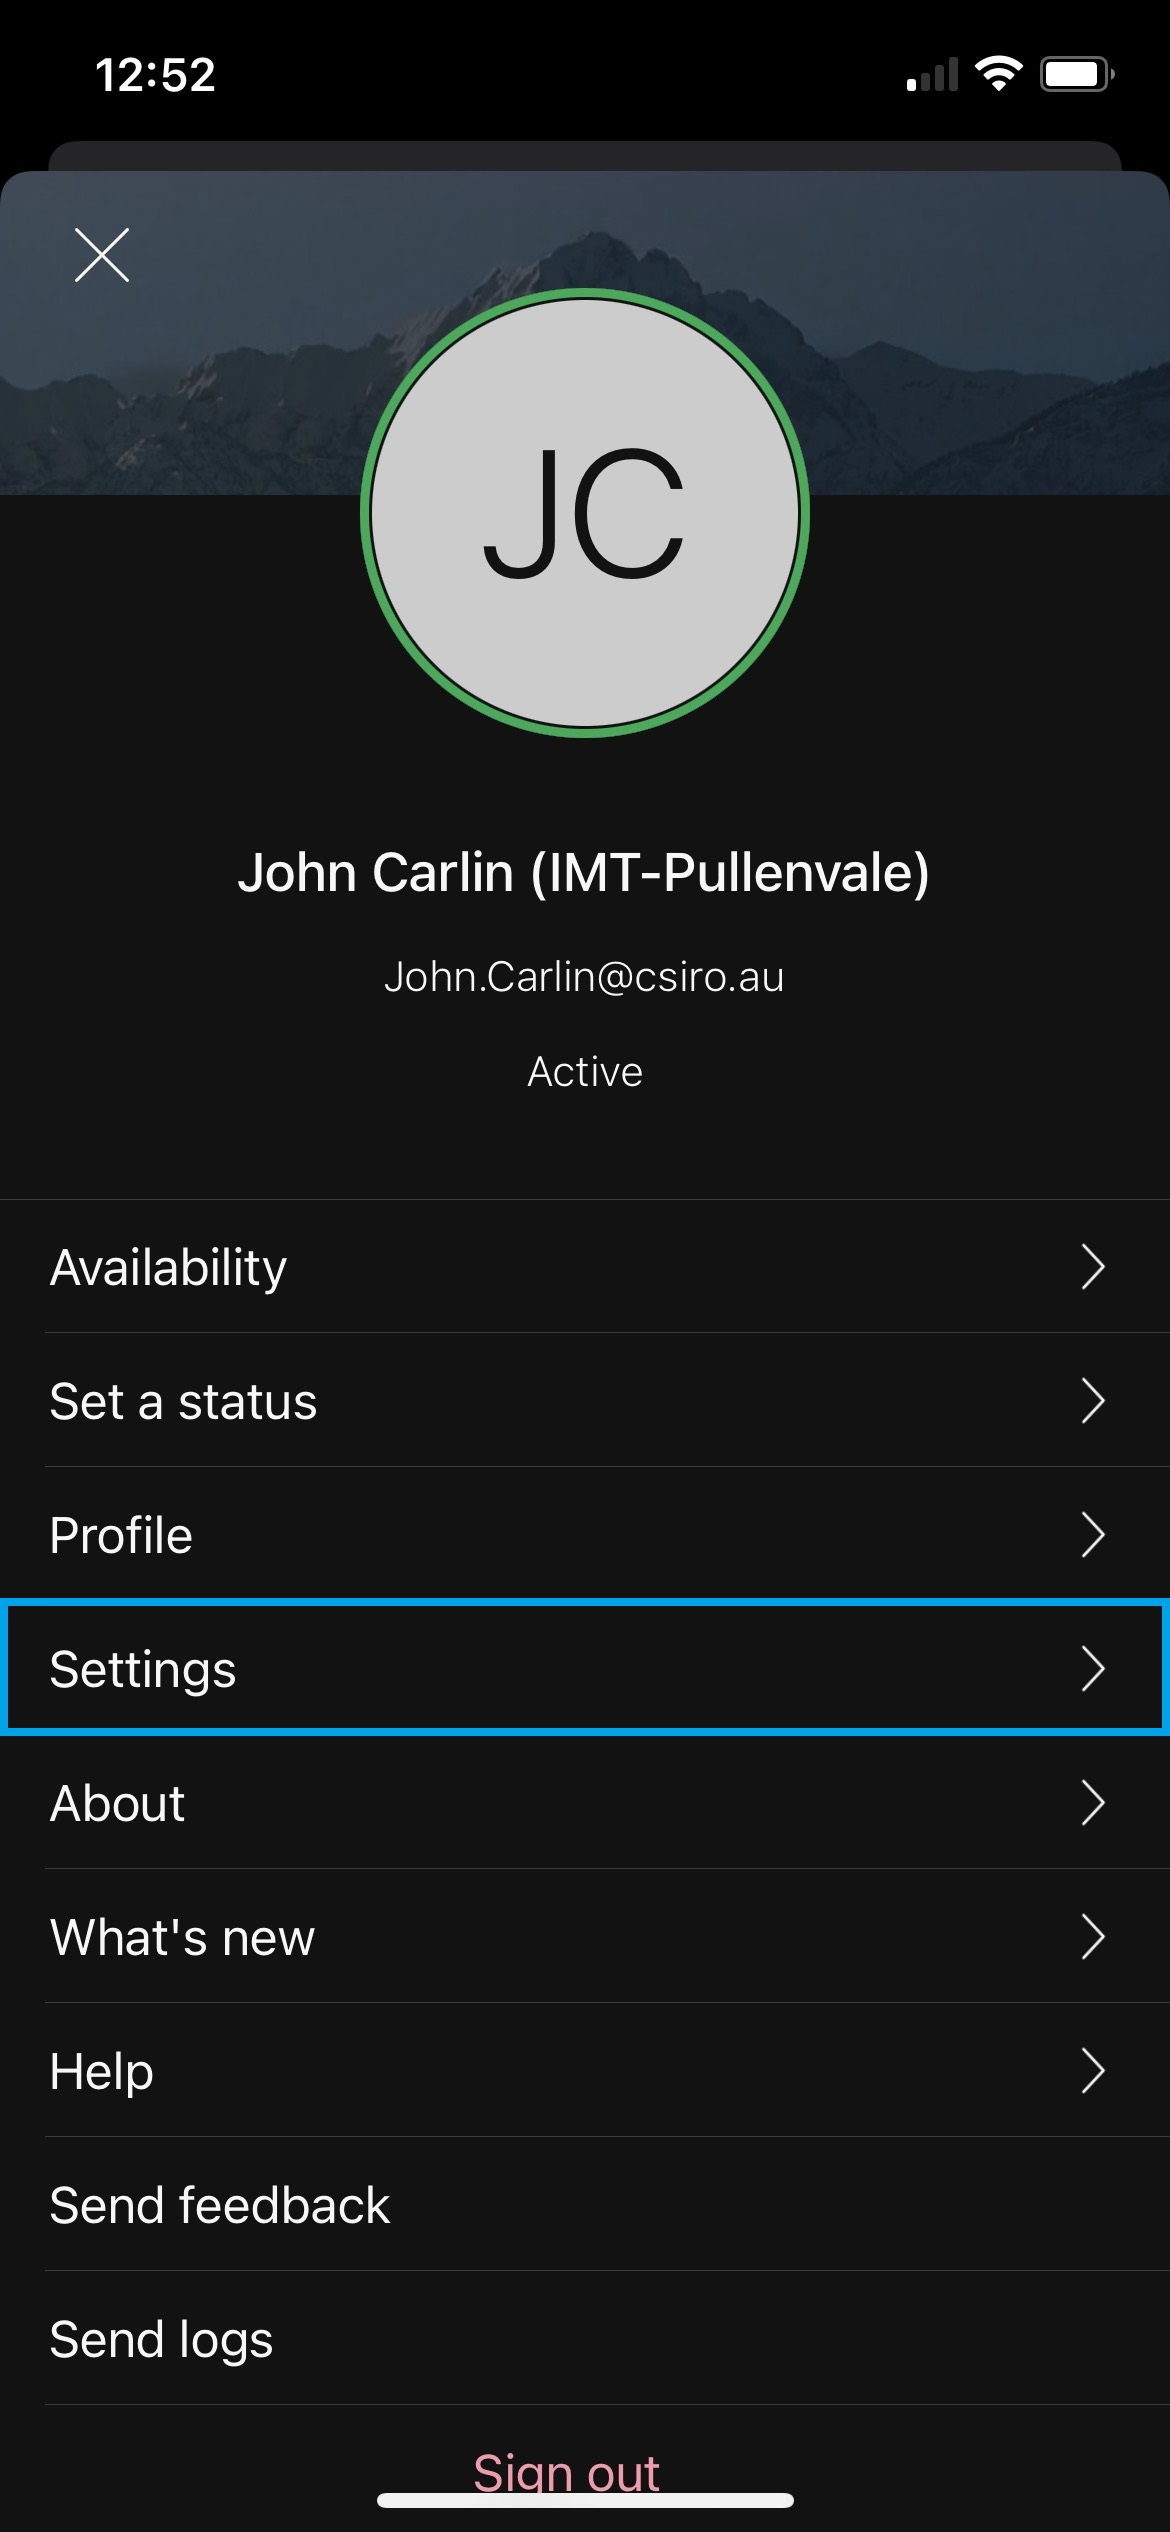
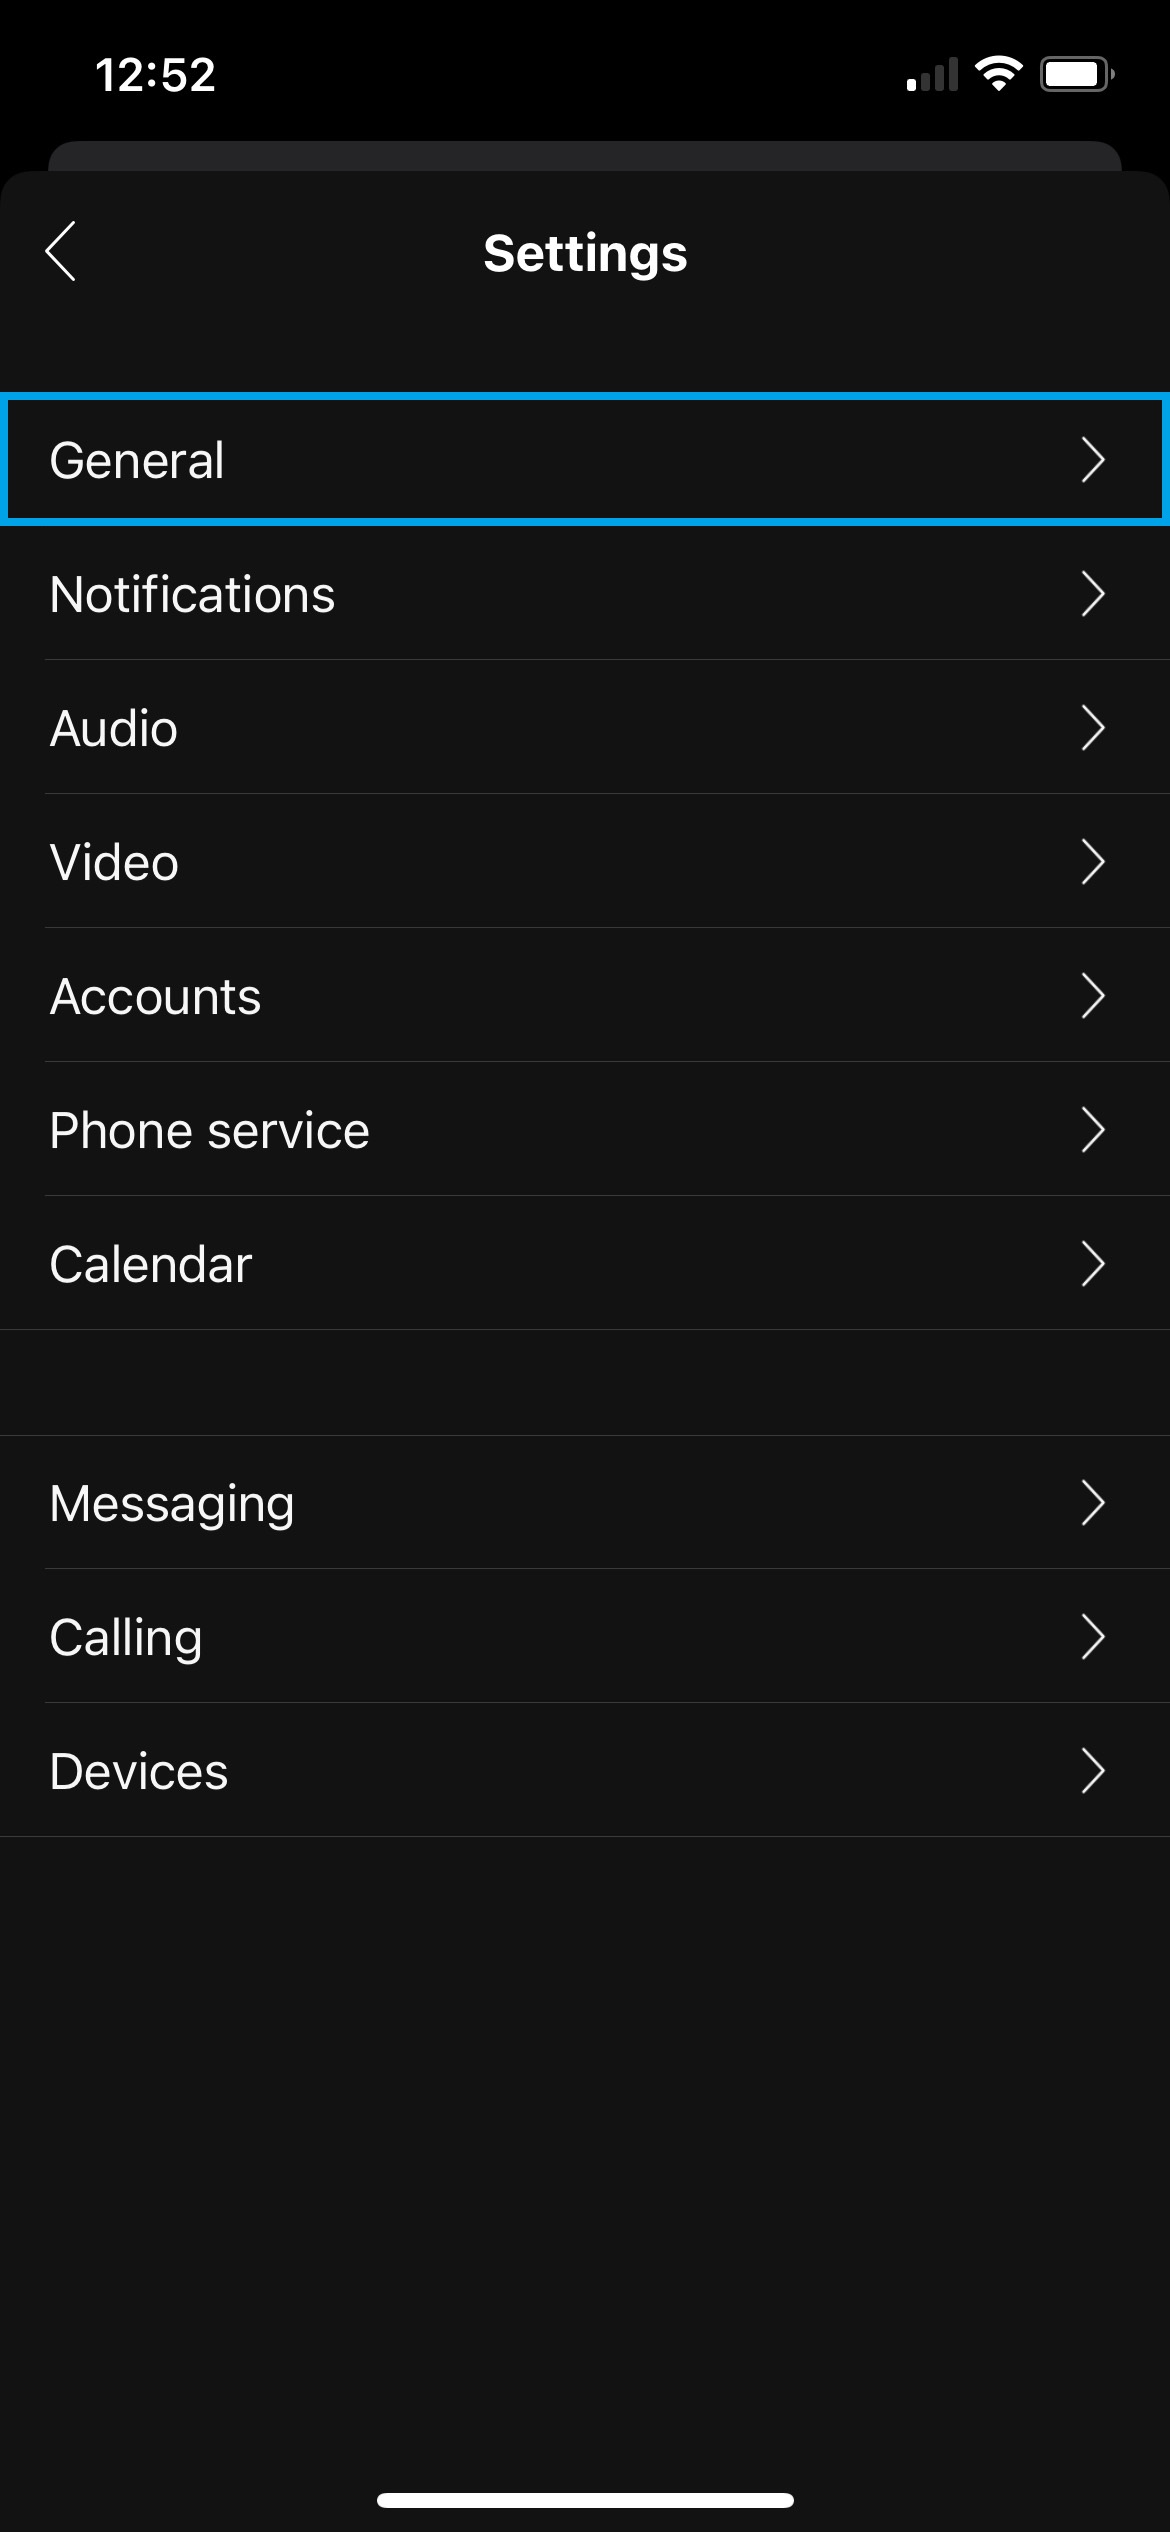
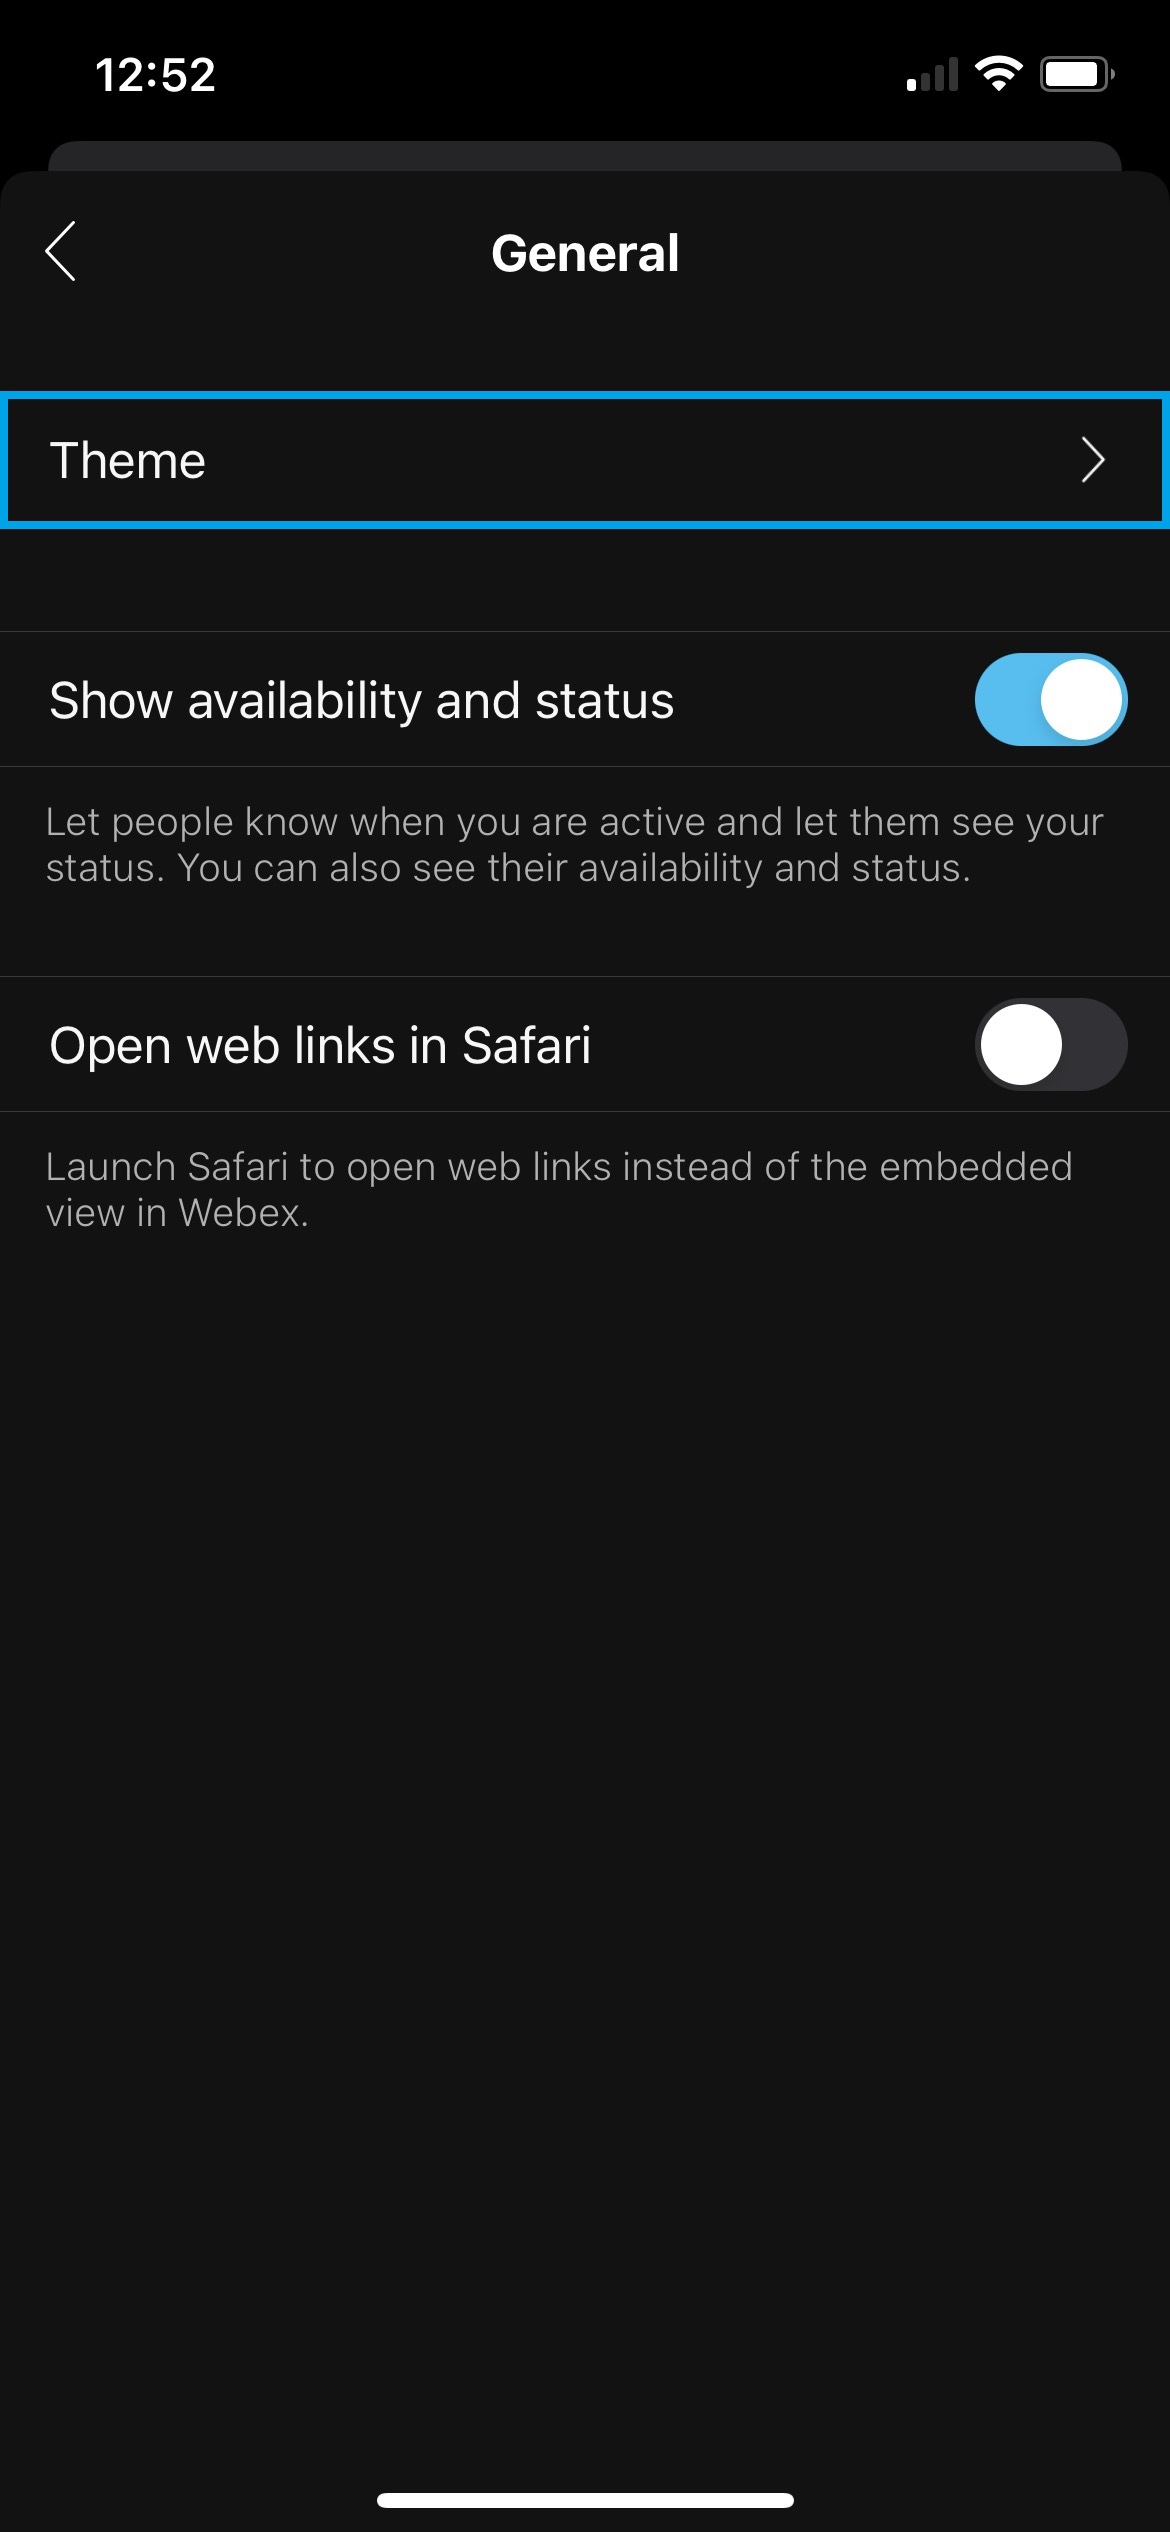
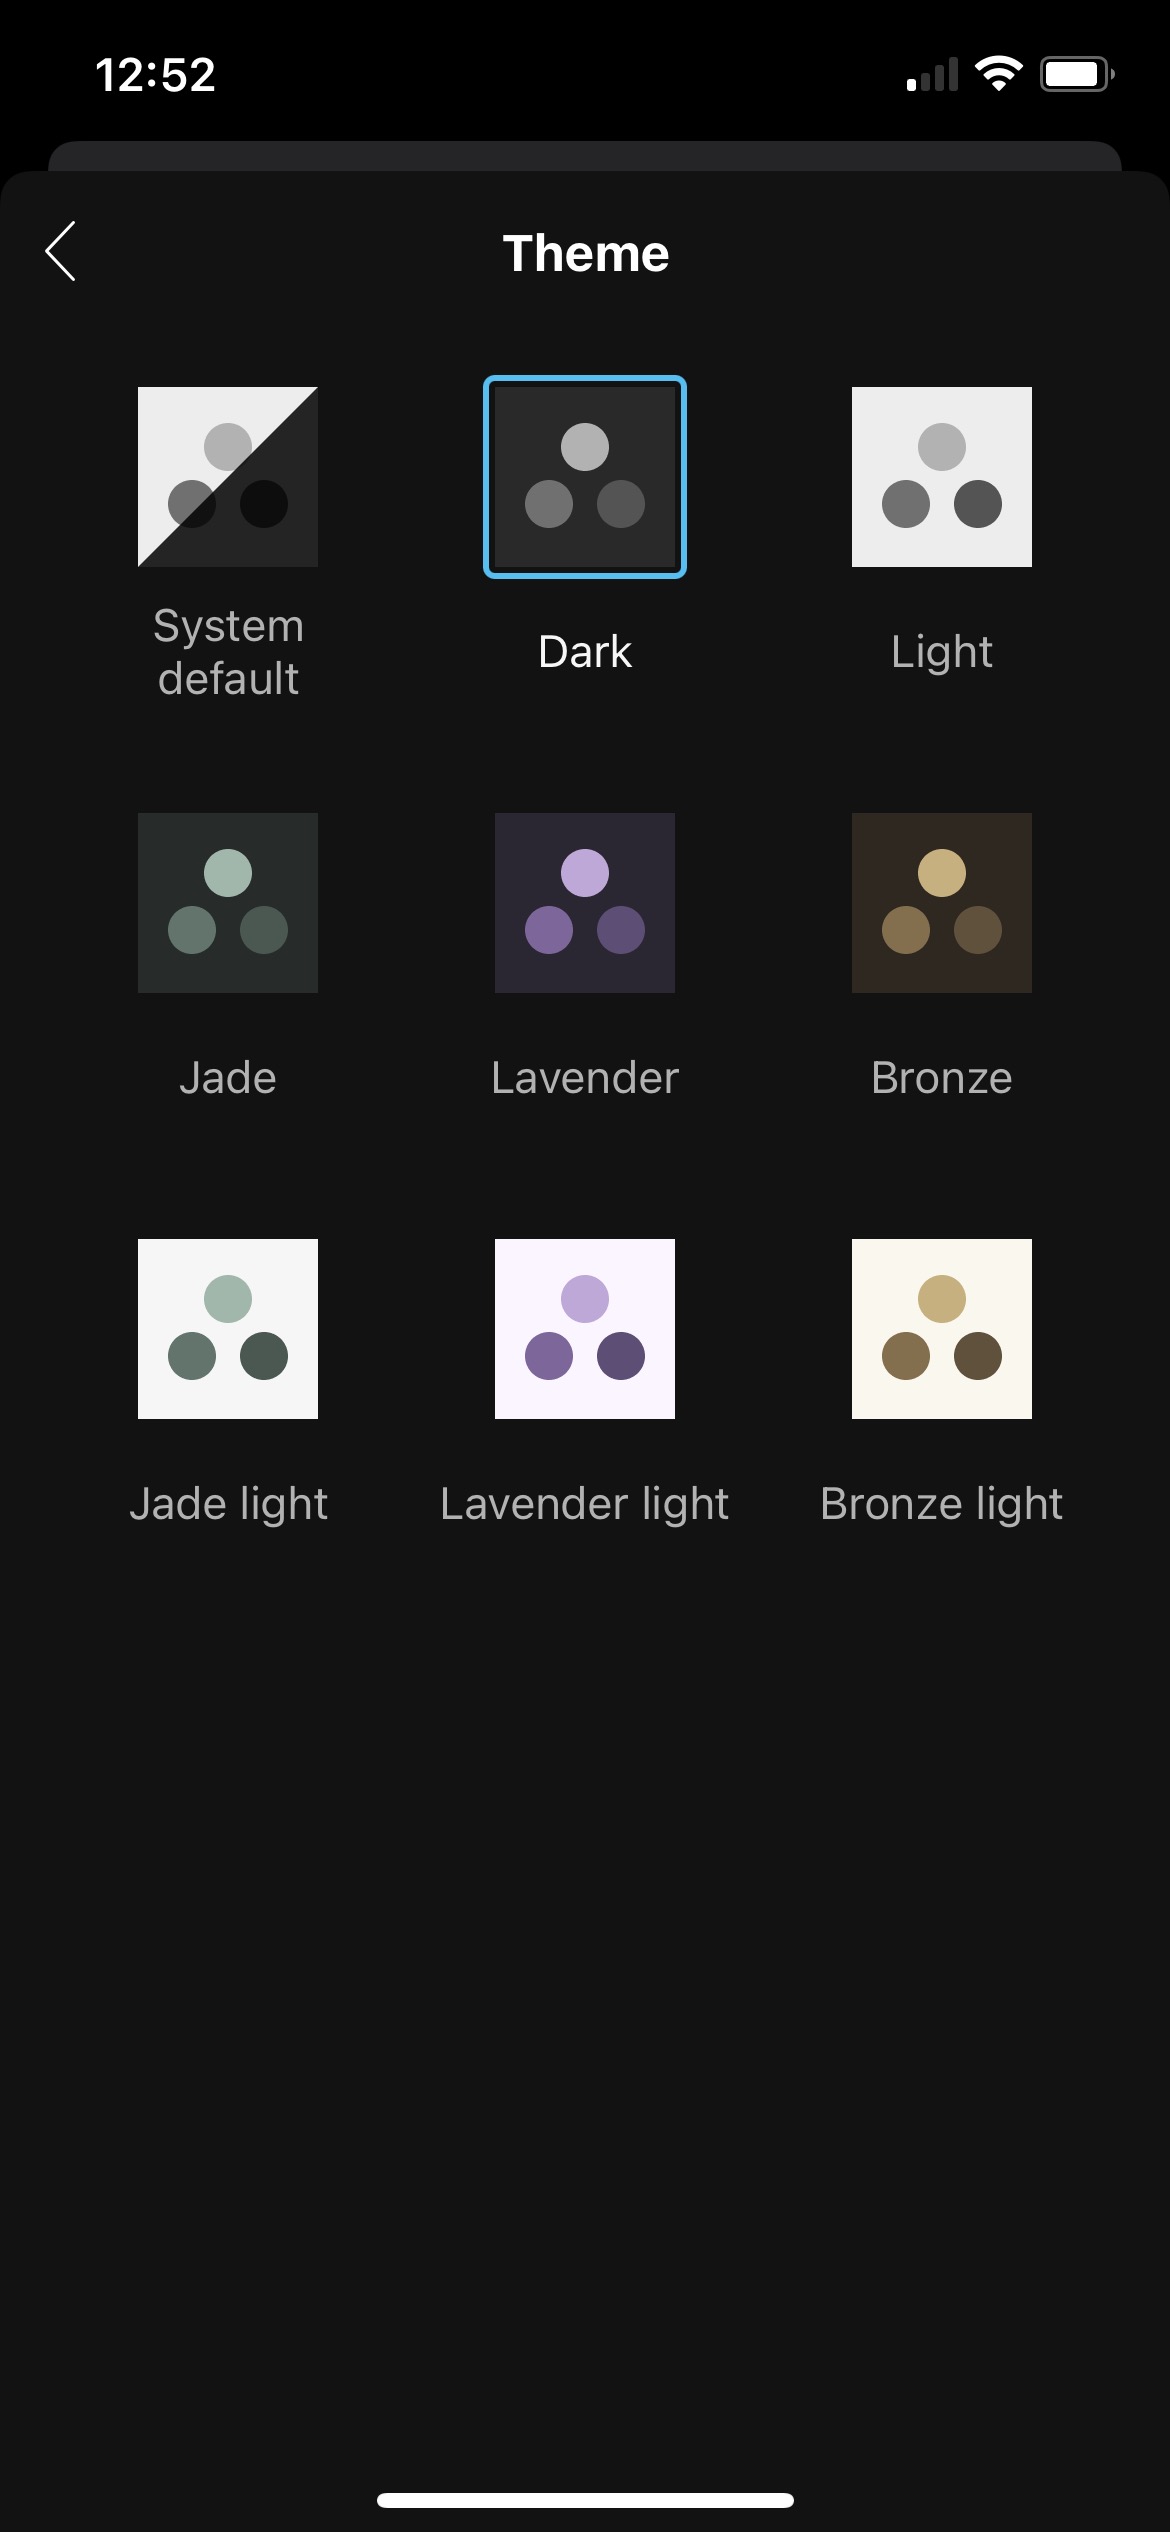
Webex App allows you to personalise the appearance of your app by choosing from one of several colour themes. To adjust the appearance of your Webex App:
- Press your profile icon in the top left corner
- Press 'Settings'
- Press 'General'
- Press 'Theme'
-
Select your preferred colour theme.
Camera, speaker and microphone settings>
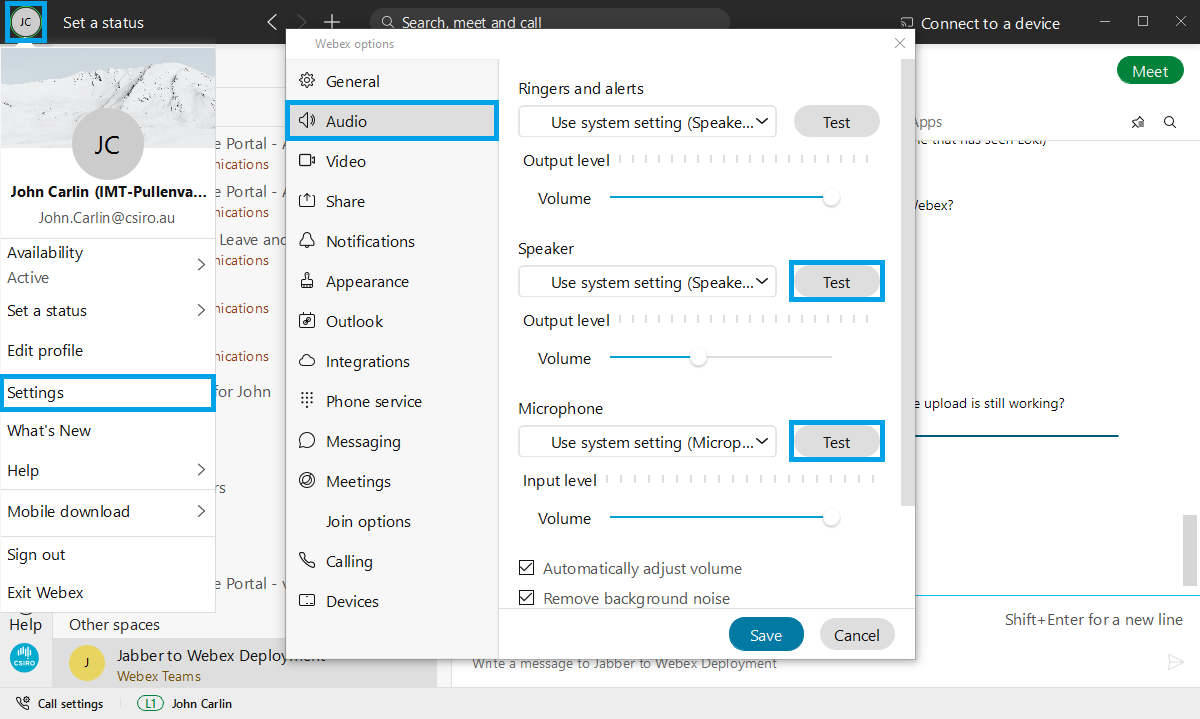
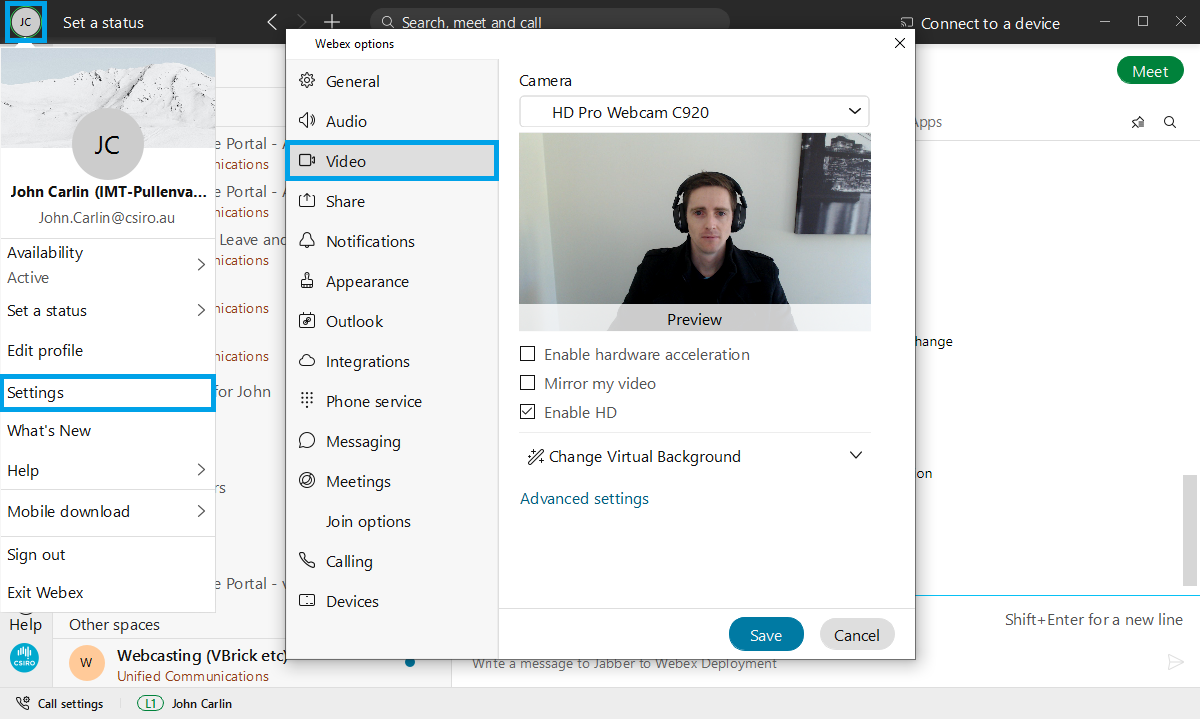
To check that your camera, speaker and microphone settings are correct:
- Click your profile icon in the top left corner
- Click 'Settings'
- Click 'Audio'
- Select the appropriate 'Microphone' and 'Speaker' devices and then click 'Test'. These tests will play a sound to help correctly identify your speaker device, and record and playback your voice to help correctly identify your microphone device.
- Click 'Video'
- Select the appropriate 'Camera' device
-
Click 'Save'.
To check that your camera, speaker and microphone settings are correct:
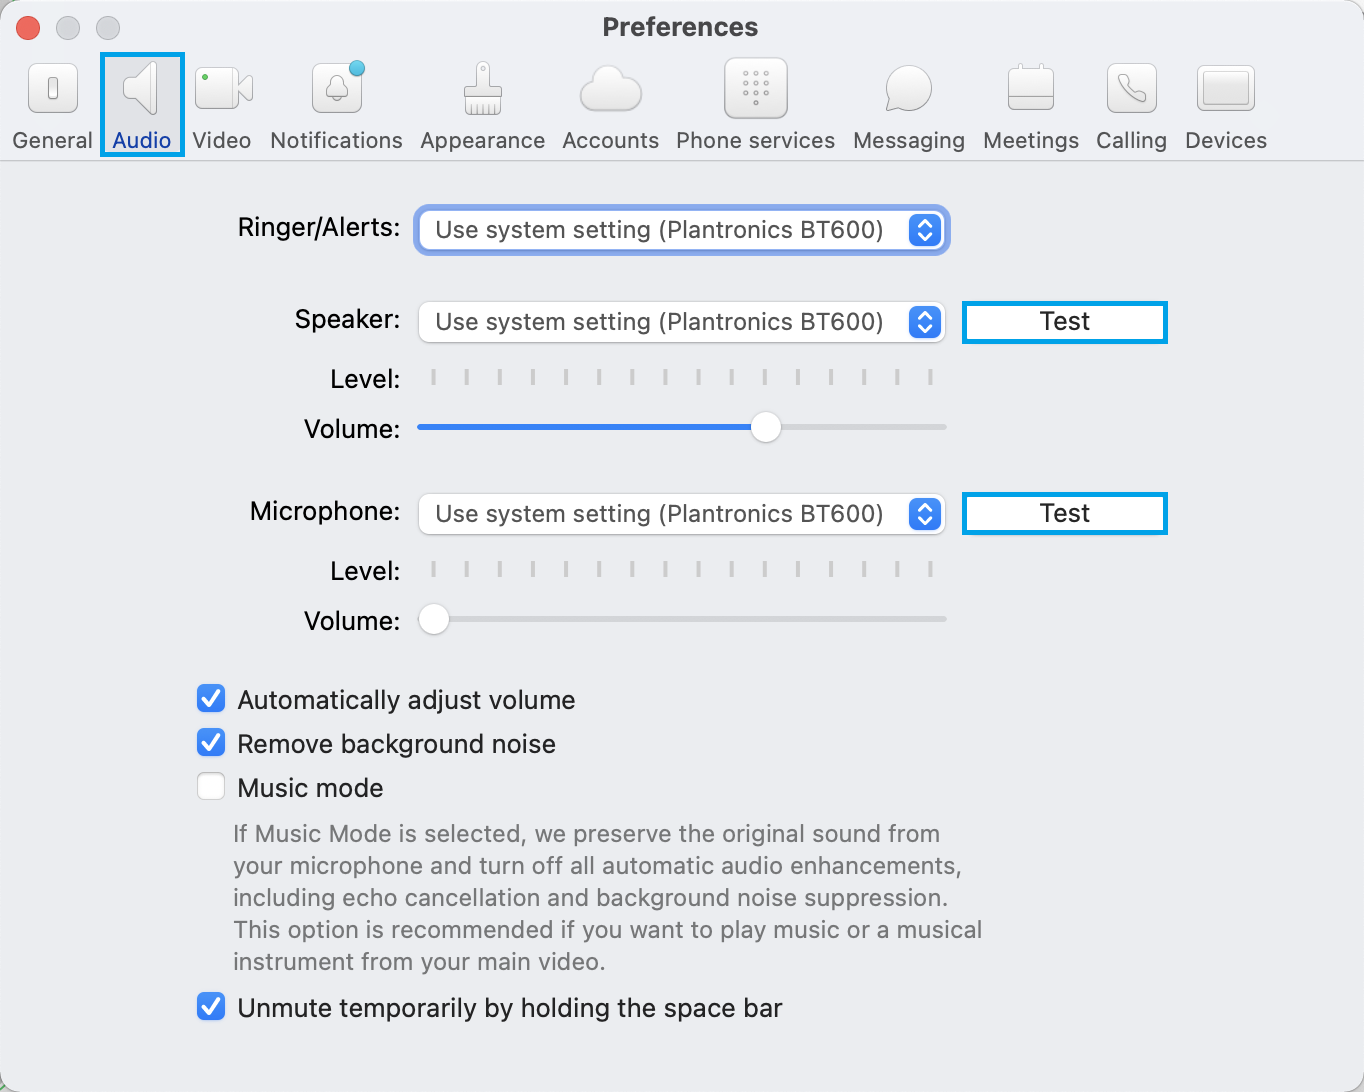
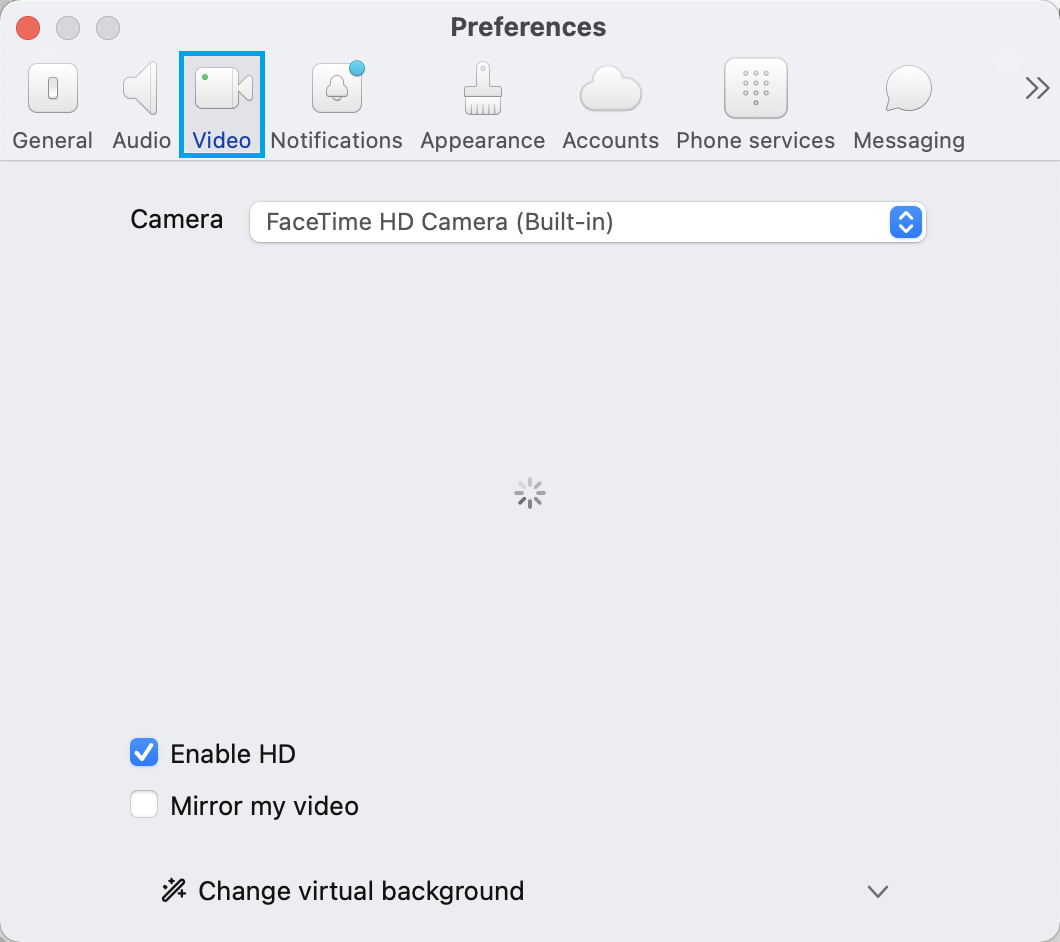
- Click 'Webex' and then click 'Preferences'
- Click 'Audio'
- Select the appropriate 'Microphone' and 'Speaker' devices and then click 'Test'. These tests will play a sound to help correctly identify your speaker device, and record and playback your voice to help correctly identify your microphone device.
- Click 'Video'
-
Select the appropriate 'Camera' device

Teams and spaces>
Webex App is built on the concept of teams and spaces. Teams are groups of people who will be working together on a regular basis. Spaces allow for groups of people to focus on a particular issue or task. Spaces can be nested within a team (allowing all team members to automatically see the space), or spaces can be standalone and therefore only allow access to people who have been added to the space.
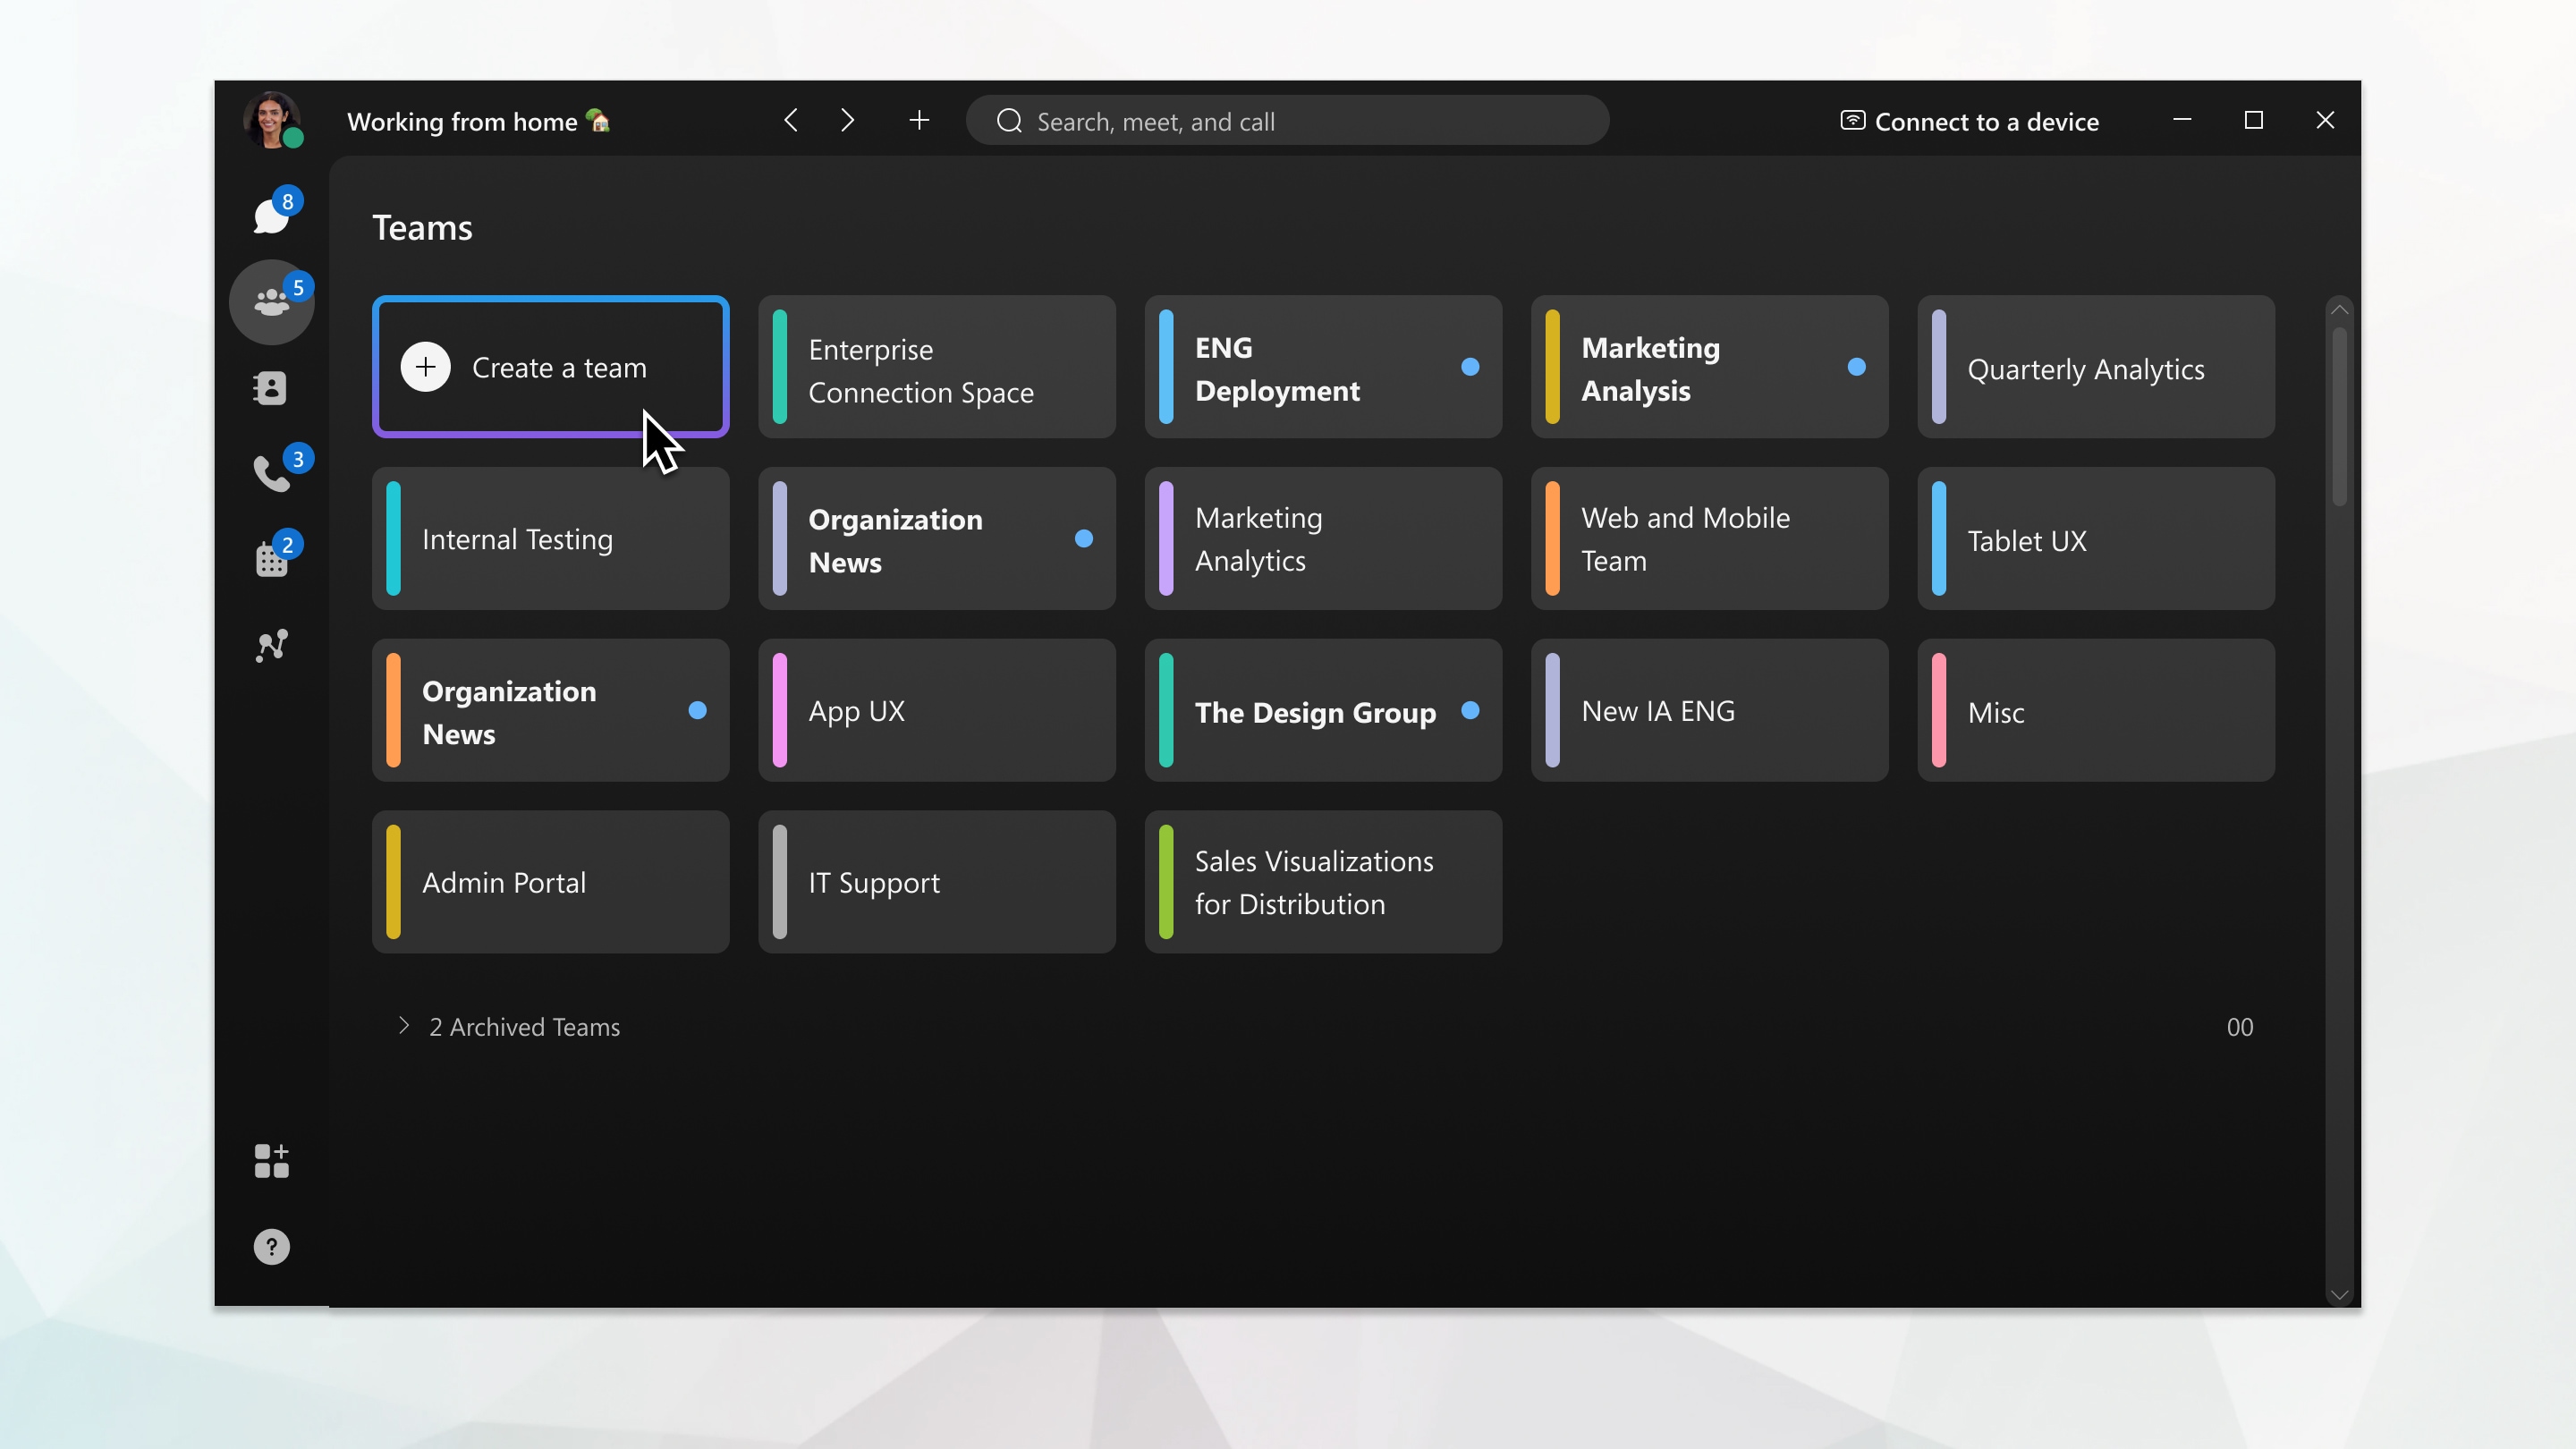
Creating a team
Follow the steps in the gif below to create a team.
https://help.webex.com/en-us/n3kbxbf/Webex-Create-a-Team.
Creating a space
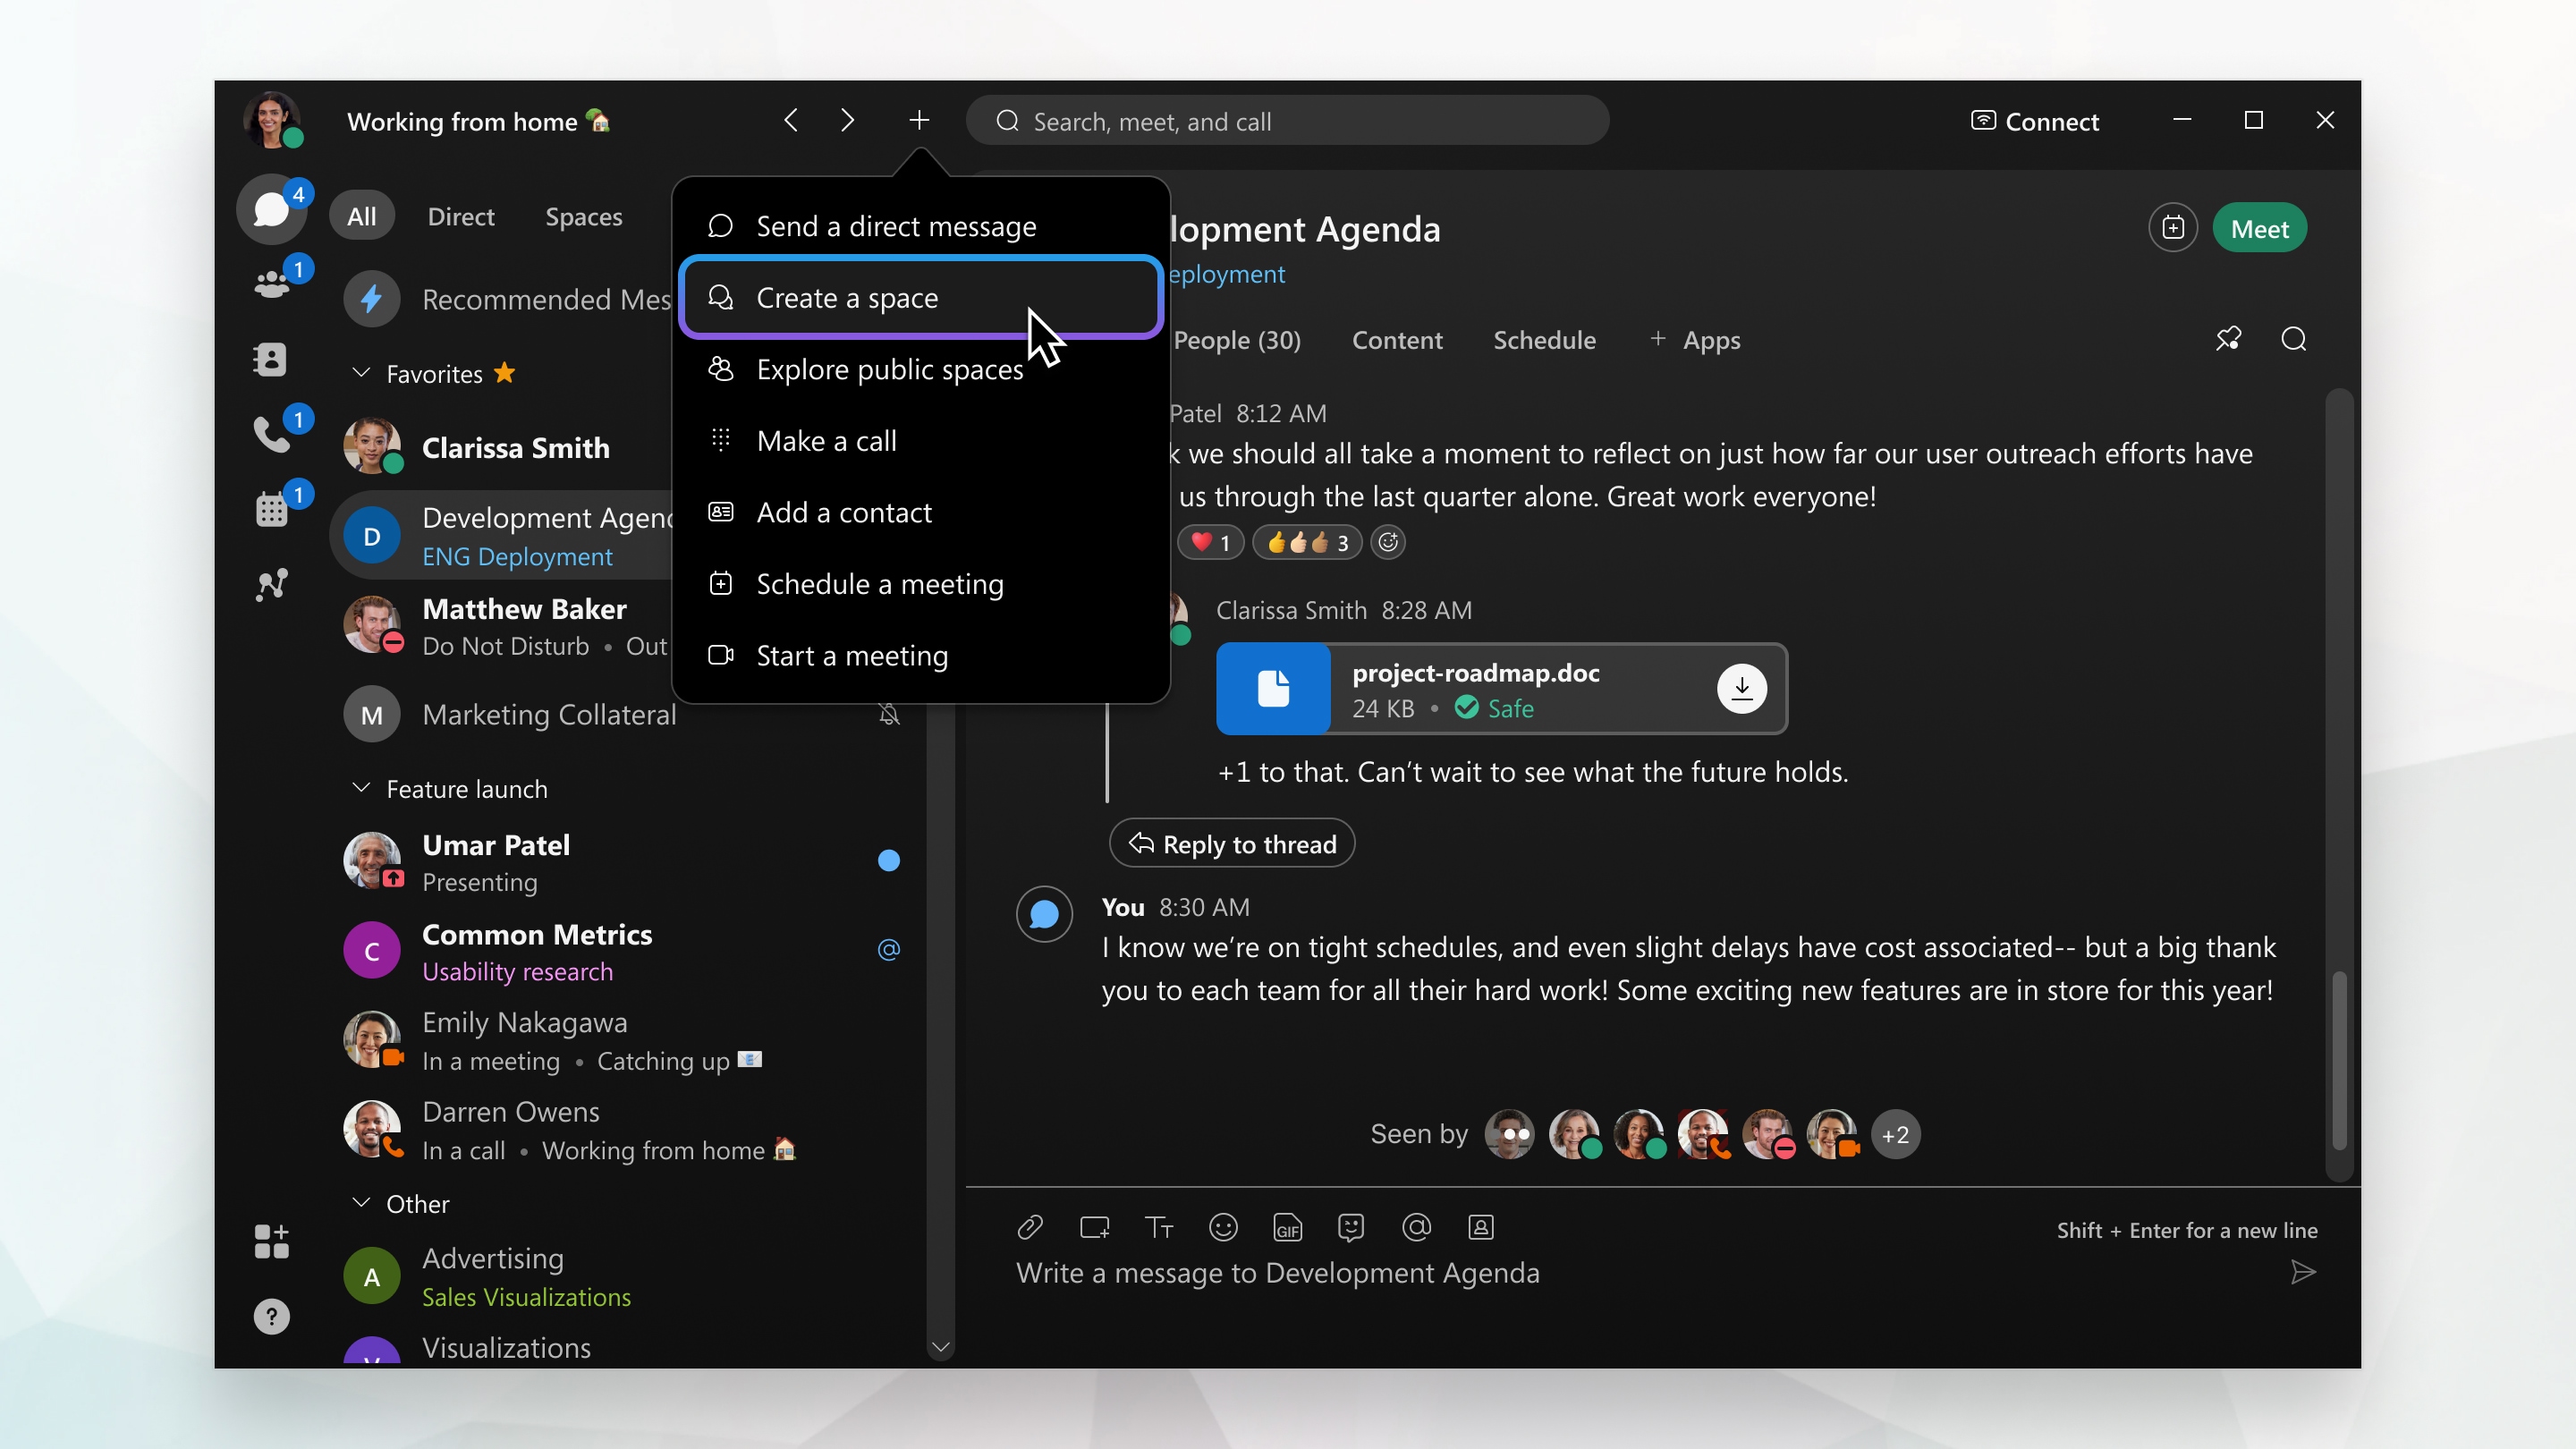
Follow the steps in the gif below to create a space.
https://help.webex.com/en-us/hk71r4/Webex-Create-a-Space
Roles within teams and spaces
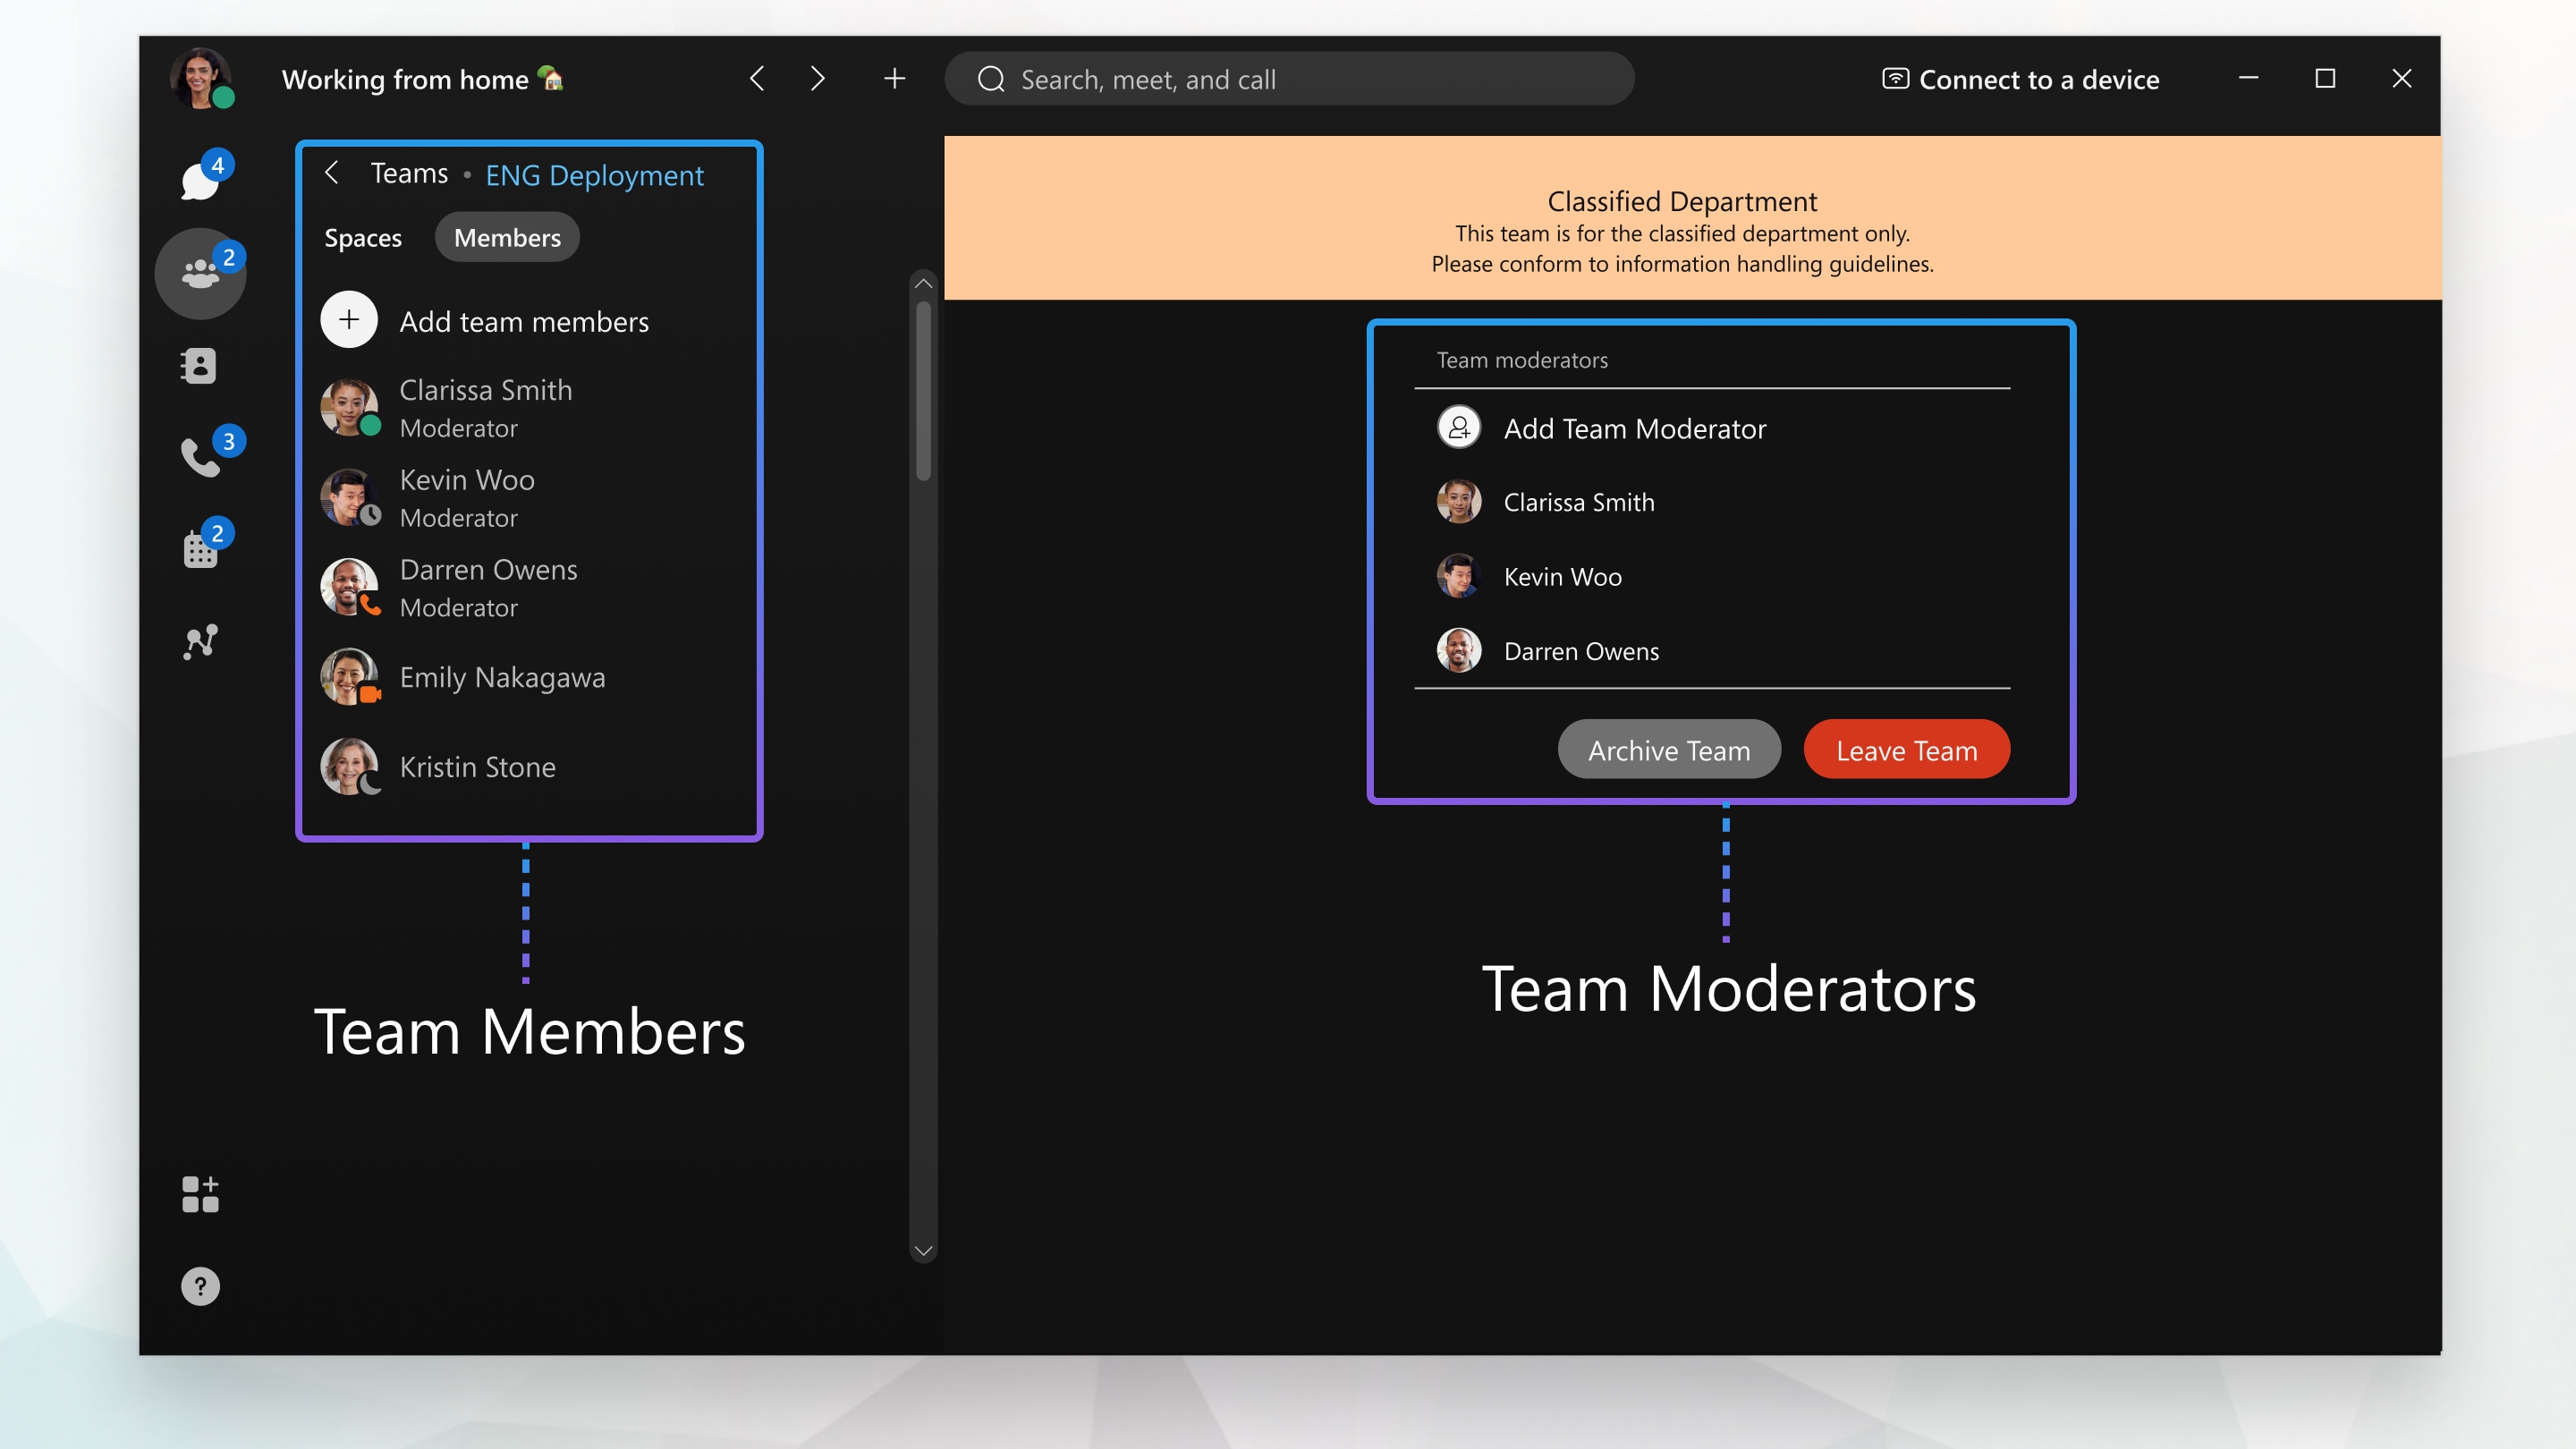
Members of a team or space can be assigned roles that control what they can and cannot do. At a high level, a person can be a team/space moderator who can add members, delete messages, and edit team/space settings. Or a person can be a team/space member who can simply participate in the team or space. External participants can be assigned moderator or member roles.
https://help.webex.com/en-us/zuwad5/Webex-Roles-on-Teams-and-Spaces
Webex App is built on the concept of teams and spaces. Teams are groups of people who will be working together on a regular basis. Spaces allow for groups of people to focus on a particular issue or task. Spaces can be nested within a team (allowing all team members to automatically see the space), or spaces can be standalone and therefore only allow access to people who have been added to the space.
Creating a team
https://help.webex.com/en-us/n3kbxbf/Webex-Create-a-Team
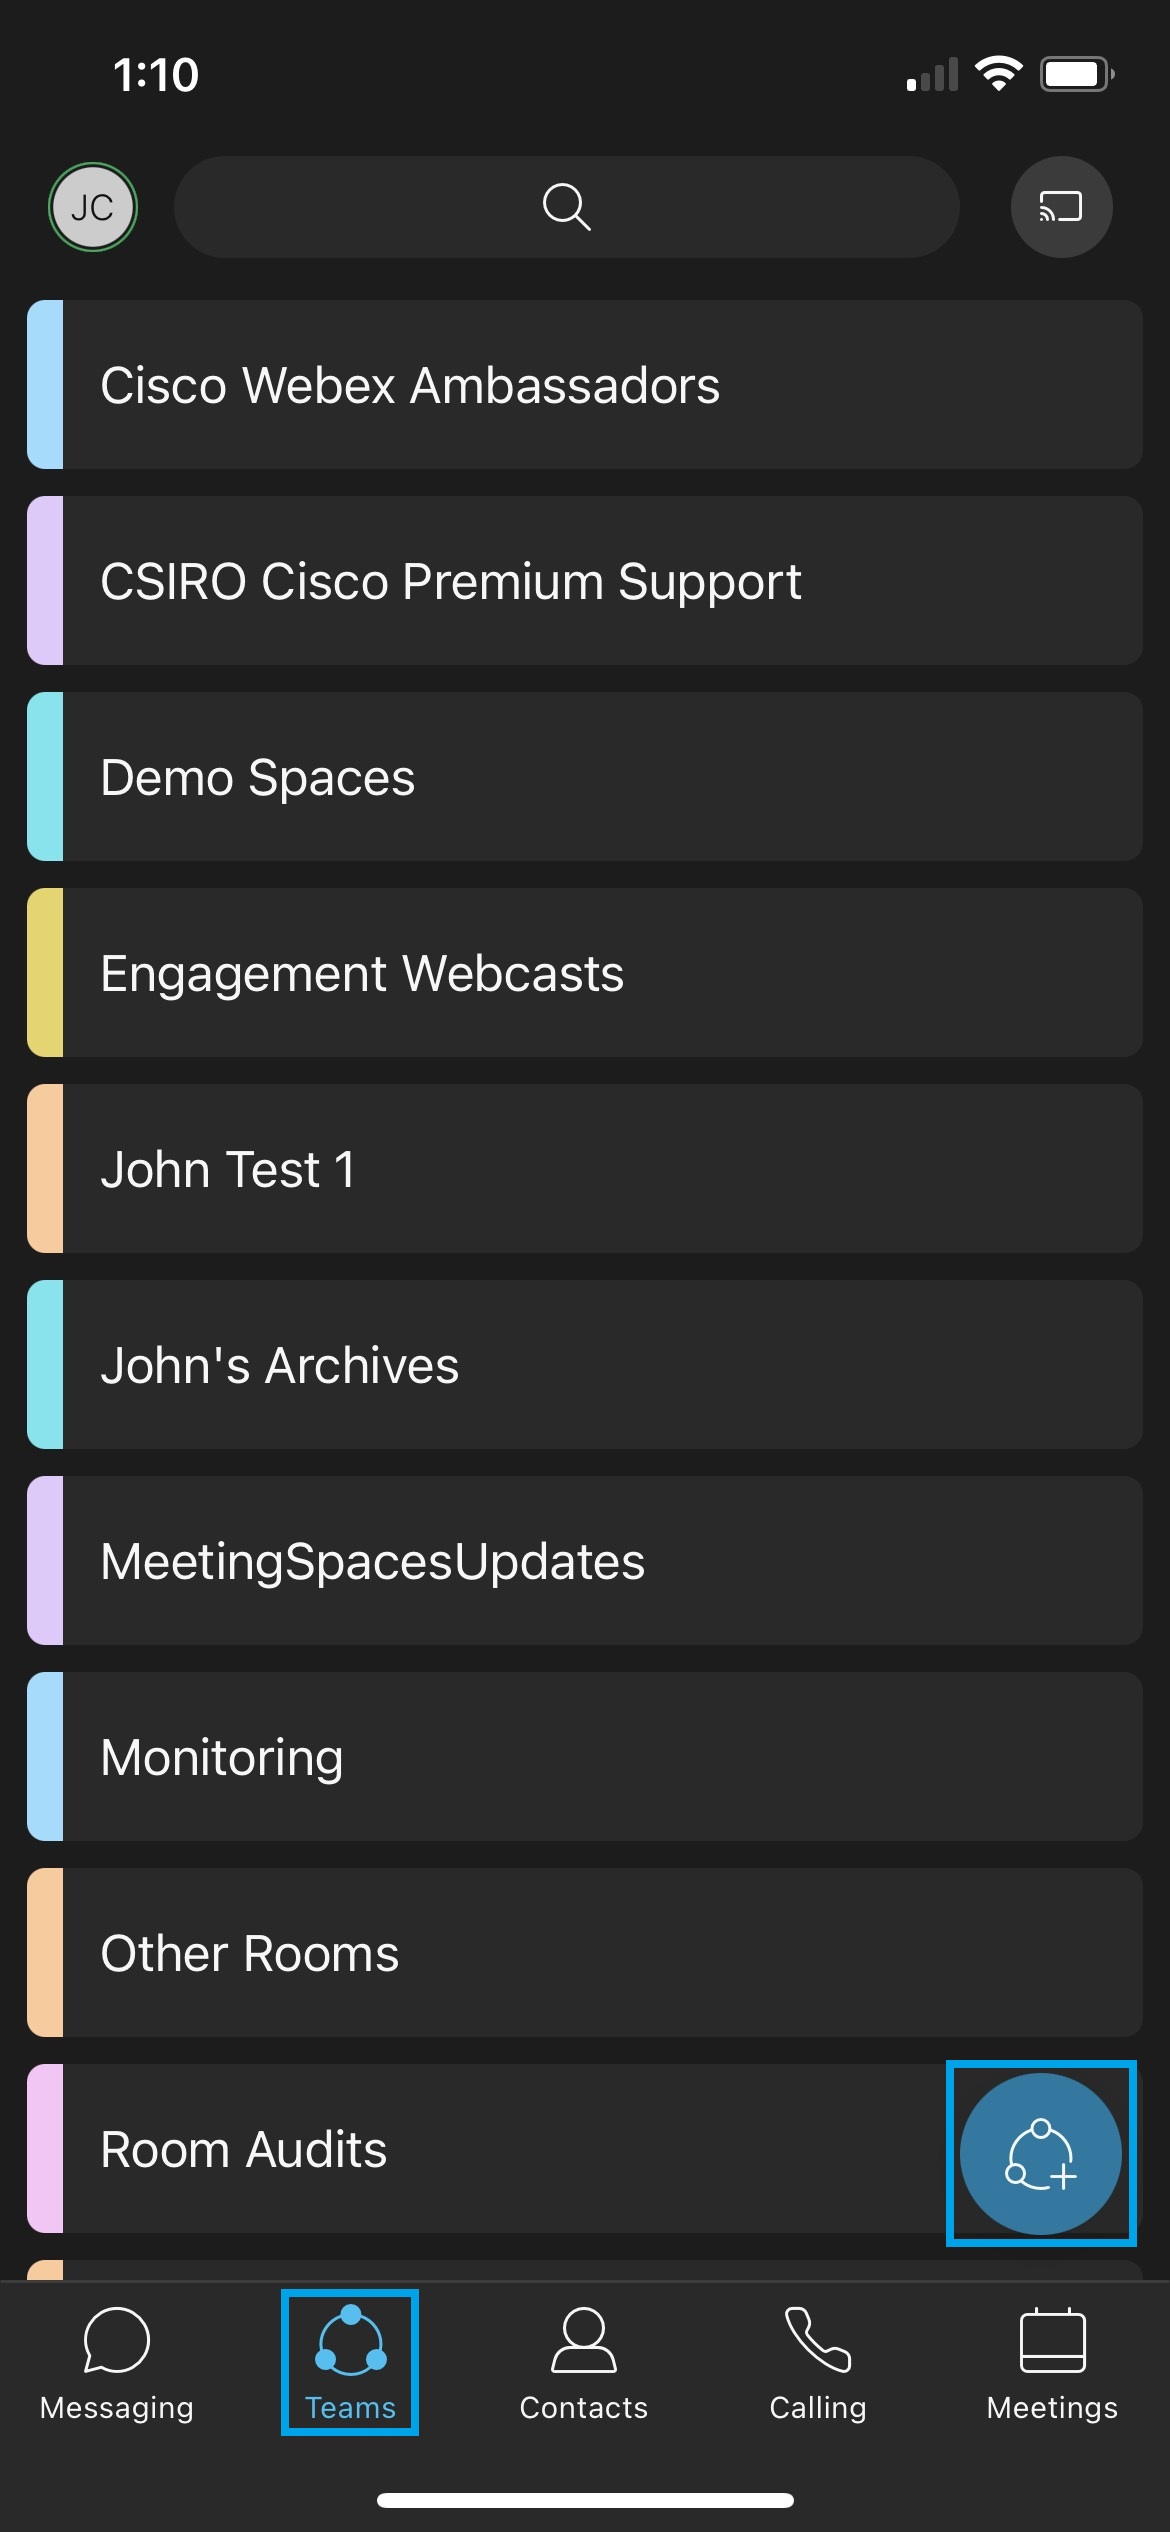
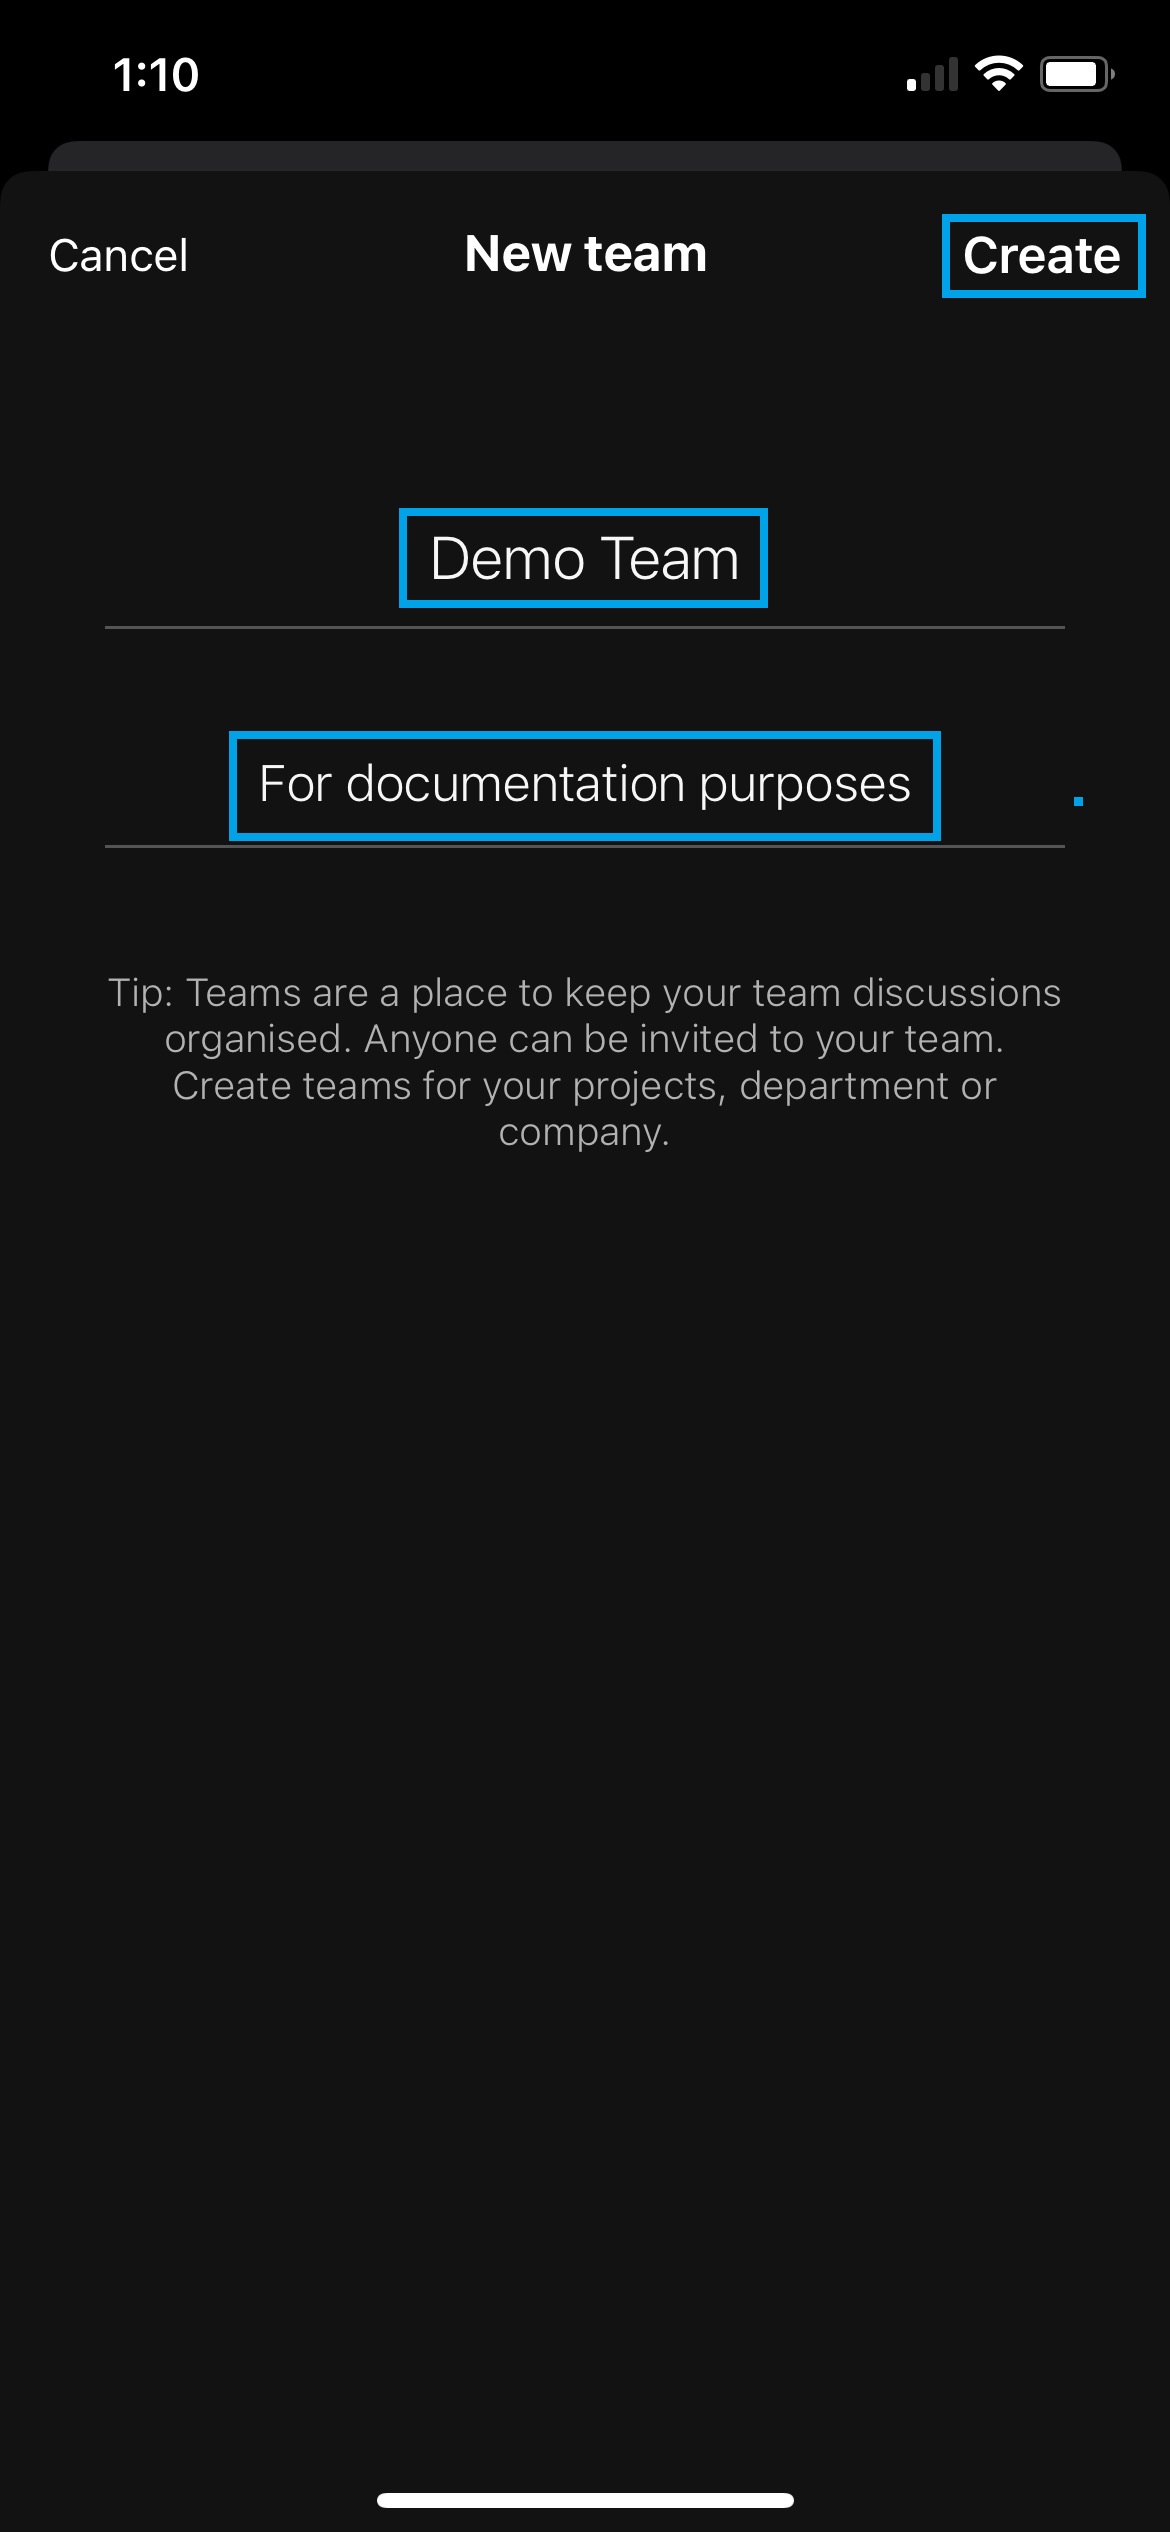
To create a team:
- Press the 'Teams' tab and then press the new team icon
- Enter a name for the team
- Enter an optional description for the team
-
Press 'Create'
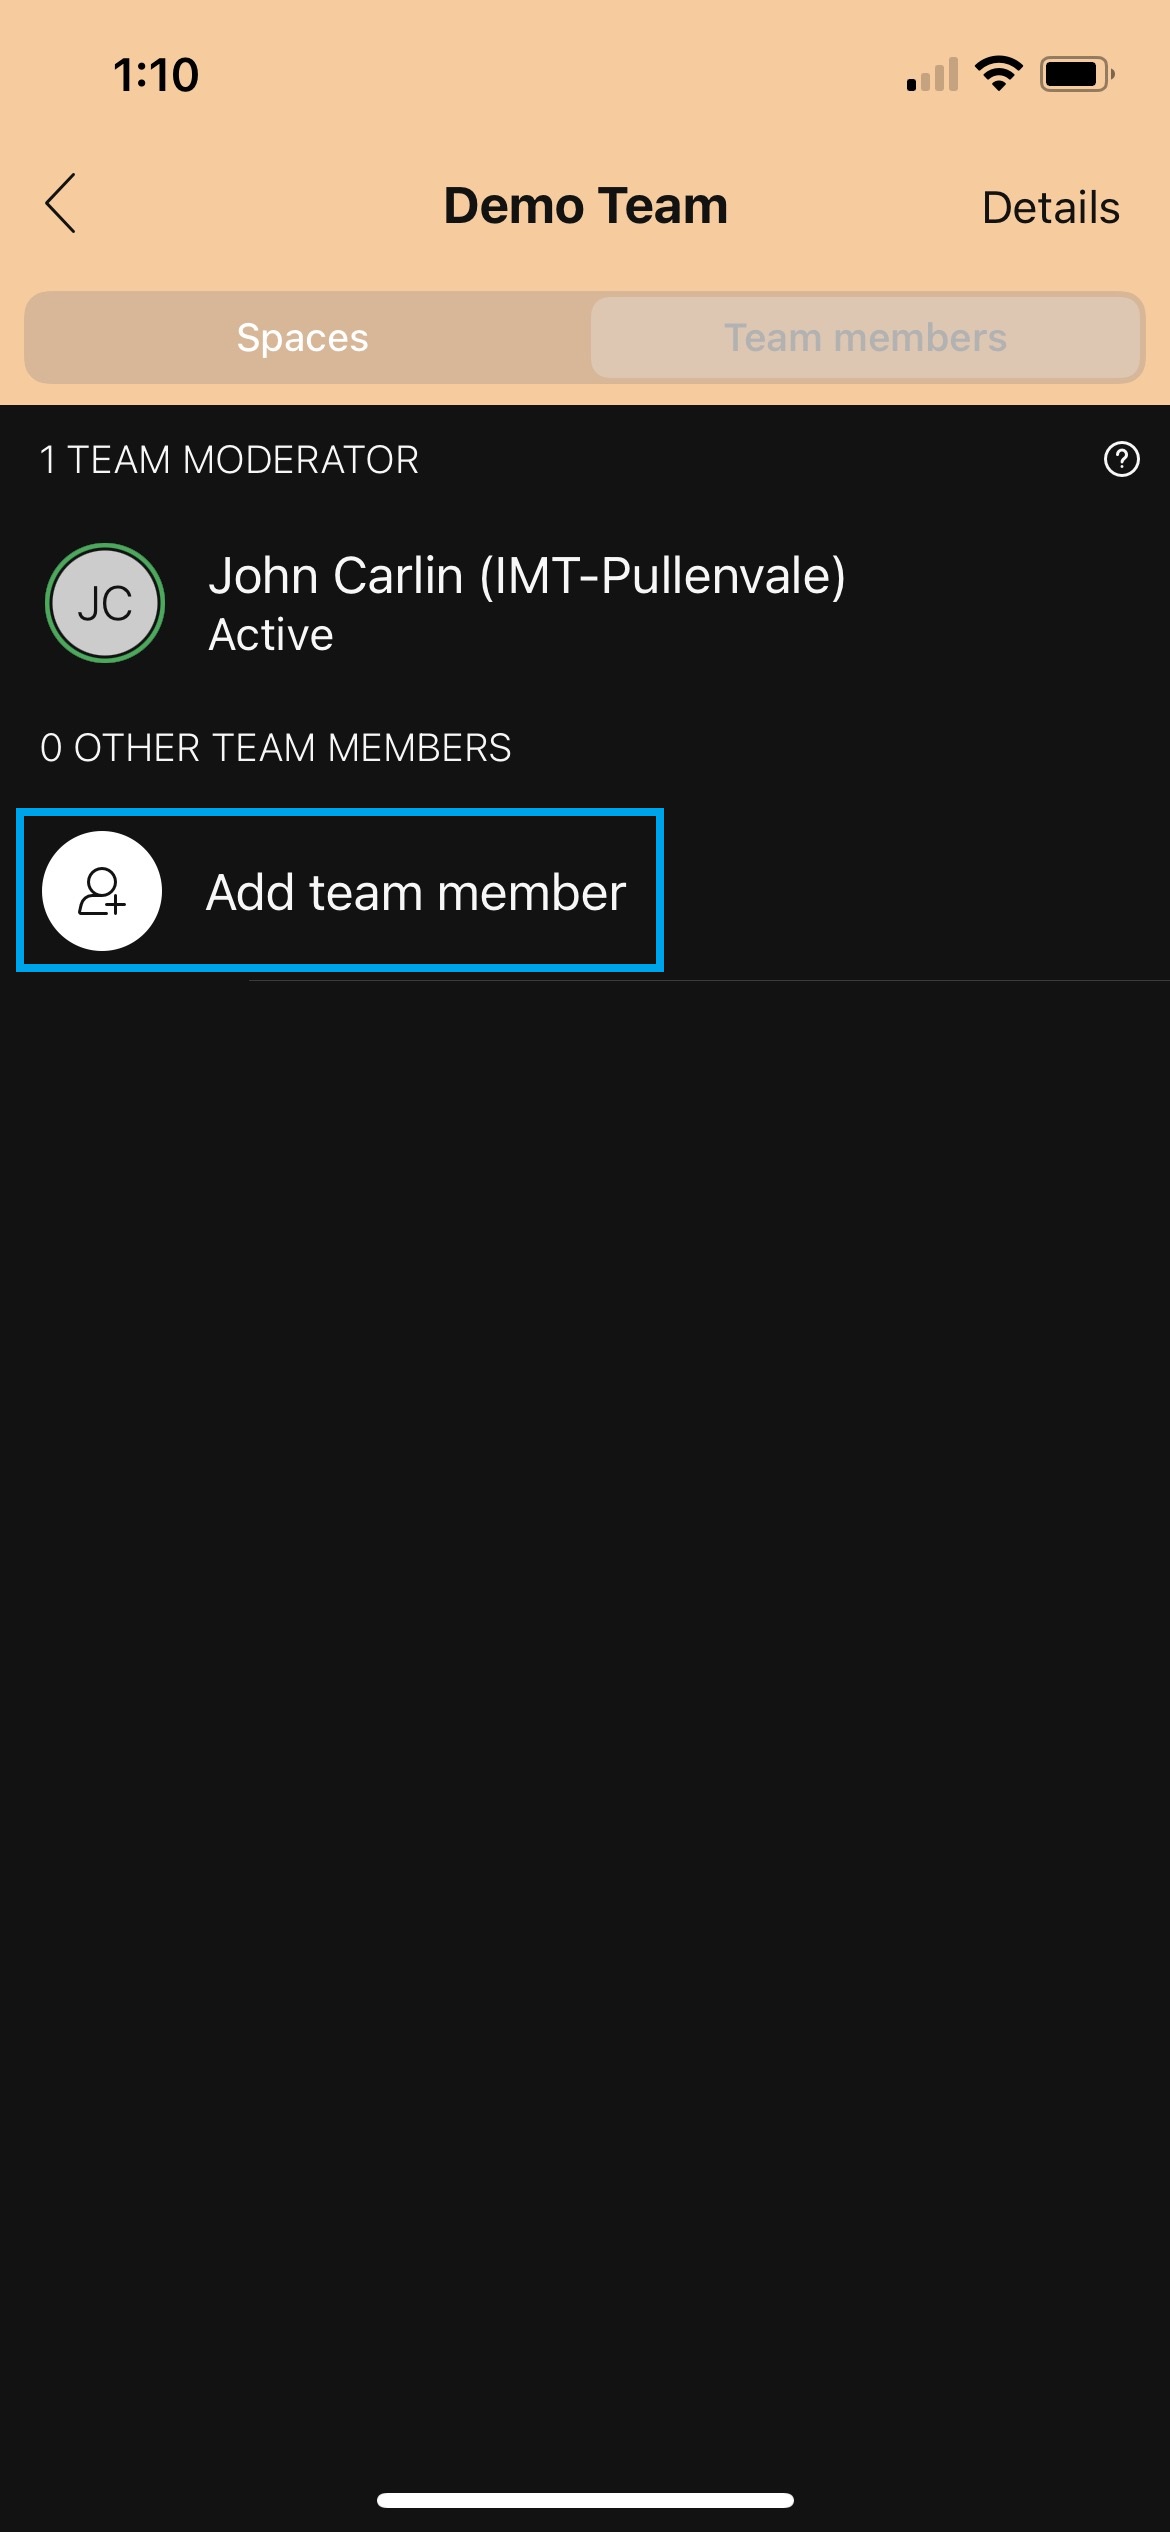
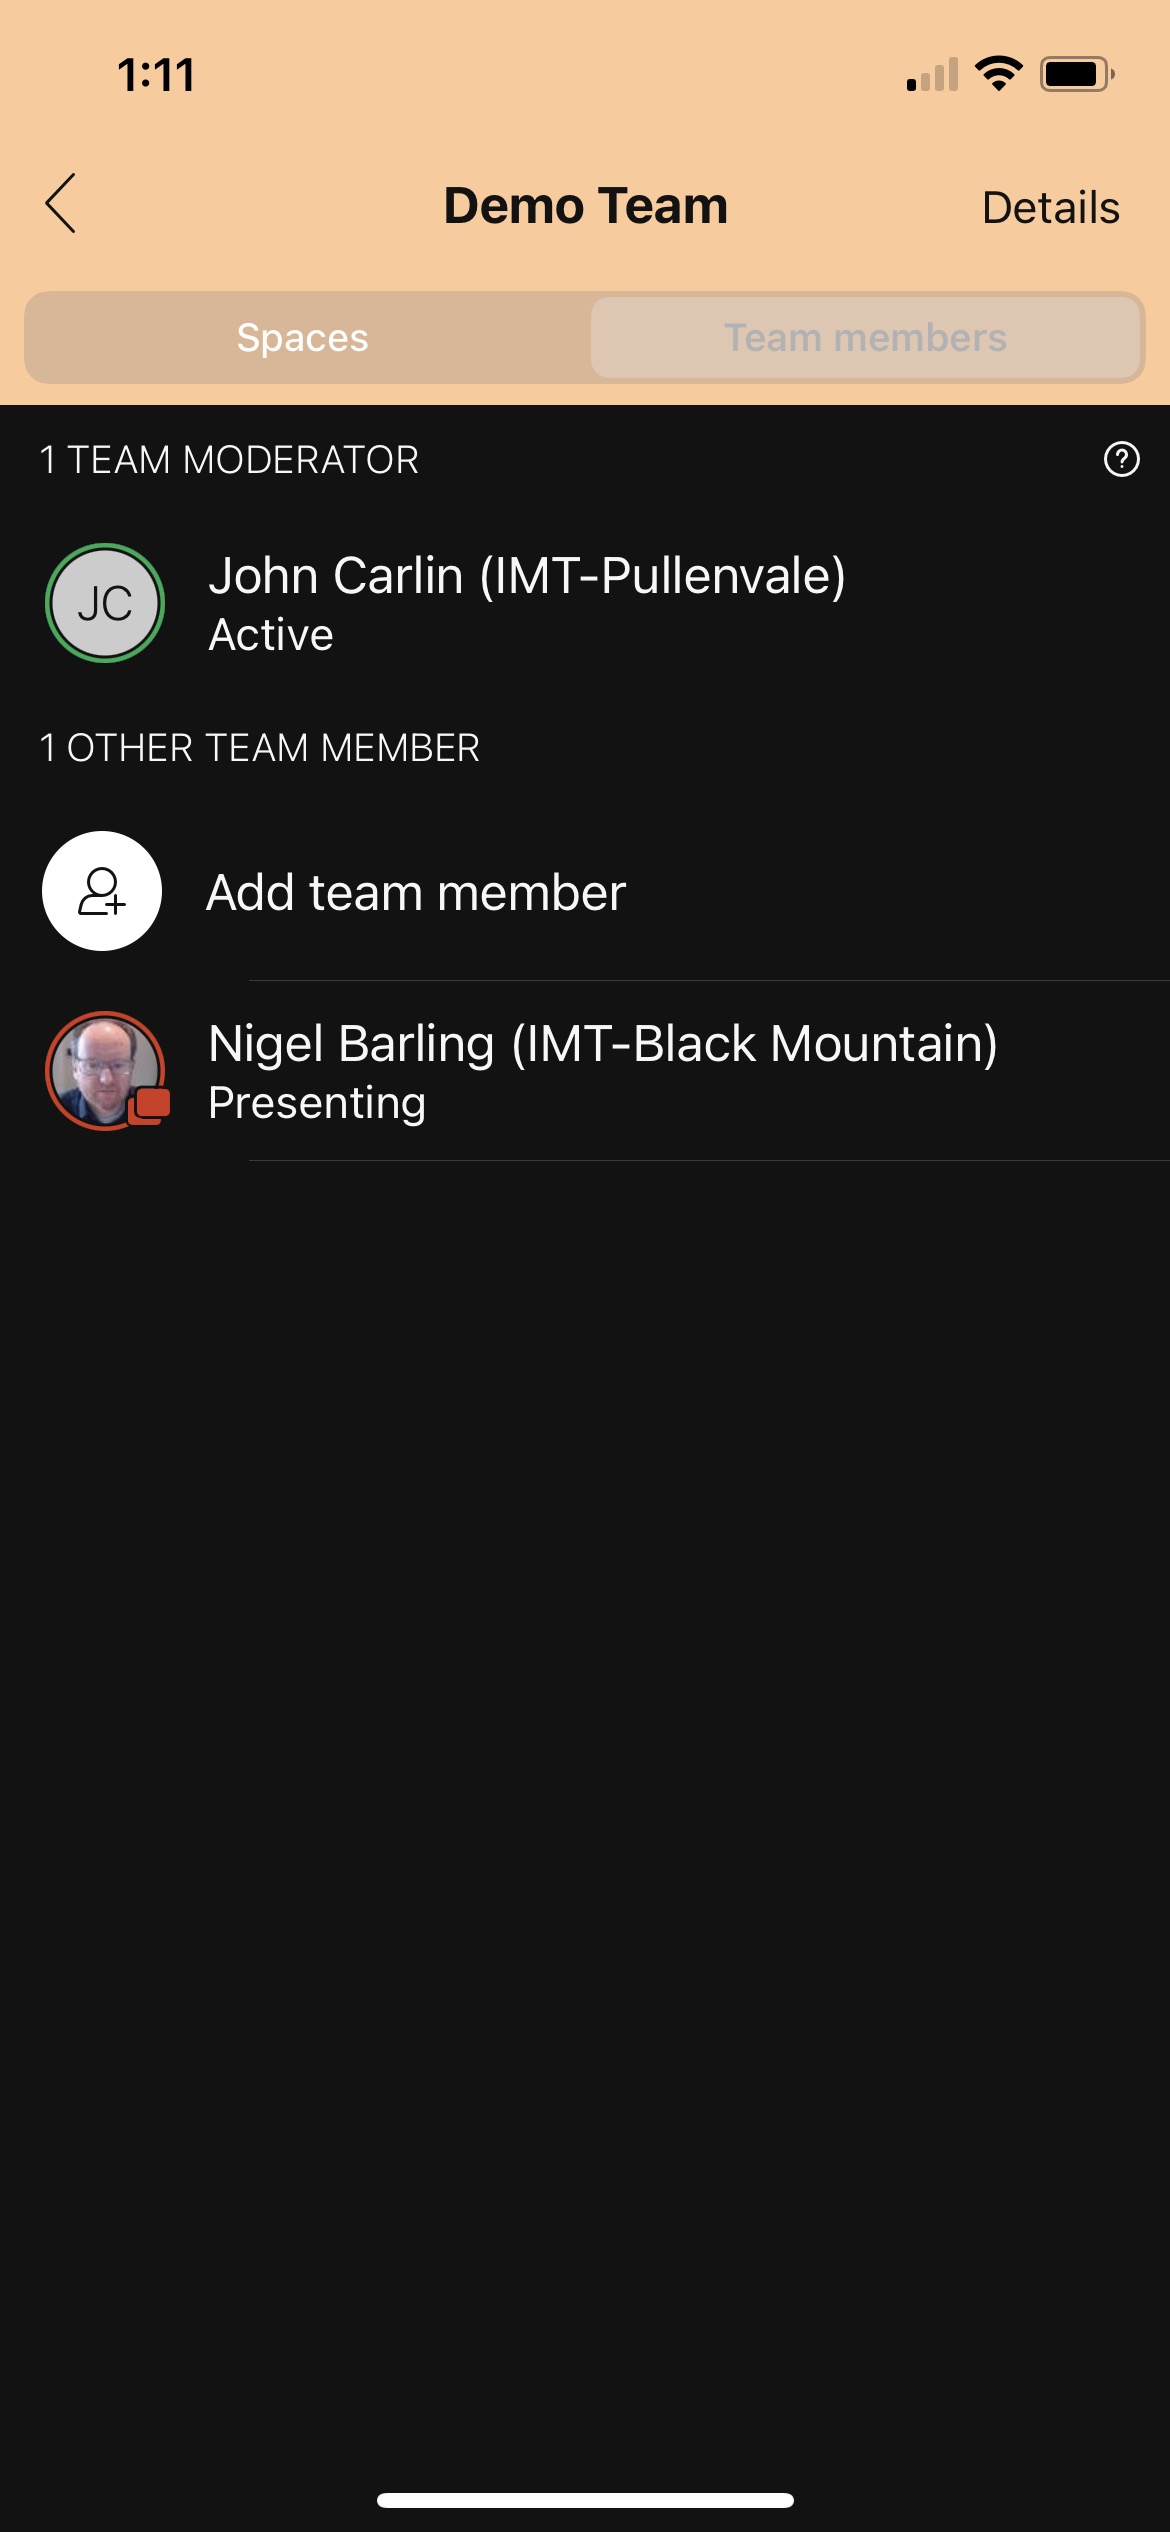
- Press 'Add team member'
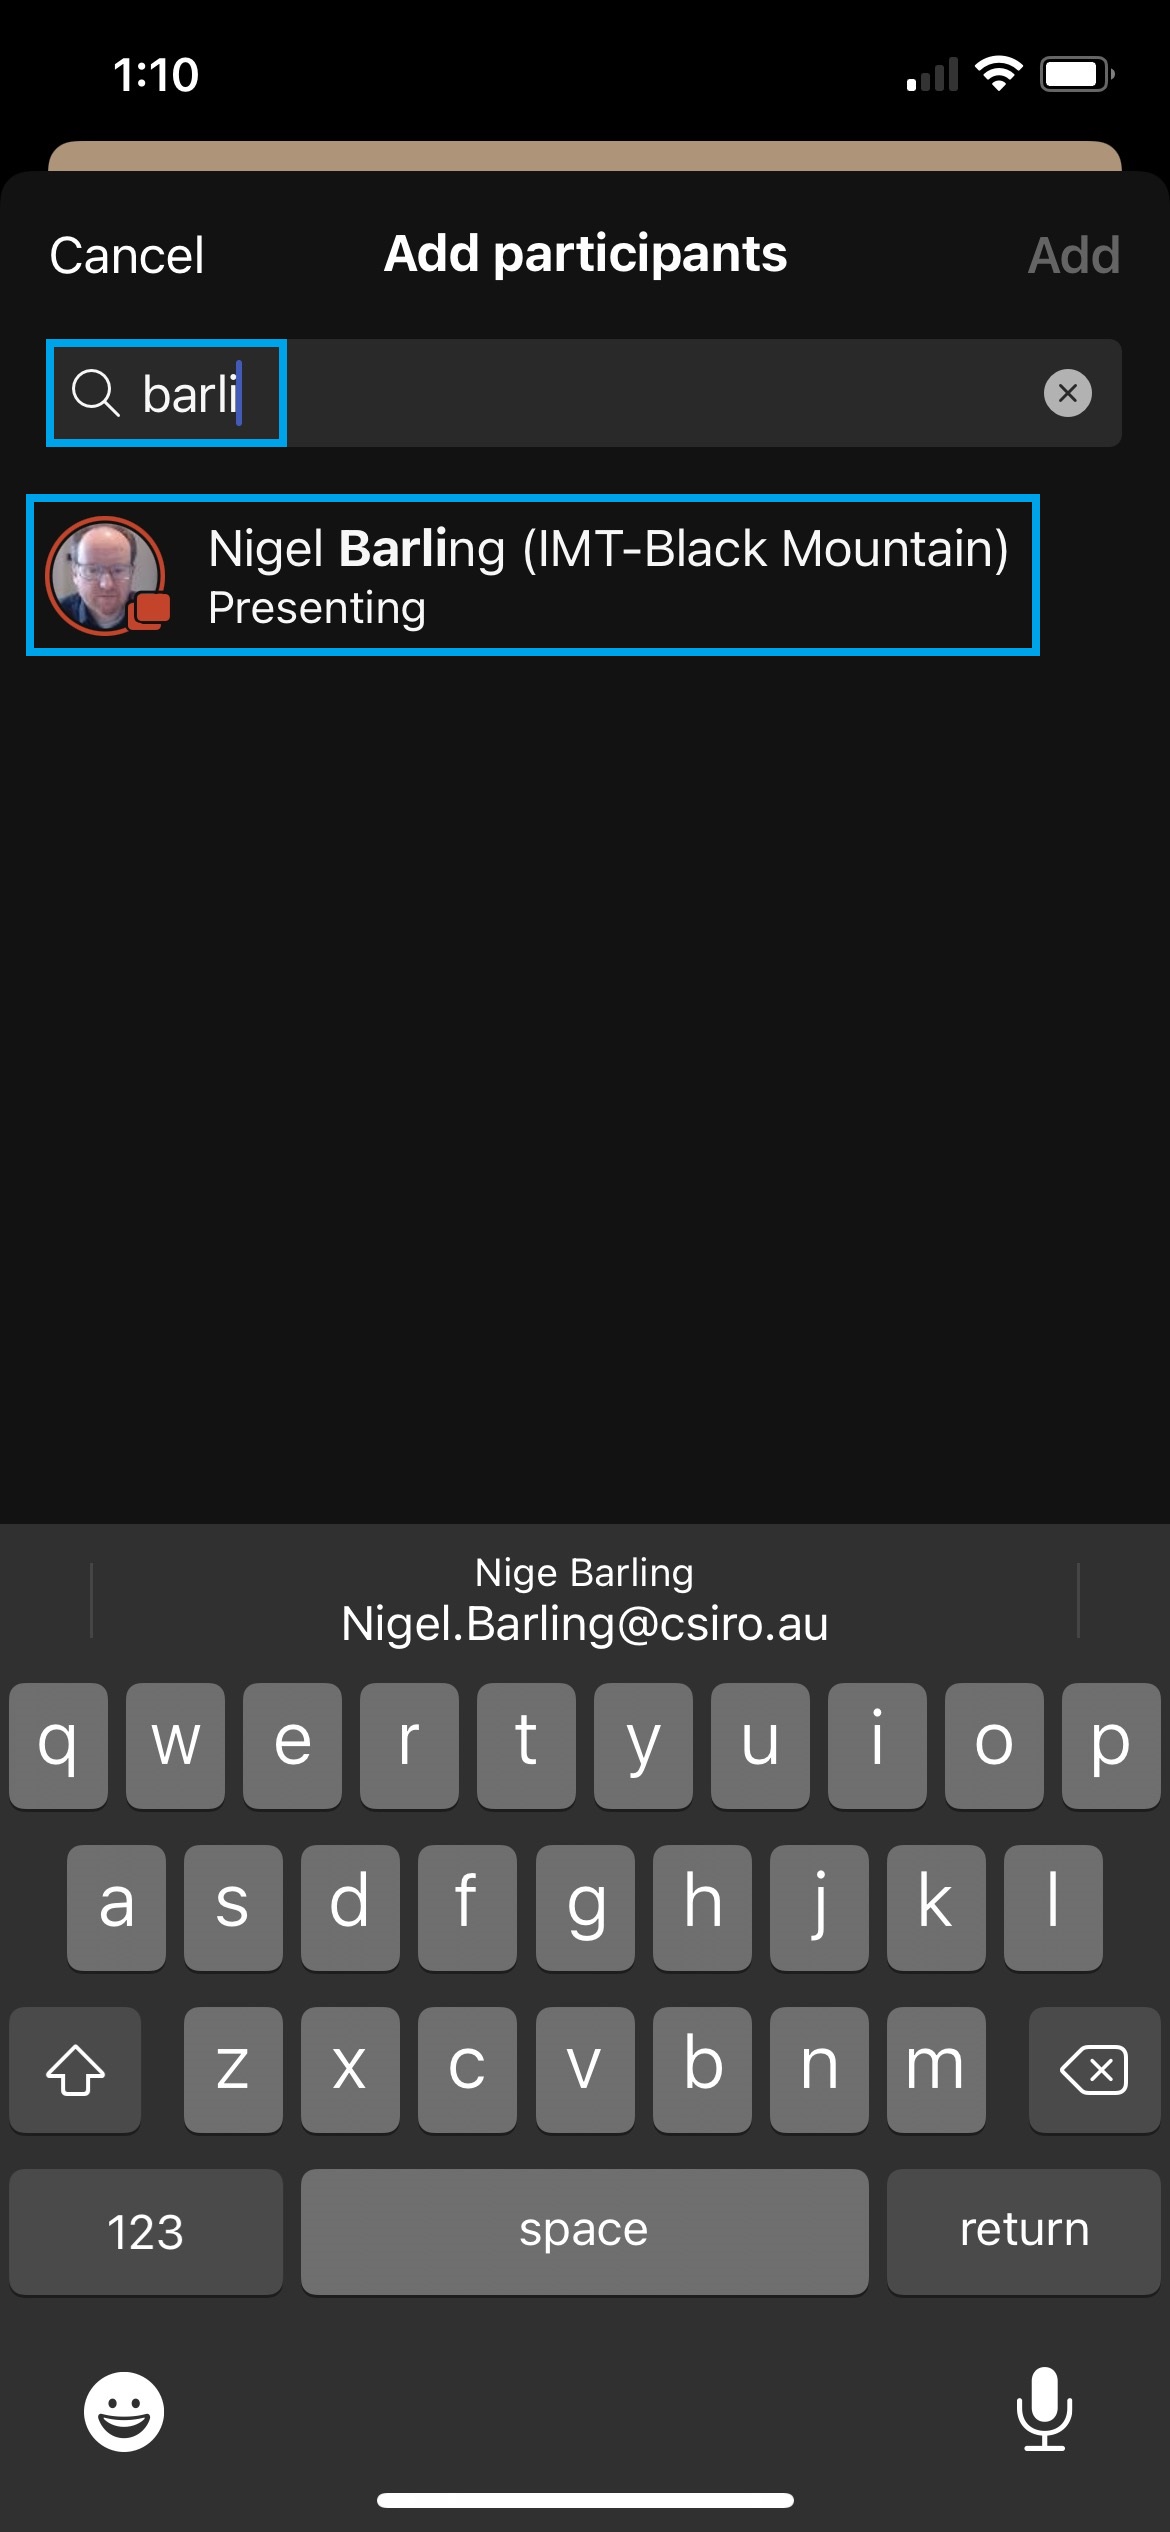
- Start typing the name of the person you wish to add and select the appropriate result - repeat this step until all team members have been added
-
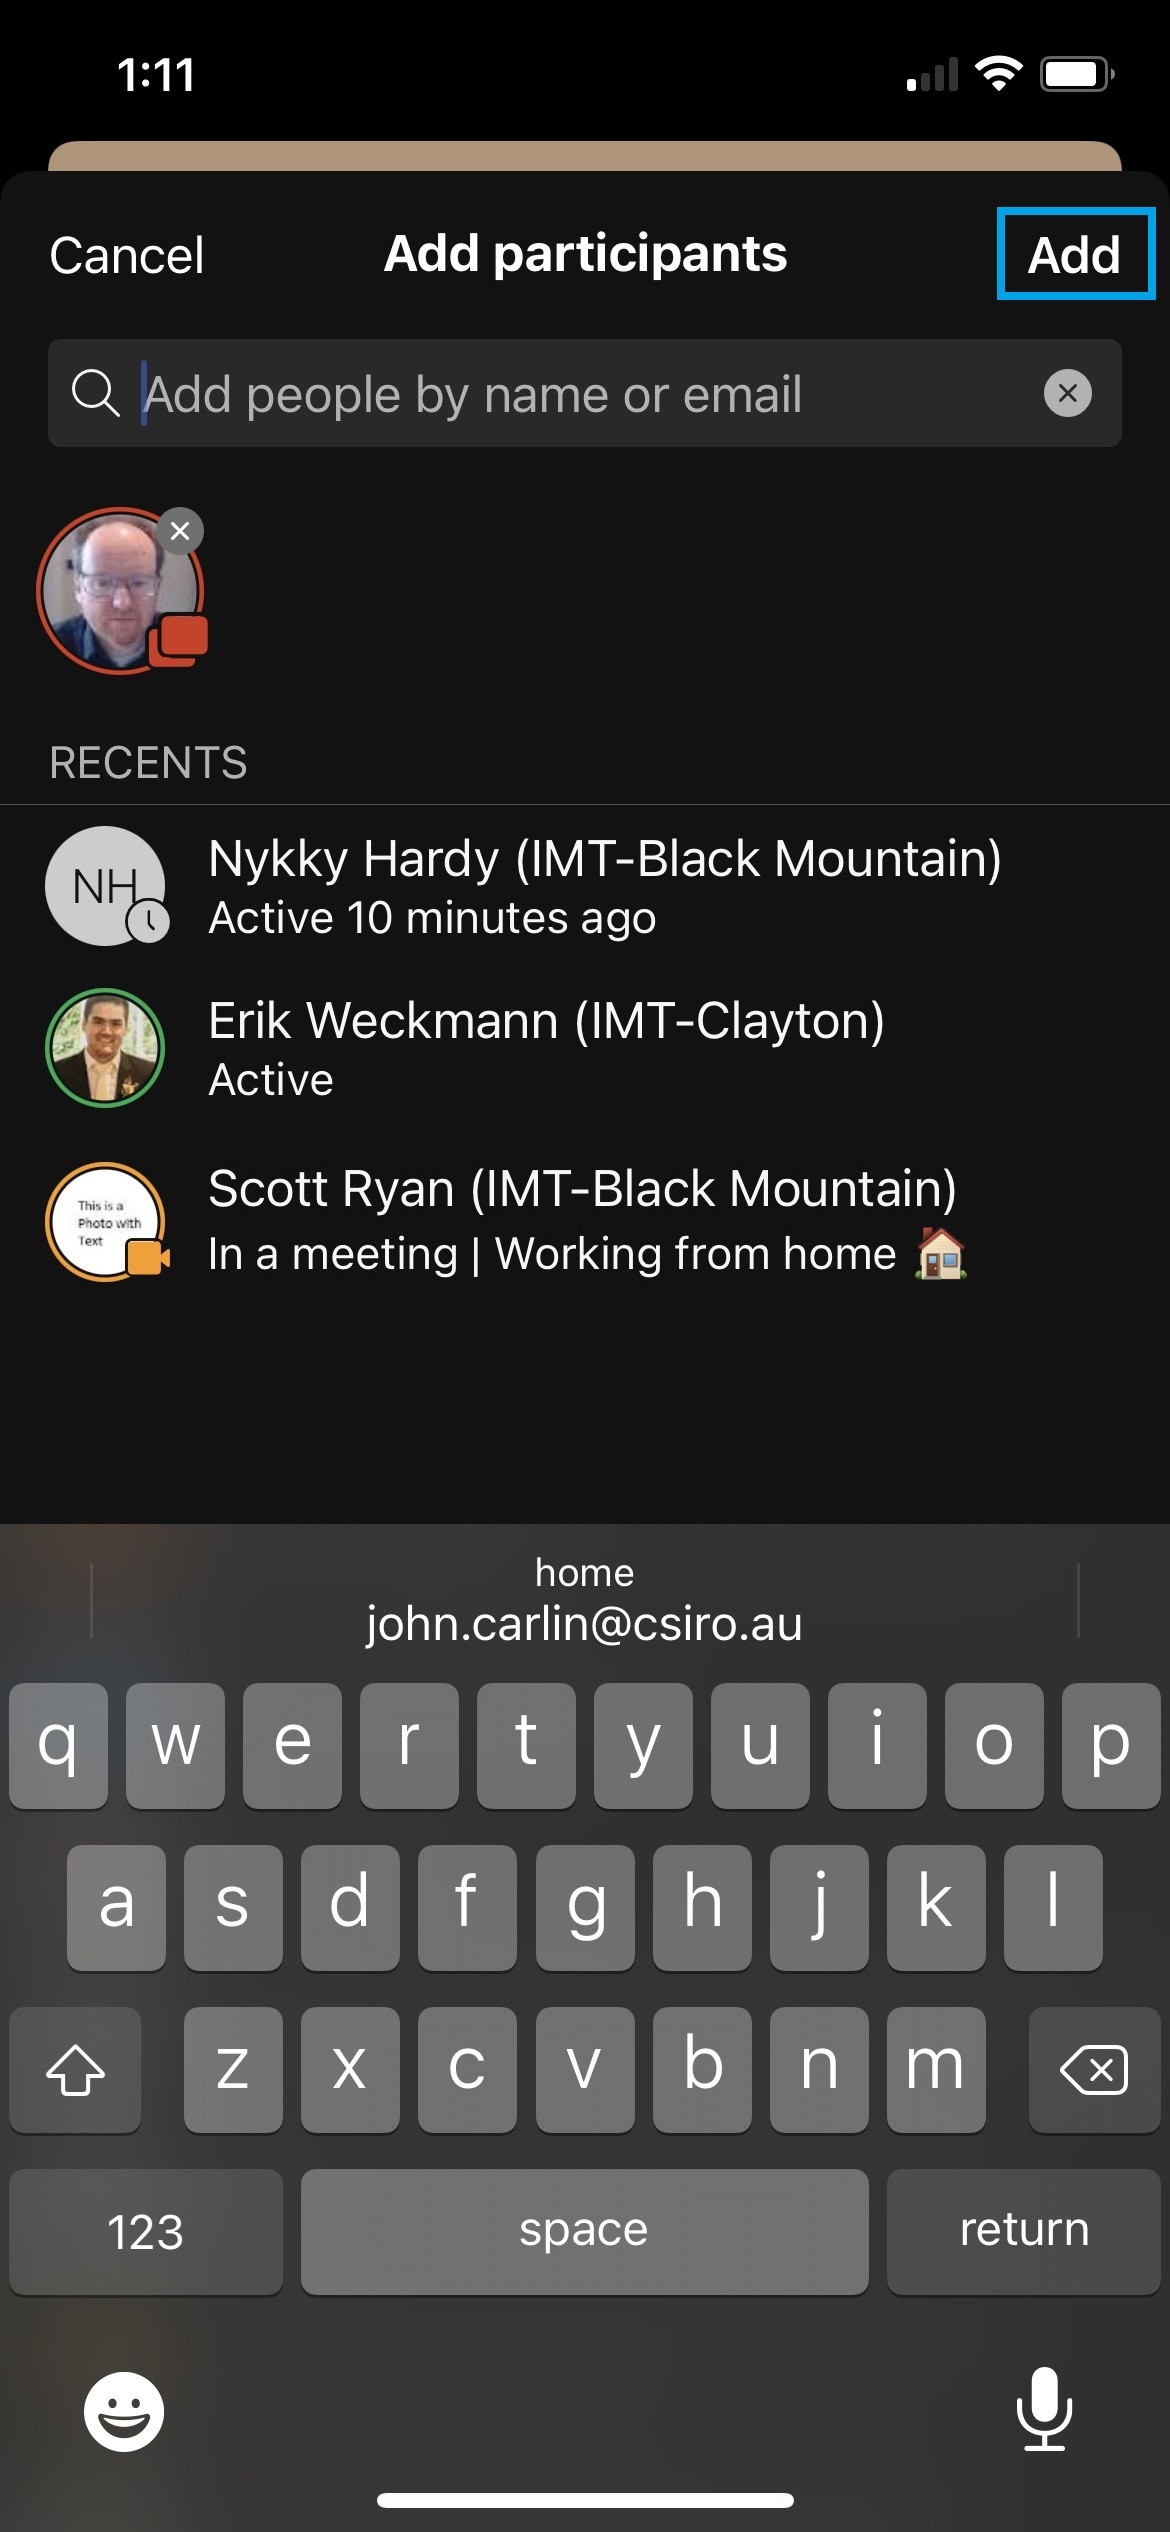
Press 'Add'.
Creating a space
https://help.webex.com/en-us/hk71r4/Webex-Create-a-Space
To create a space:
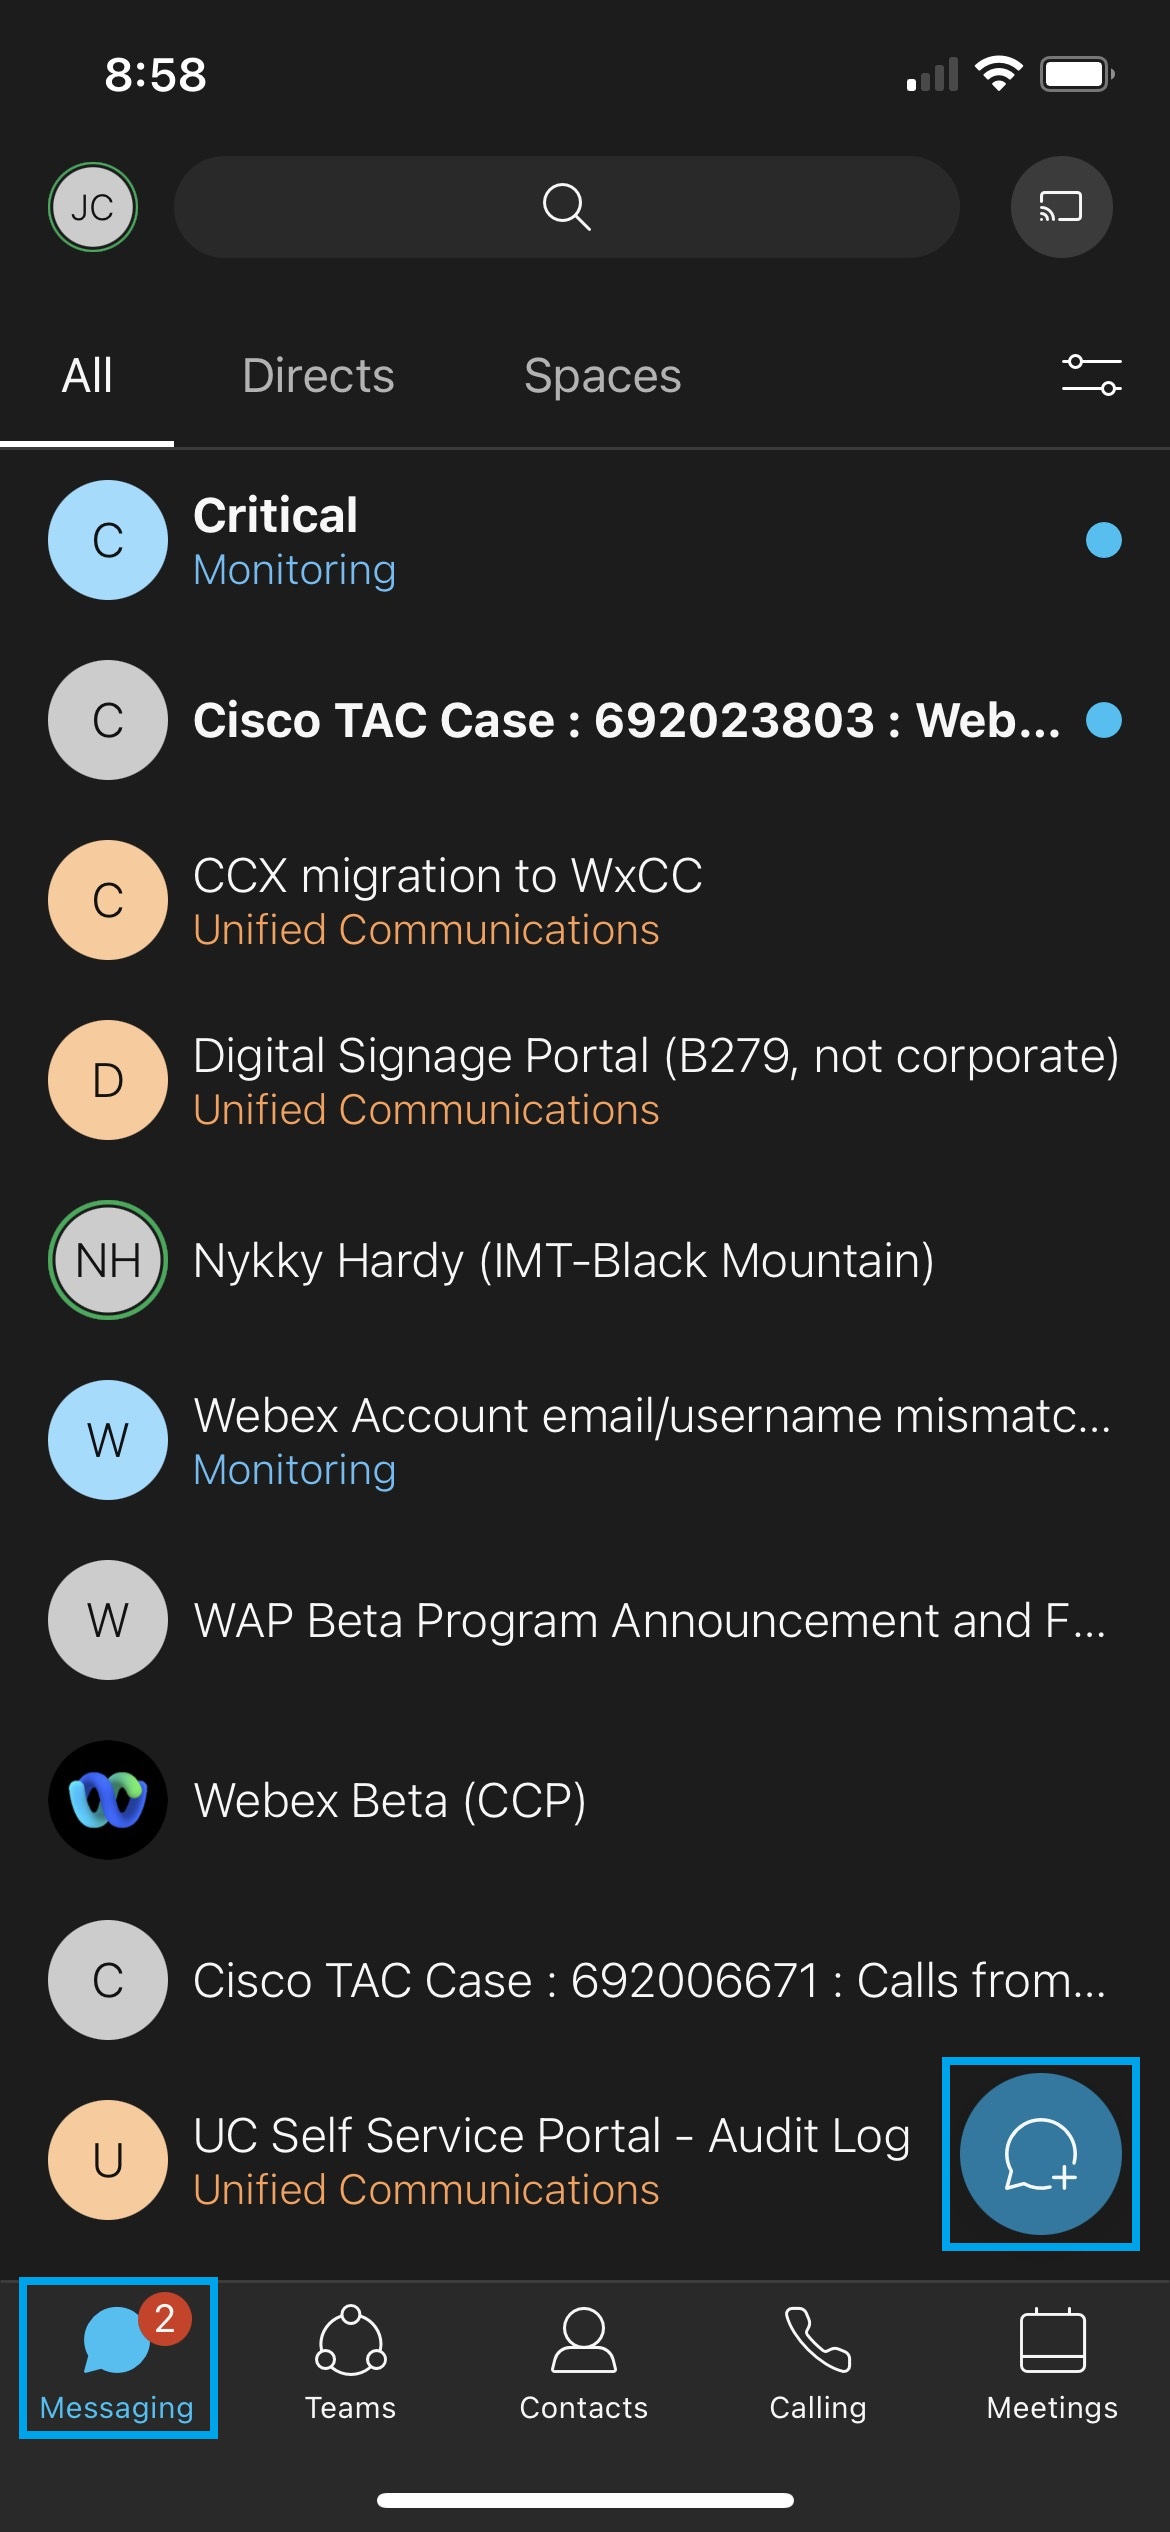
- Press the 'Messaging' tab and then press the new space icon
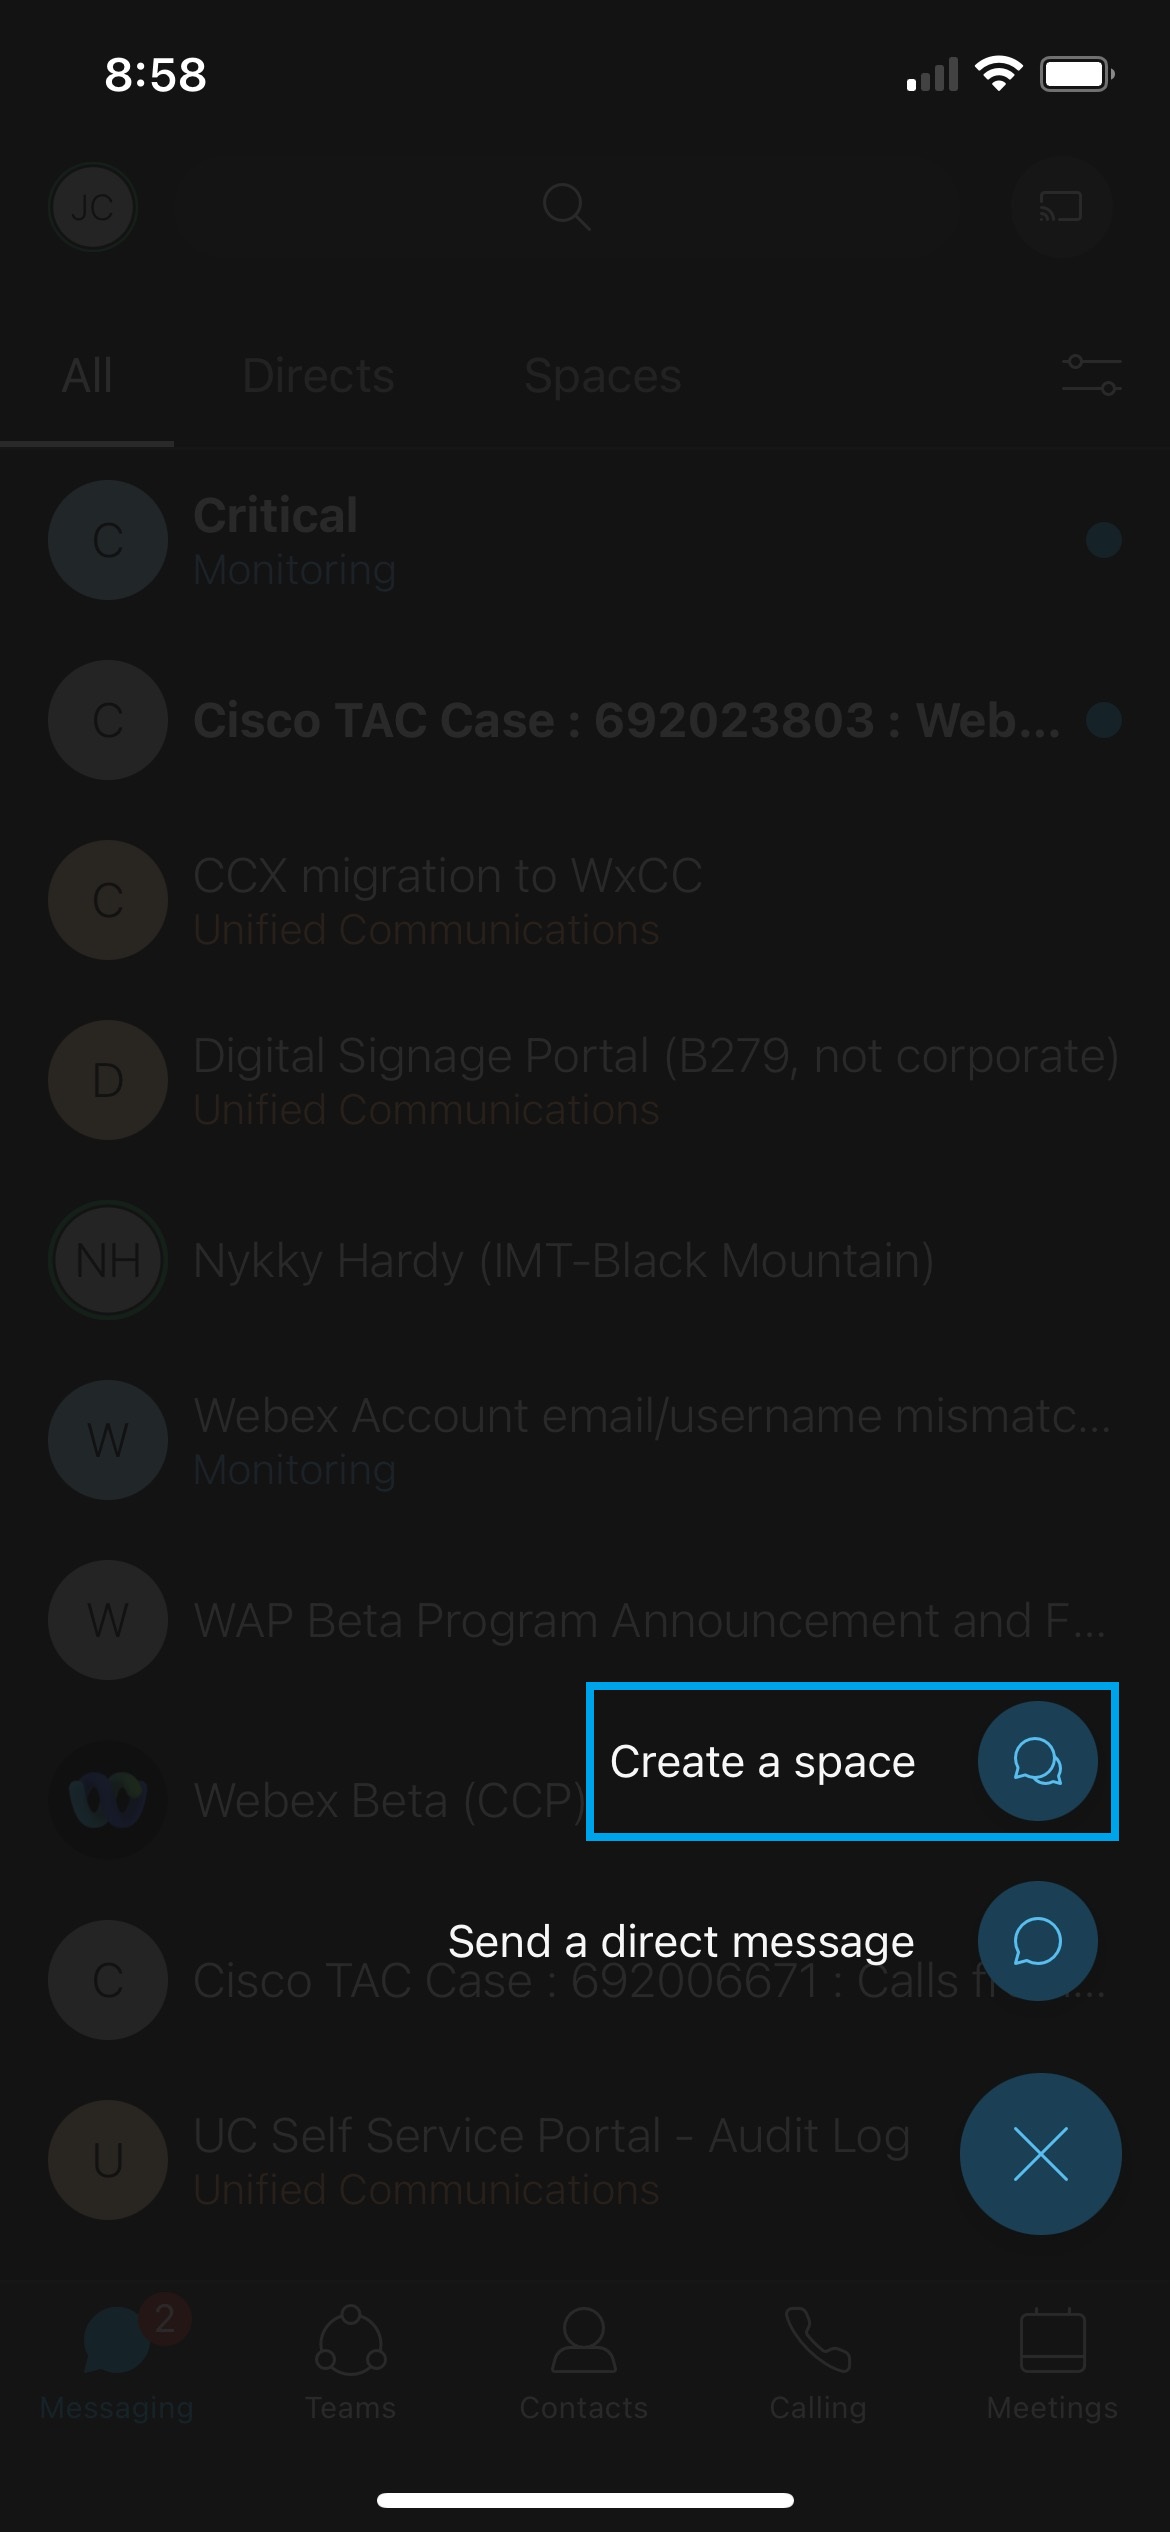
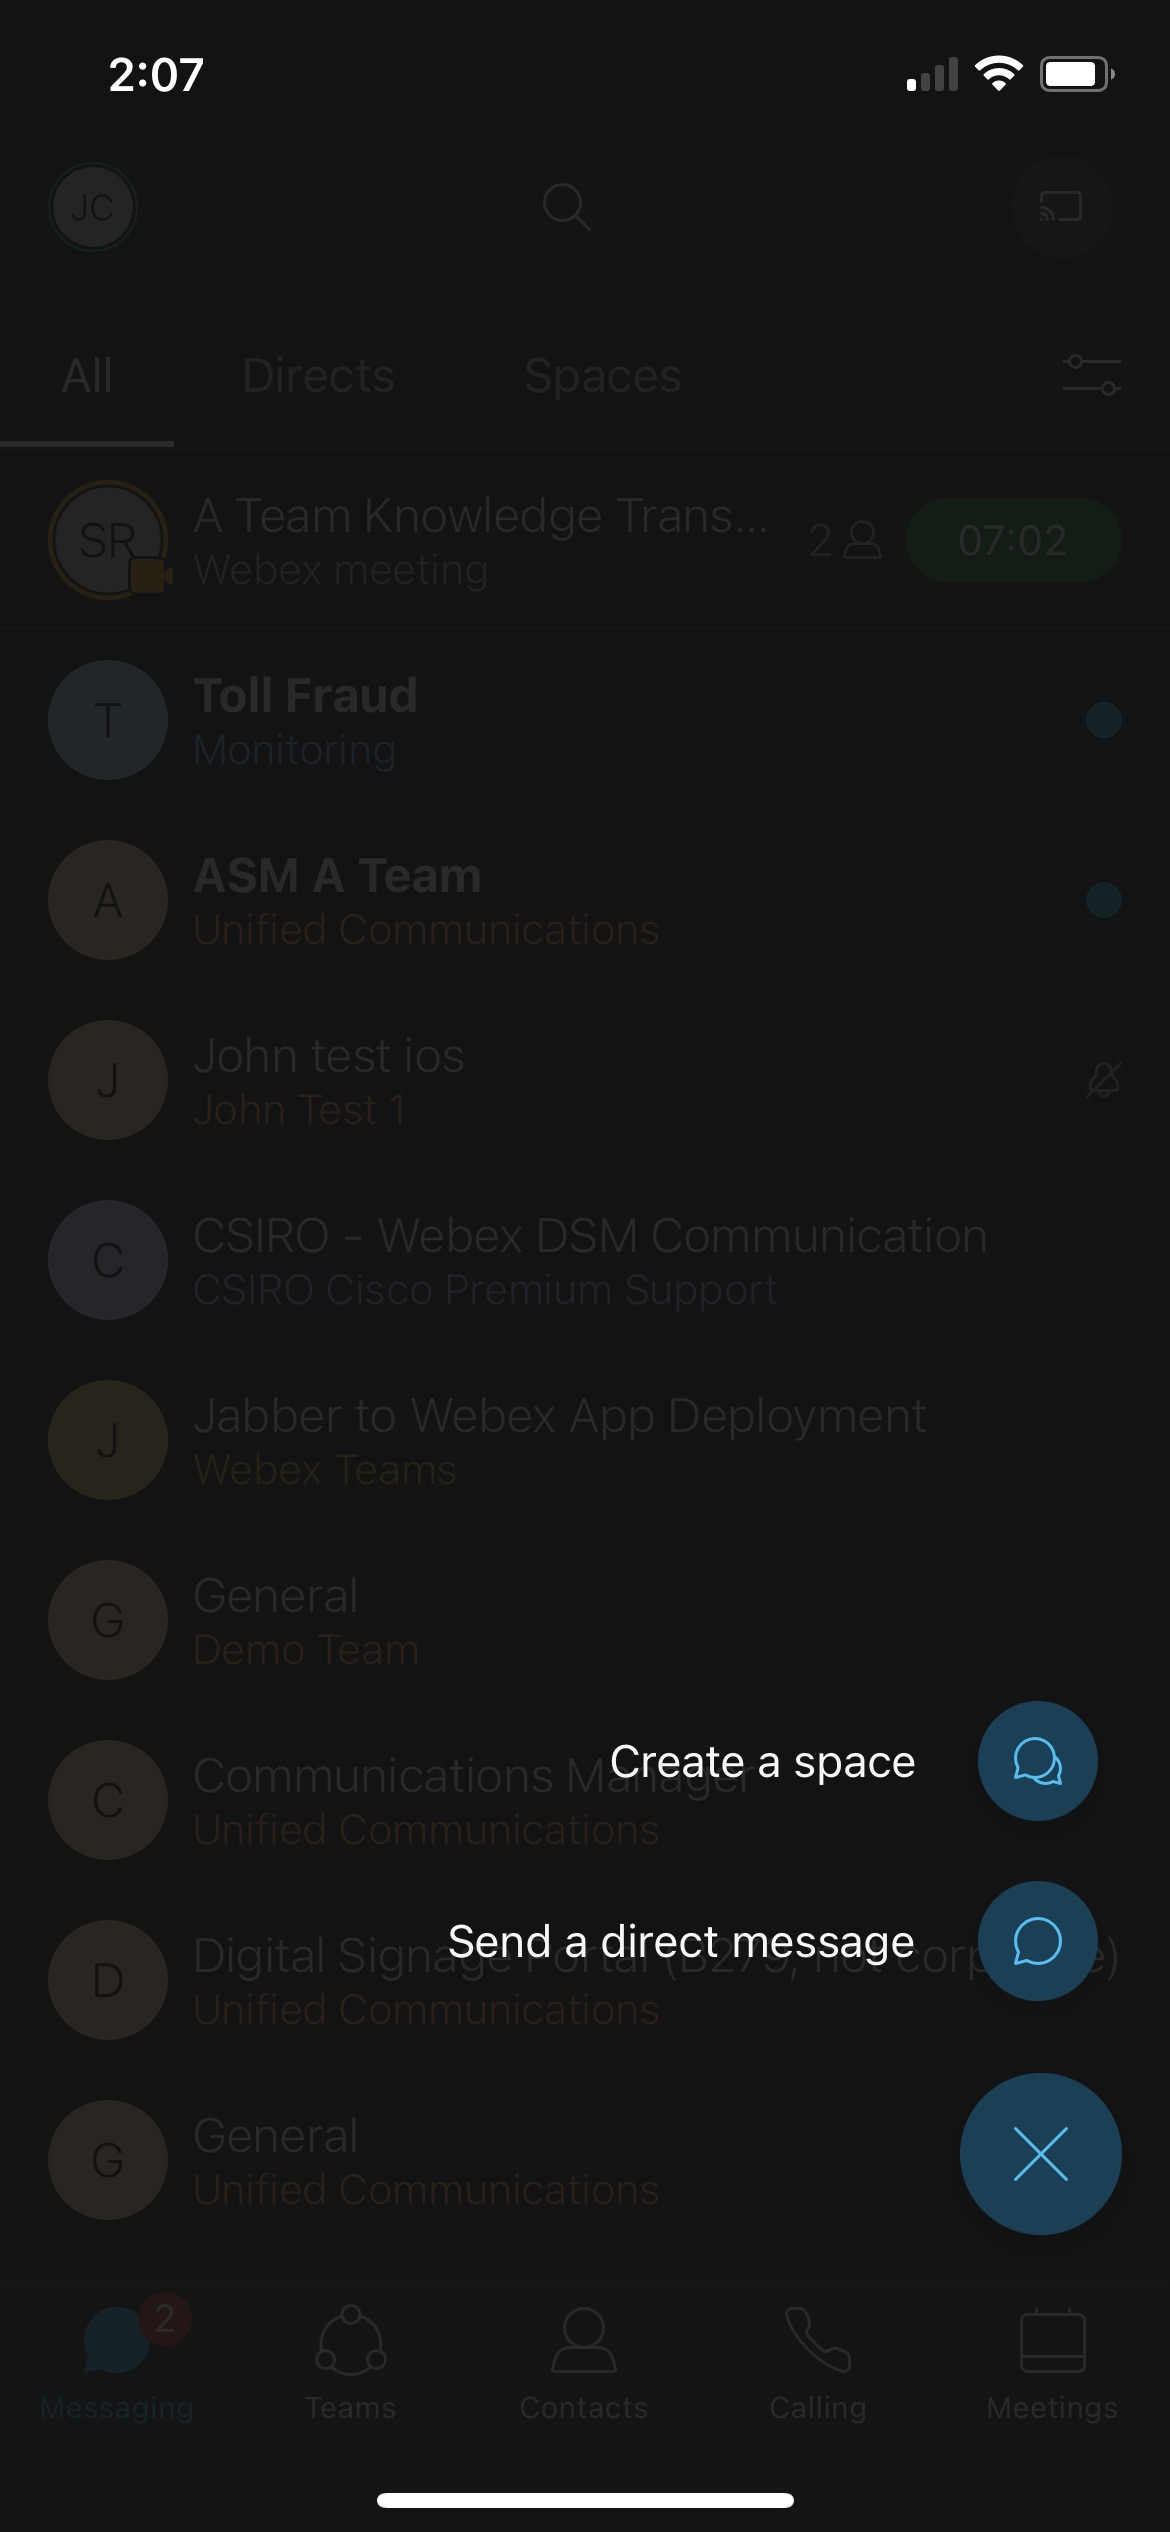
- Press 'Create a space'
-
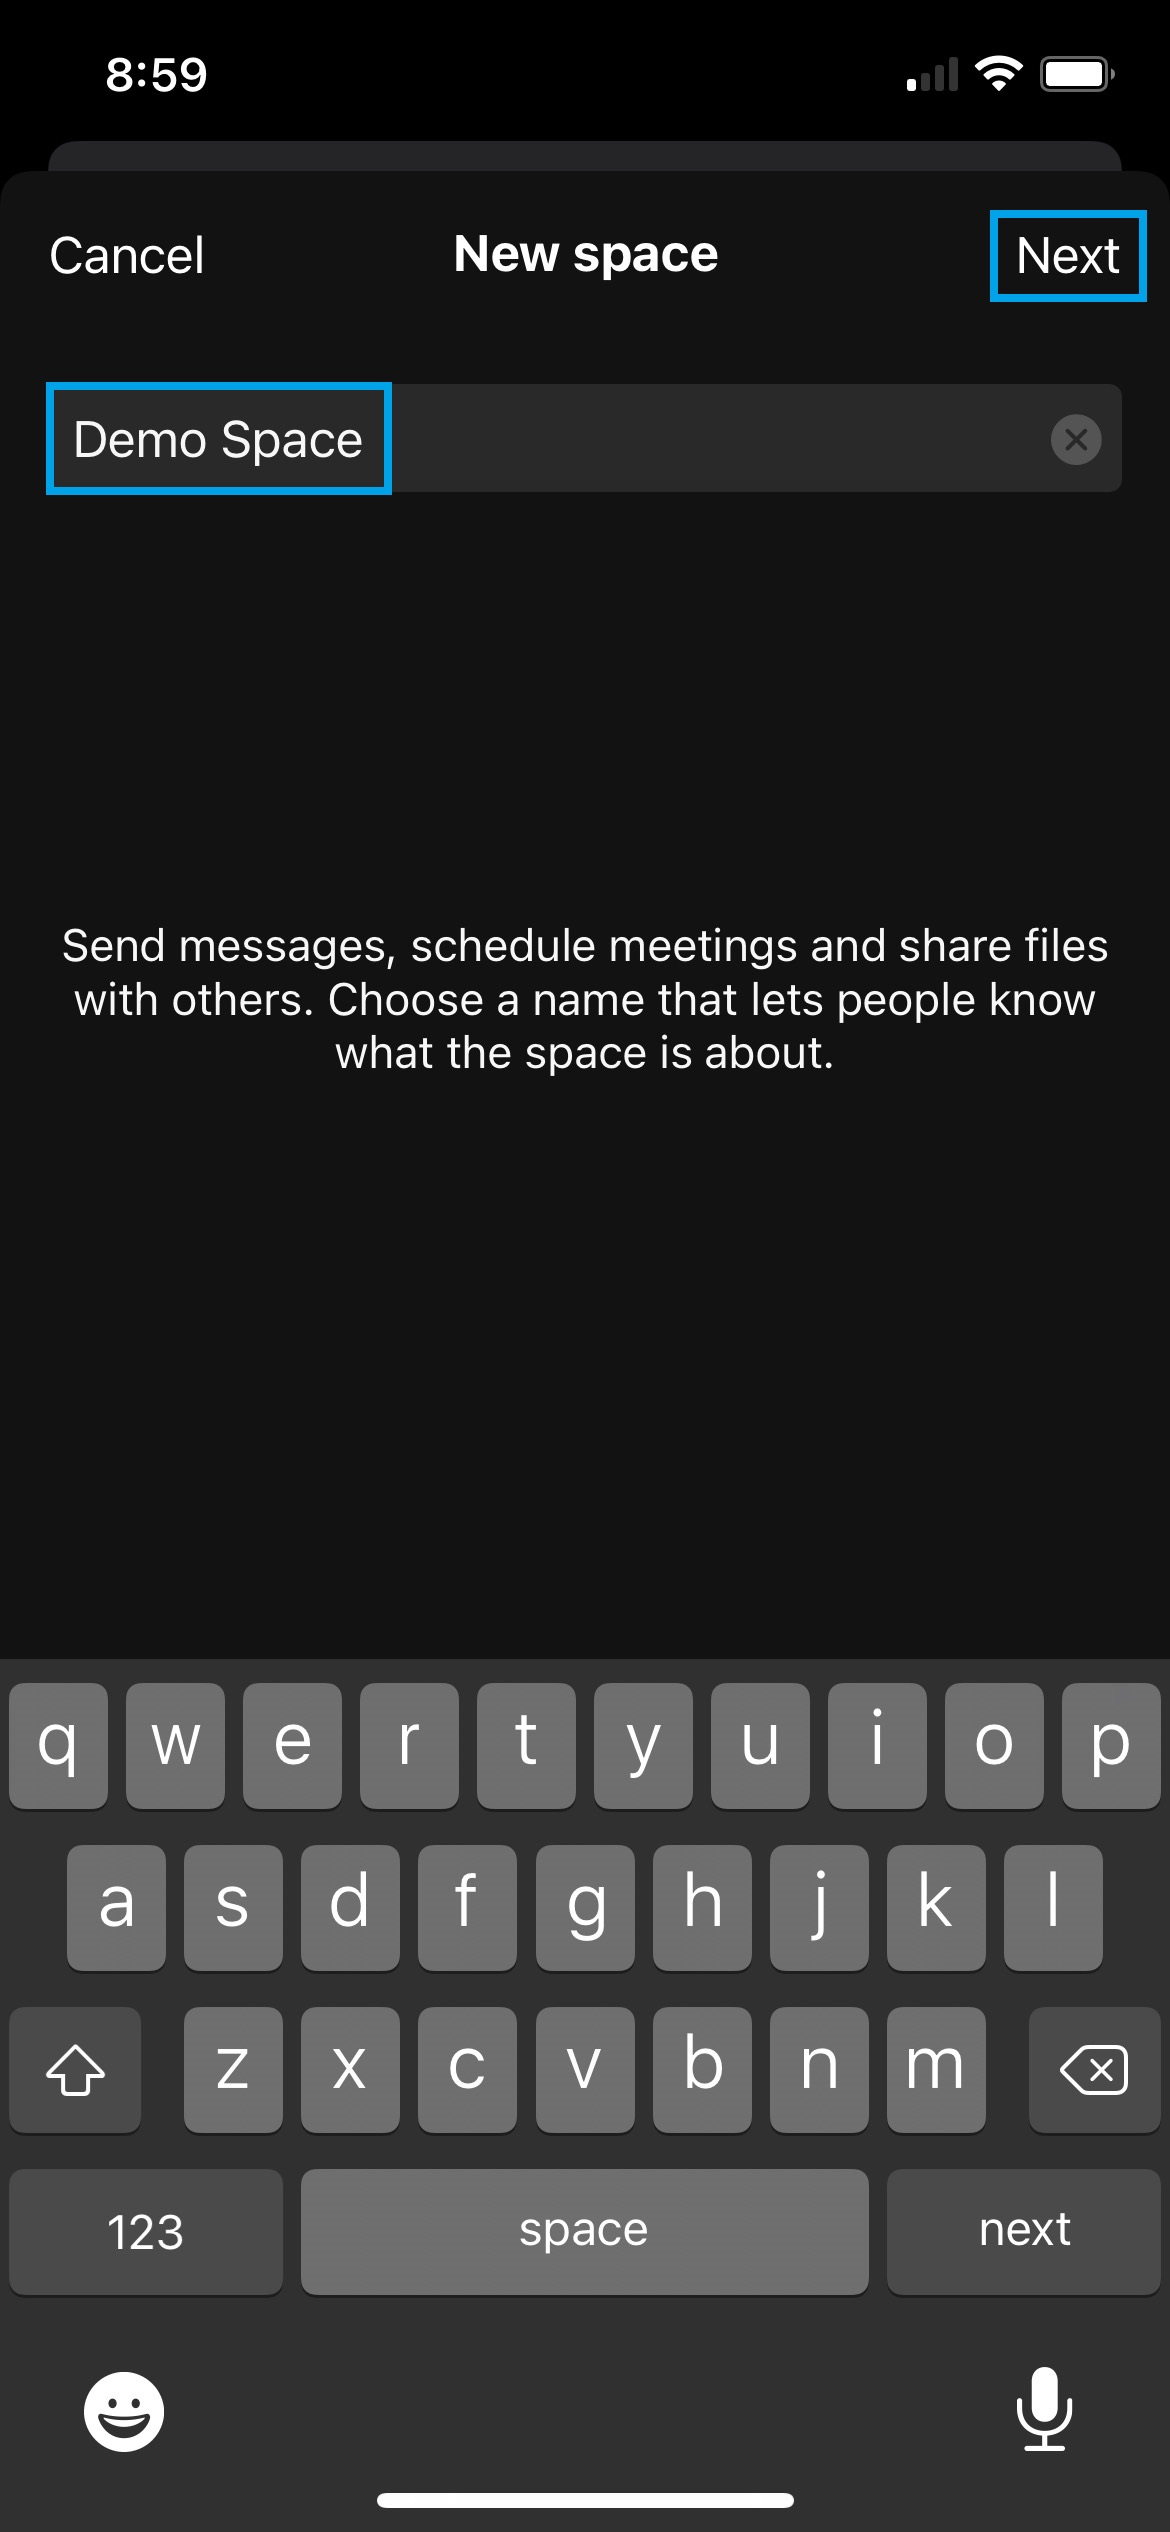
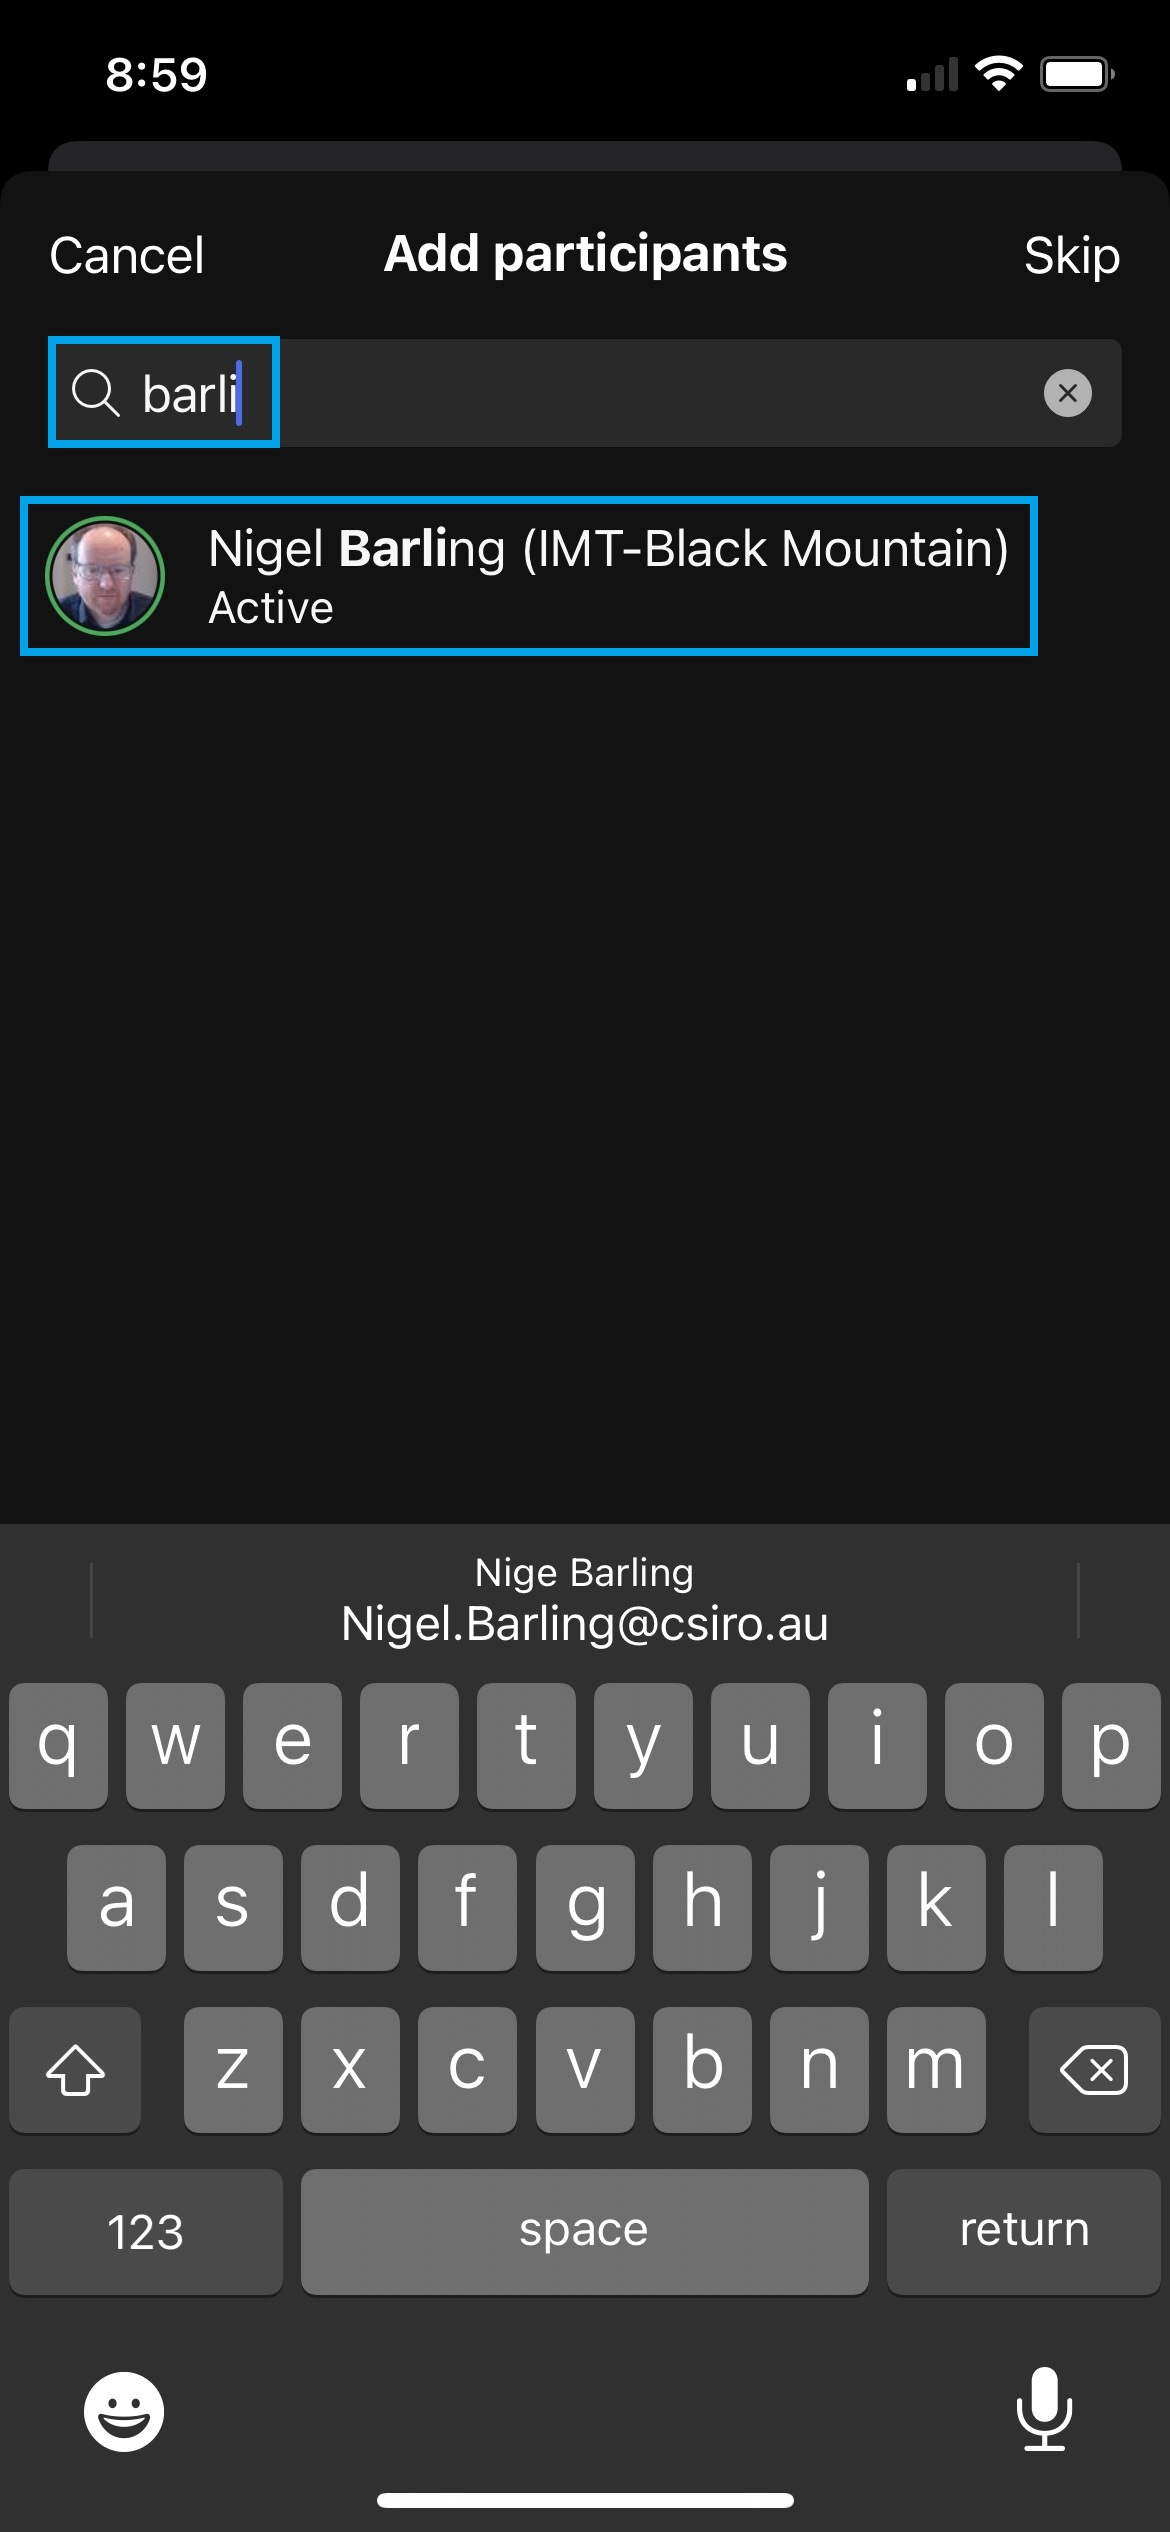
Enter a name for the space and press 'Next'
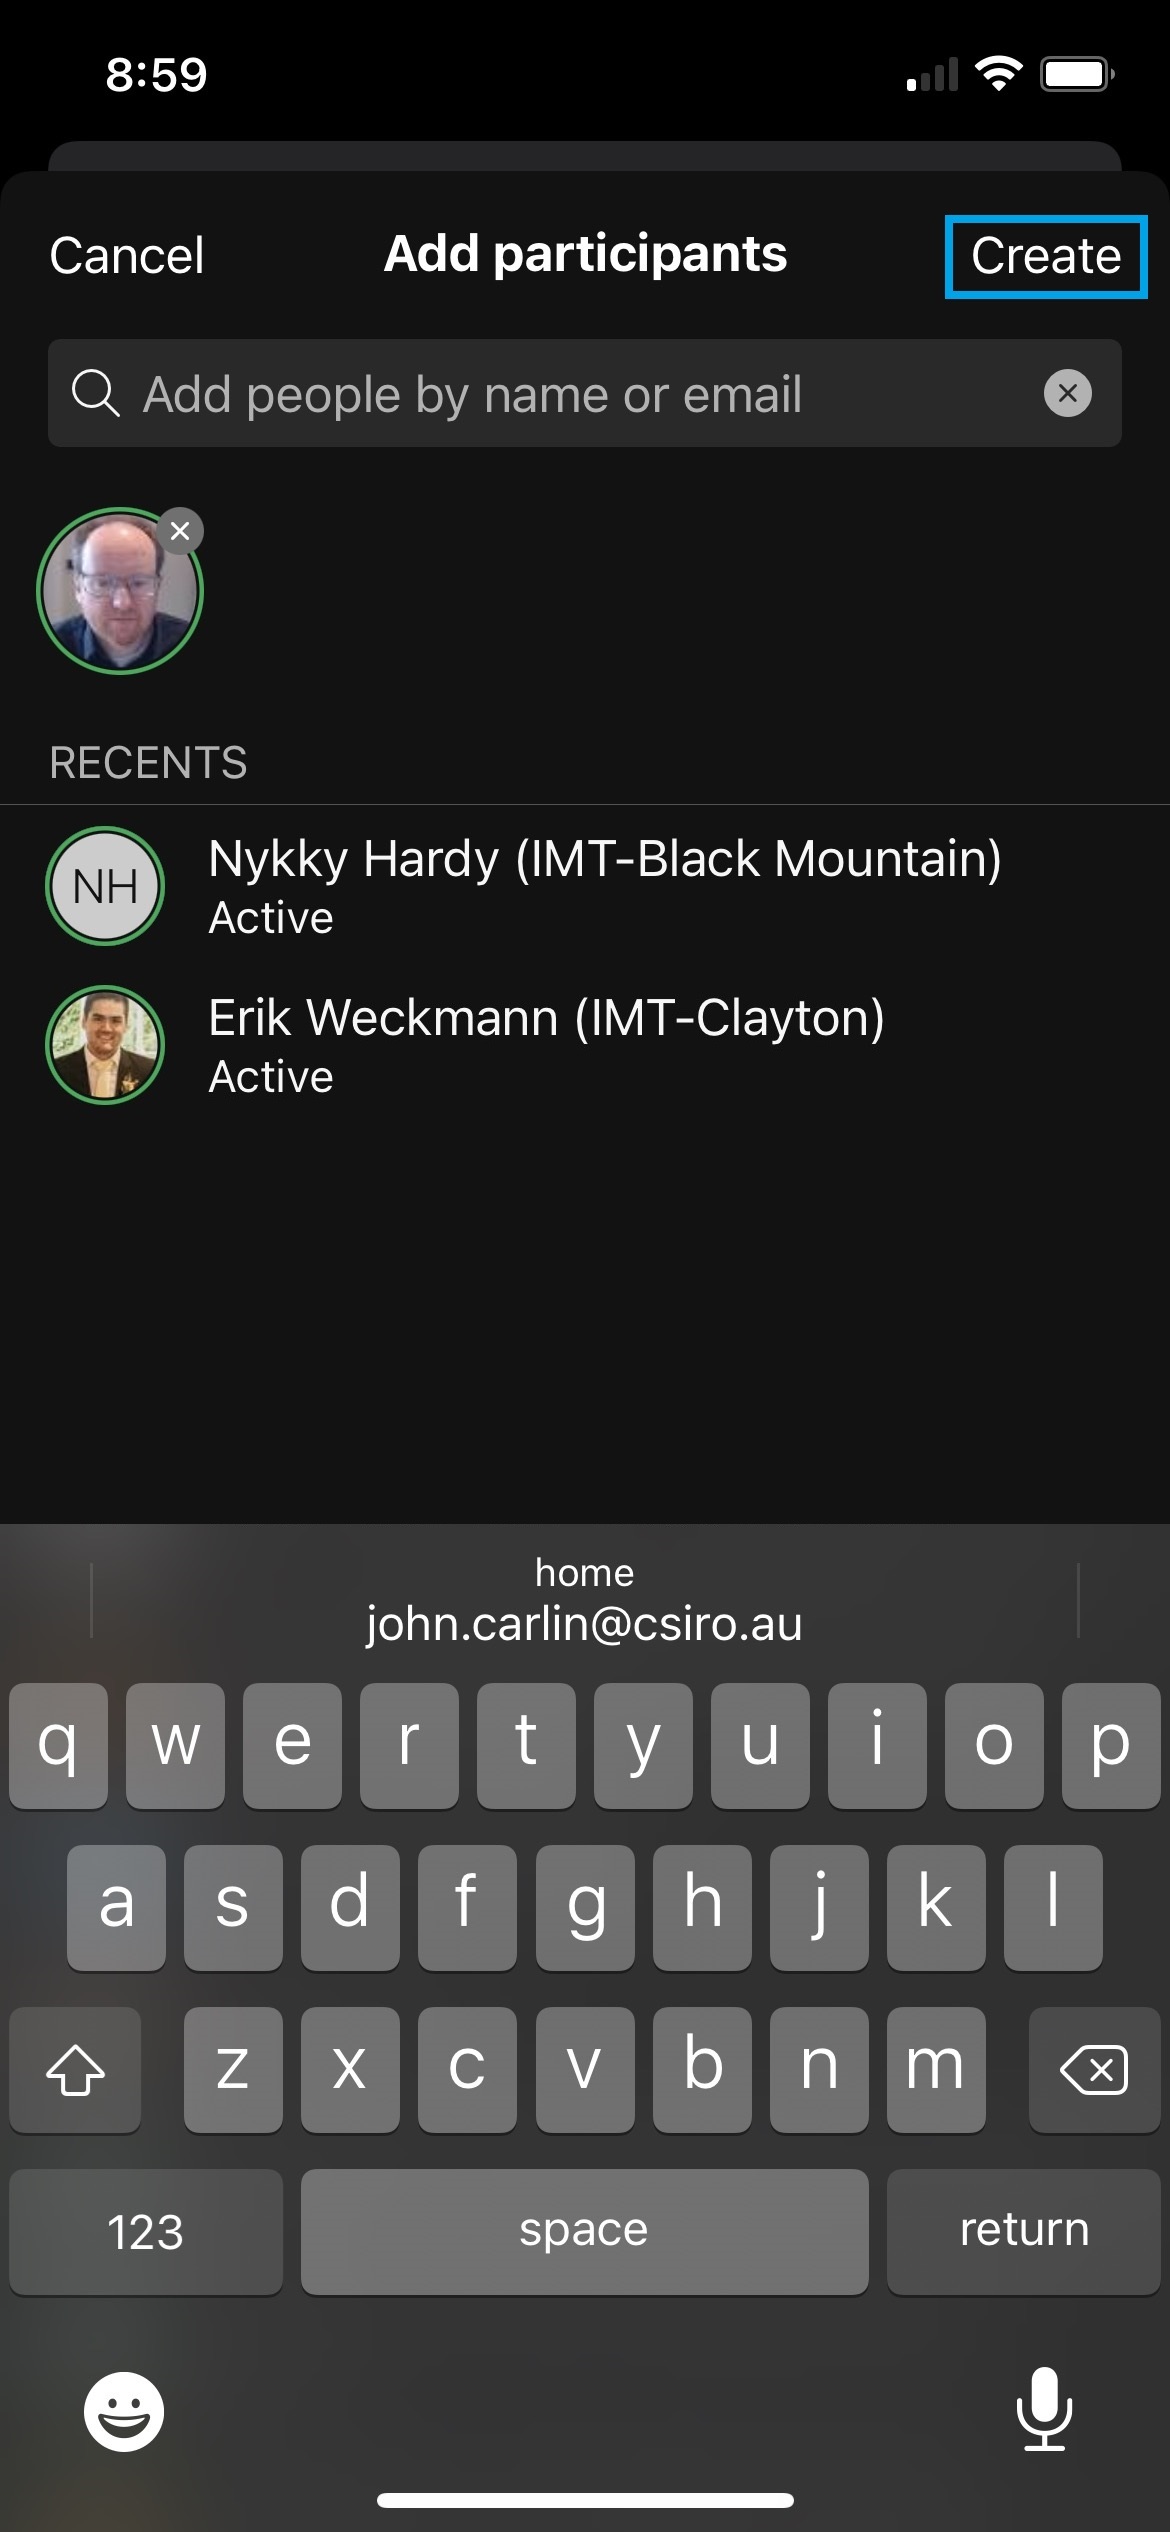
- Start typing the name of the person you wish to add and select the appropriate result - repeat this step until all space members have been added
-
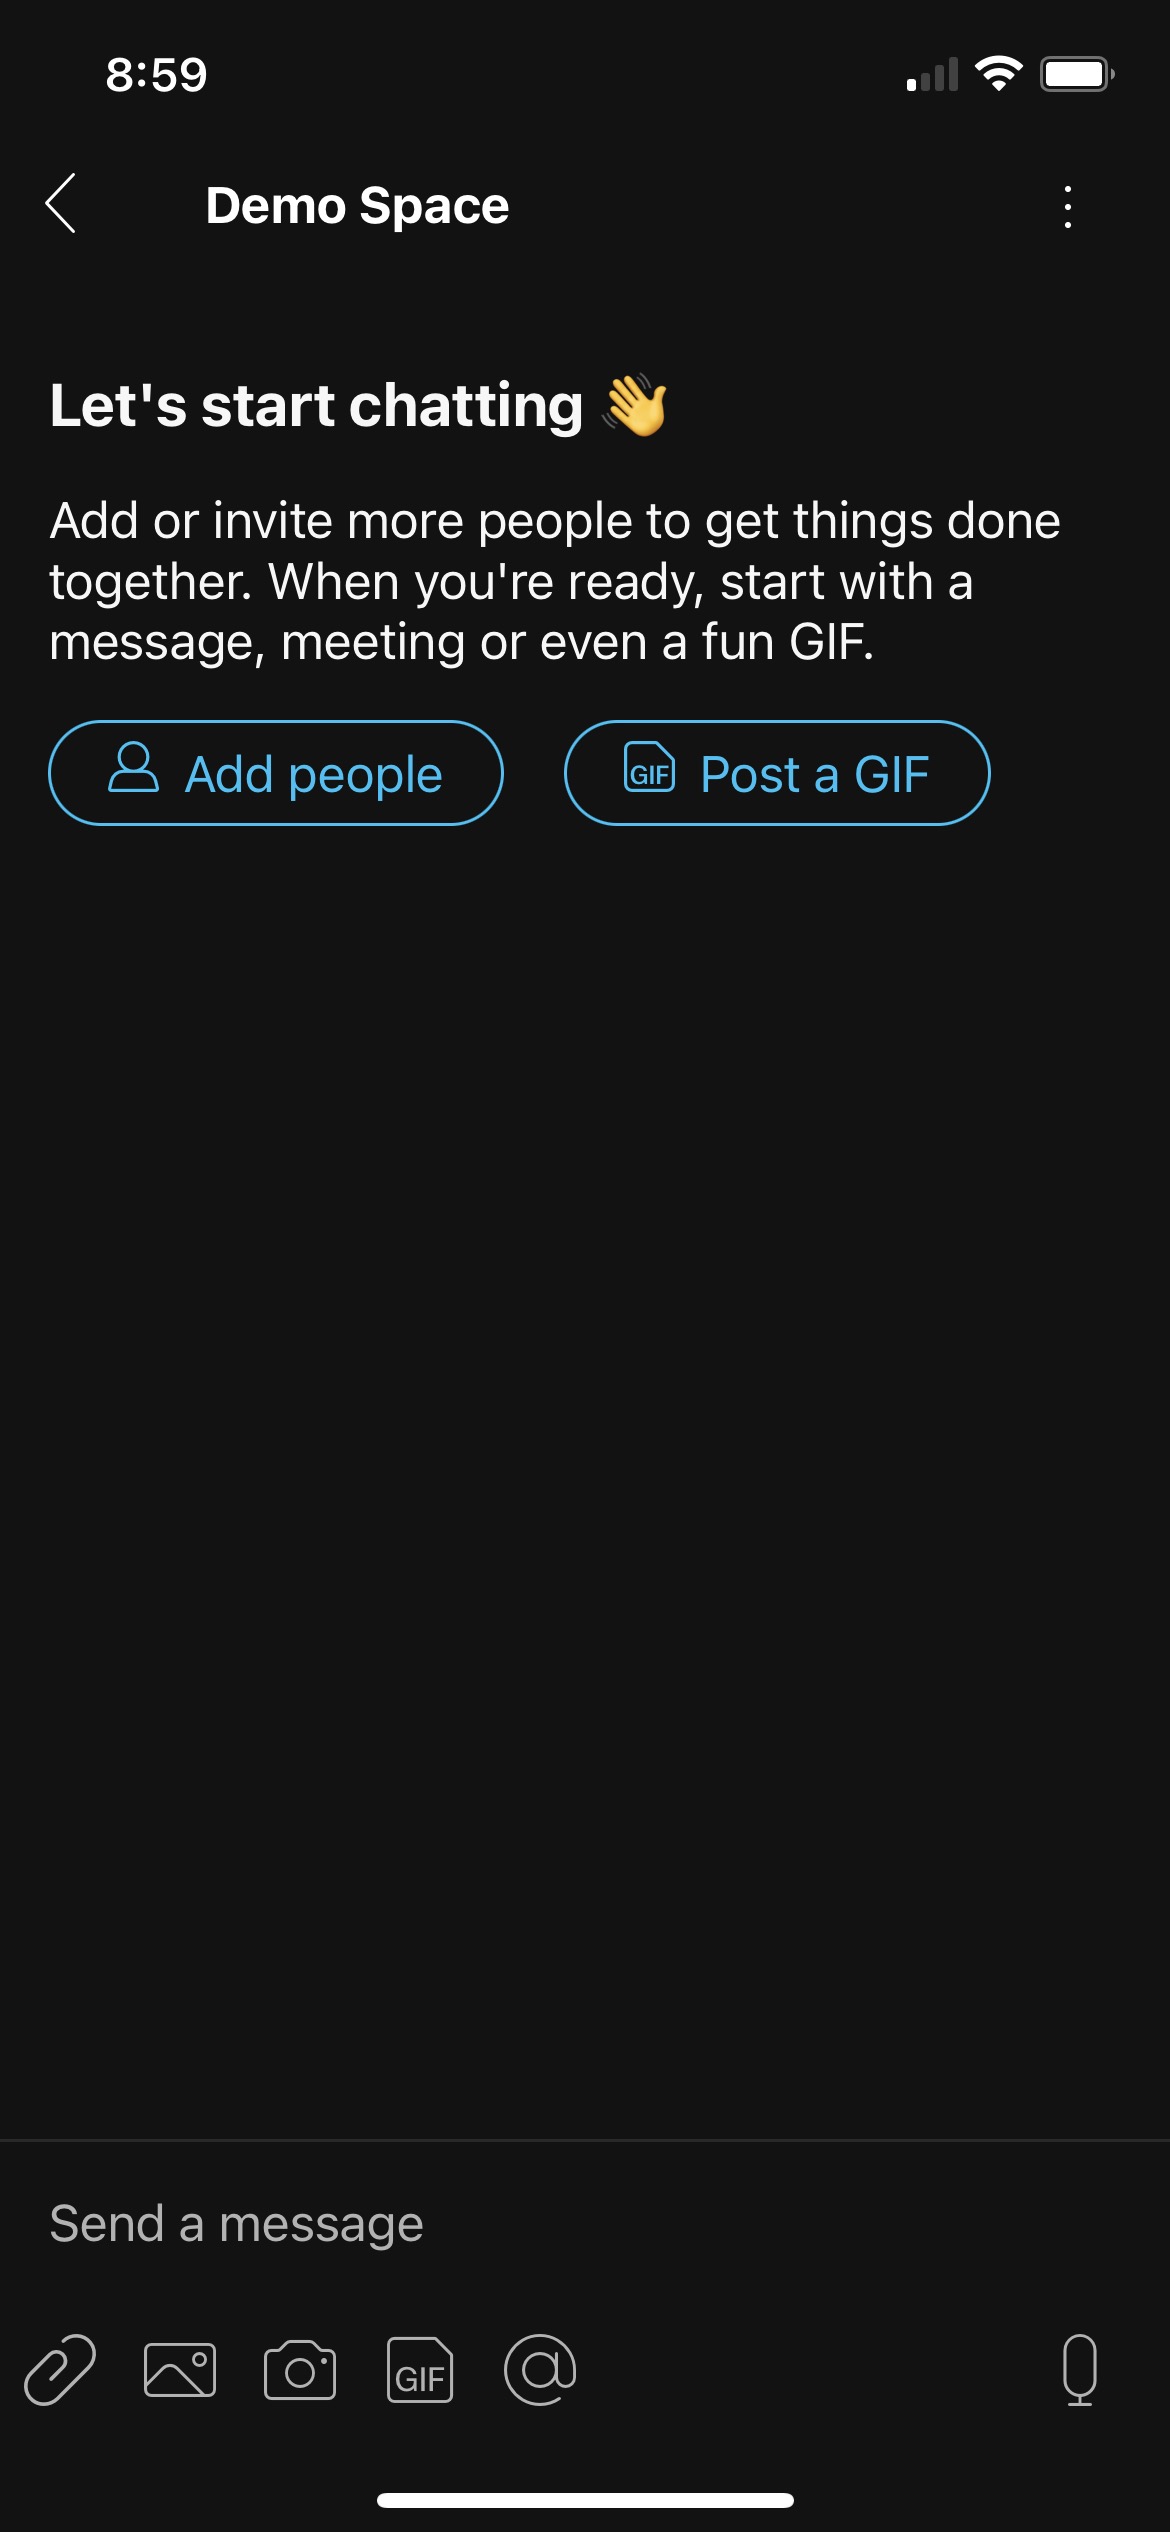
Press 'Create'.
Roles within teams and spaces
Members of a team or space can be assigned roles that control what they can and cannot do. At a high level, a person can be a team/space moderator who can add members, delete messages, and edit team/space settings. Or a person can be a team/space member who can simply participate in the team or space. External participants can be assigned moderator or member roles.
https://help.webex.com/en-us/zuwad5/Webex-Roles-on-Teams-and-Spaces
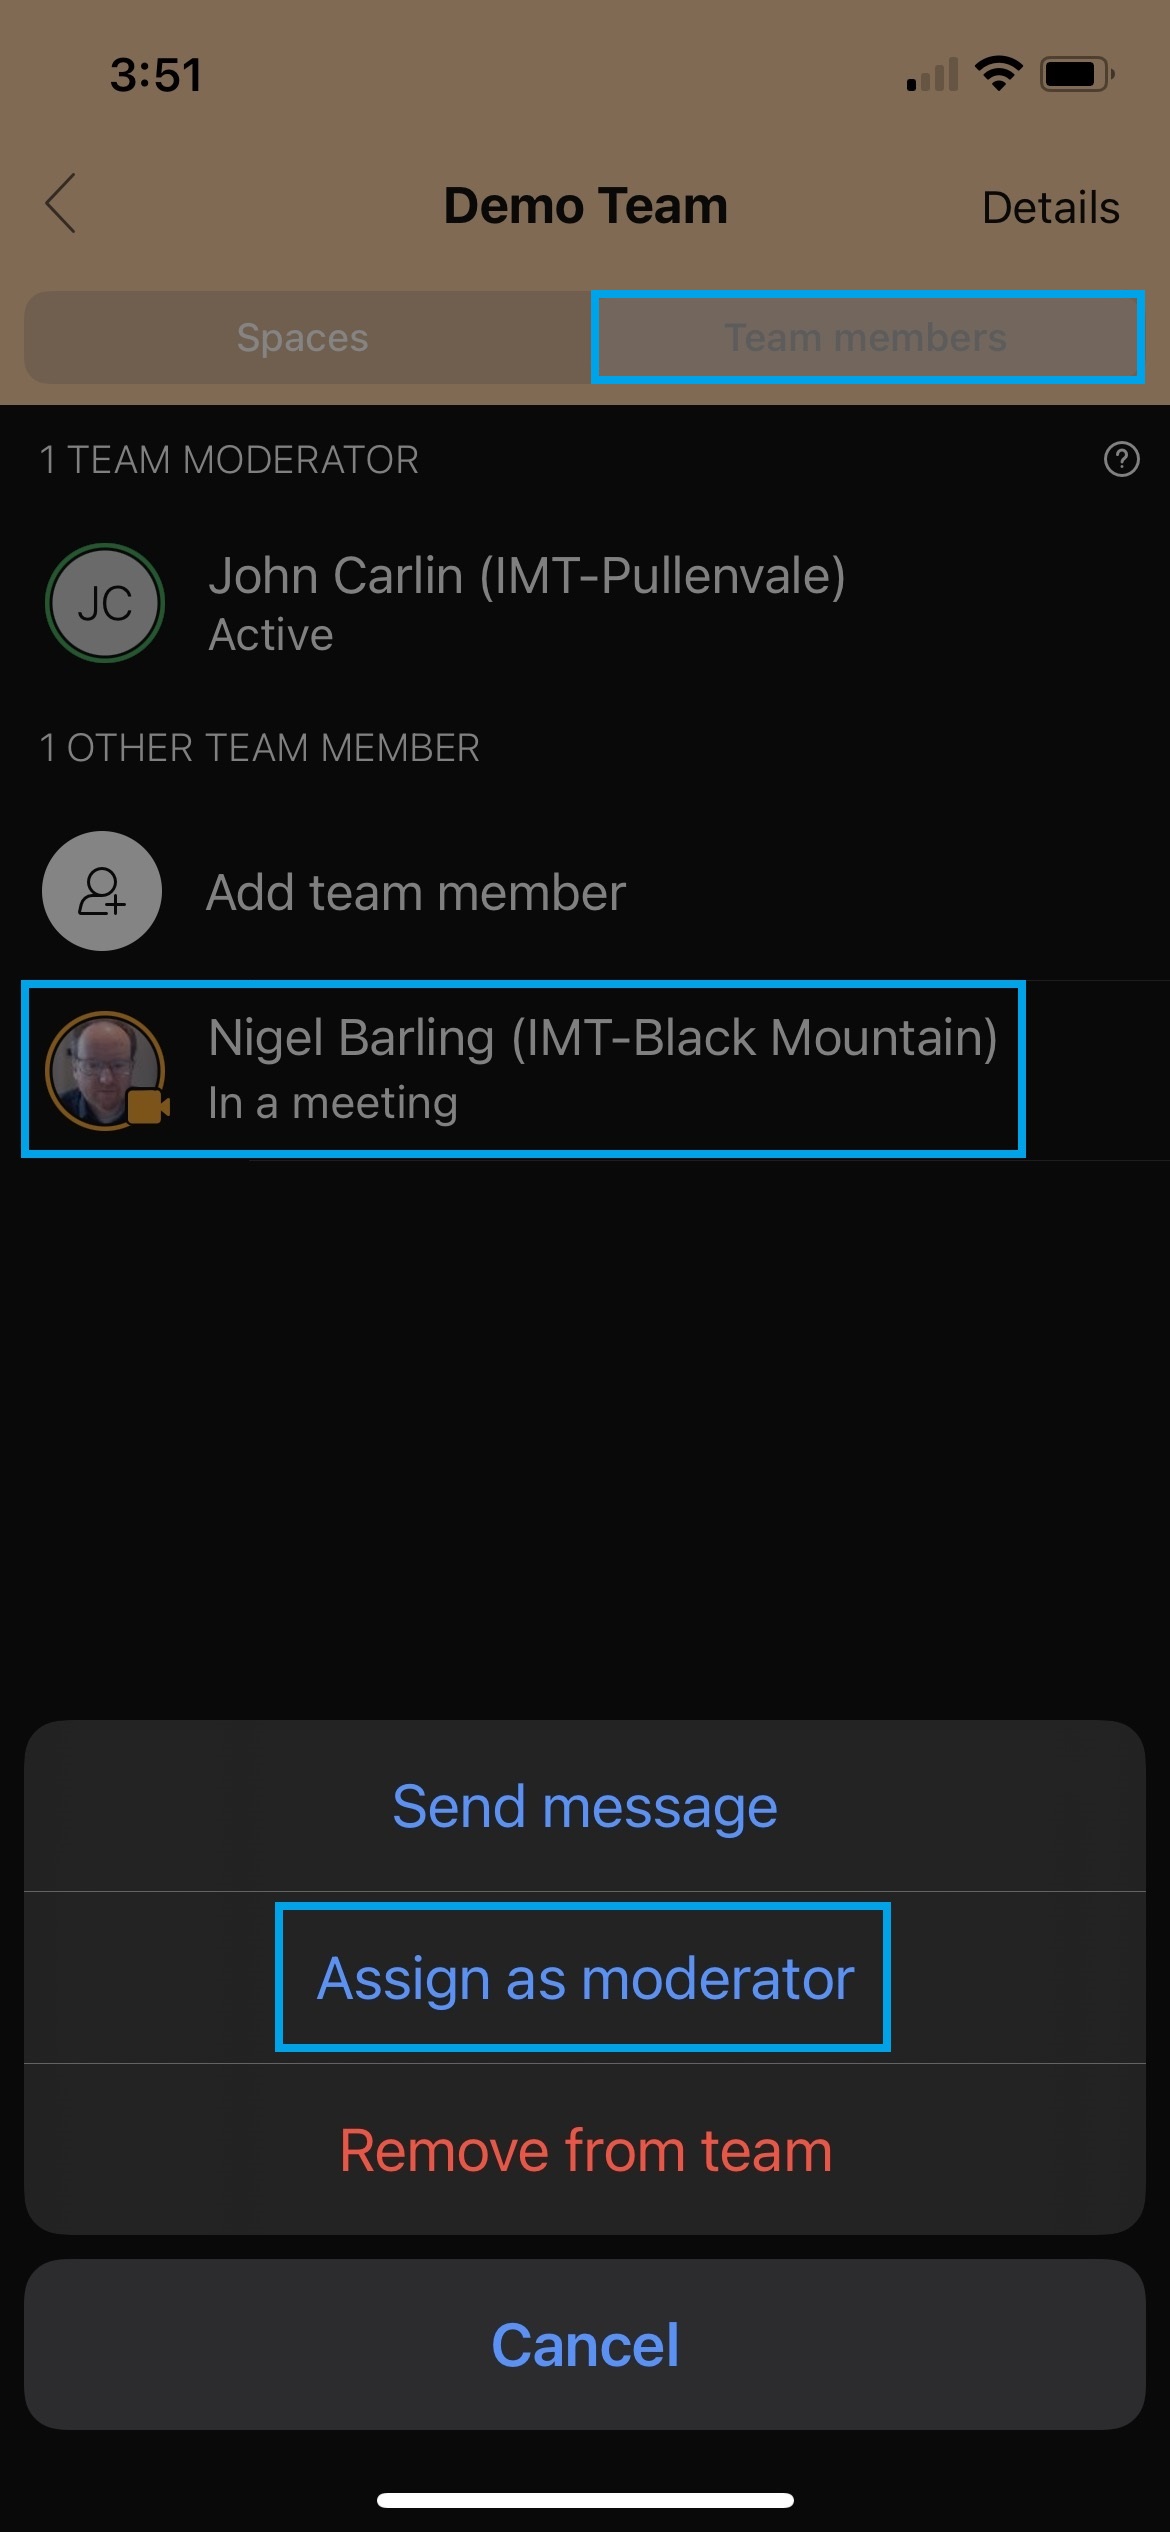
To give a team member the moderator role:
- Open the team
- Press the 'Team members' tab
- Press and hold on the person you wish to give the moderator role to
-
Press 'Assign as moderator'.
Messaging>
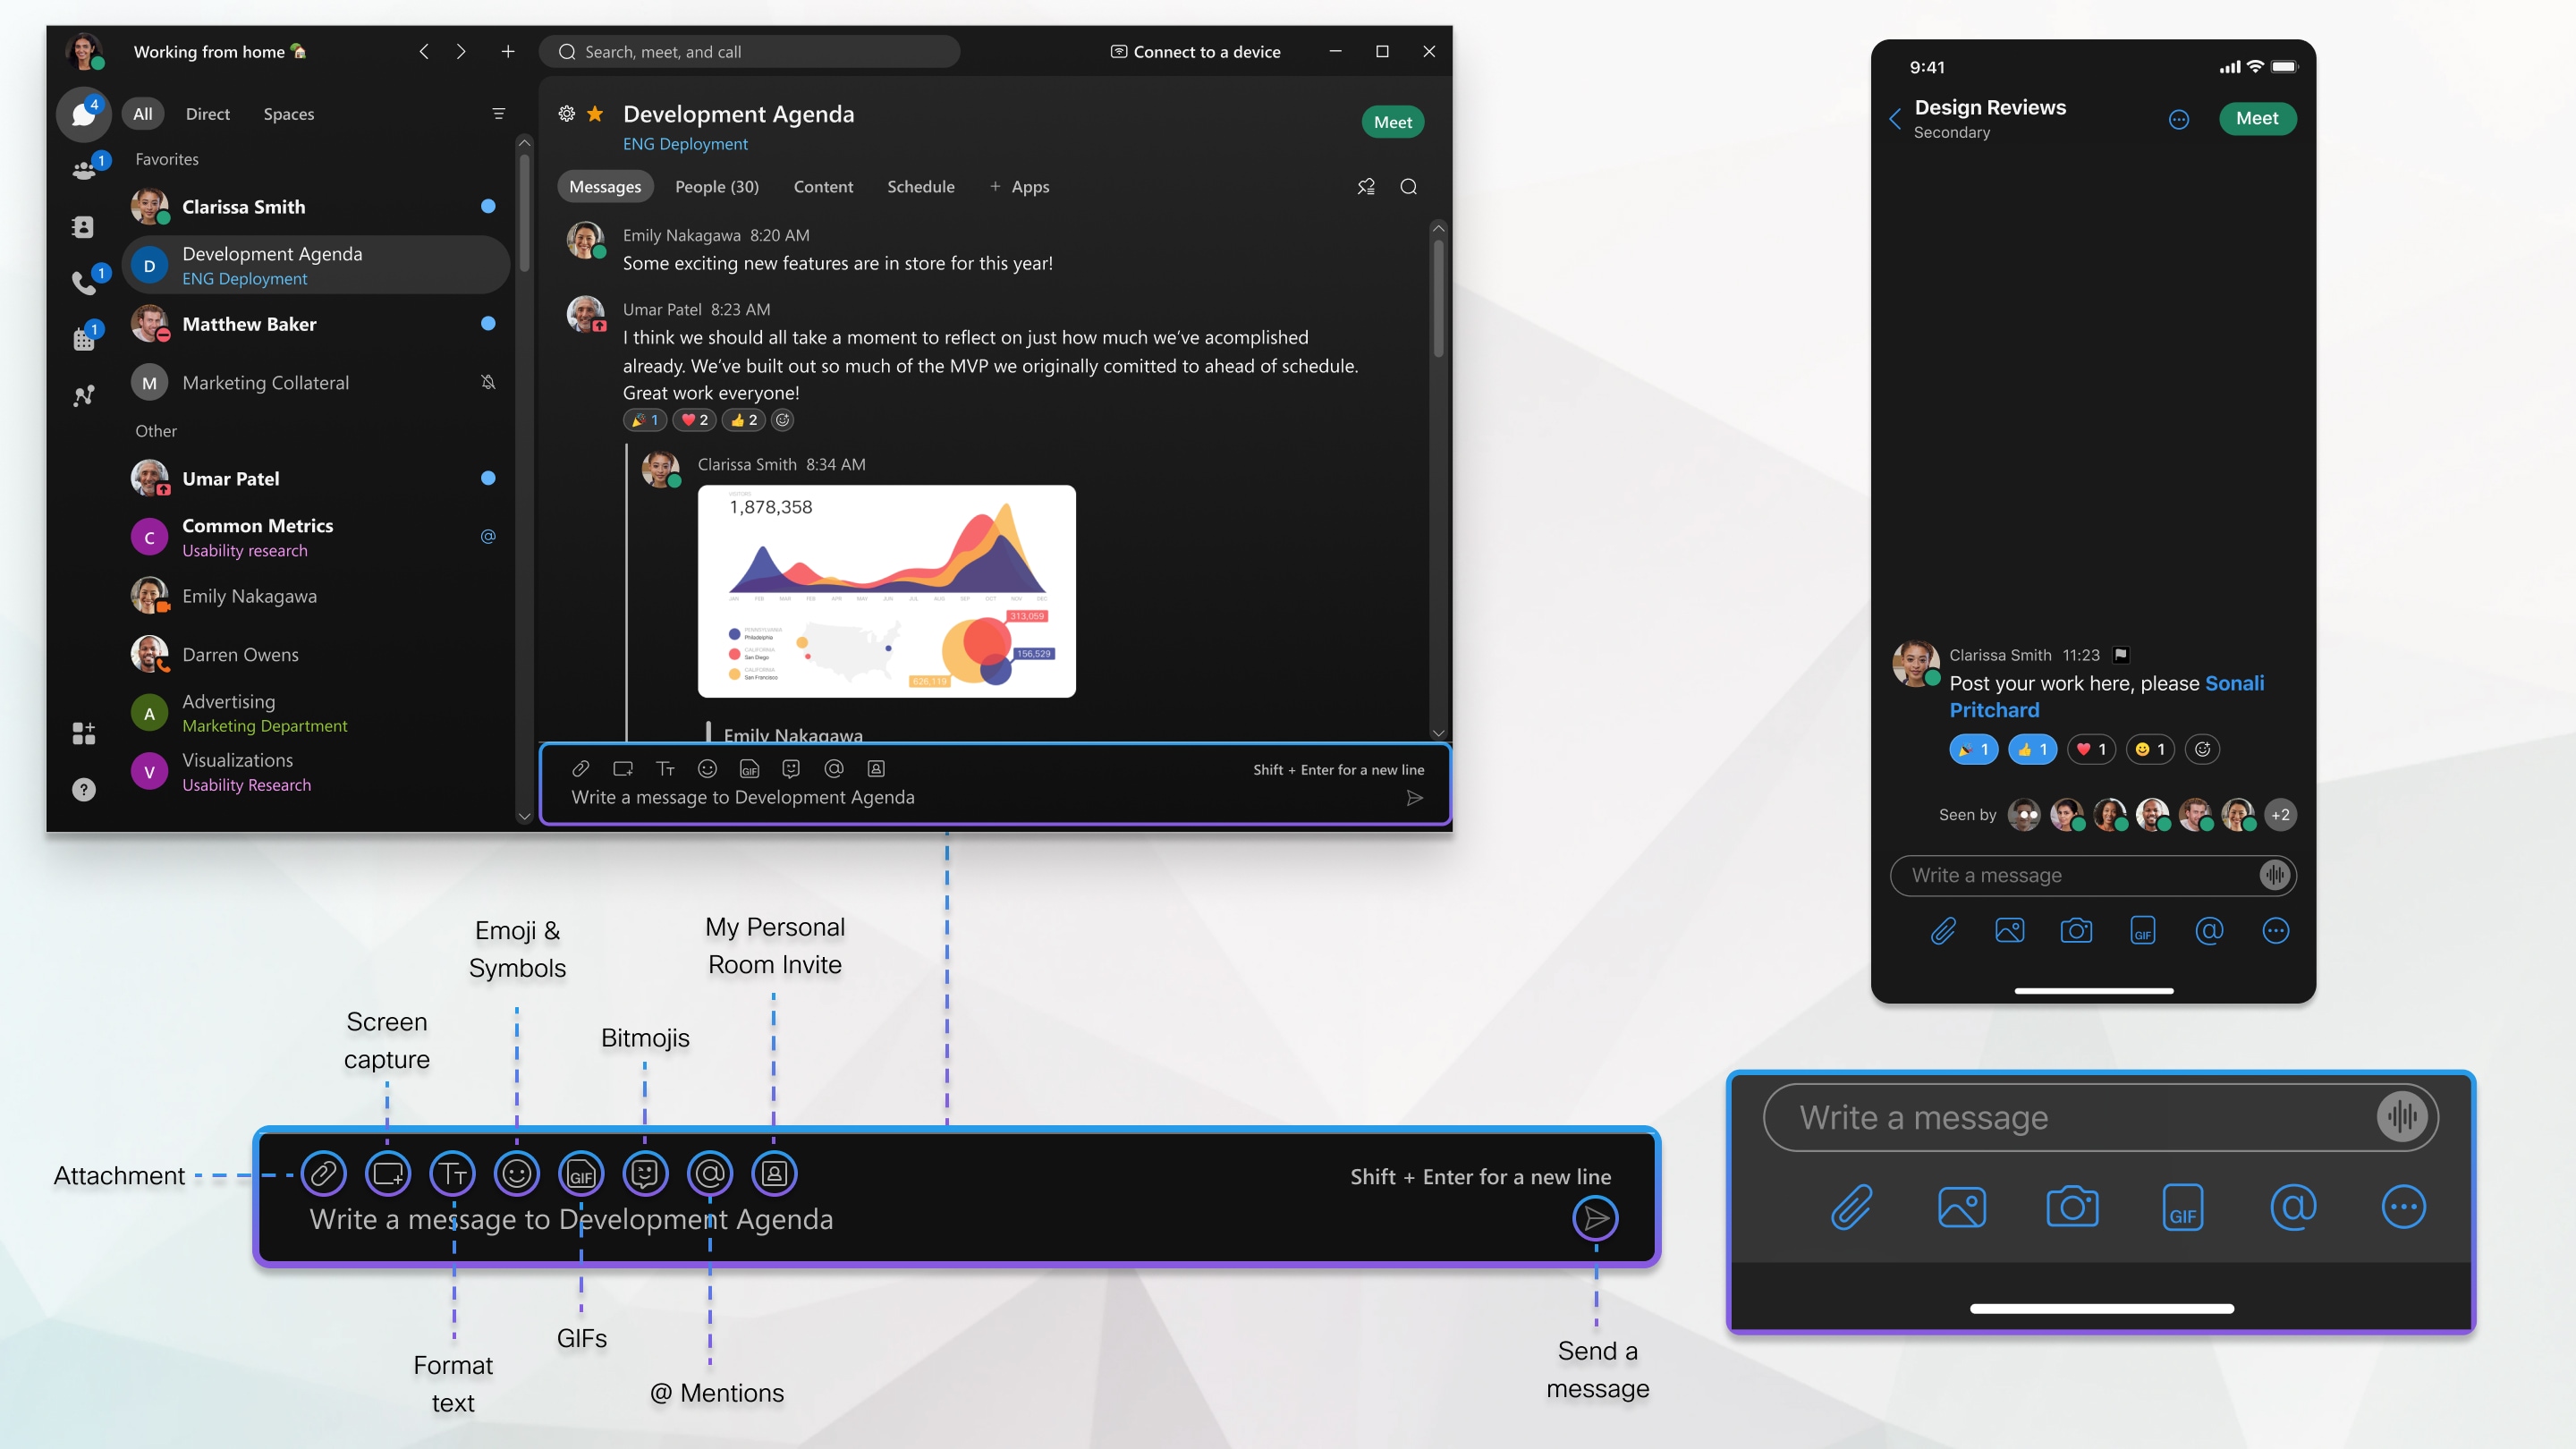
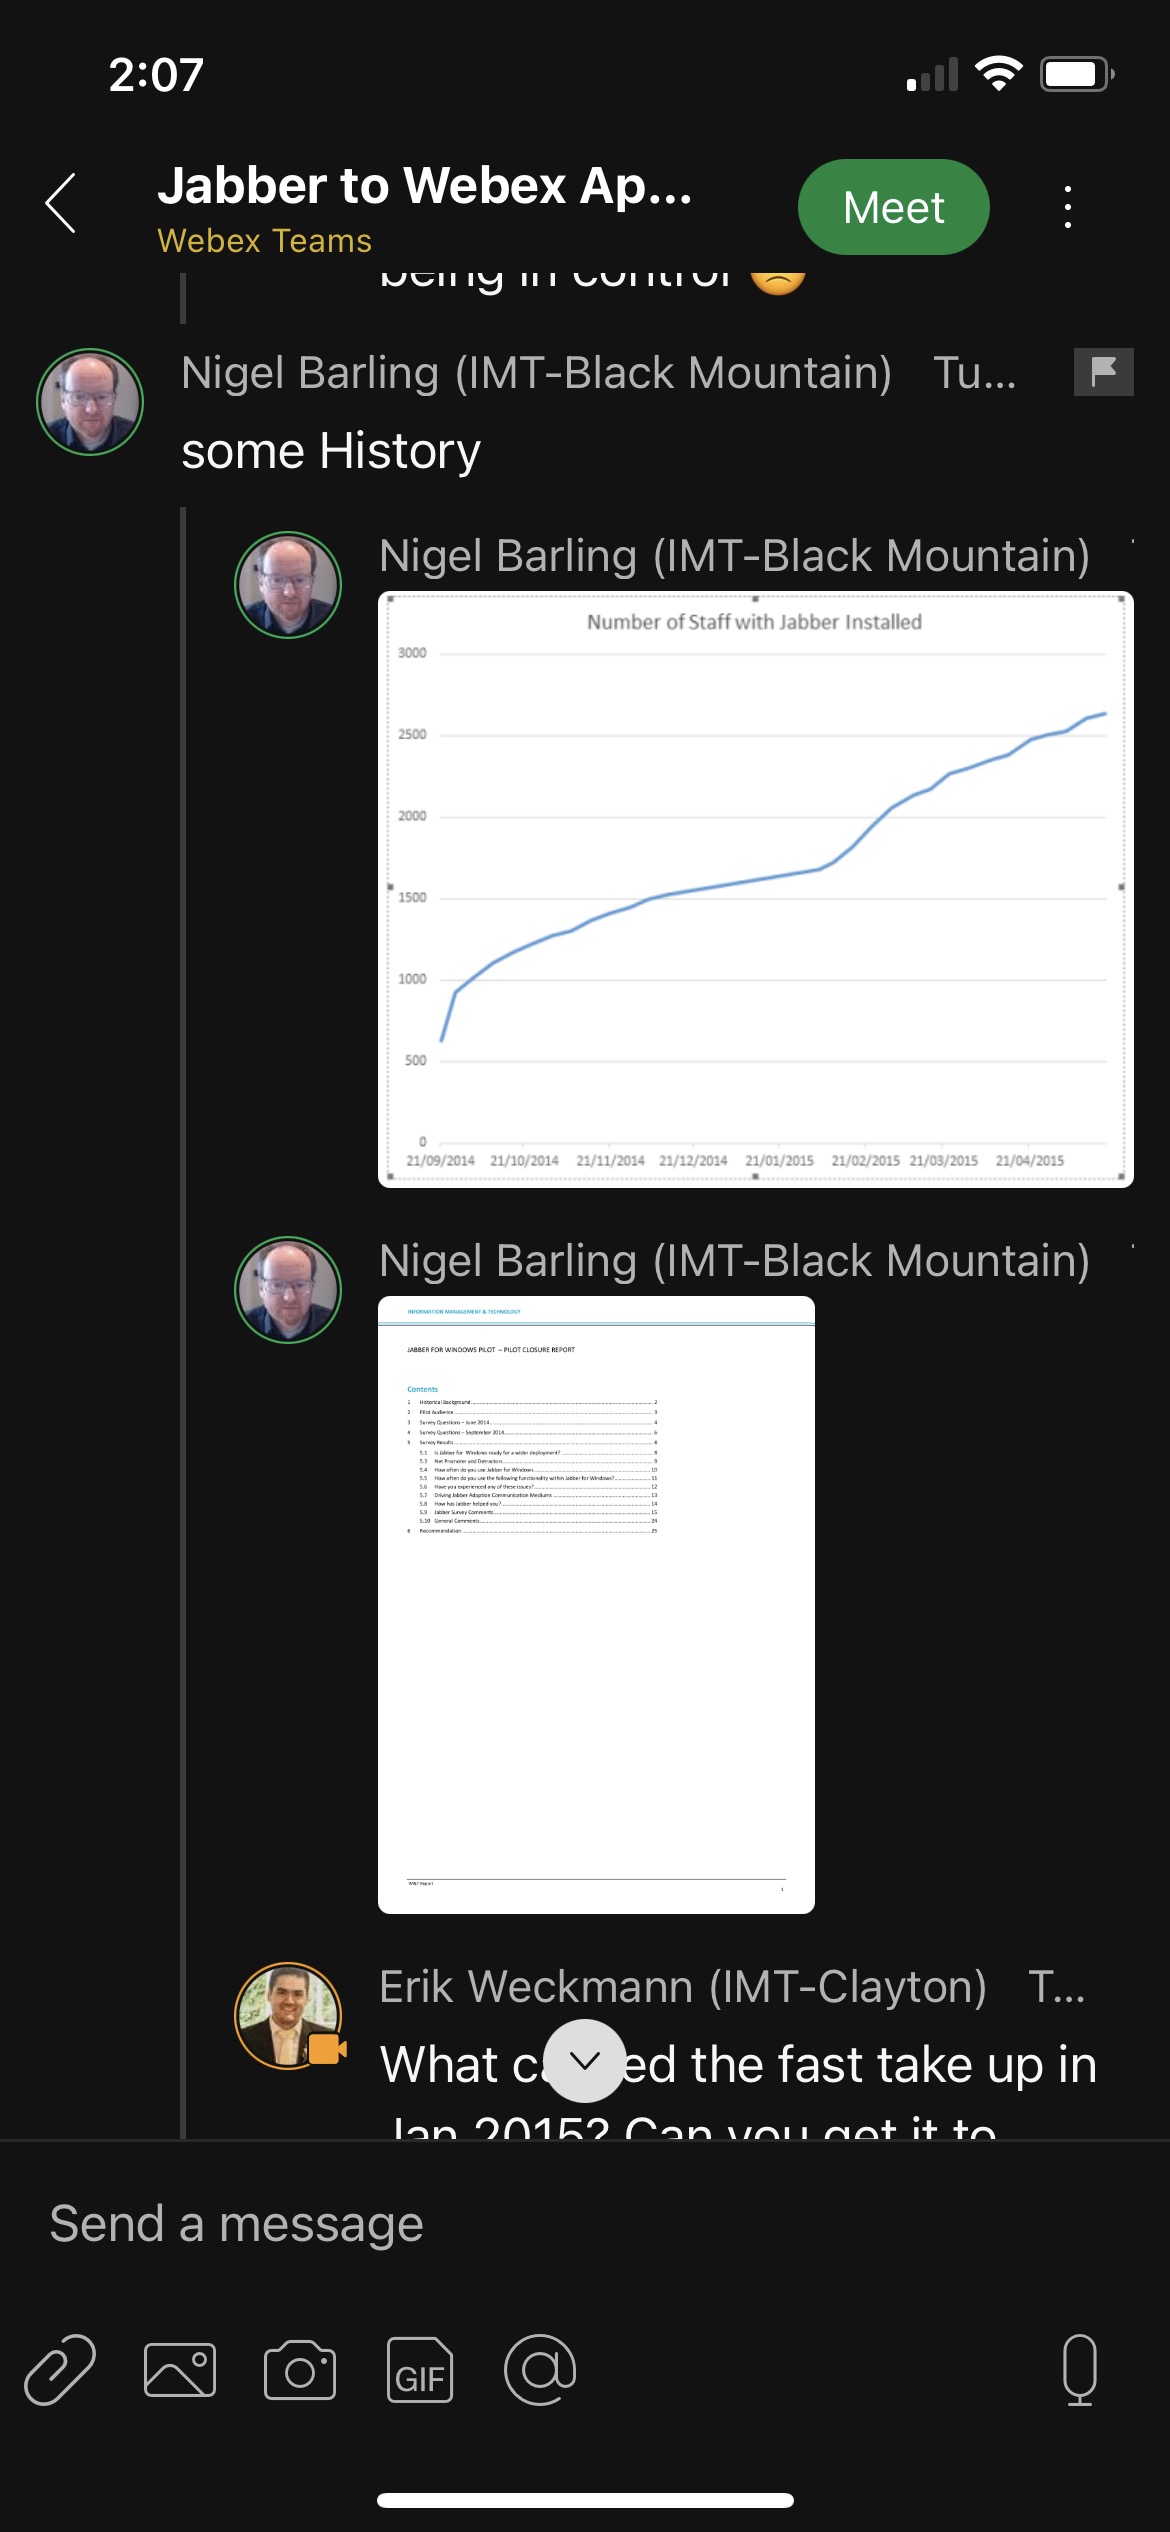
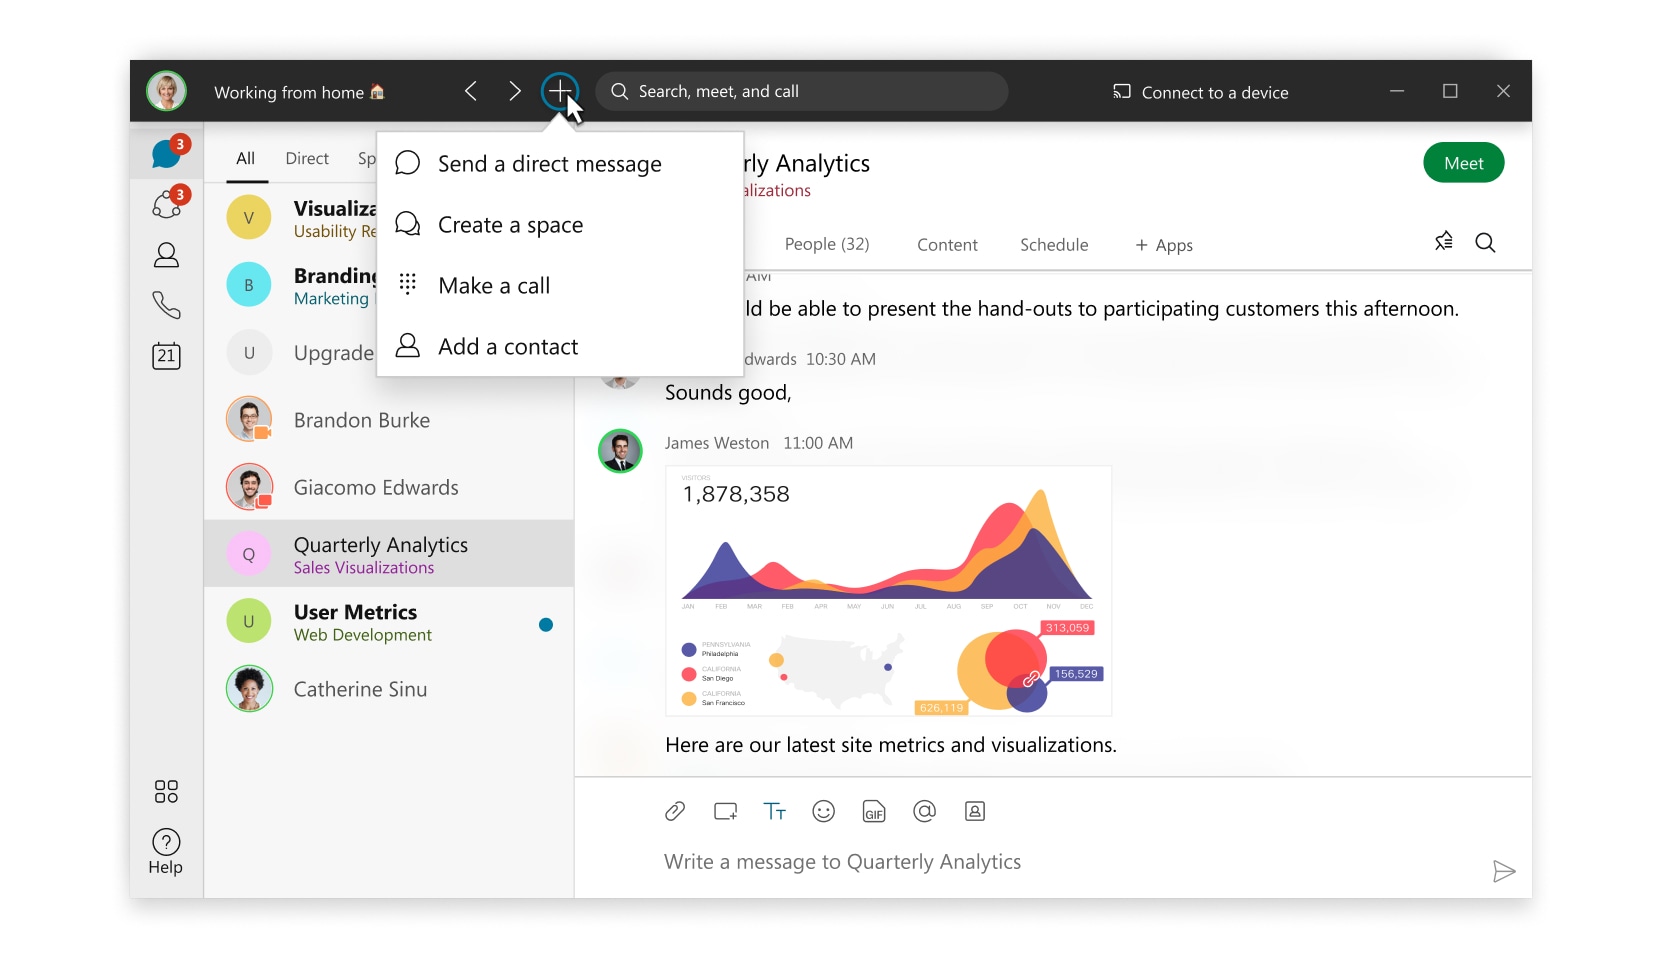
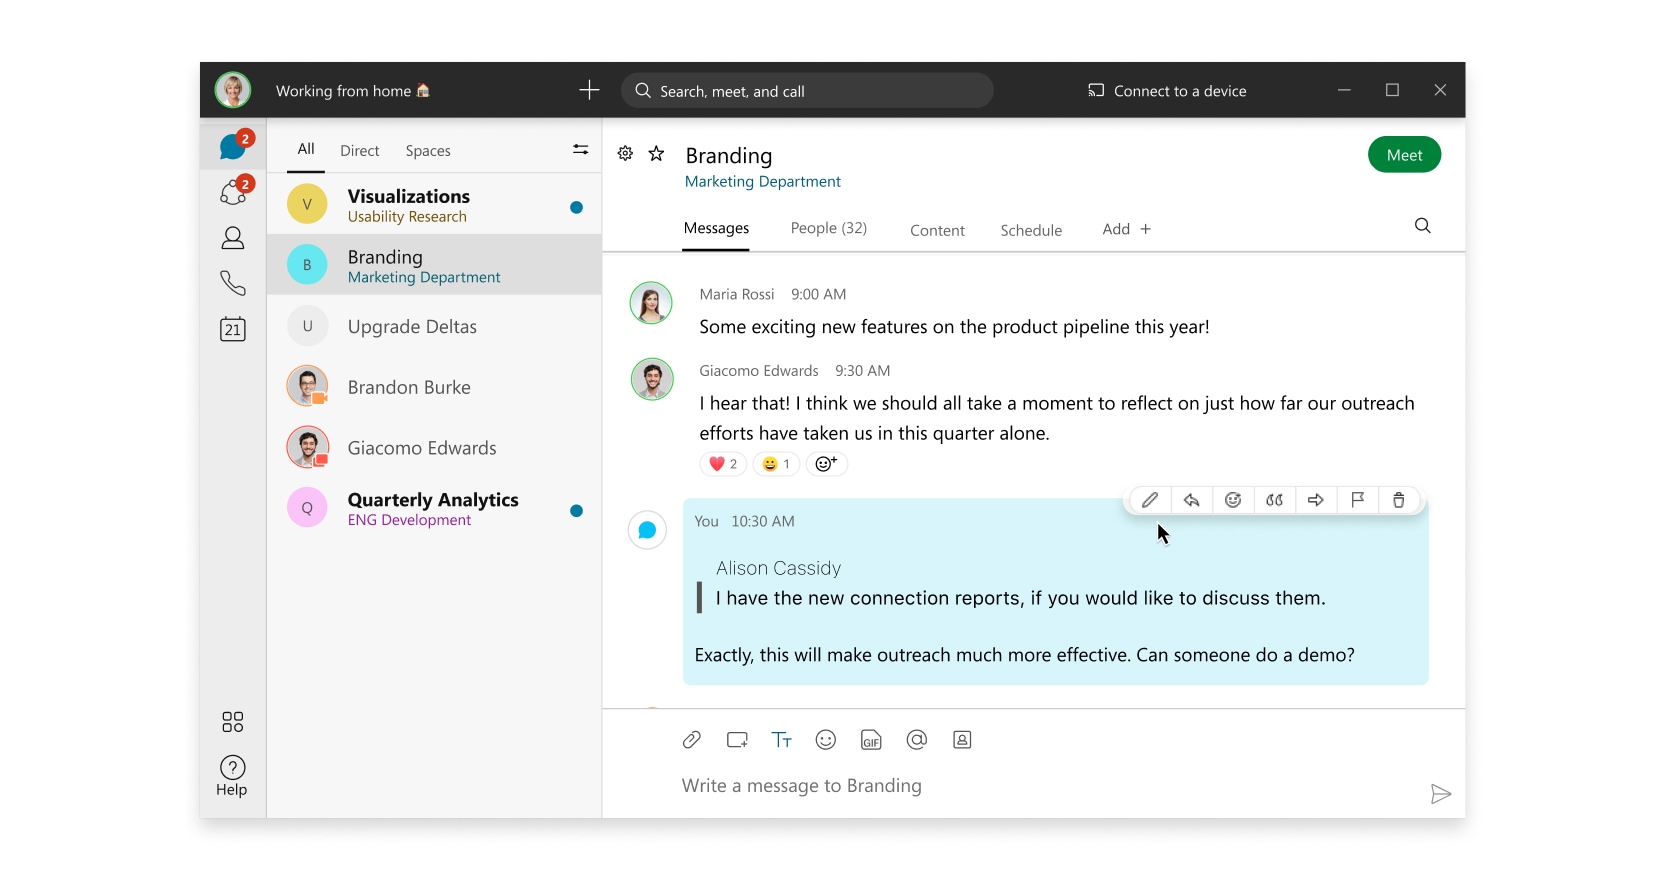
Webex App supports messaging in one-on-one and group spaces, including the ability to send files, images and GIFs. Messages can also be reacted to, quoted, or used to generate a thread. All Webex App messages are persistent meaning that you can open Webex App on different devices and see the entire history, nothing is ever lost.
https://help.webex.com/en-us/nuayvai/Webex-Messaging
Searching for messages, files, people or spaces>
You can search Webex App for messages or files sent or received in a particular space, or in any space. You can also search for people or spaces.
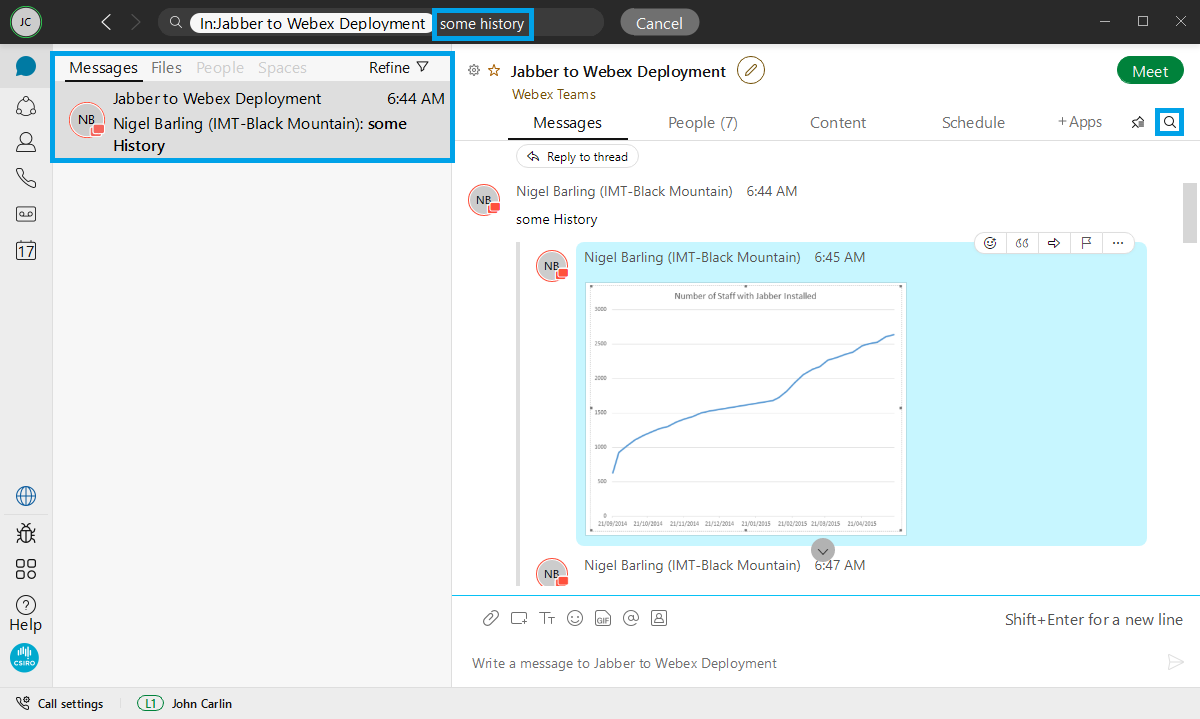
To search a particular space for messages or files:
- Click the search icon located in the top right corner of the space
- Enter a search term
-
Filter results as required, then click on a result to view the message or file in context.
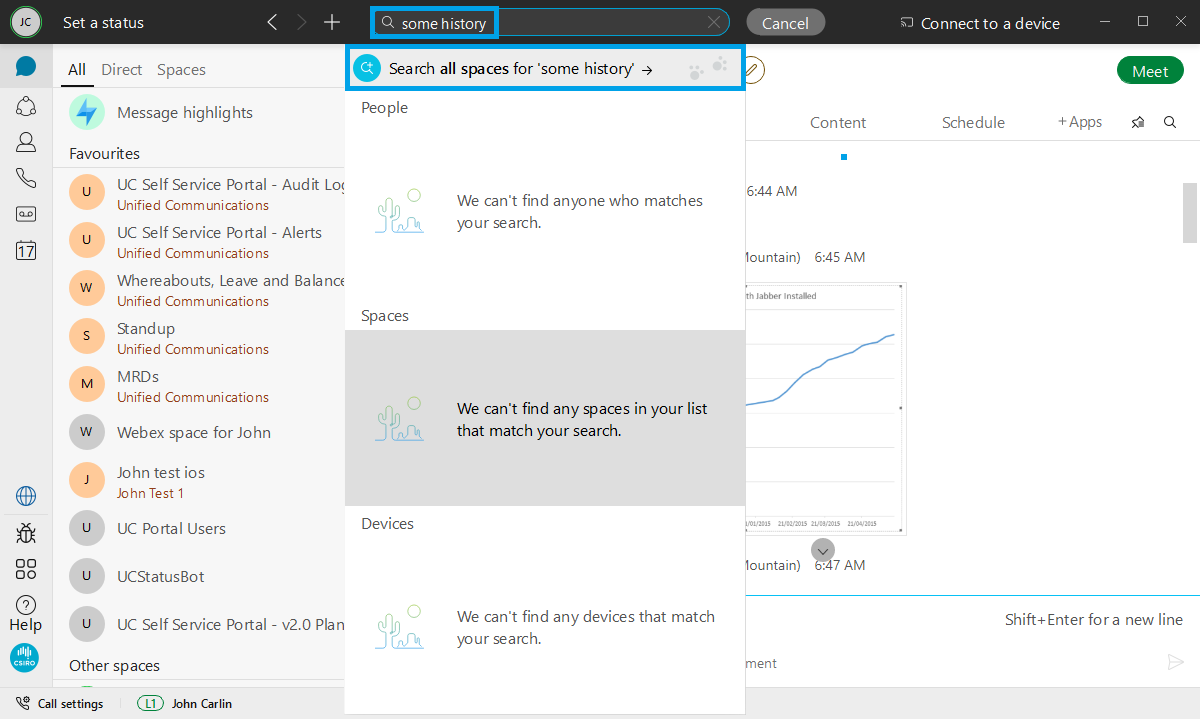
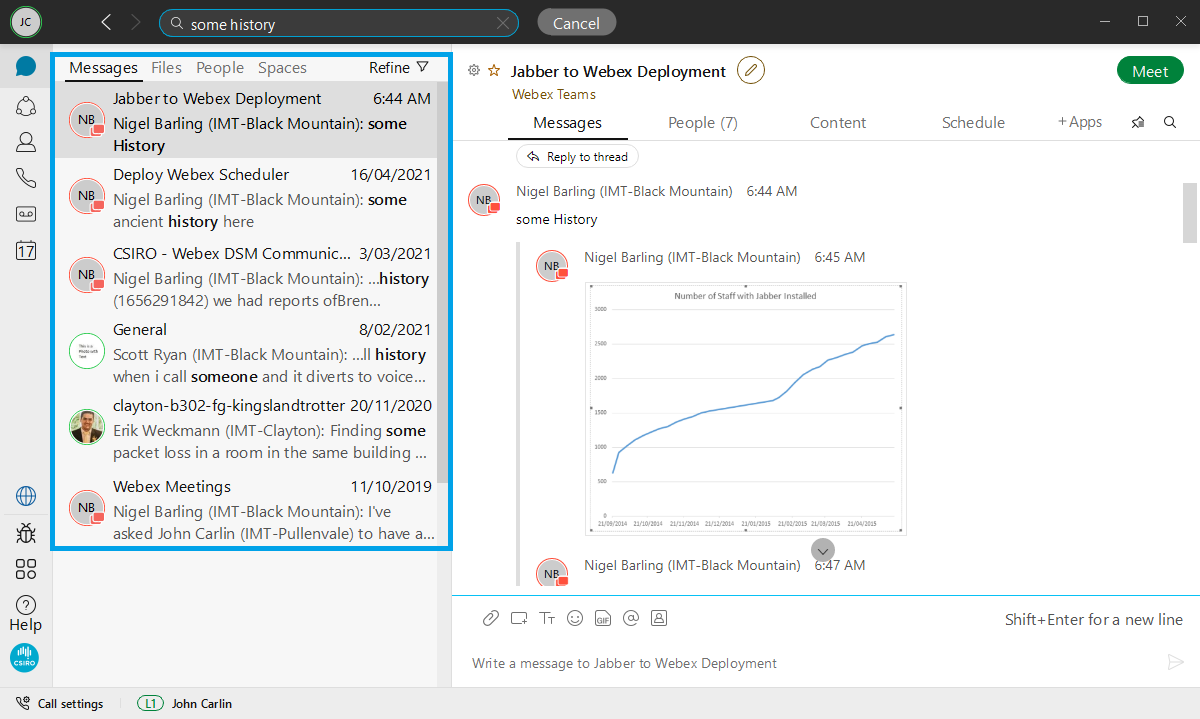
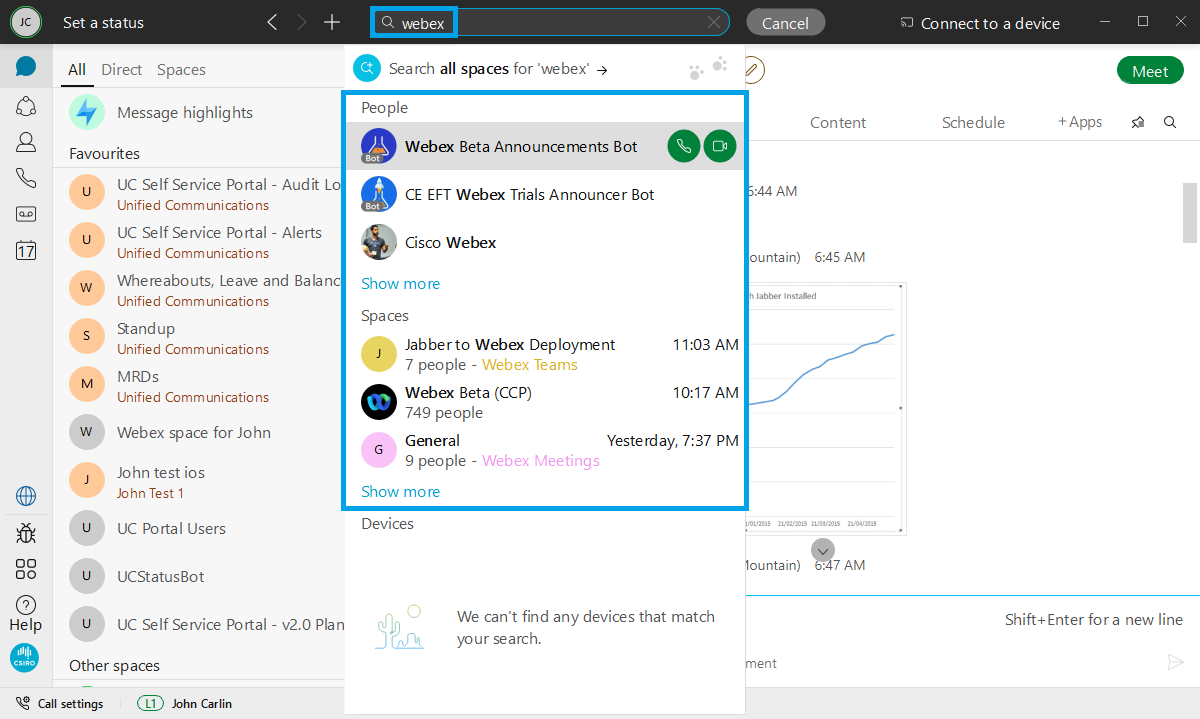
To search all spaces for messages or files:
- Enter a search term in the main search bar
- Click 'Search all spaces...'
-
Filter results as required, then click on a result to view the message or file in context.
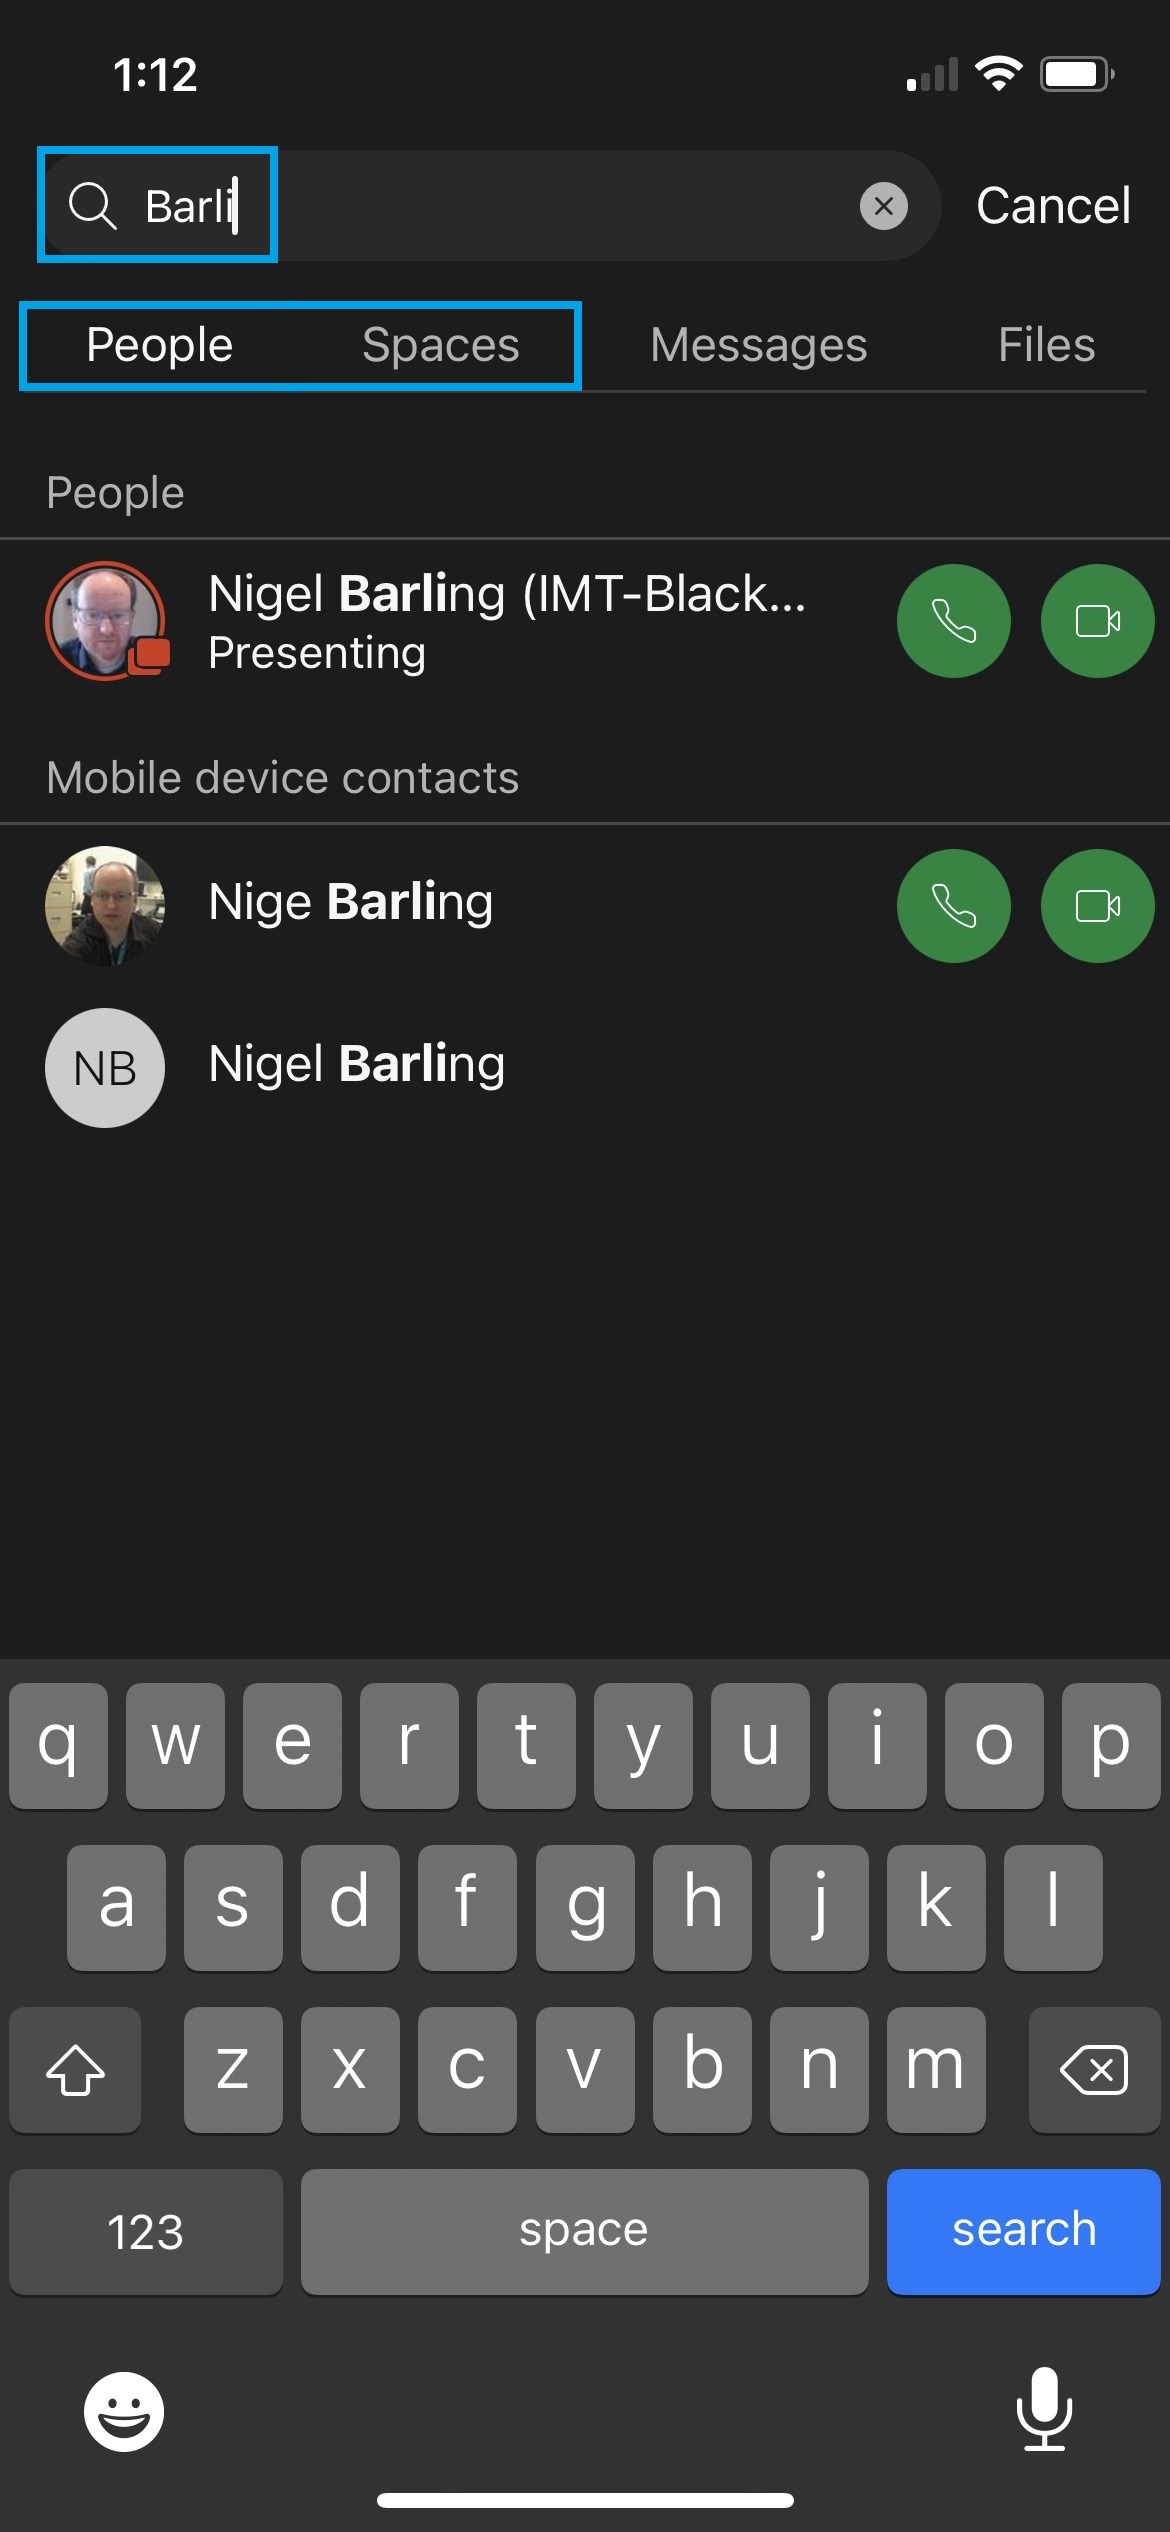
To search for people or spaces:
- Enter a search term in the main search bar
-
Click on a person or space to open that space.
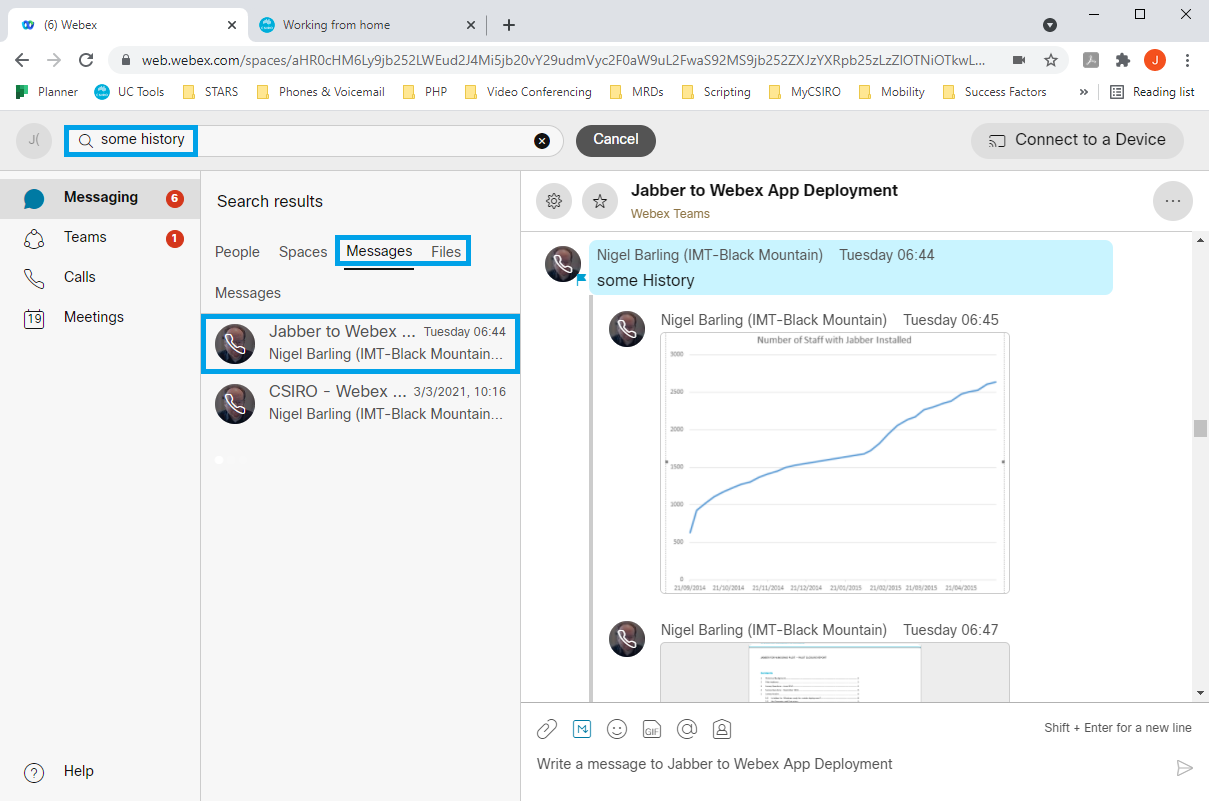
You can search Webex App for messages or files sent or received in any space. You can also search for people or spaces.
To search for messages or files:
- Enter a search term in the search bar
- Click the 'Messages' or 'Files' filter
-
Click on a result to view the message or file in context.
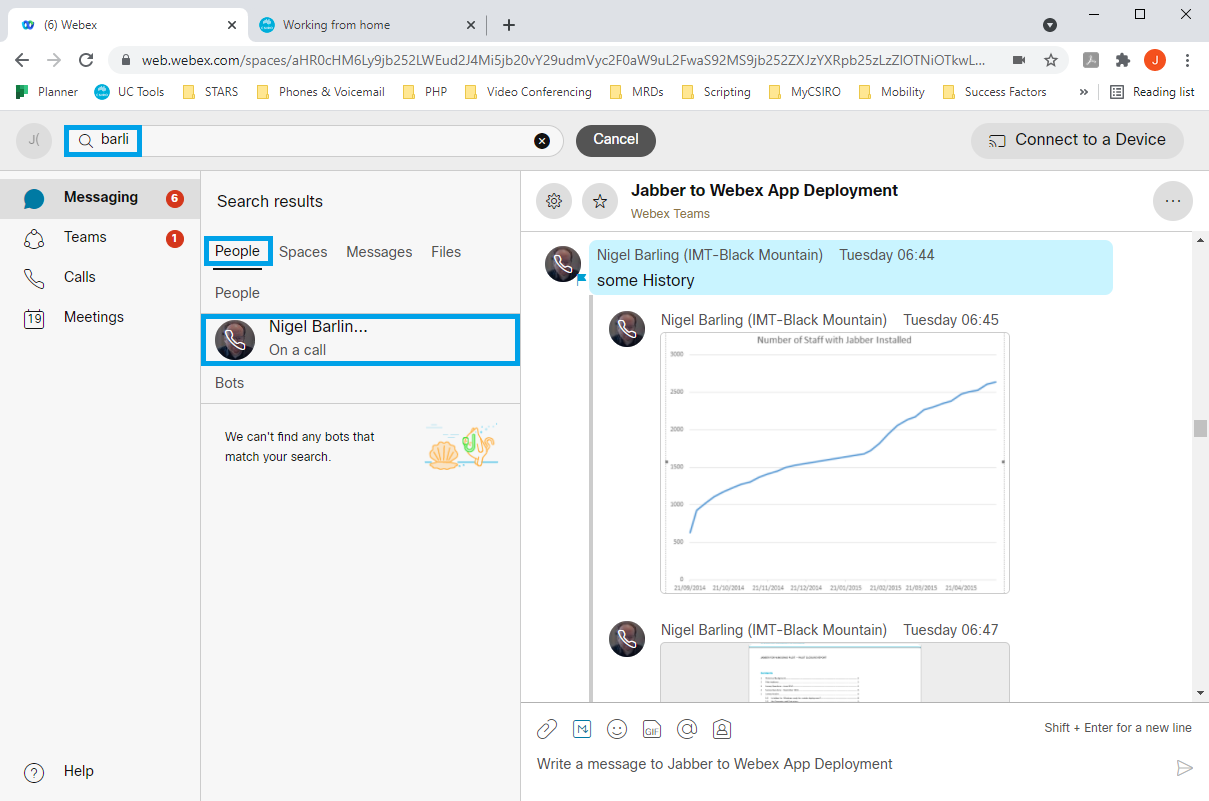
To search for people or spaces:
- Enter a search term in the search bar
- Click the 'People' or 'Spaces' filter
-
Click on a person or space to open that space.
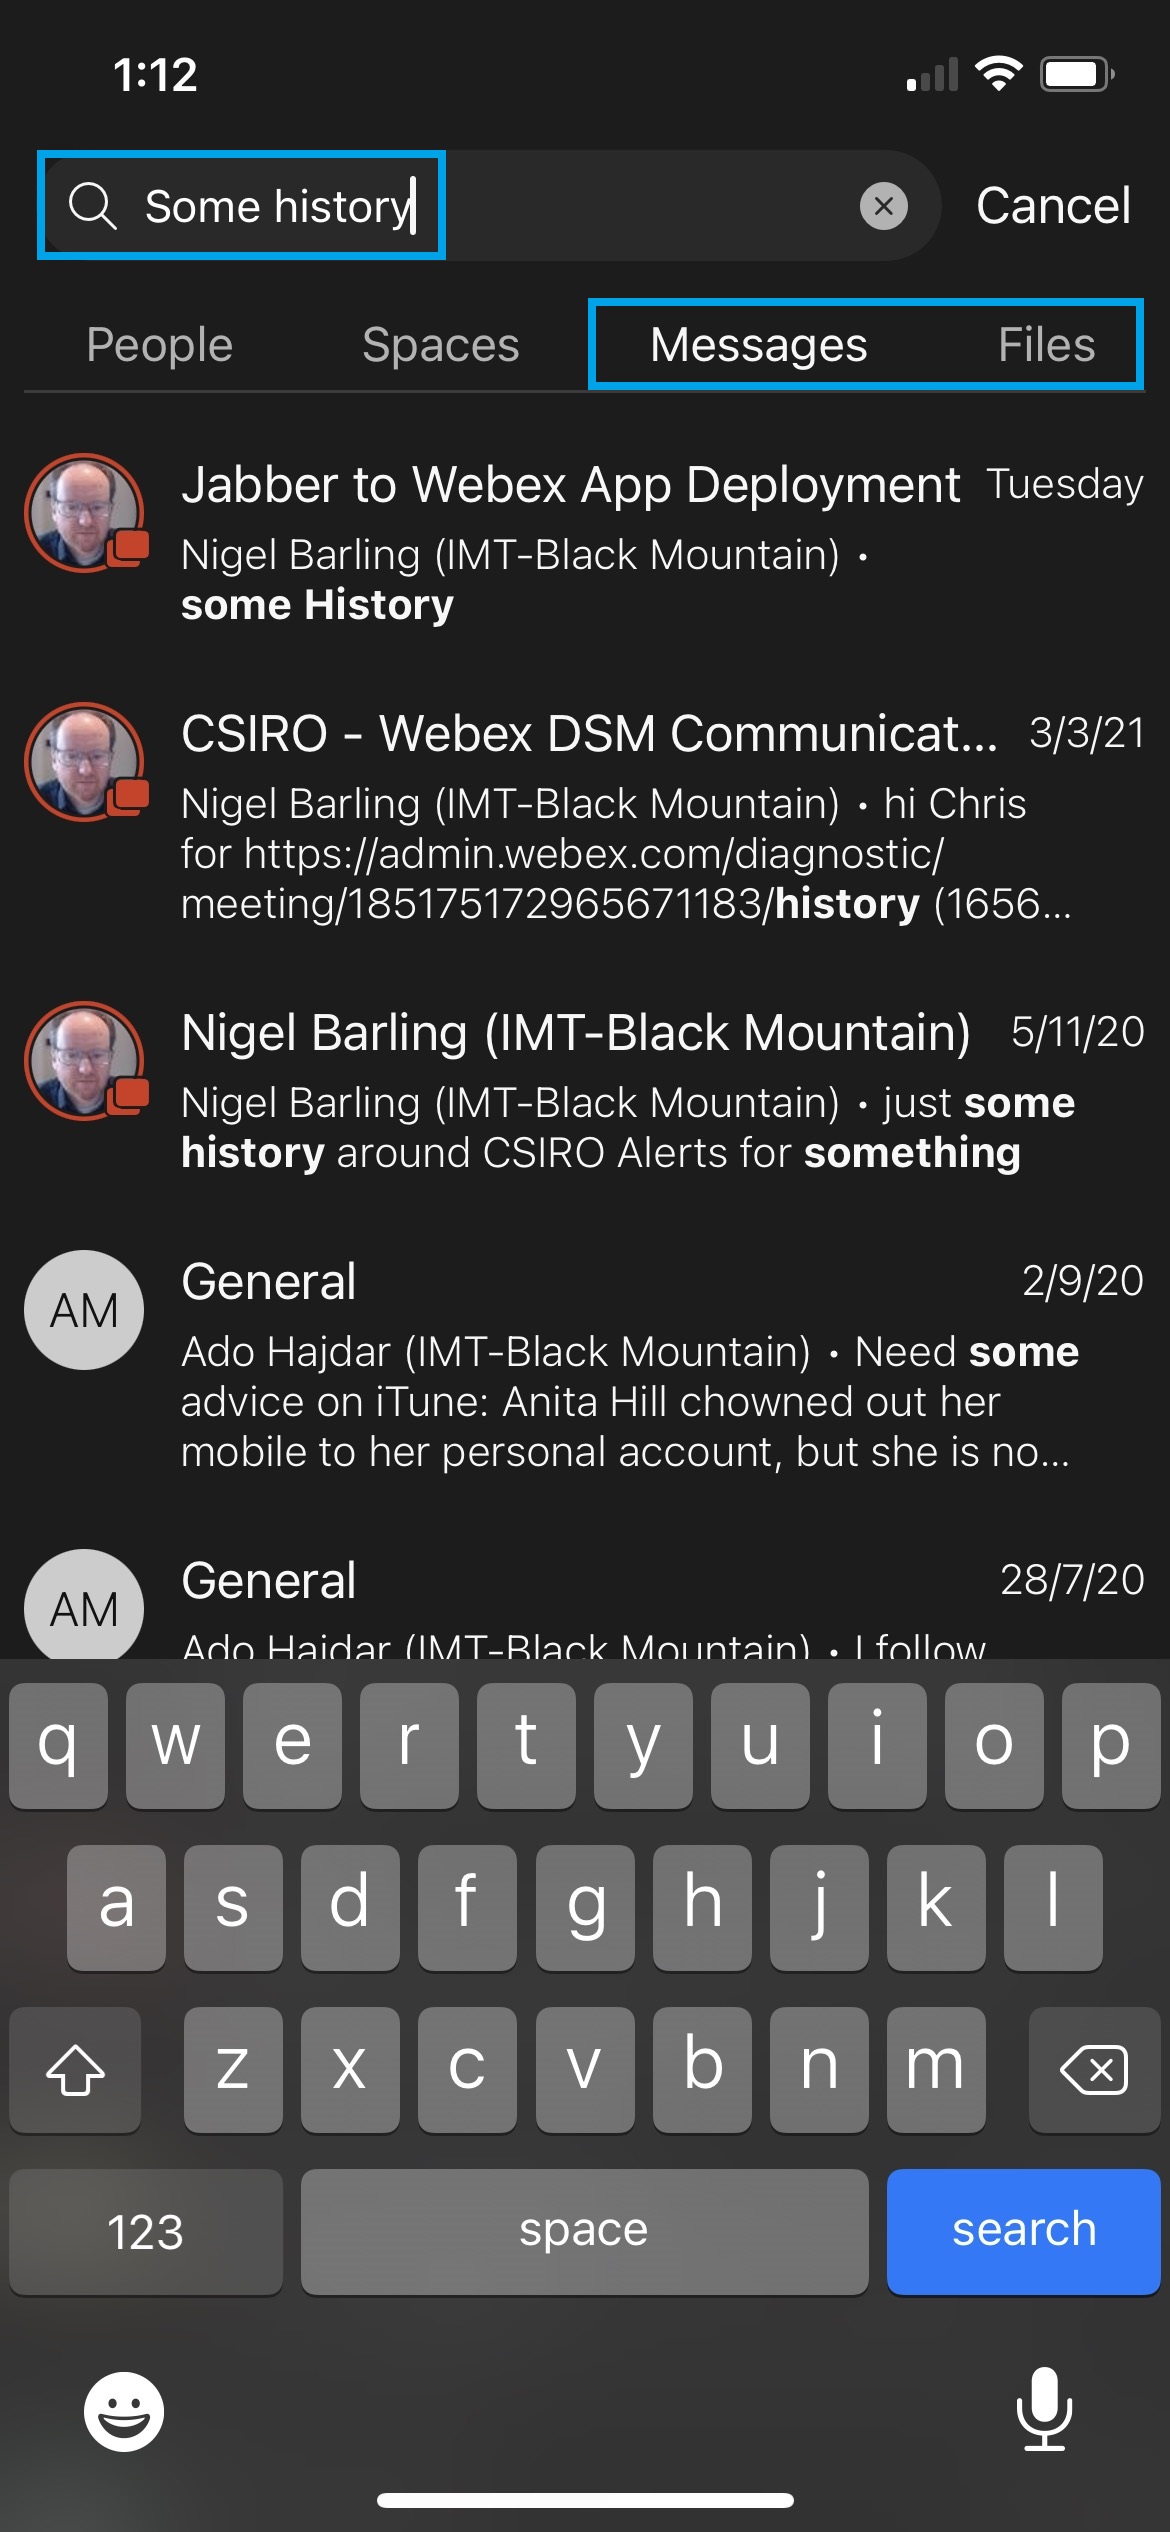
You can search Webex App for messages or files sent or received in any space. You can also search for people or spaces.
To search for messages or files:
- Enter a search term in the main search bar
- Select the 'Messages' or 'Files' filter
-
Select a result to view the message or file in context.
To search for people or spaces:
- Enter a search term in the main search bar
- Select the 'People' or 'Spaces' filter
-
Select a person or space to open that space.
Calling>
Webex App can be used to place and receive audio and video calls with contacts and external phone numbers.
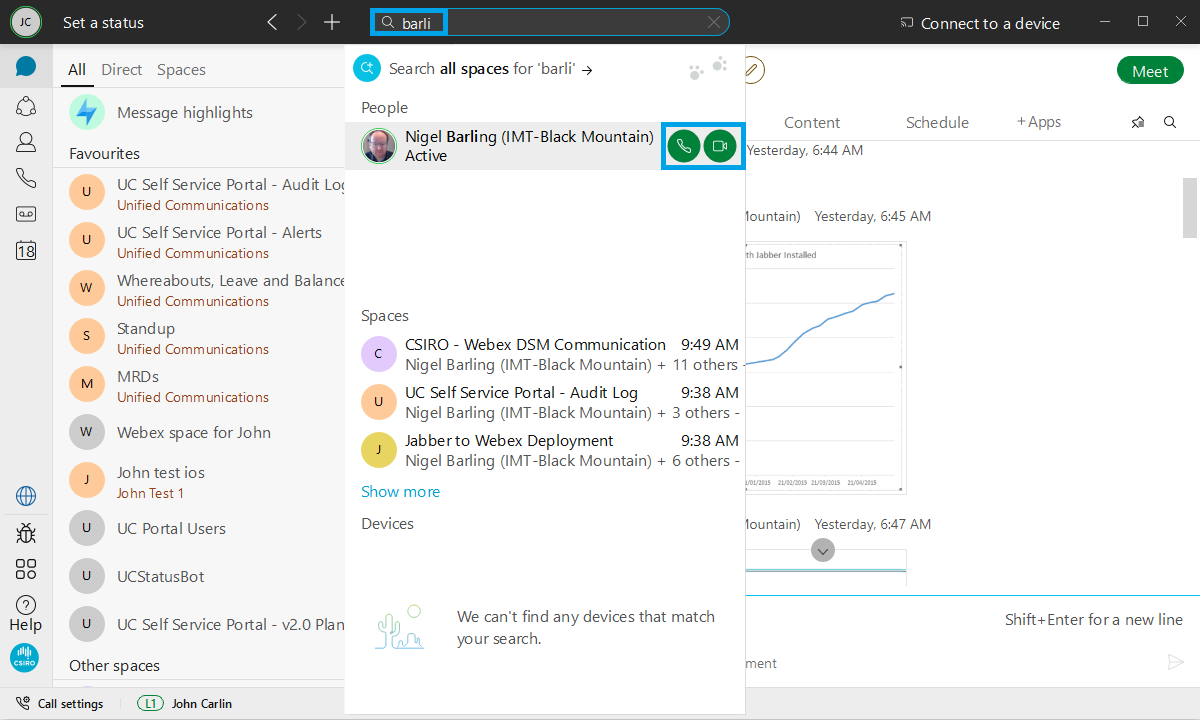
To call a contact:
- Search for the contact by typing their name in the search bar
-
Click the audio or video call button to start the call
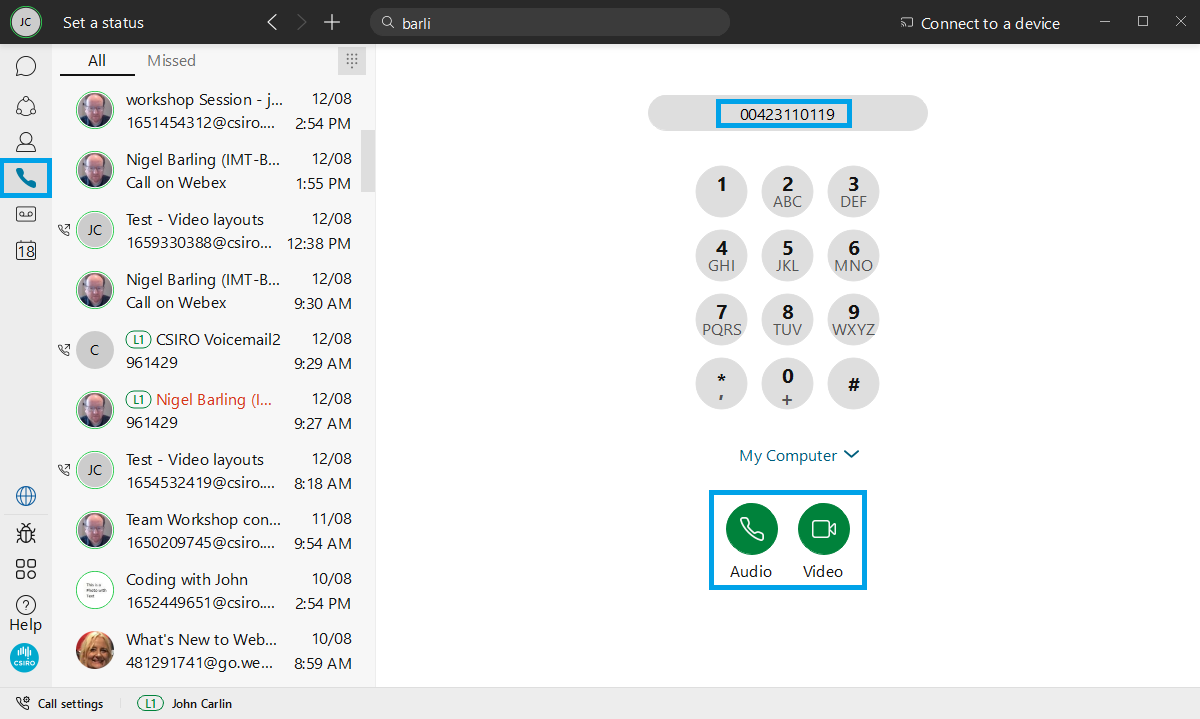
To dial a phone number:
- Select the 'Calling' tab
- Enter the number you wish to call
-
Click the audio or video call button to start the call
Call forwarding
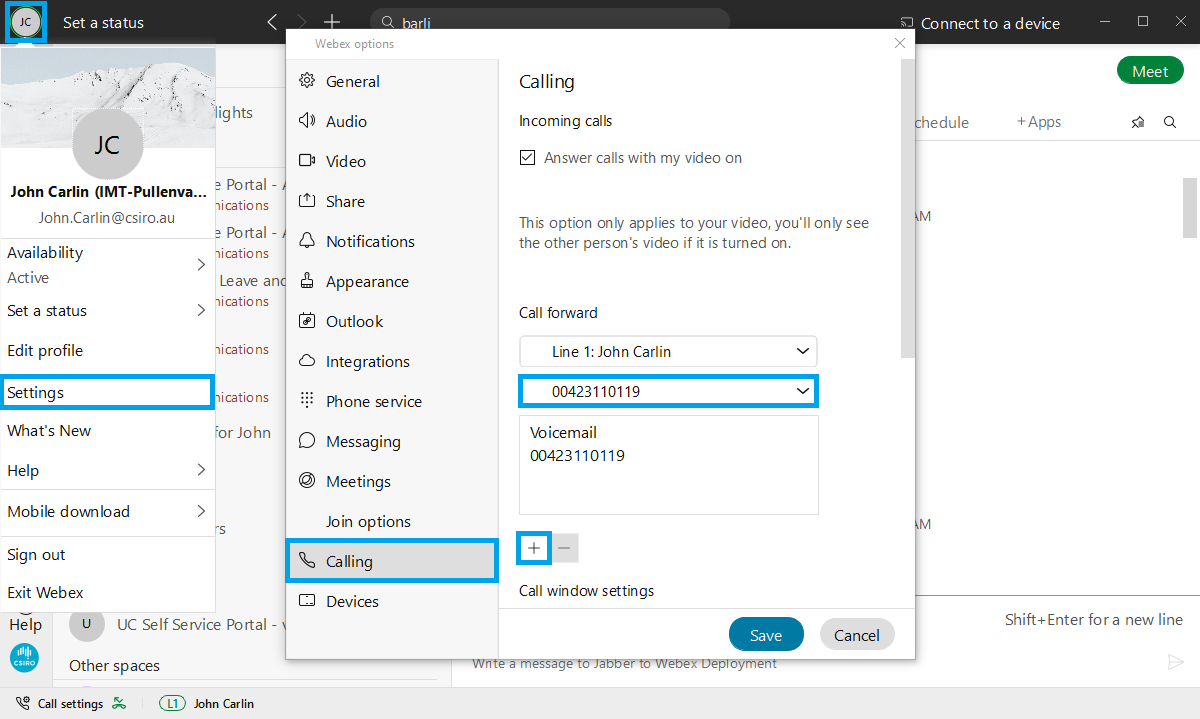
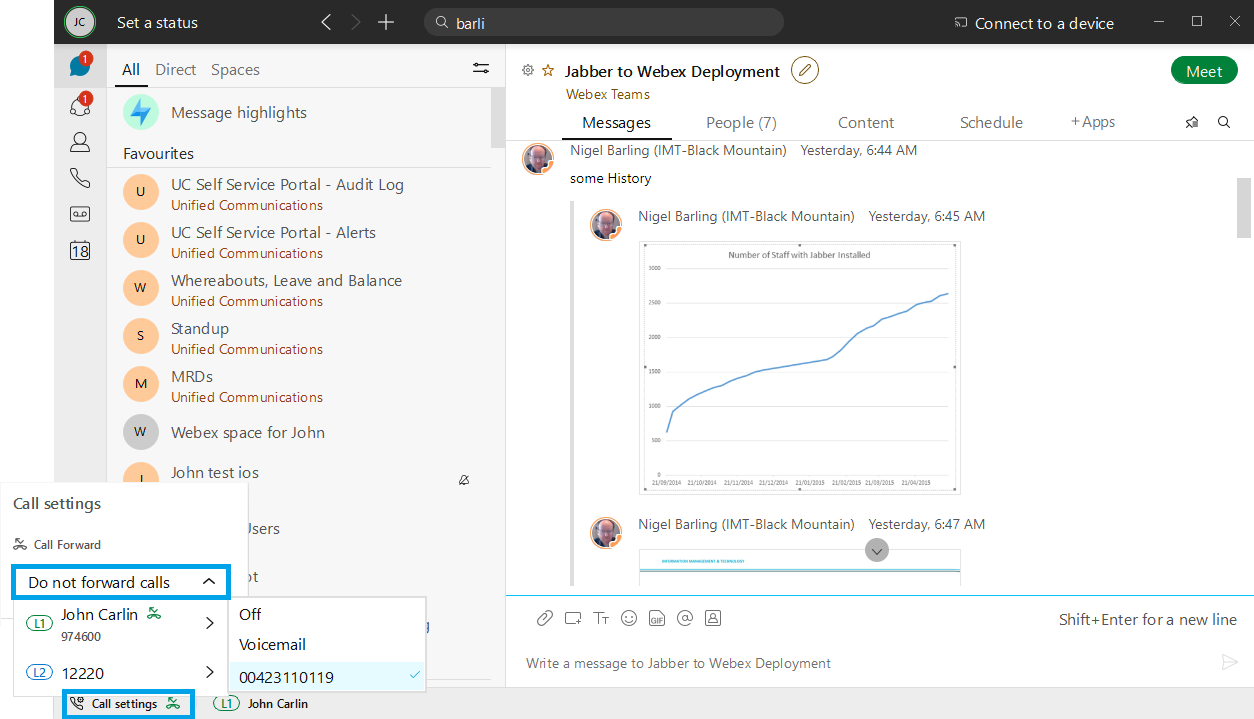
To enable call forwarding:
- Click your profile icon in the top left corner
- Click 'Settings'
- Click 'Calling'
- Click the + button to add a new number that your line can be forwarded to
- Select the number from the drop down list
-
Click 'Save'
-
Once you have configured call forwarding for the first time, you can quickly enable and disable it through the 'Call settings' menu.
Call forwarding
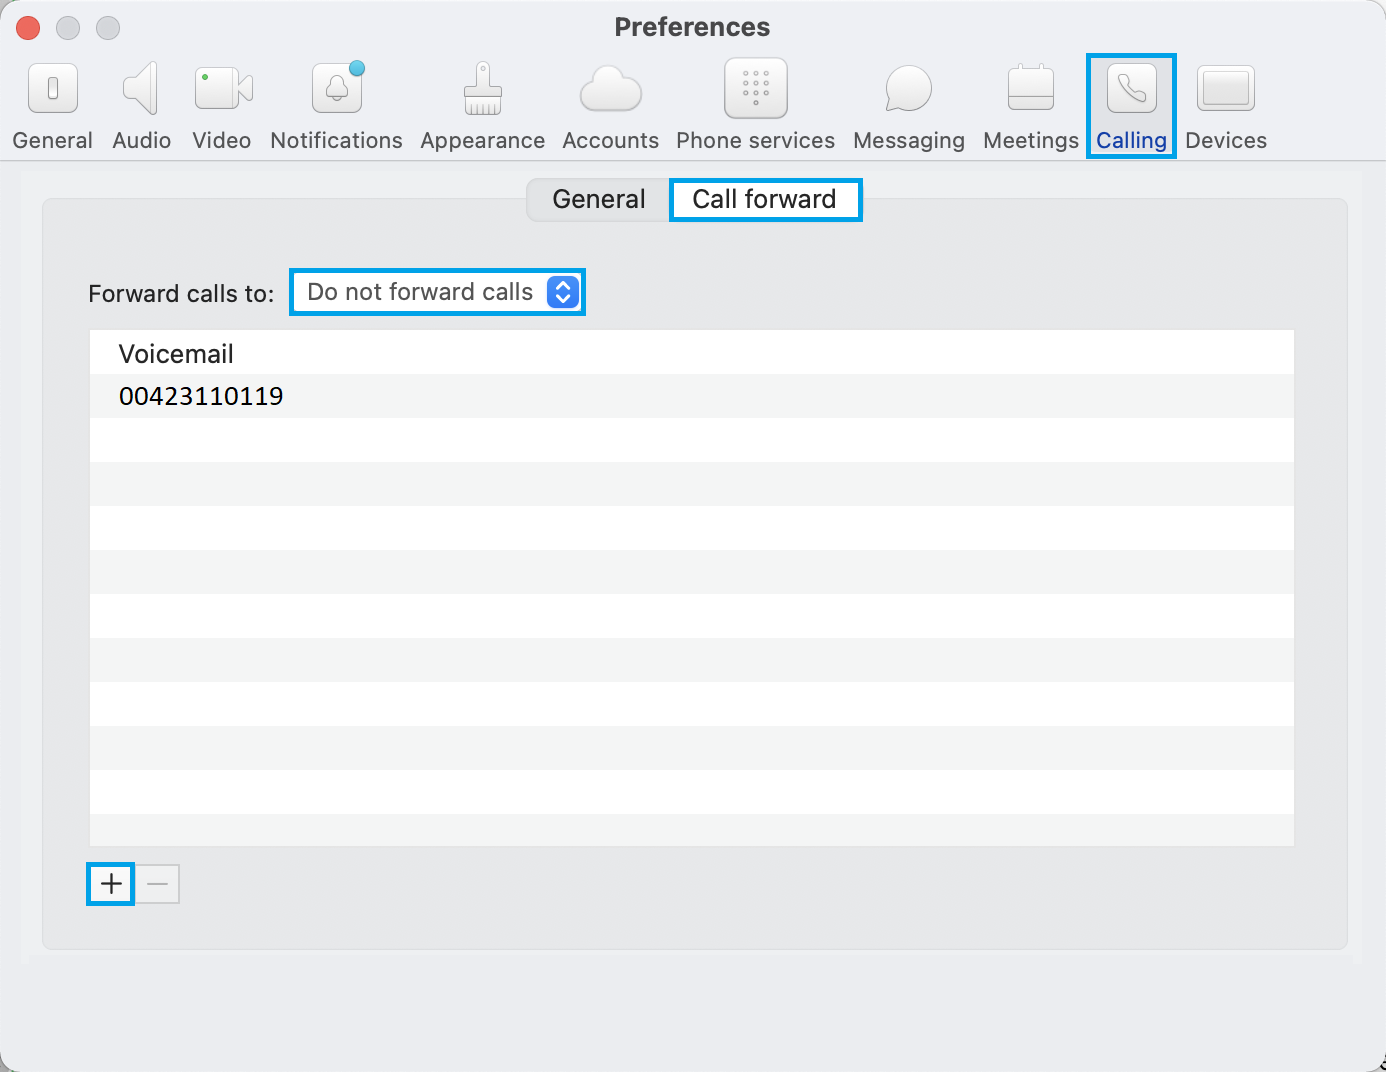
To enable call forwarding:
- Click 'Webex' and then click 'Preferences'
- Click 'Calling'
- Click 'Voicemail'
- To add a new number, click the + icon
-
Select a number from the drop down list to forward calls to.

-
Once you have configured call forwarding for the first time, you can quickly enable and disable it through the 'Call settings' menu.

Multiline
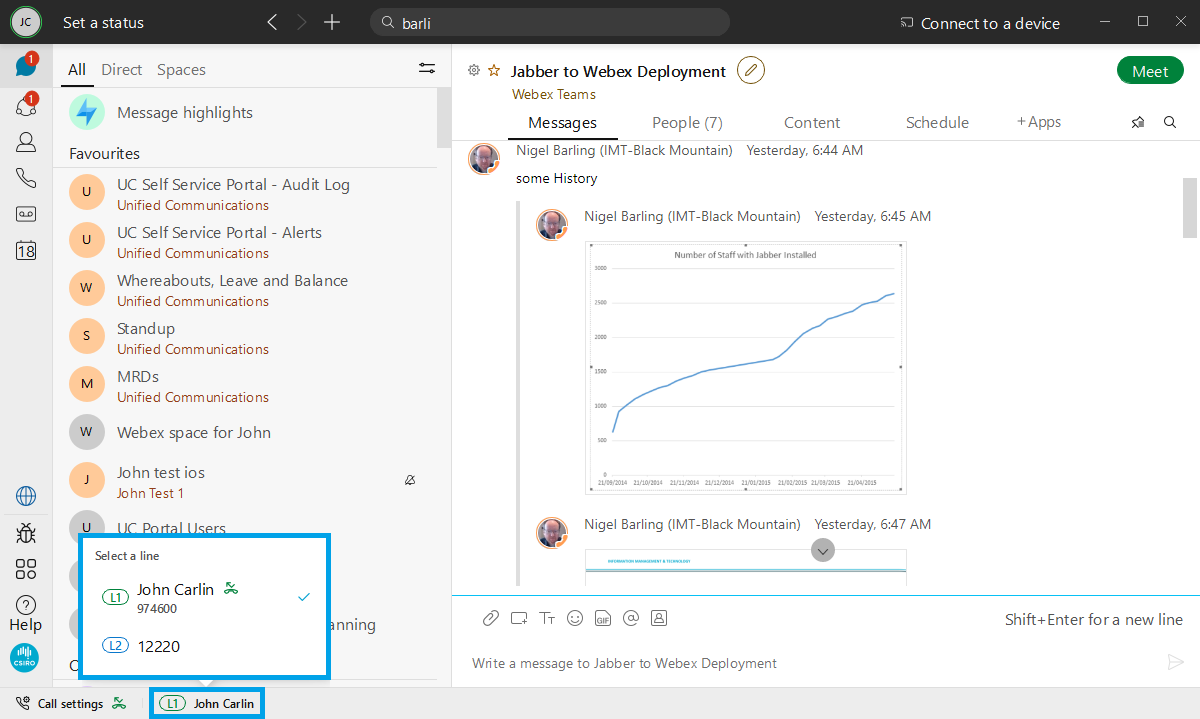
Webex App supports multiline setups. The line that is active will be used for outgoing calls, but calls can be received on any line that belongs to you. To change between different lines:
- Click on your current line
-
Select a different line to make it active.
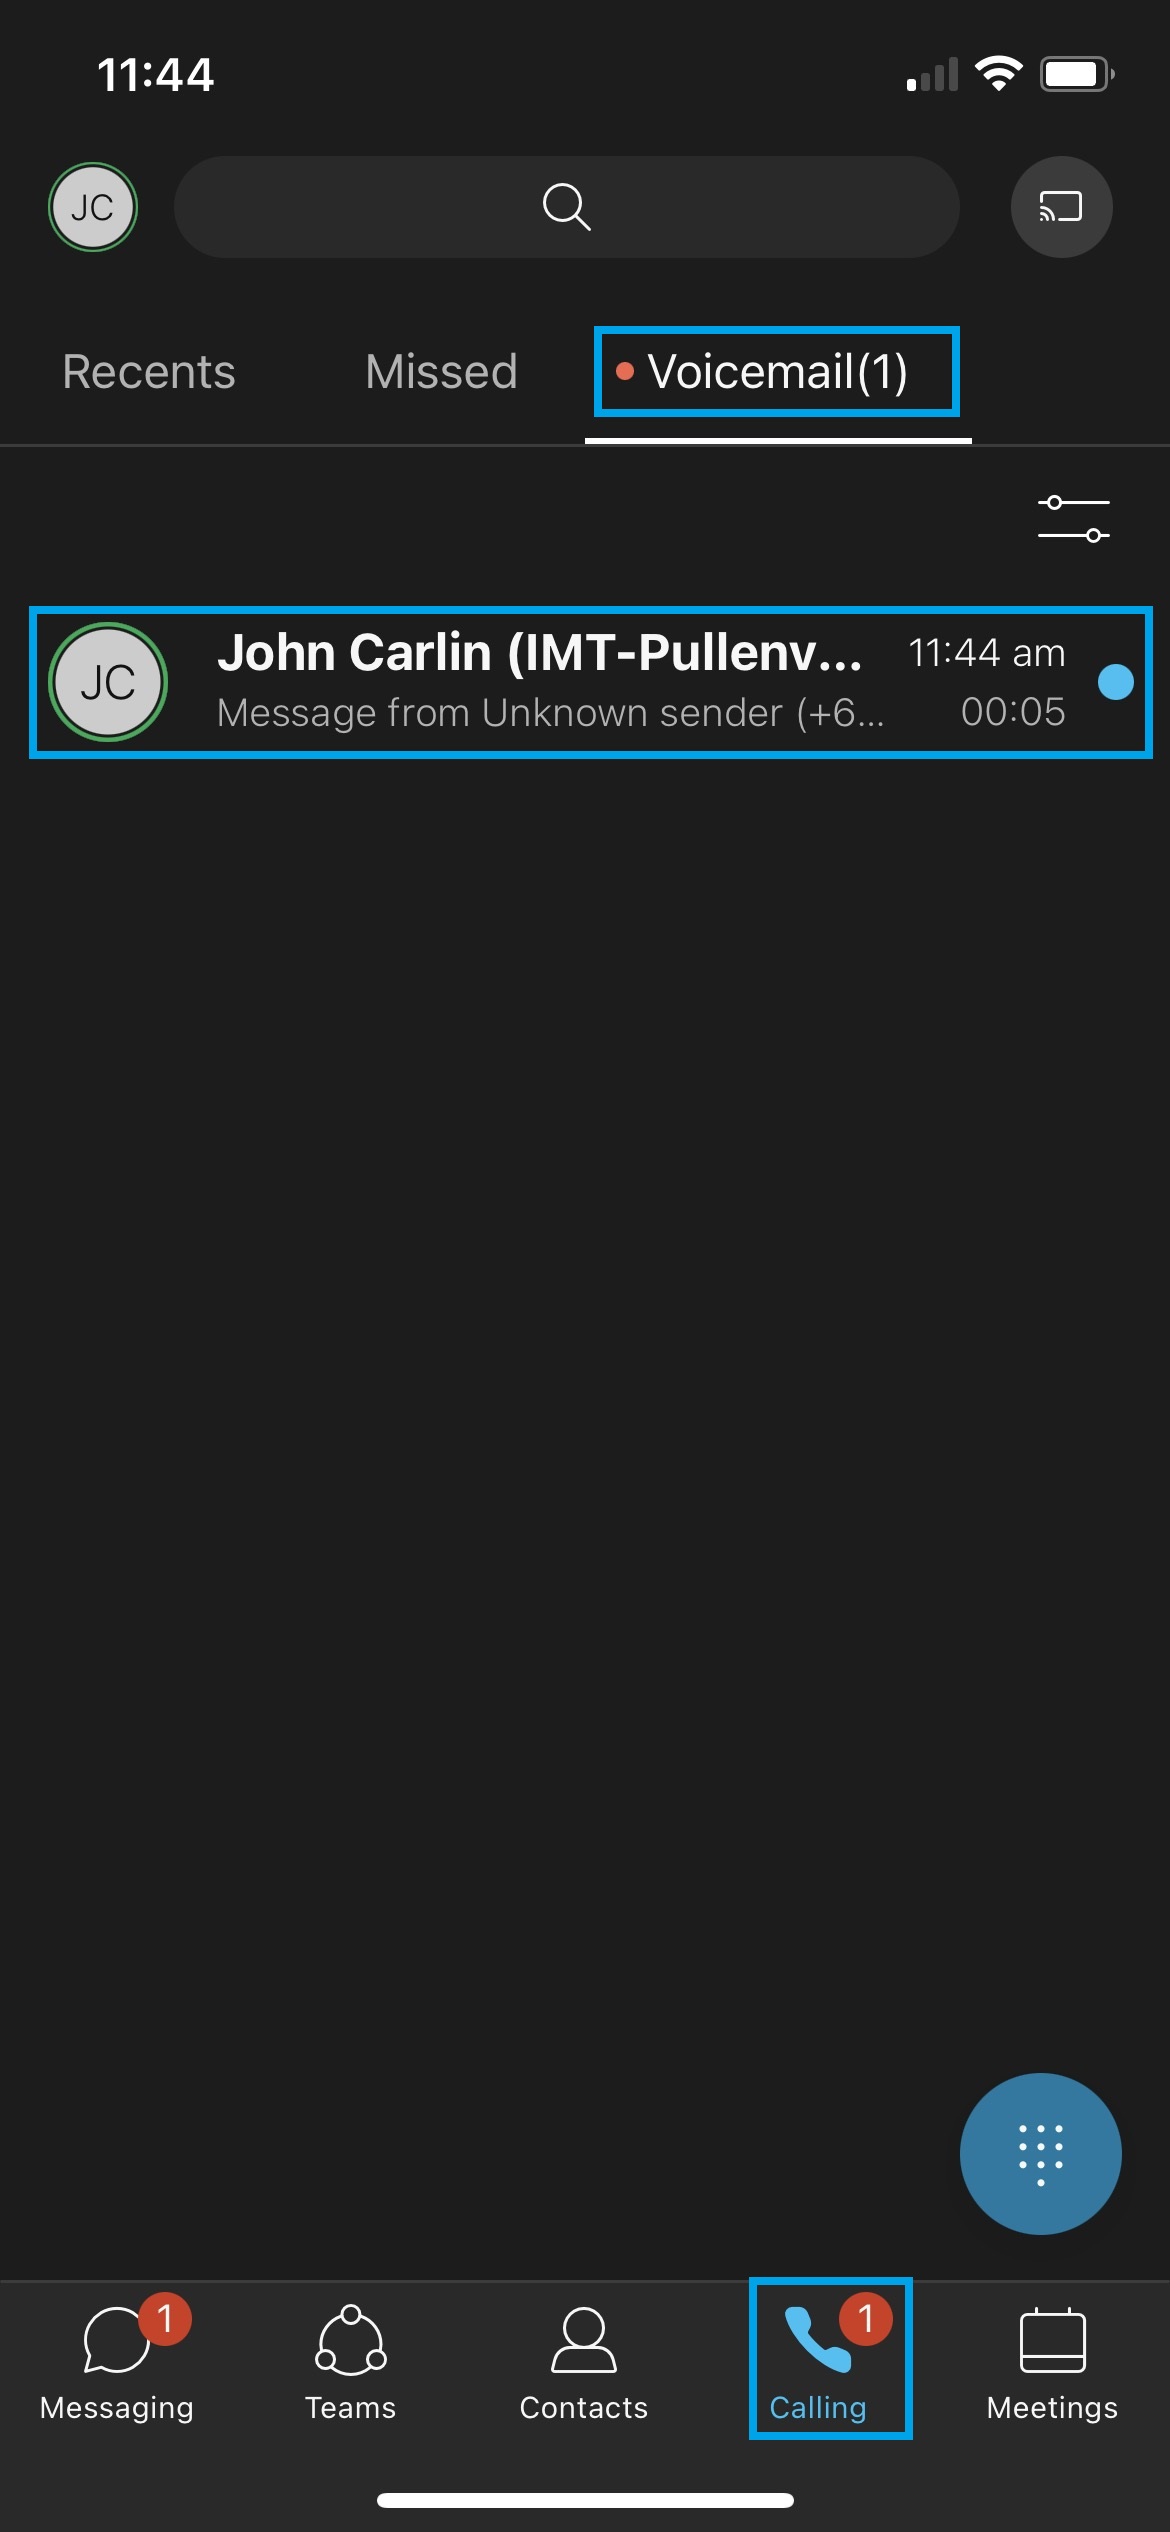
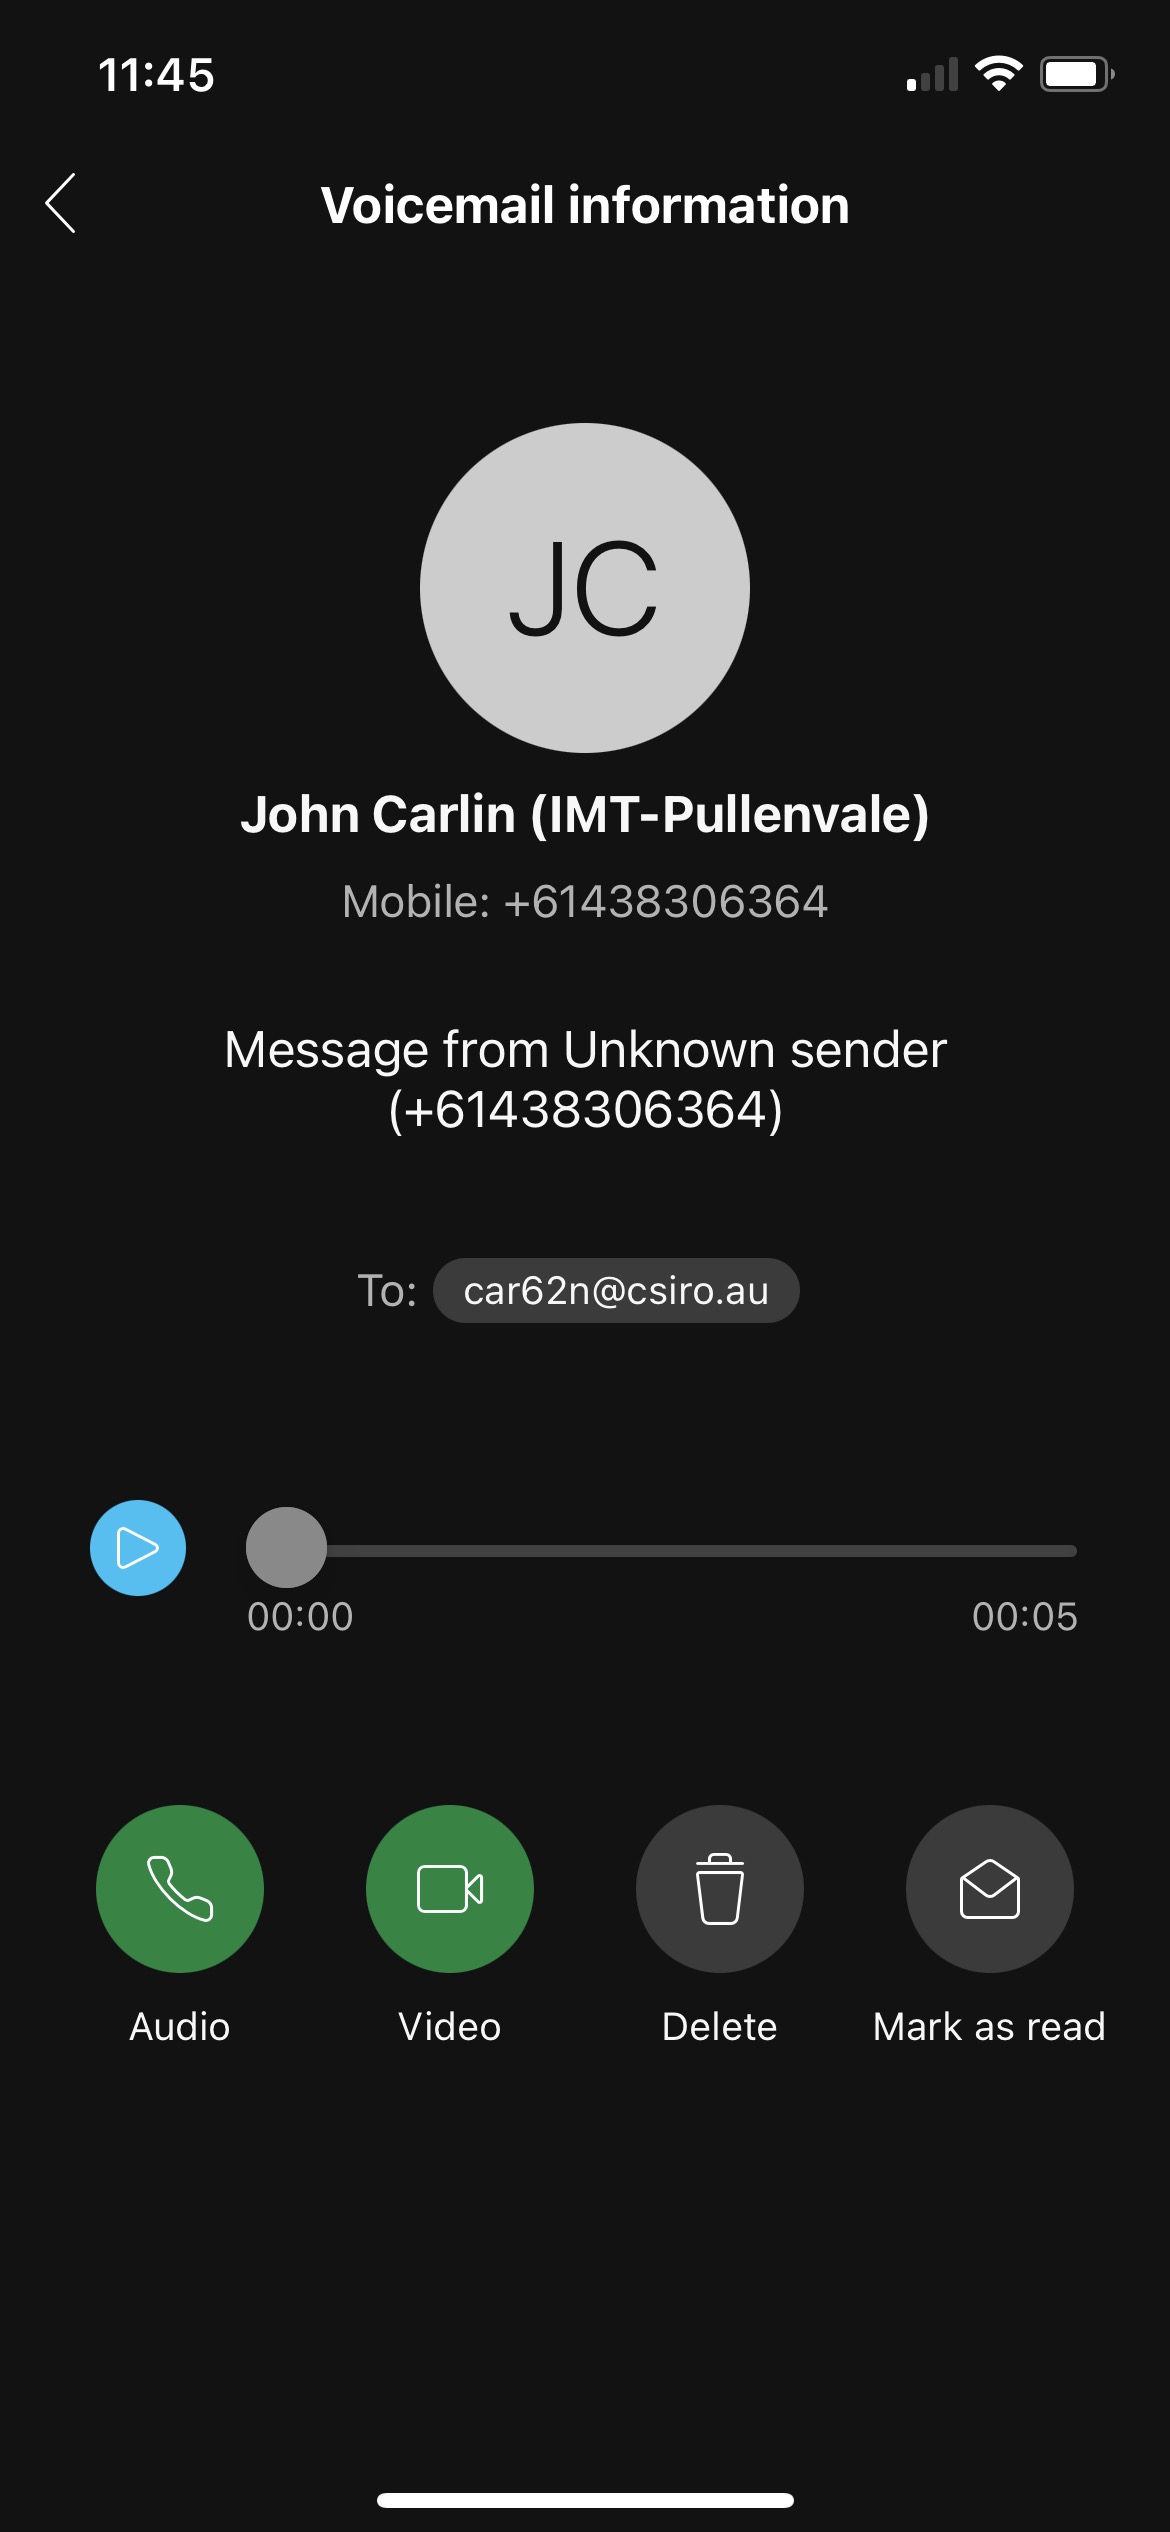
Voicemail
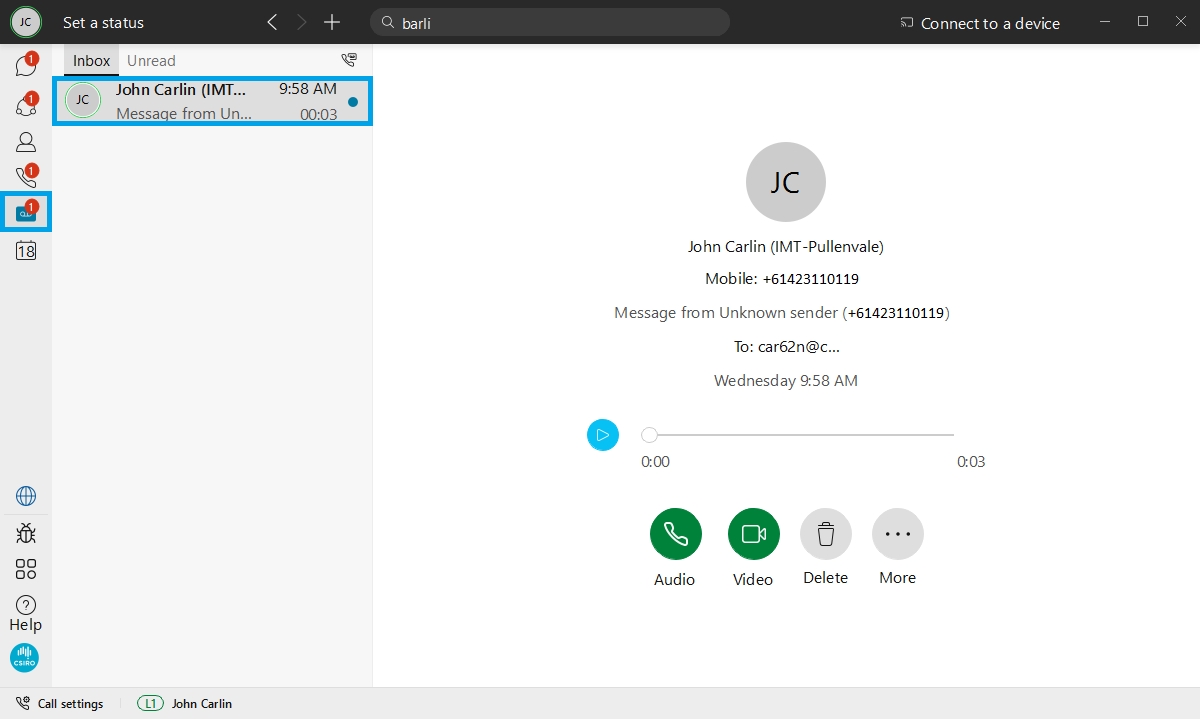
To listen to or manage your voicemail messages:
- Select the 'Voicemail' tab
- Select a message from your inbox
-
You can then play the message and optionally call the person back or delete the message.
Call parking
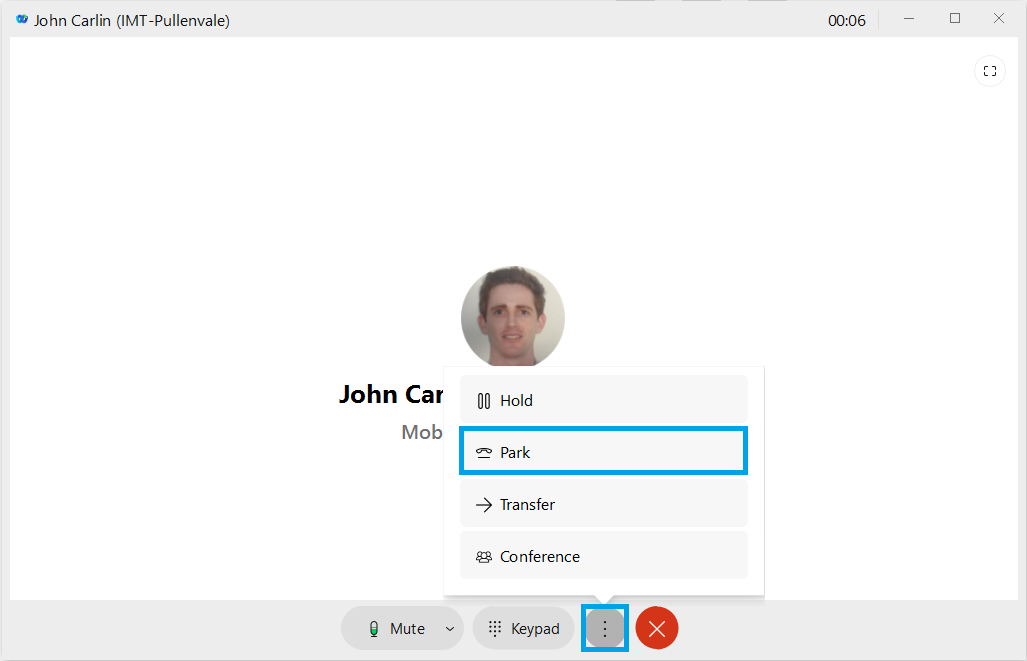
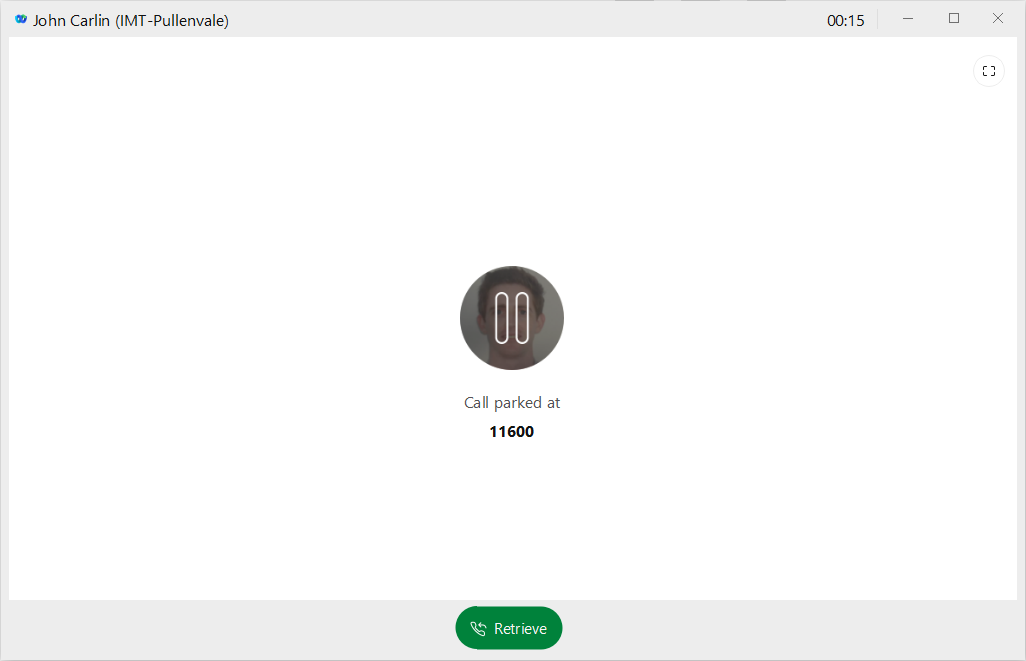
Call Parking allows you to answer a call in Webex App, 'park' the call, then resume the call from any desktop phone or Video Conferencing unit in CSIRO. This feature is great when you need to move a private conversation into another room, or upgrade a call to a Video Conferencing room.
To park a call:
- Whilst on a call, click the 3 dots and then click 'Park'
-
From a VC unit or CSIRO desktop phone, dial the number that is presented to you.
For example, dial 11600. The call will then be resumed on that device.
Webex App can be used to place and receive audio and video calls with contacts.
To call a contact:
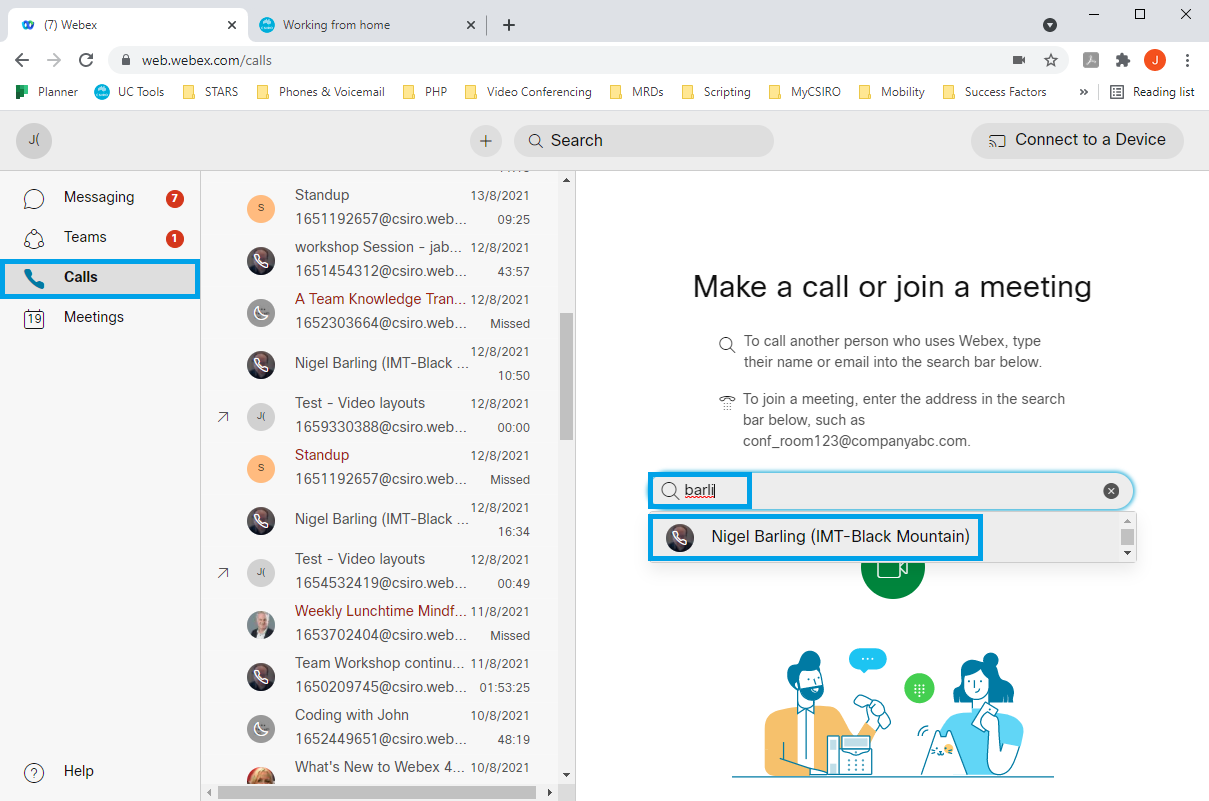
- Click the 'Calls' tab
- Search for the contact by typing their name in the search bar
- Click on a contact from the results list
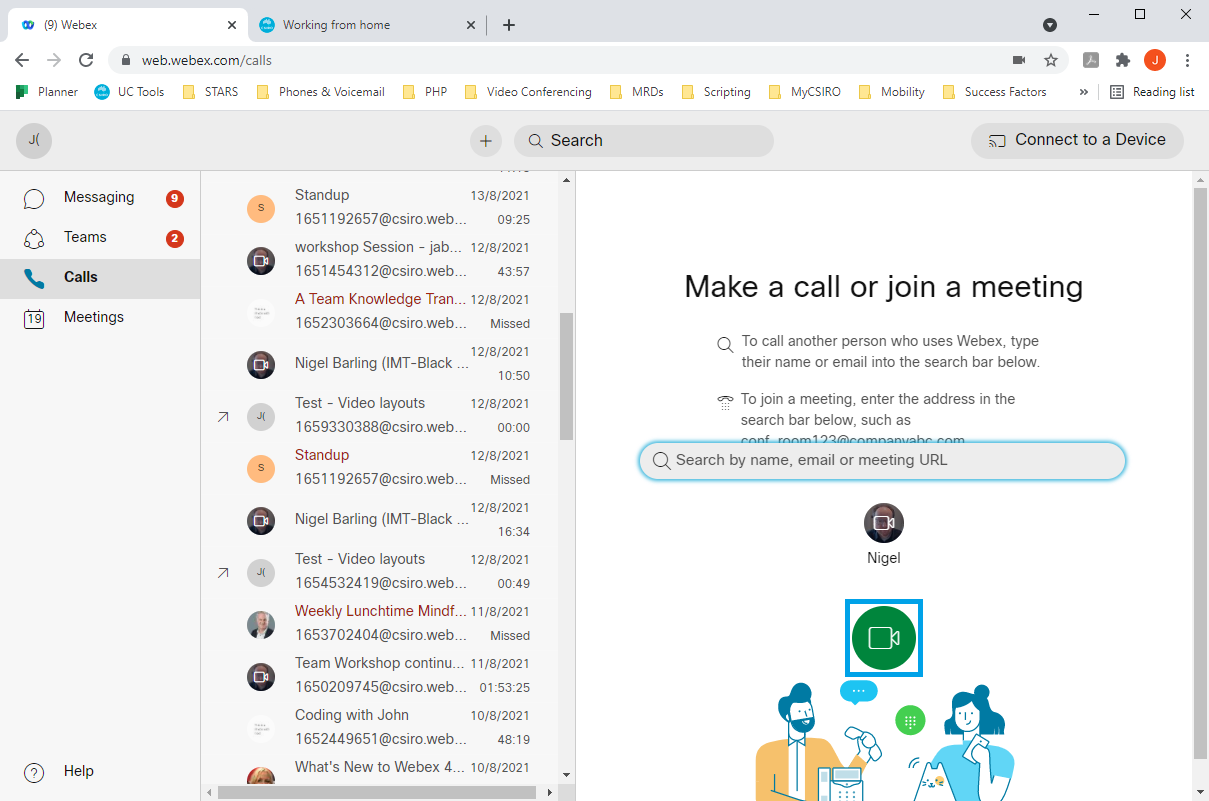
-
Click the call icon.
Webex App can be used to place and receive audio and video calls with contacts and external phone numbers.
To call a contact:
- Search for the contact by typing their name in the search bar
-
Press the audio or video call button to start the call

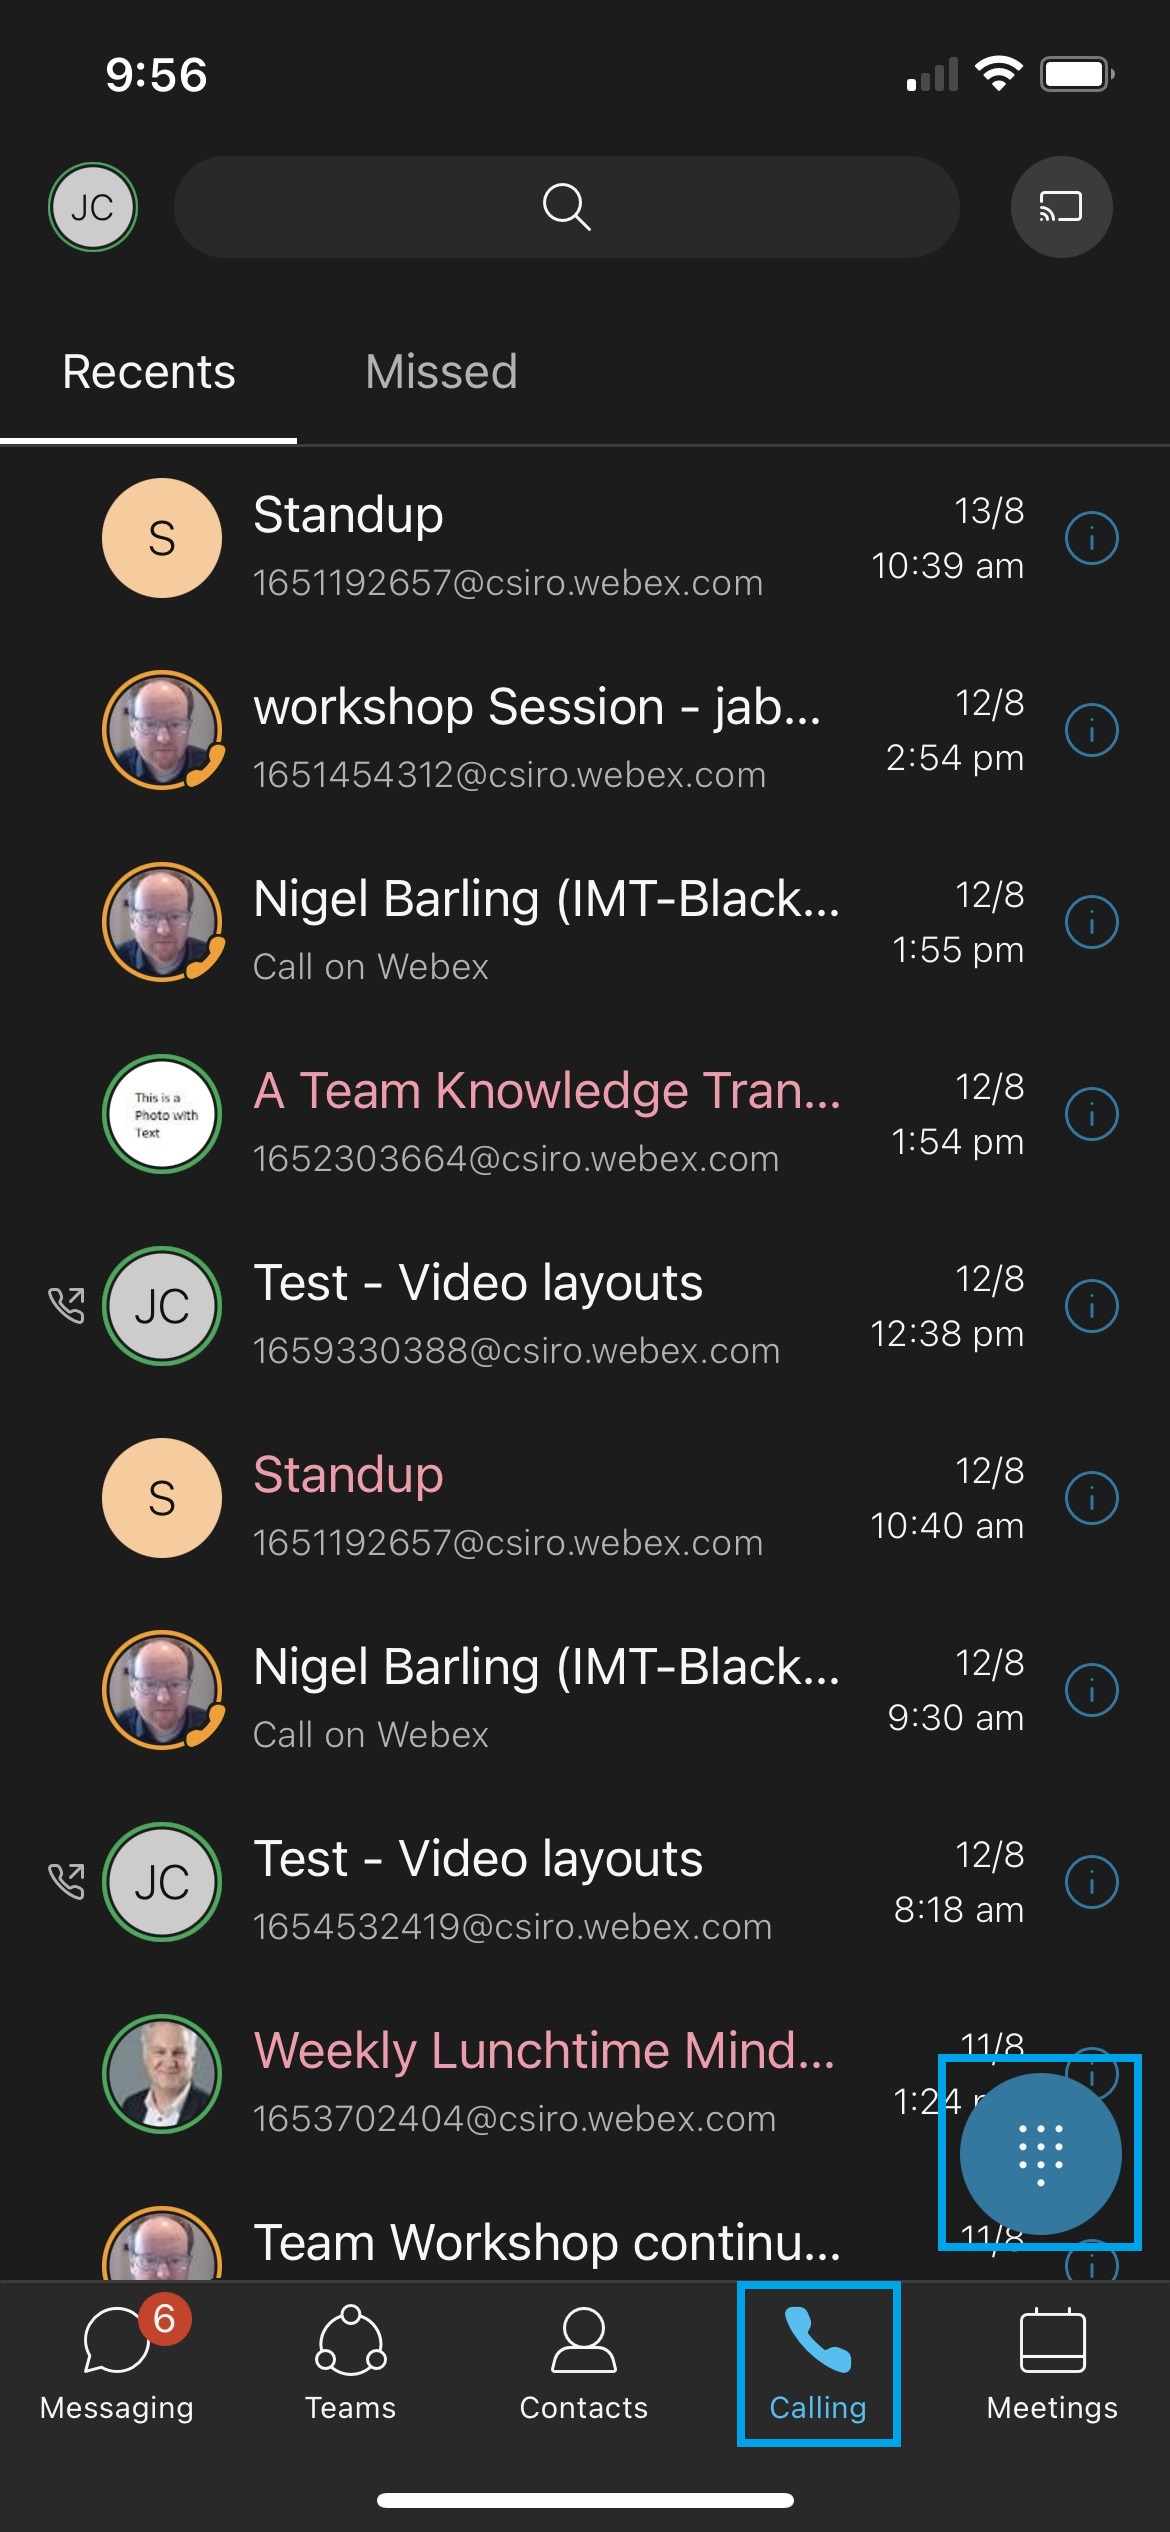
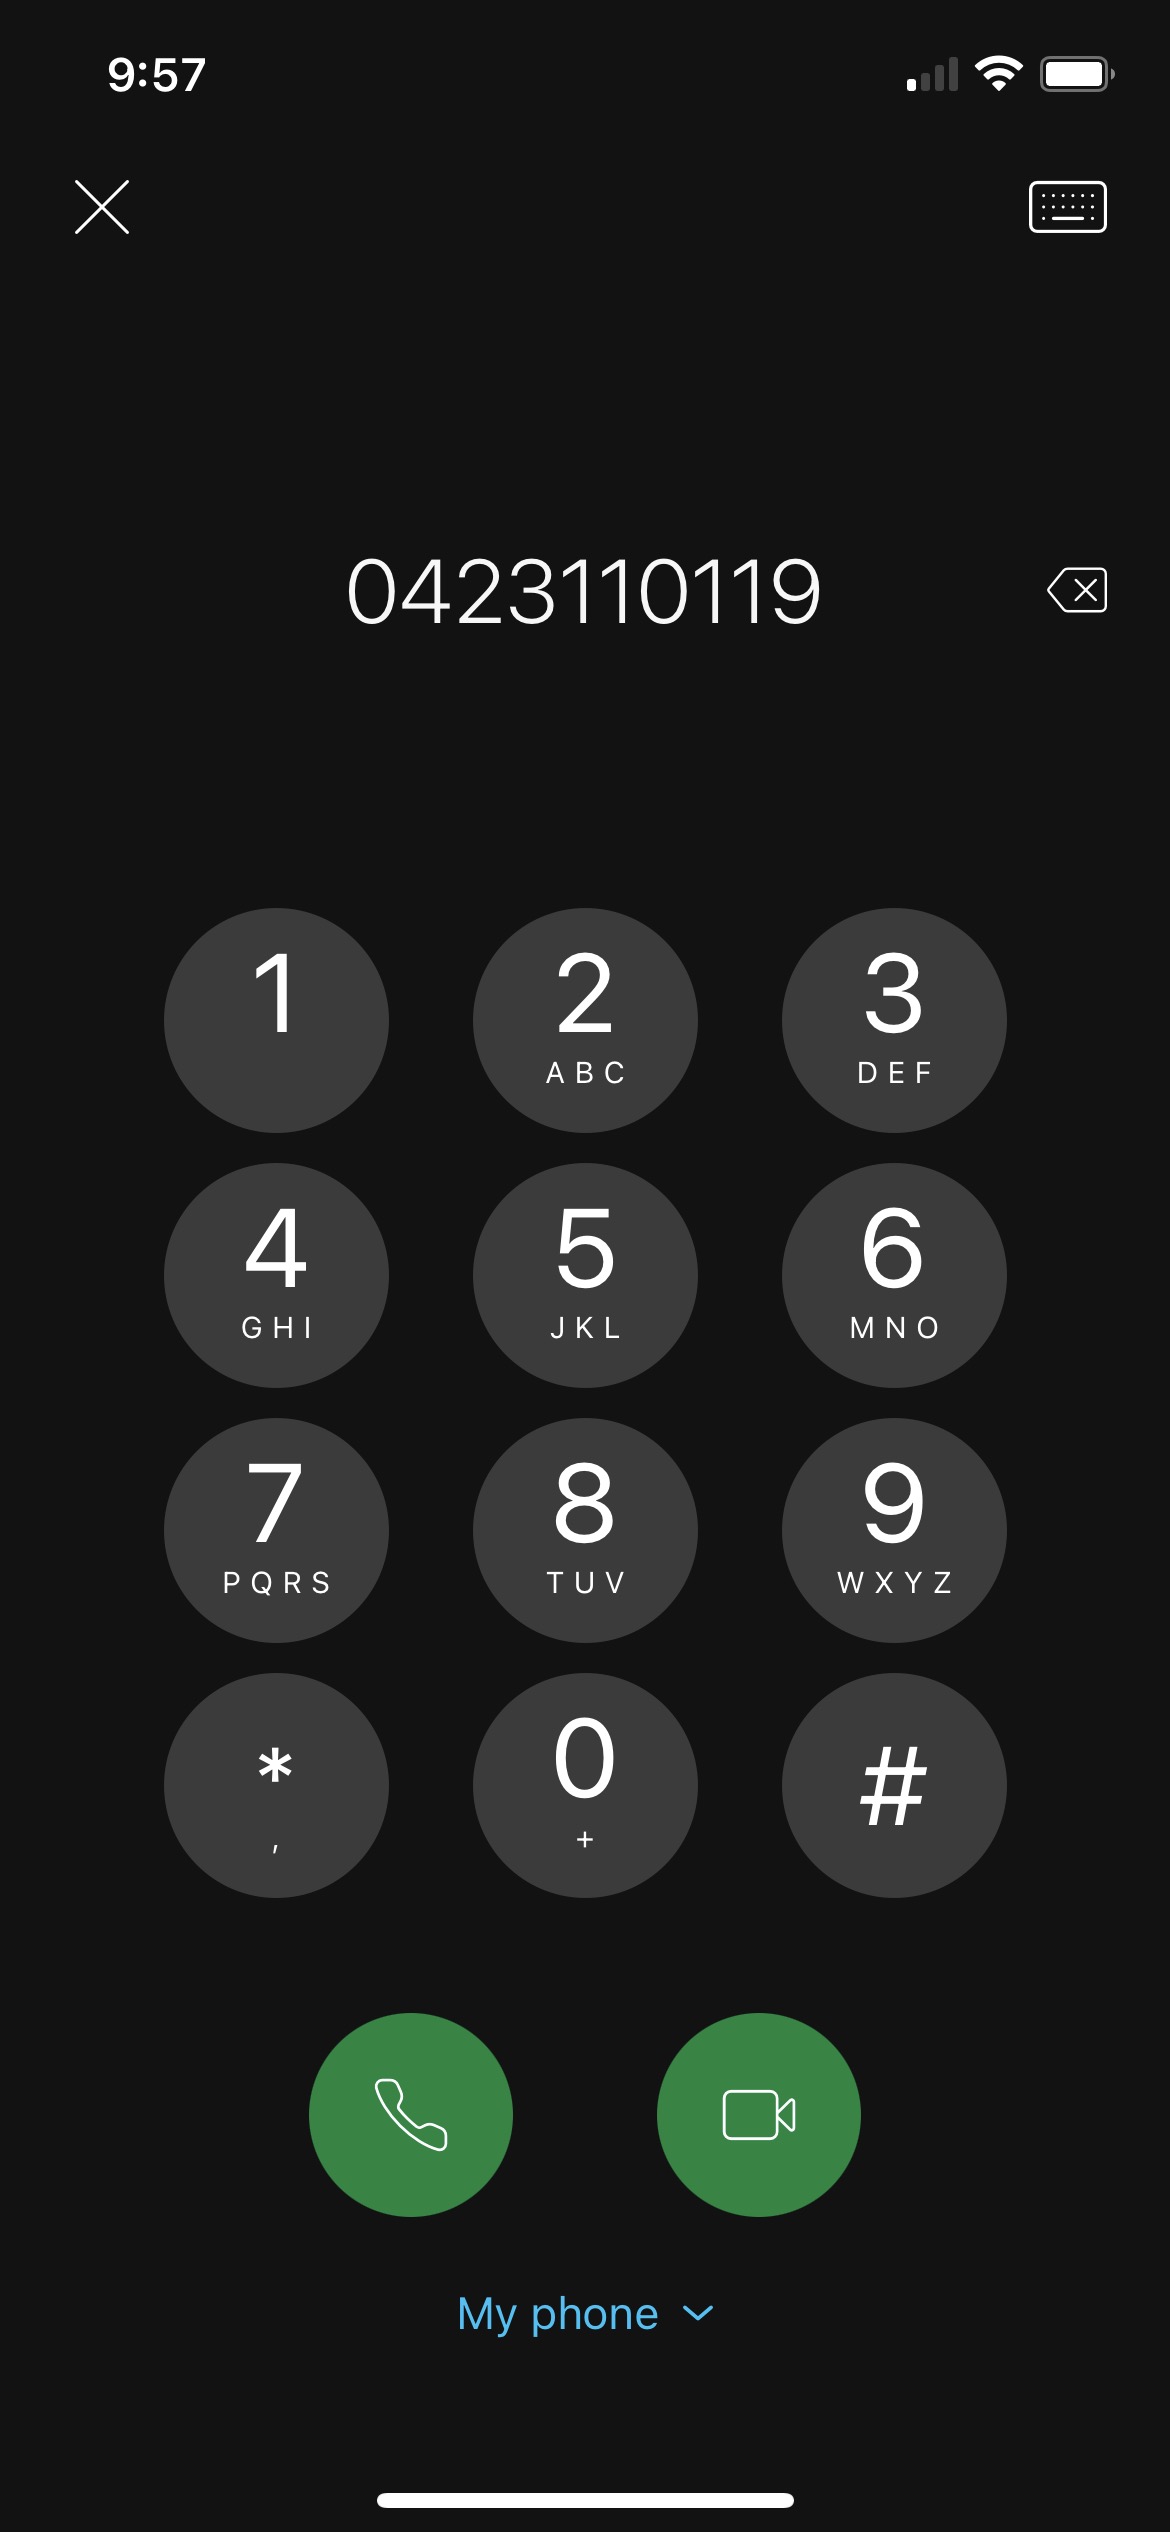
To dial a phone number:
- Press the 'Calling' tab and then press the dialpad
- Enter the number you wish to call
-
Click the audio call button to start the call
Call forwarding
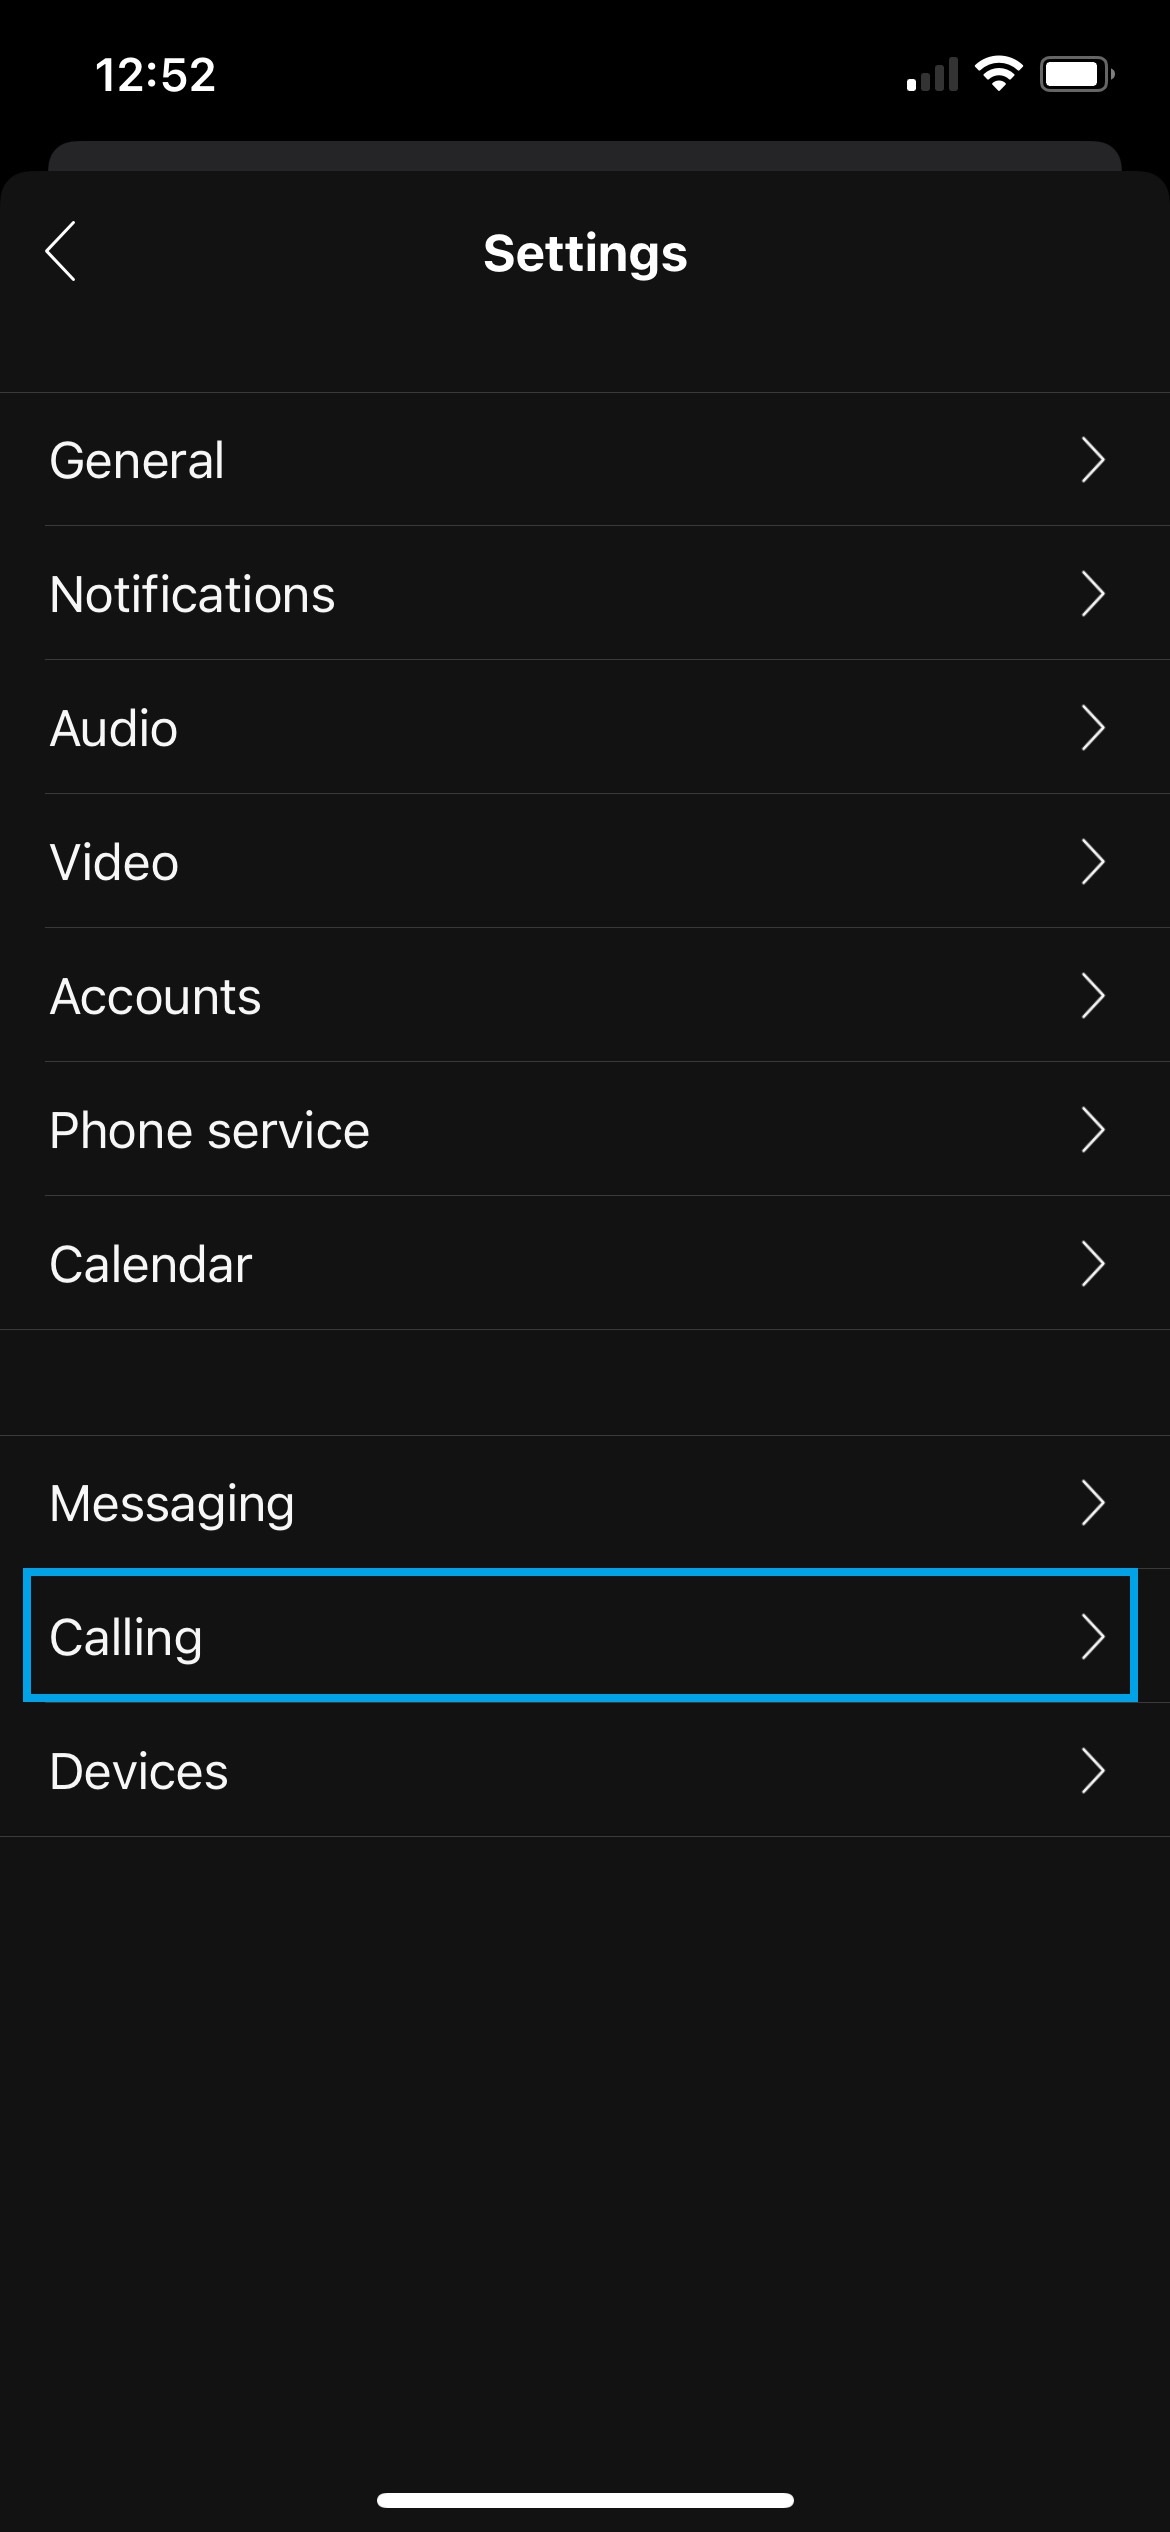
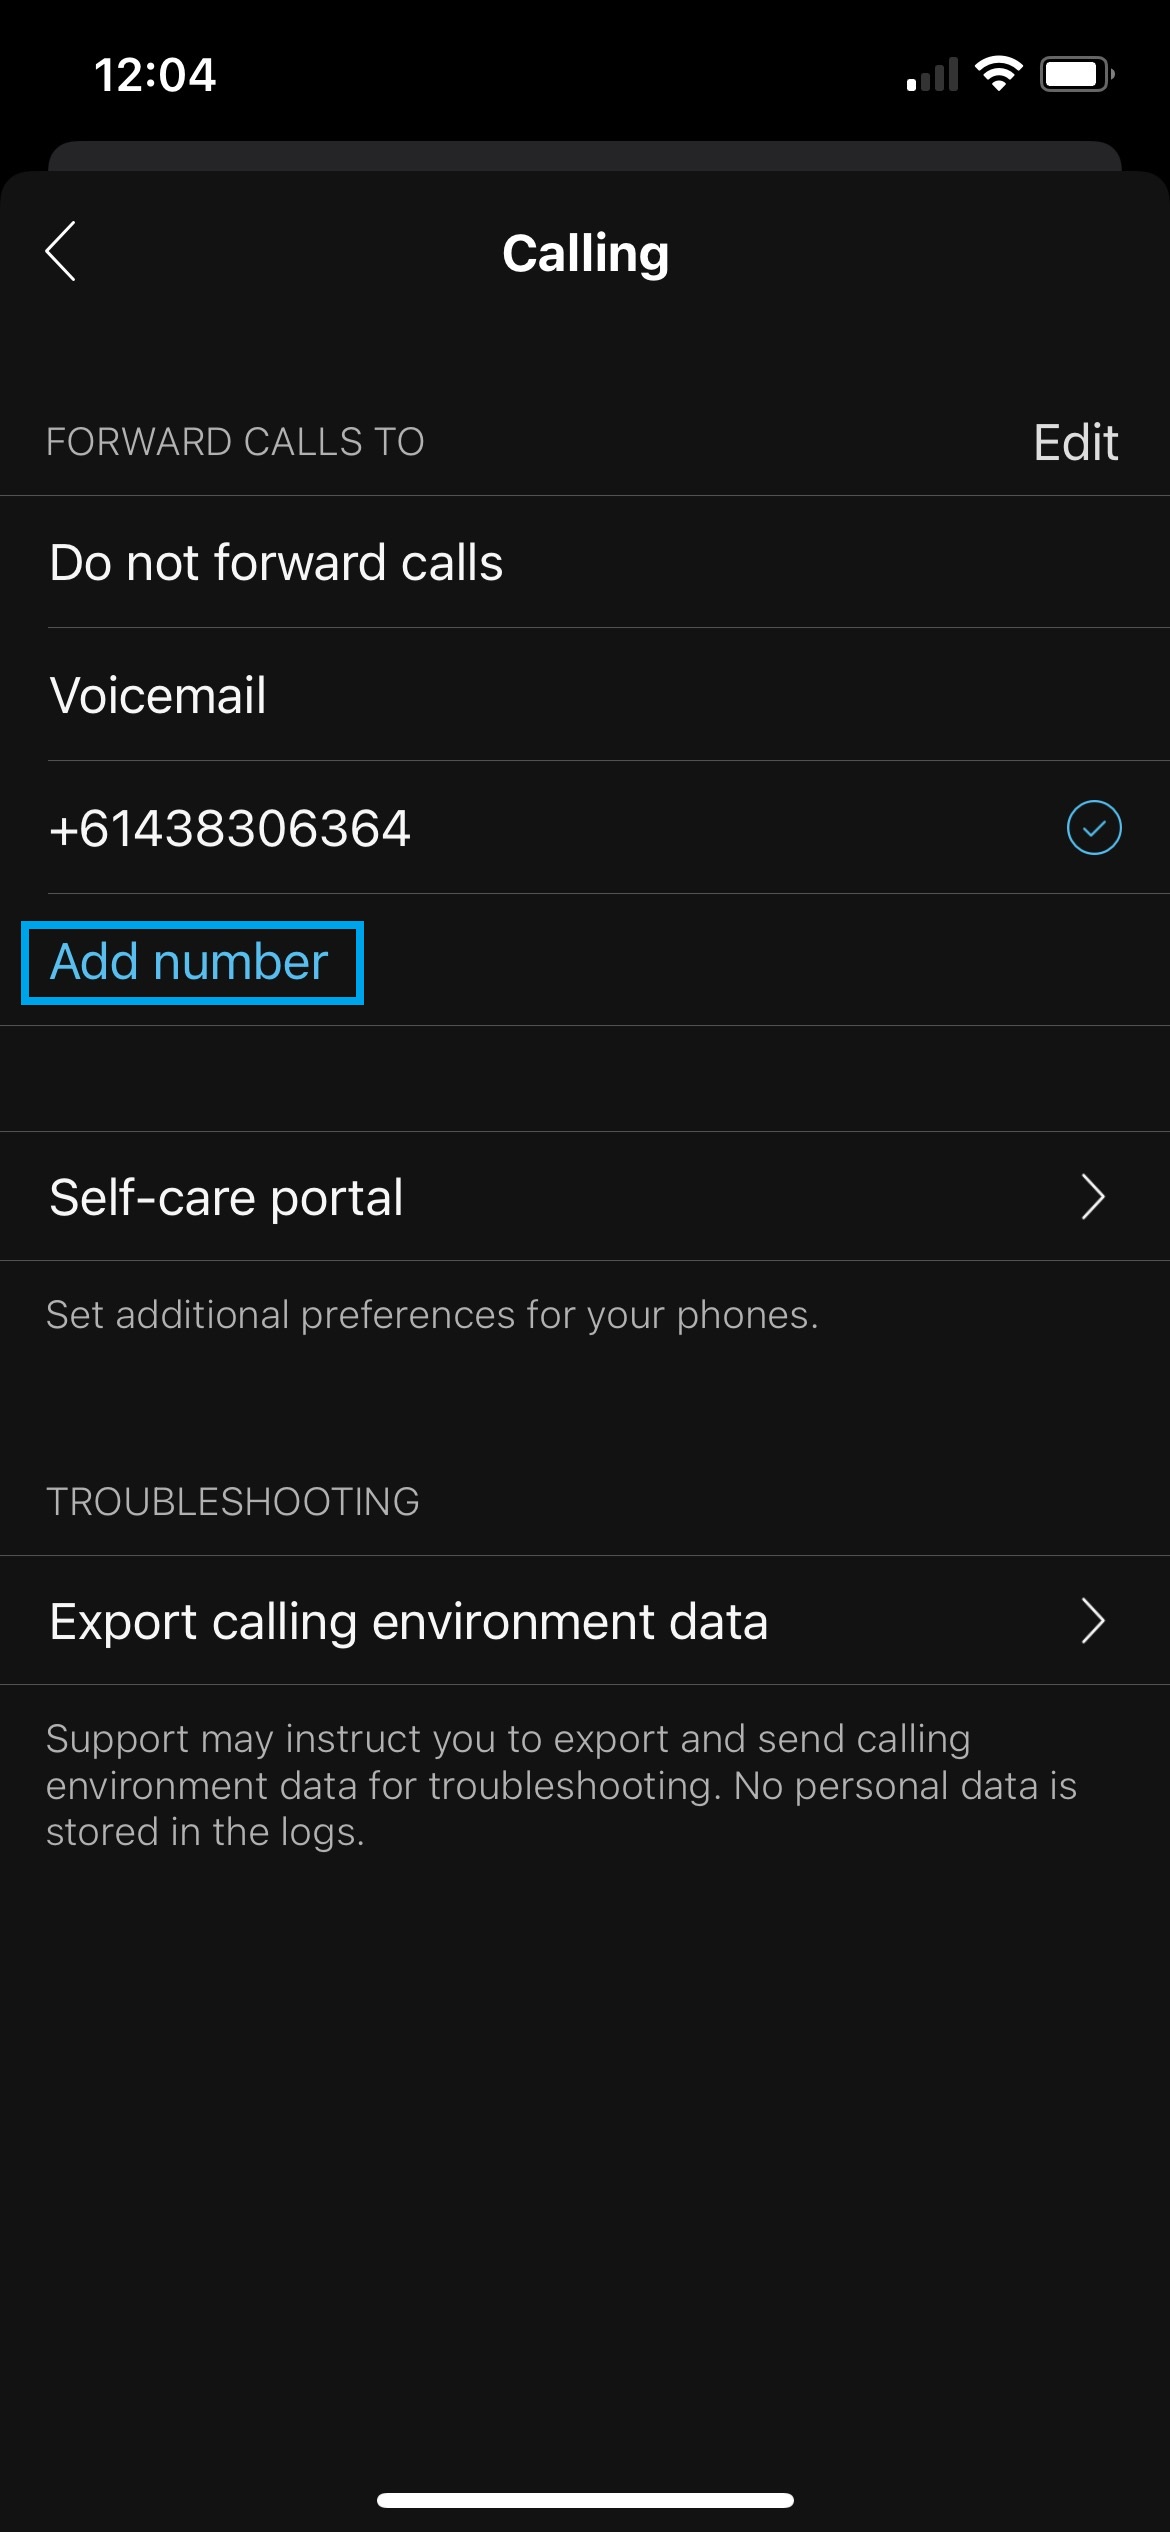
To enable call forwarding:
- Press your profile icon in the top left corner
- Press 'Settings'
- Press 'Calling'
-
Select a number from the list of available options, or press 'Add number' to add a new option.


Voicemail
To listen to or manage your voicemail messages:
- Press the 'Calling' tab
- Press 'Voicemail'
- Select a message
-
You can then play the message and optionally call the person back or delete the message.
Contacts>
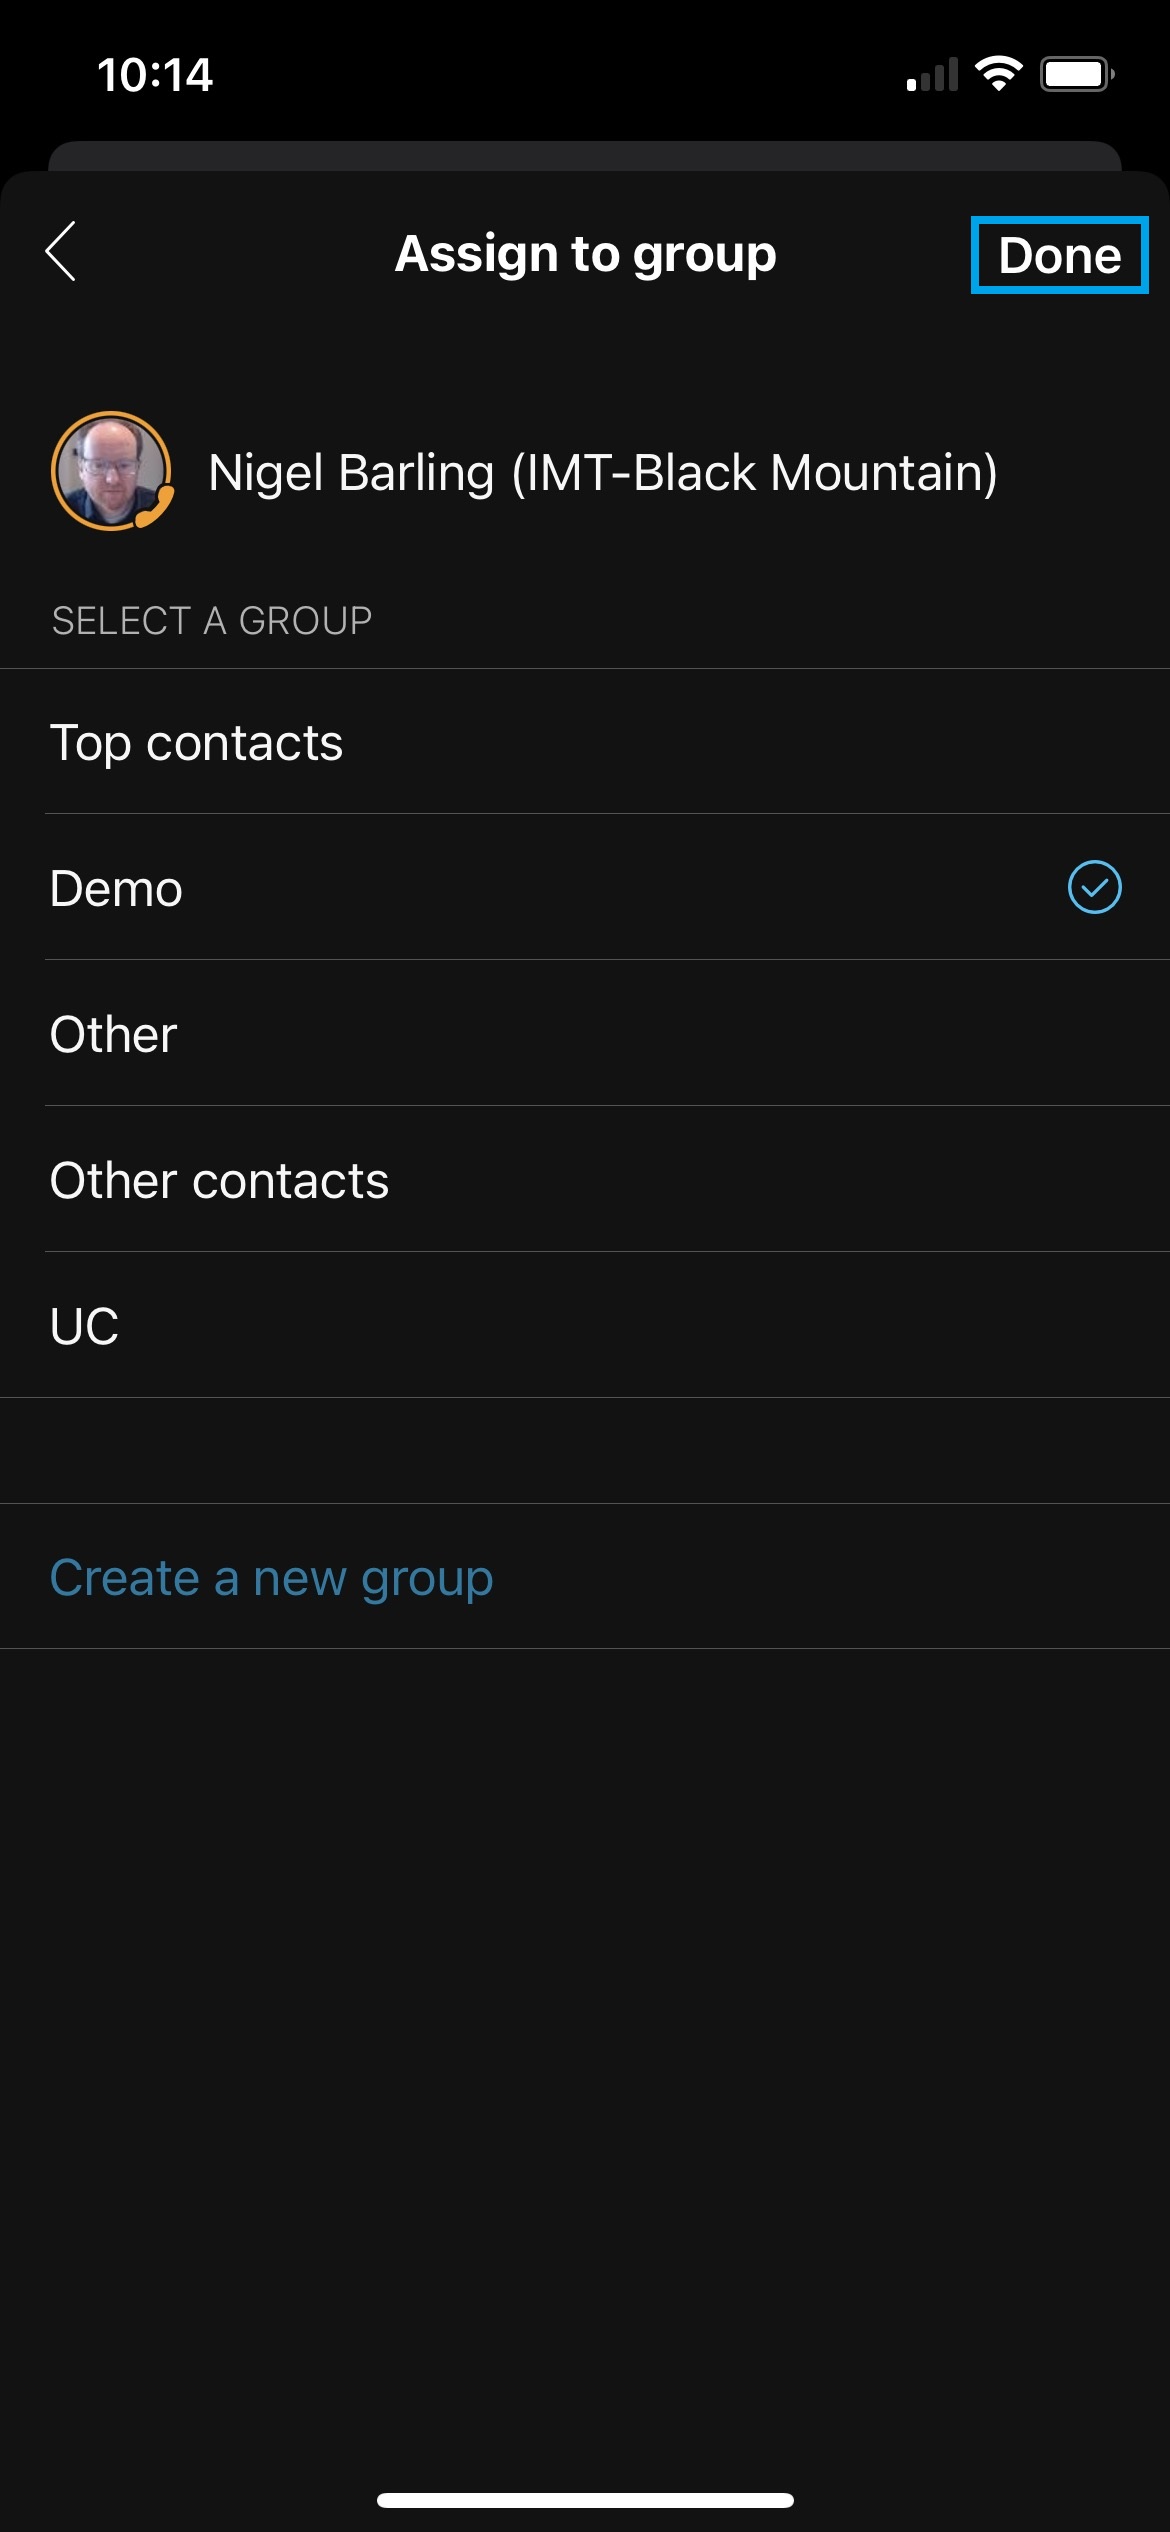
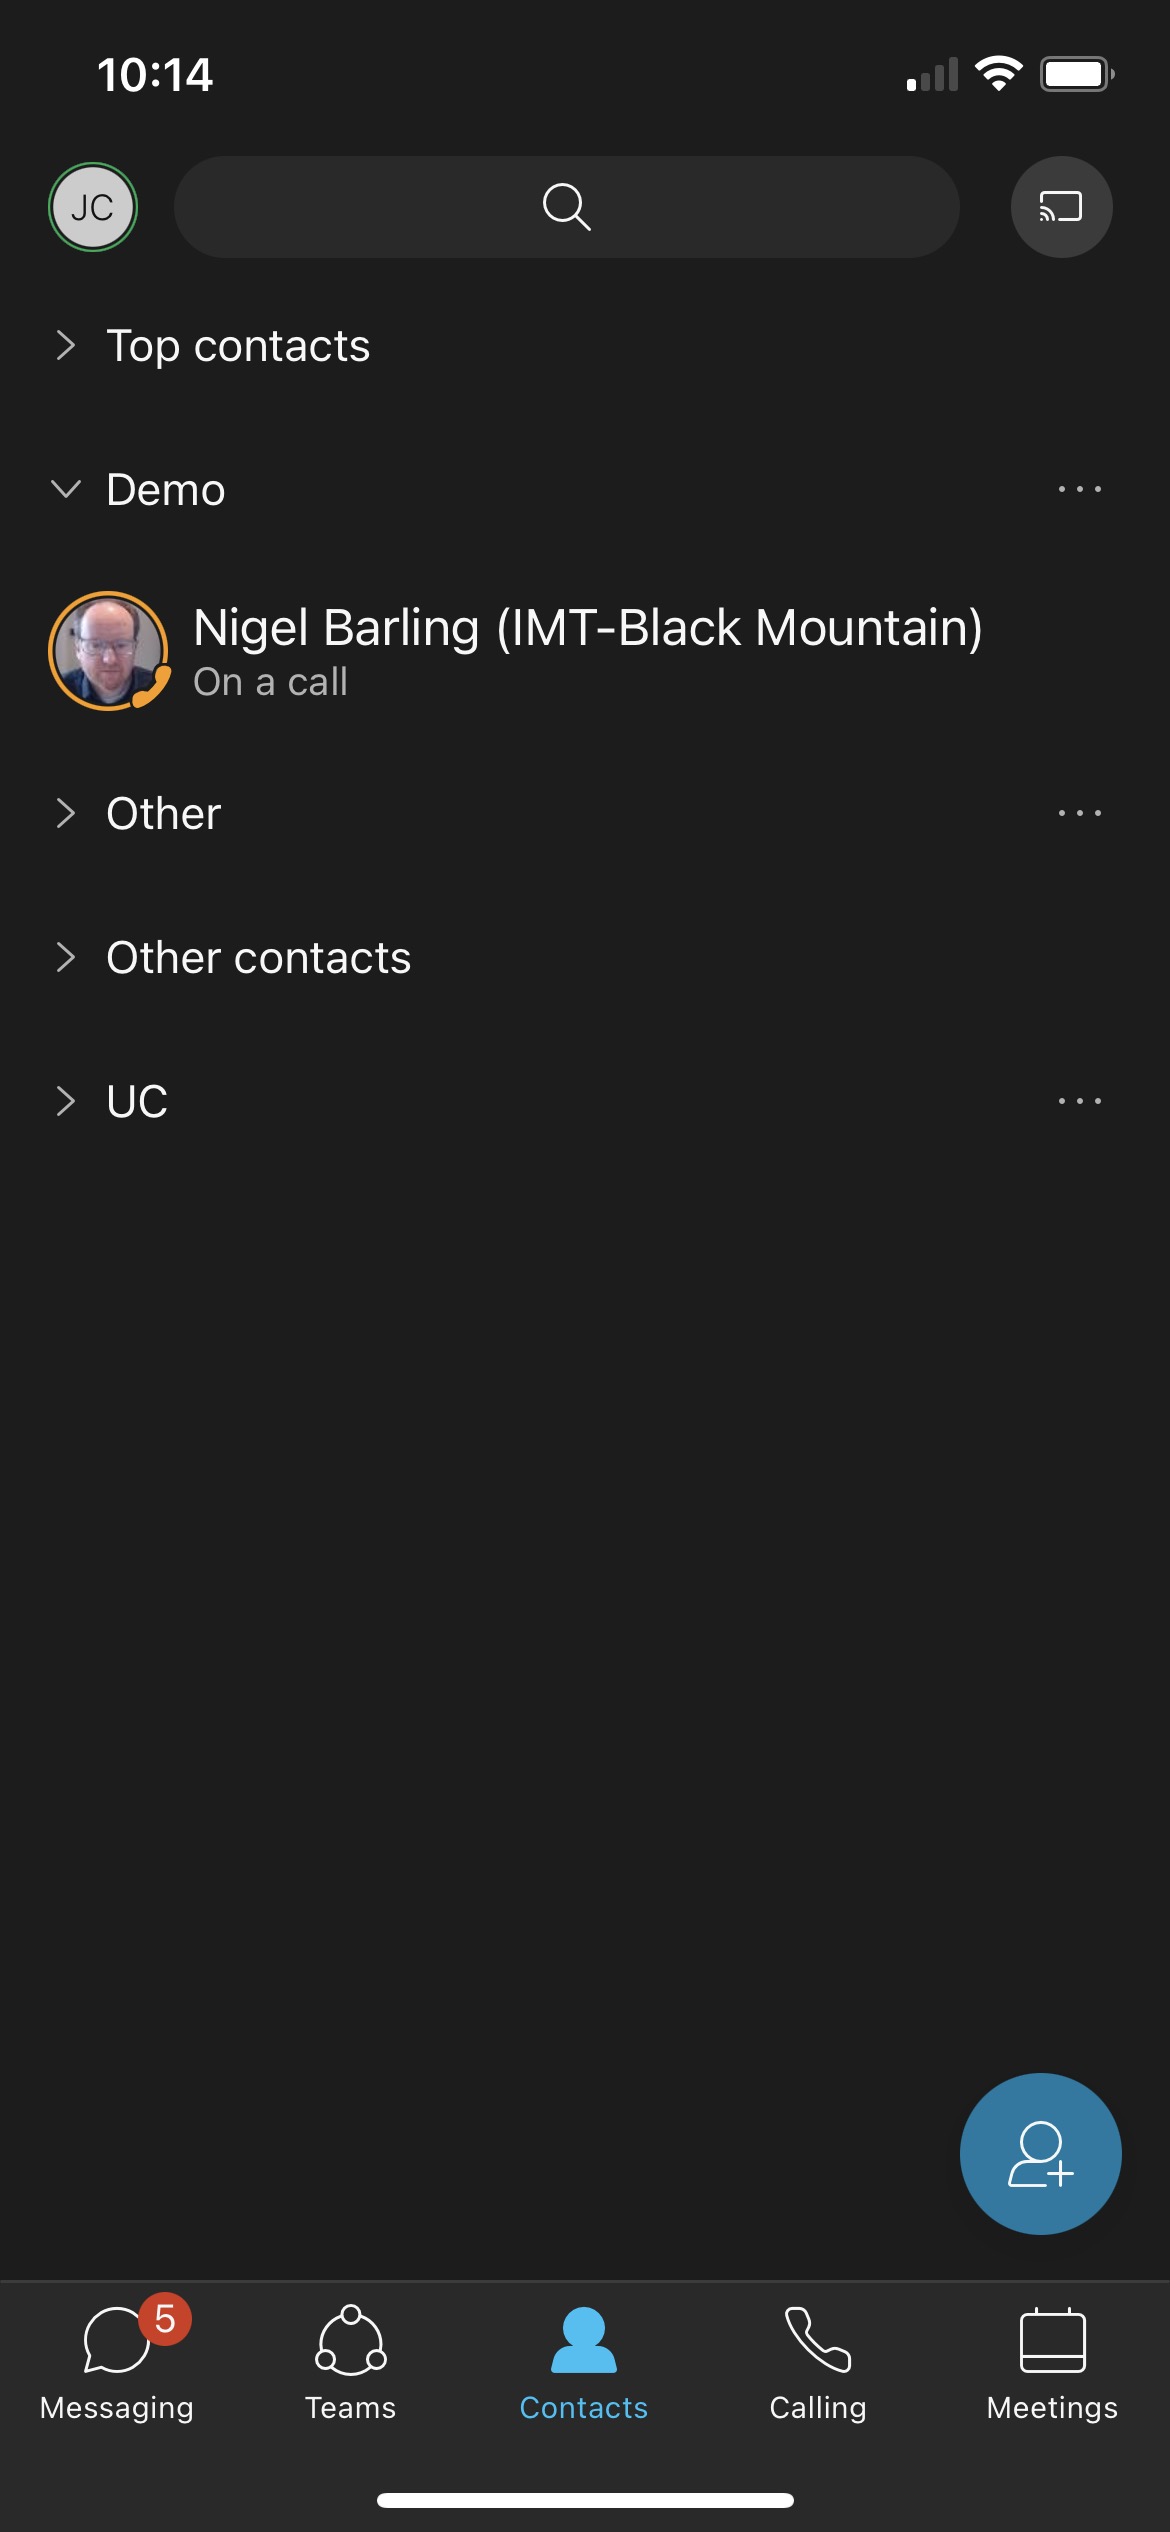
Contacts can be added to save having to search for people when you want to interact with them. Optionally, contacts can be sorted into groups to keep things organised. Contacts can be either CSIRO staff members or external people.
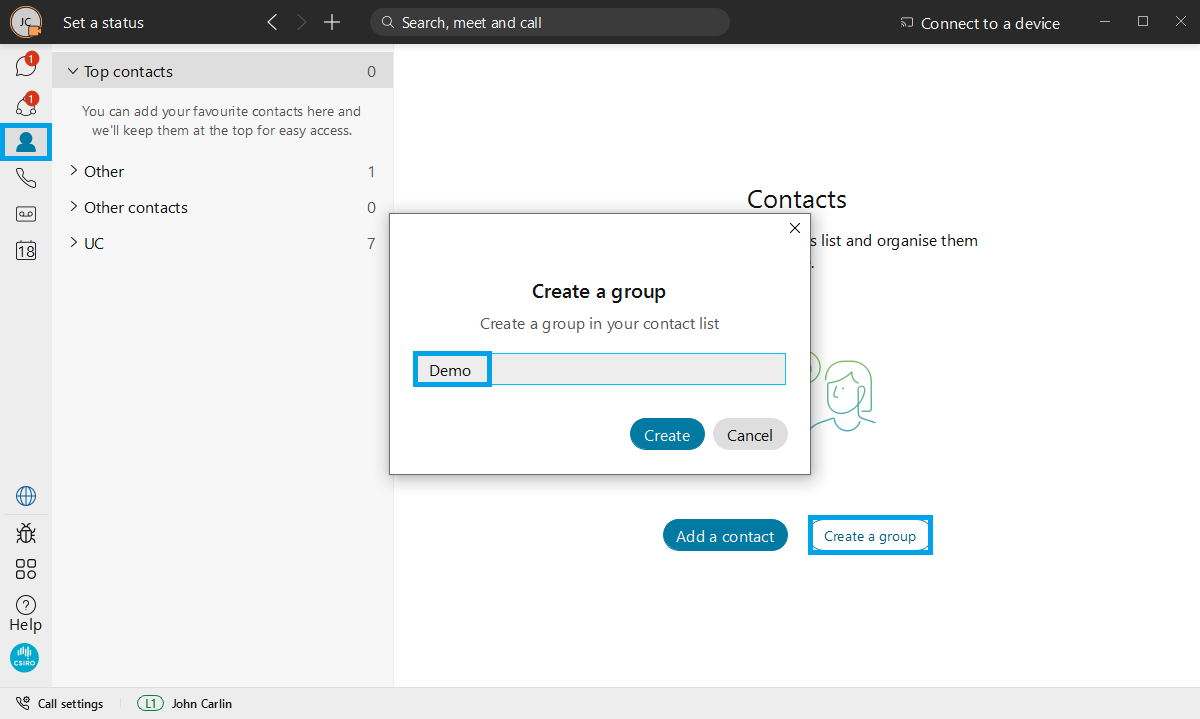
To create a contact group:
- Select the 'Contacts' tab
- Click 'Create a group'
- Enter a name for the group
-
Click 'Create'.
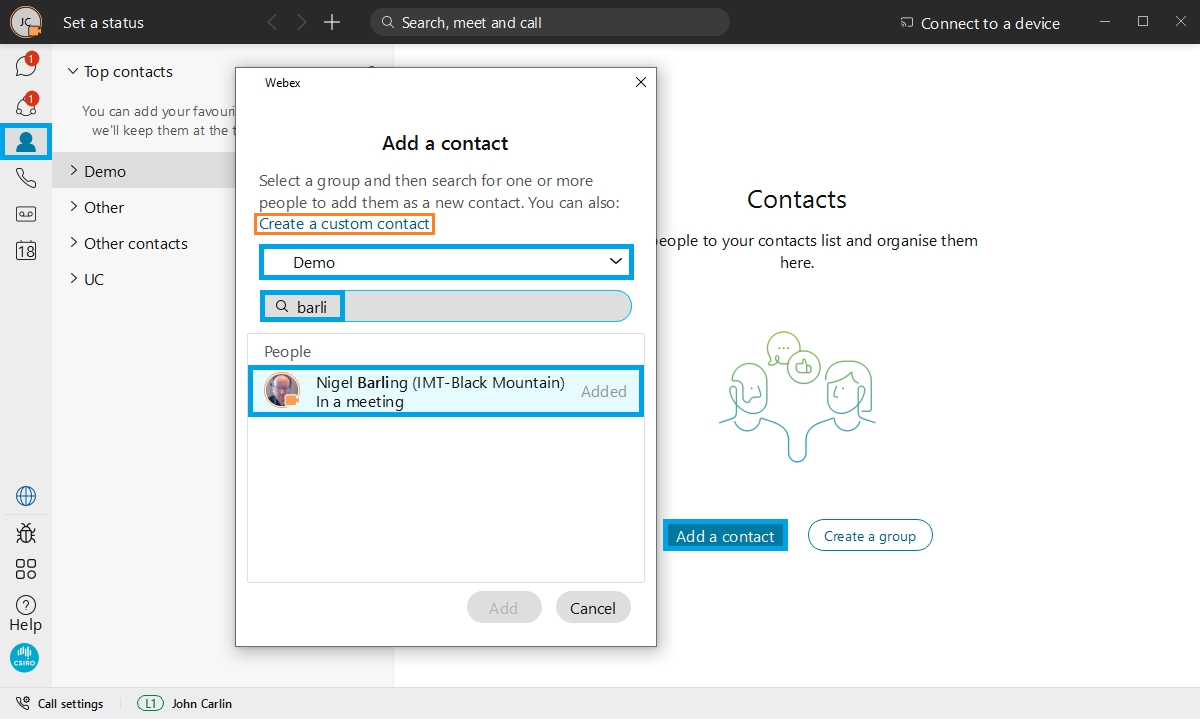
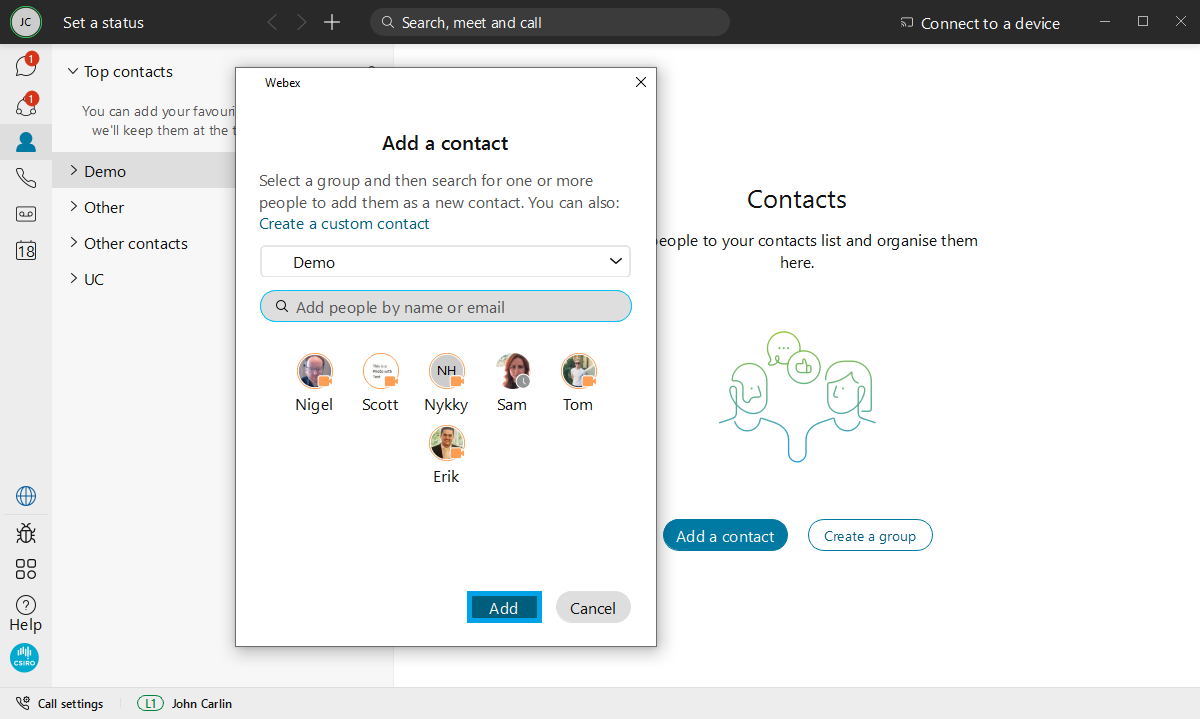
To add a contact:
- Select the 'Contacts' tab
- Click 'Add a contact'
- Select the group (if any) you wish to add the contact to
-
Search for the person you wish to add and click on the appropriate result
XTo add an external contact, click 'Create a custom contact'.
- Repeat for as many contacts as you wish to add
-
Click 'Add'
Contacts can be added to save having to search for people when you want to interact with them. Optionally, contacts can be sorted into groups to keep things organised. Contacts can be either CSIRO staff members or external people.
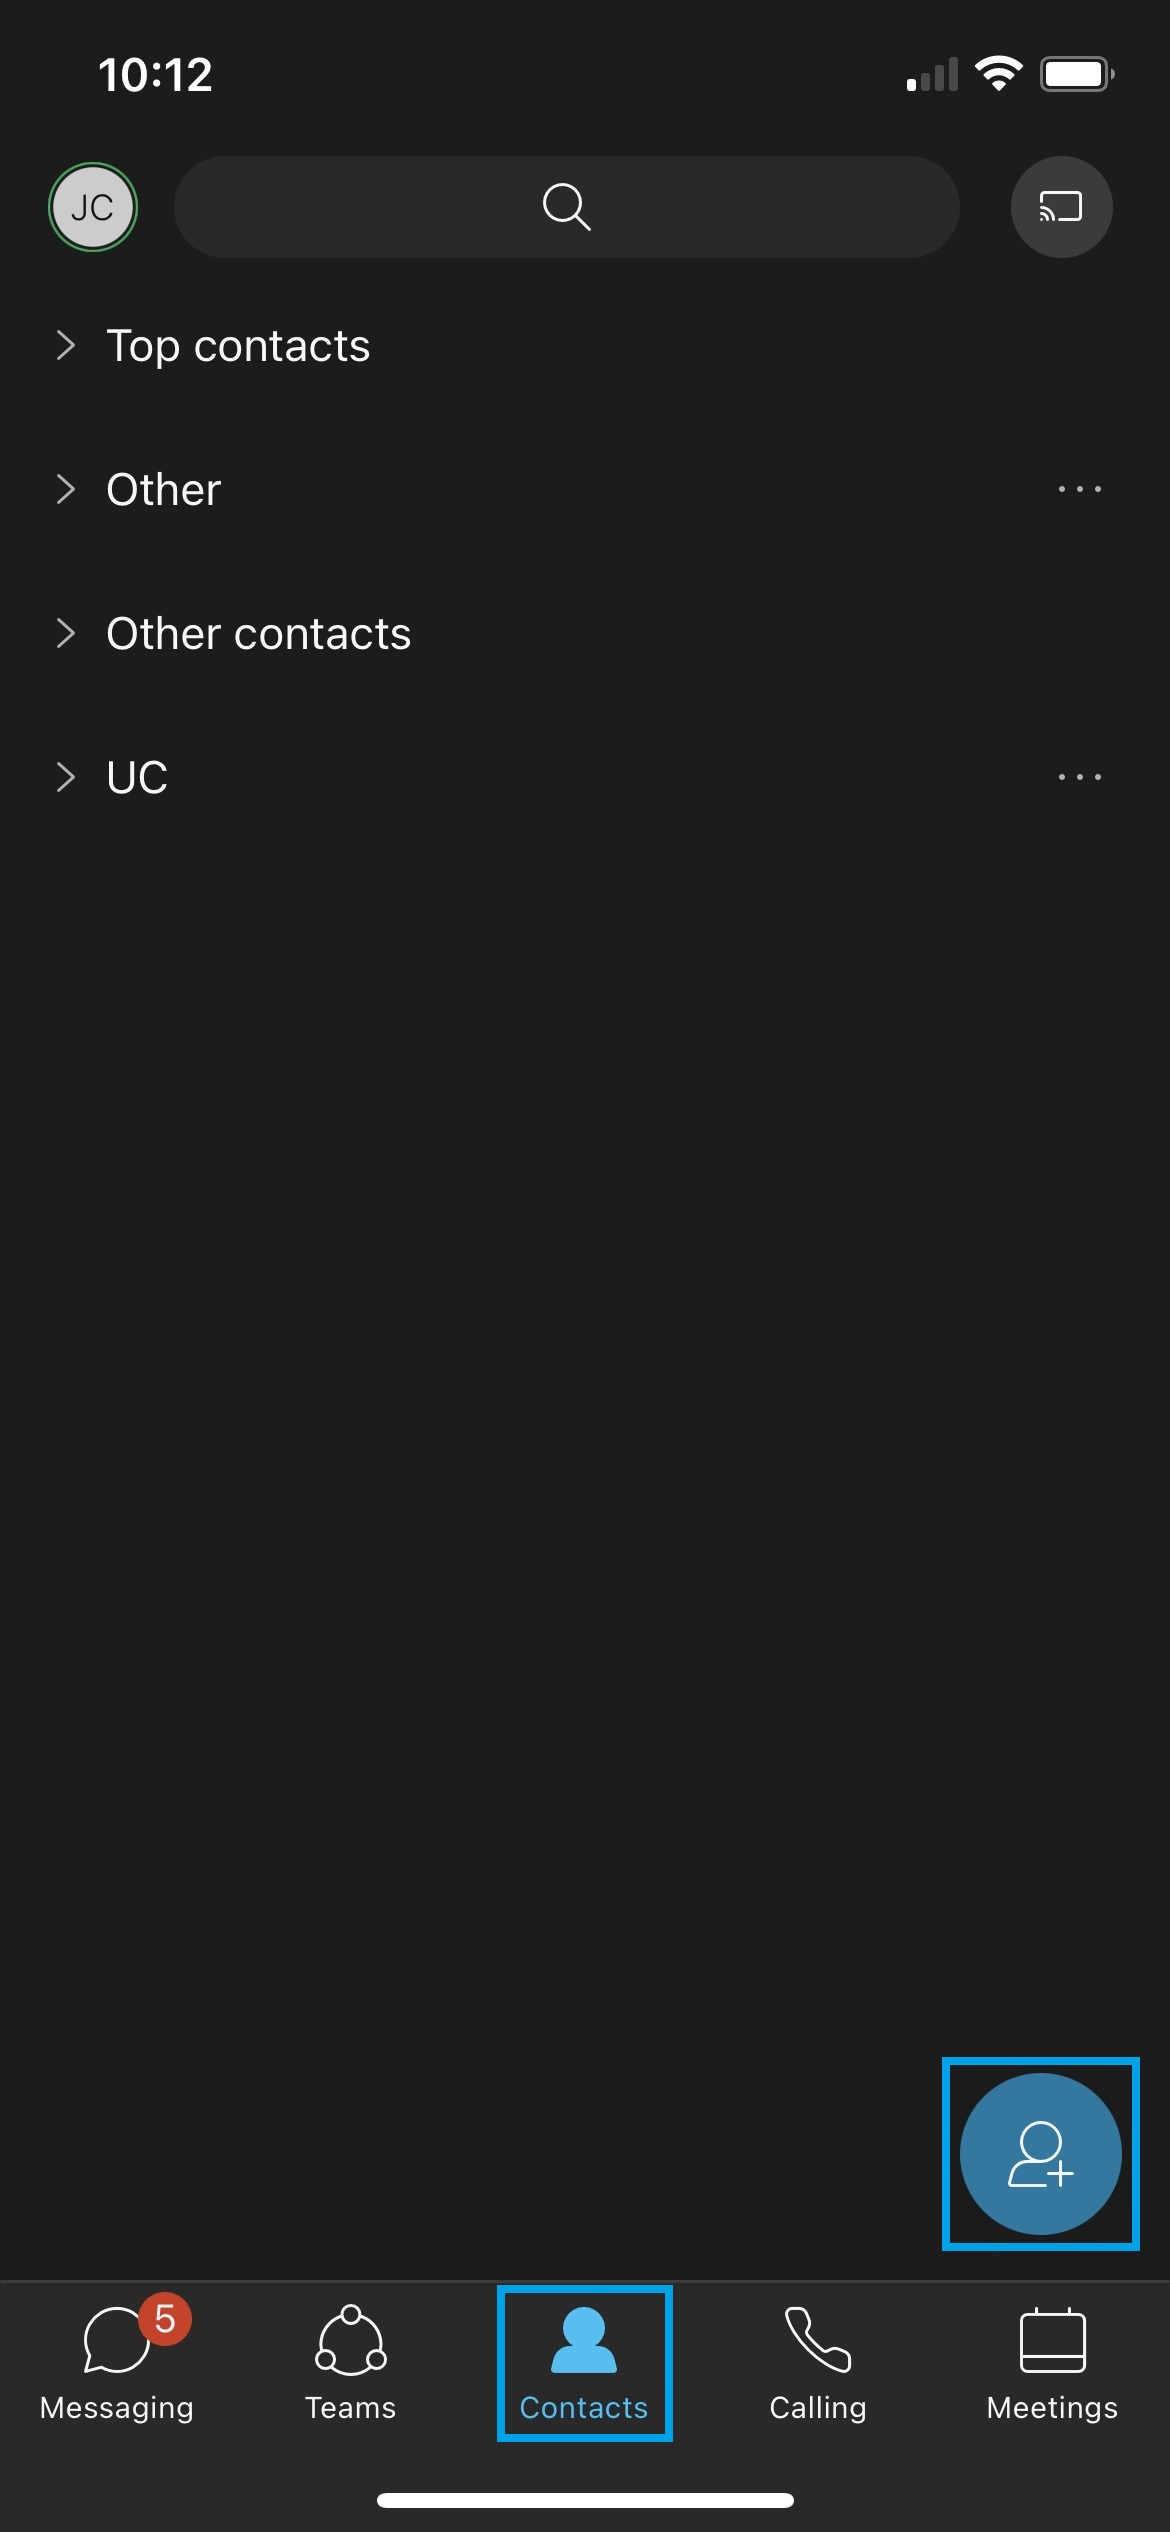
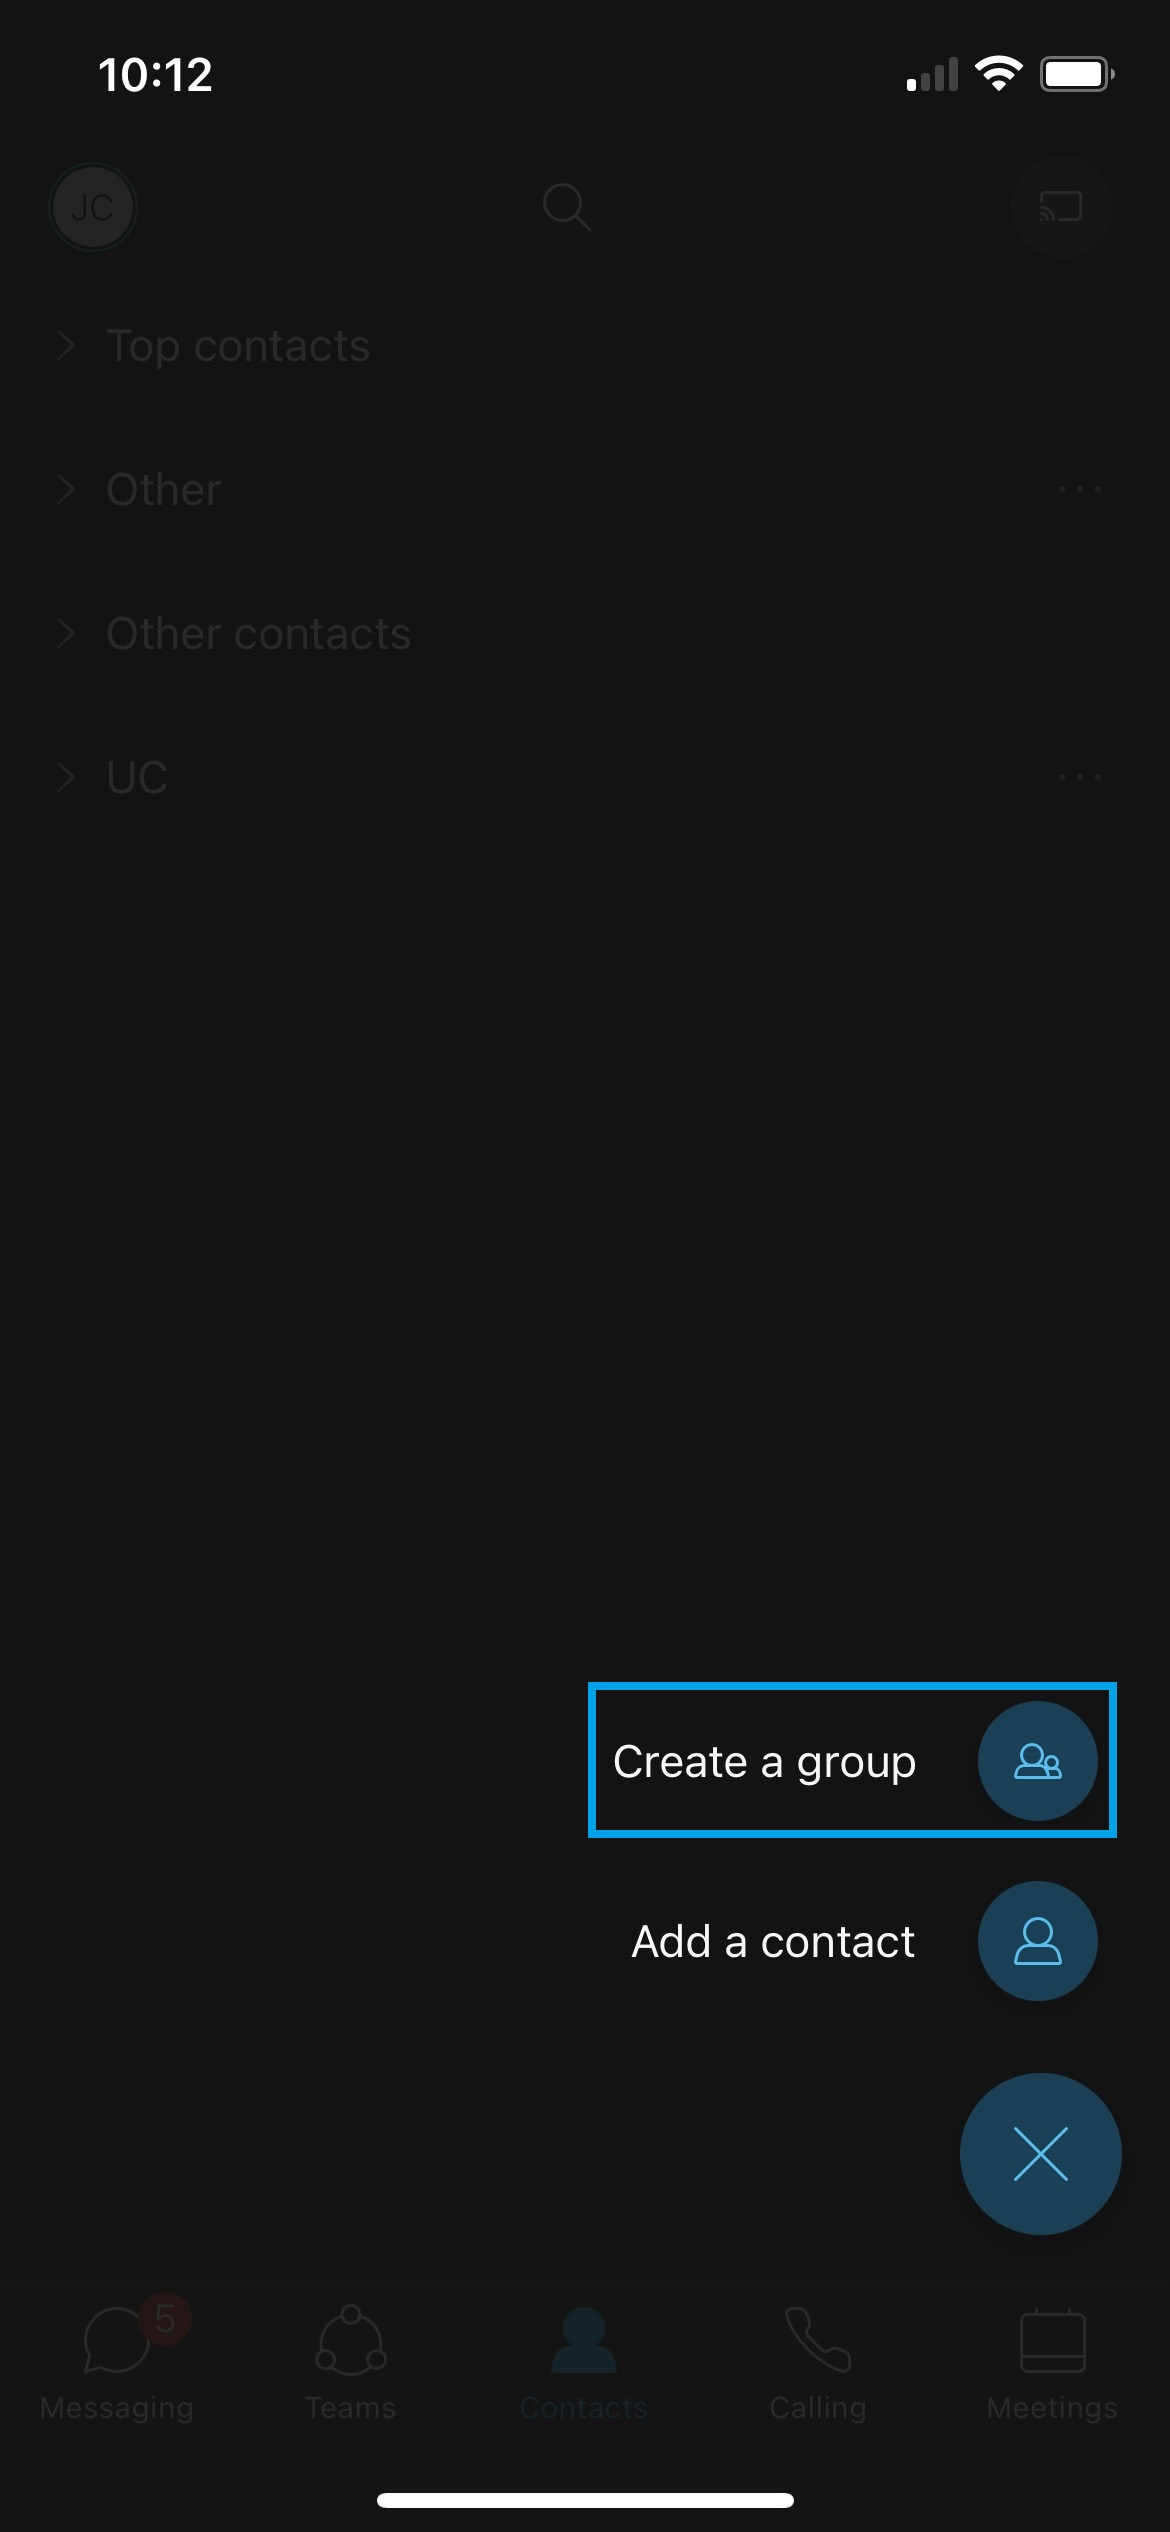
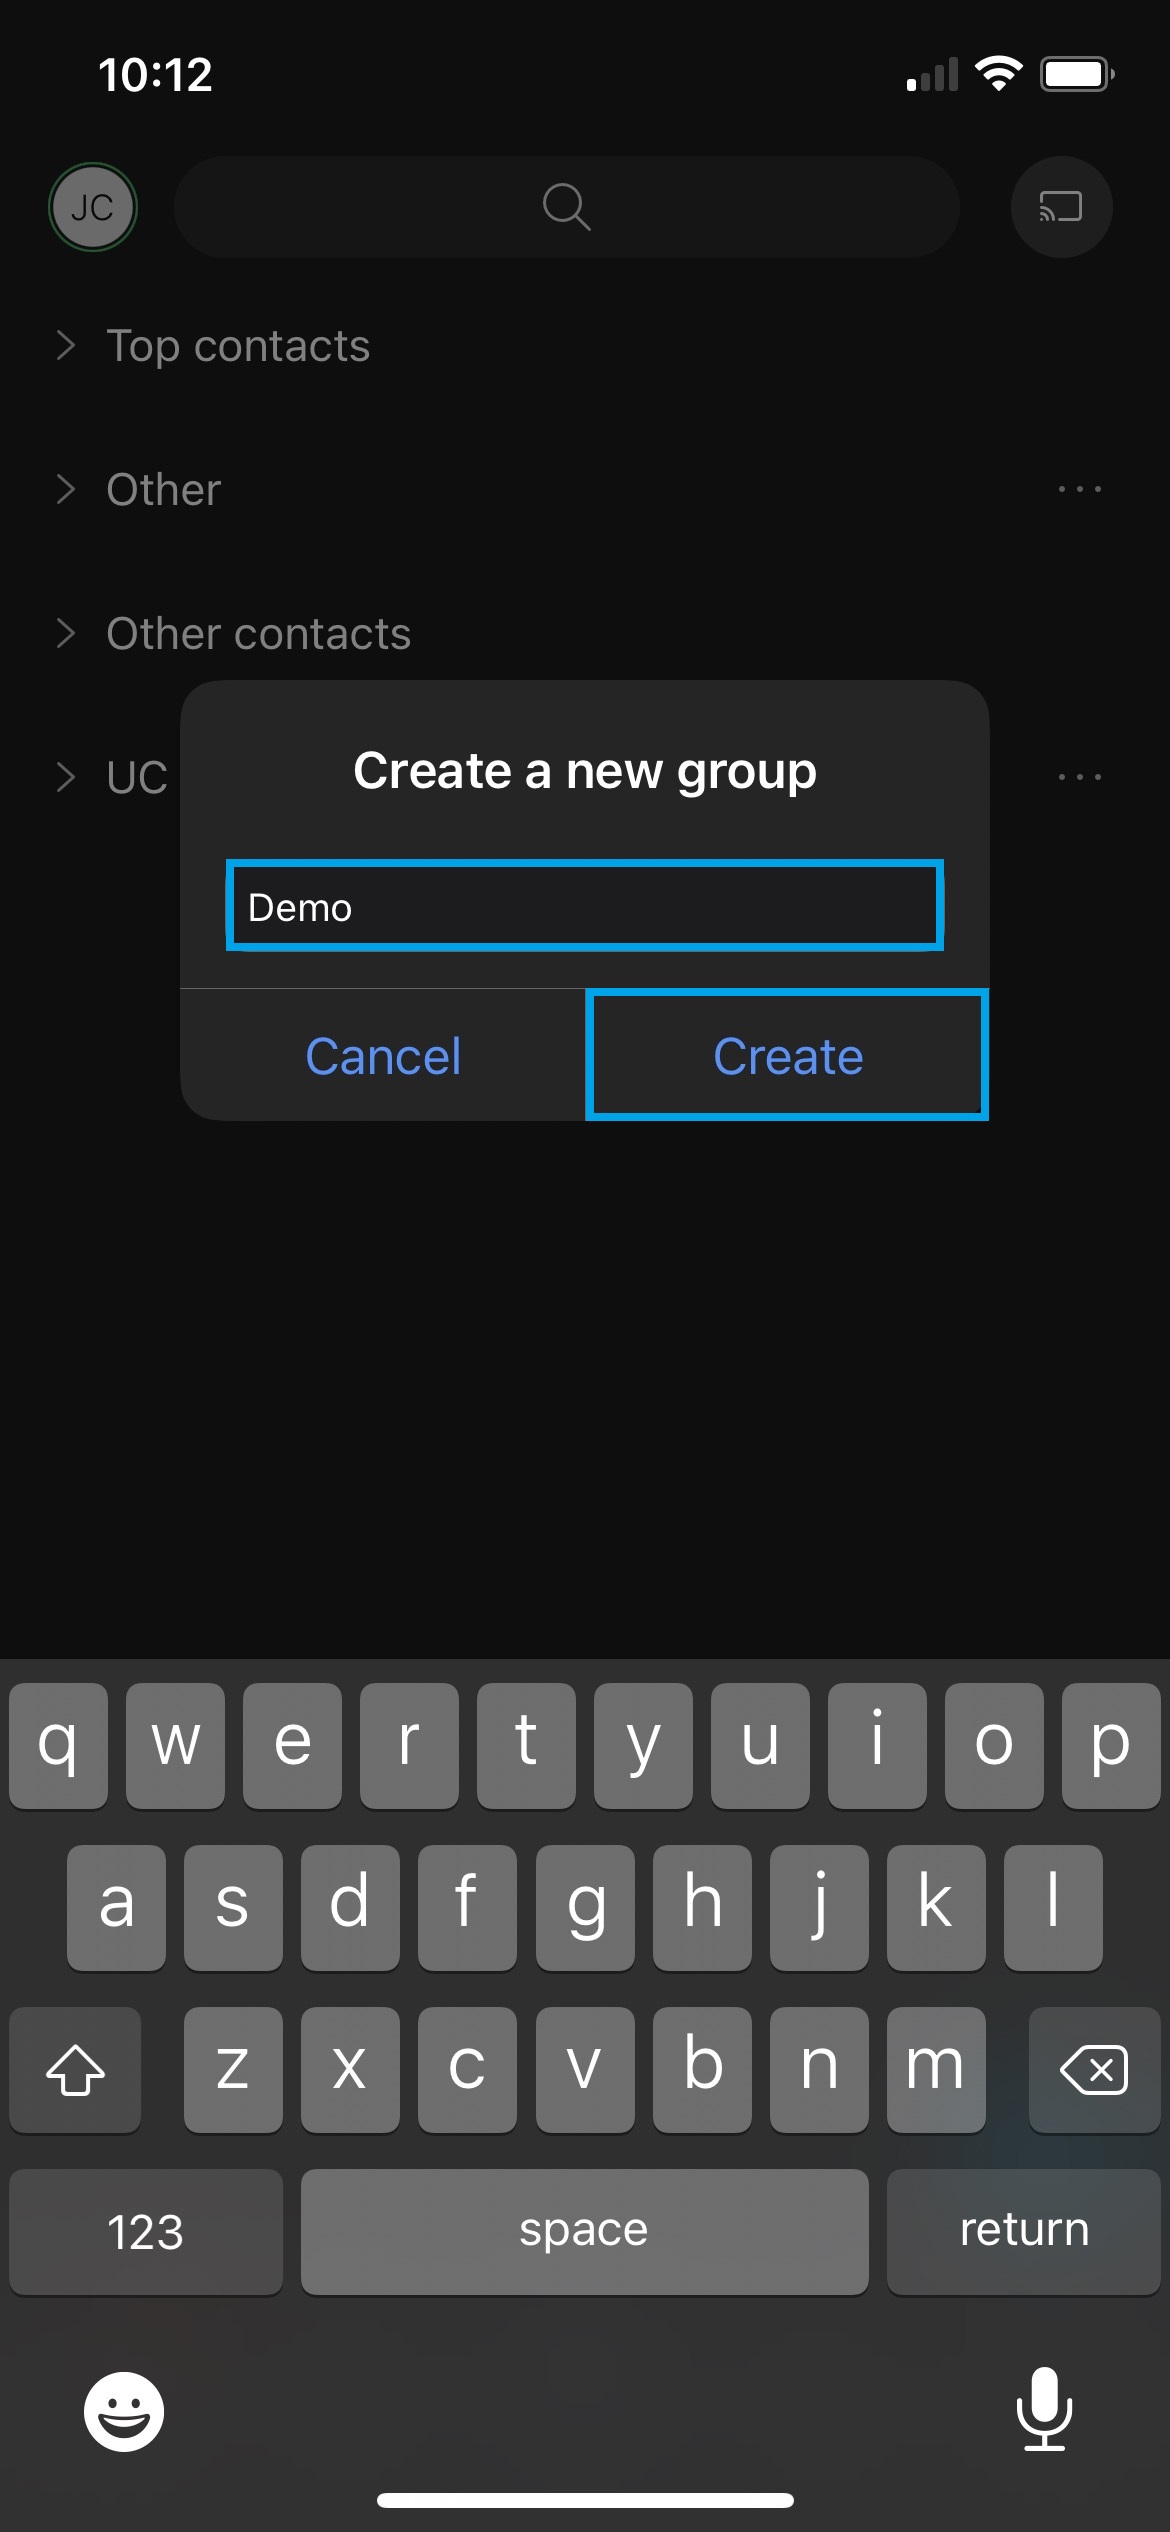
To create a contact group:
- Press the 'Contacts' tab and then press the new contact icon
- Press 'Create a group'
- Enter a name for the group
-
Press 'Create'.
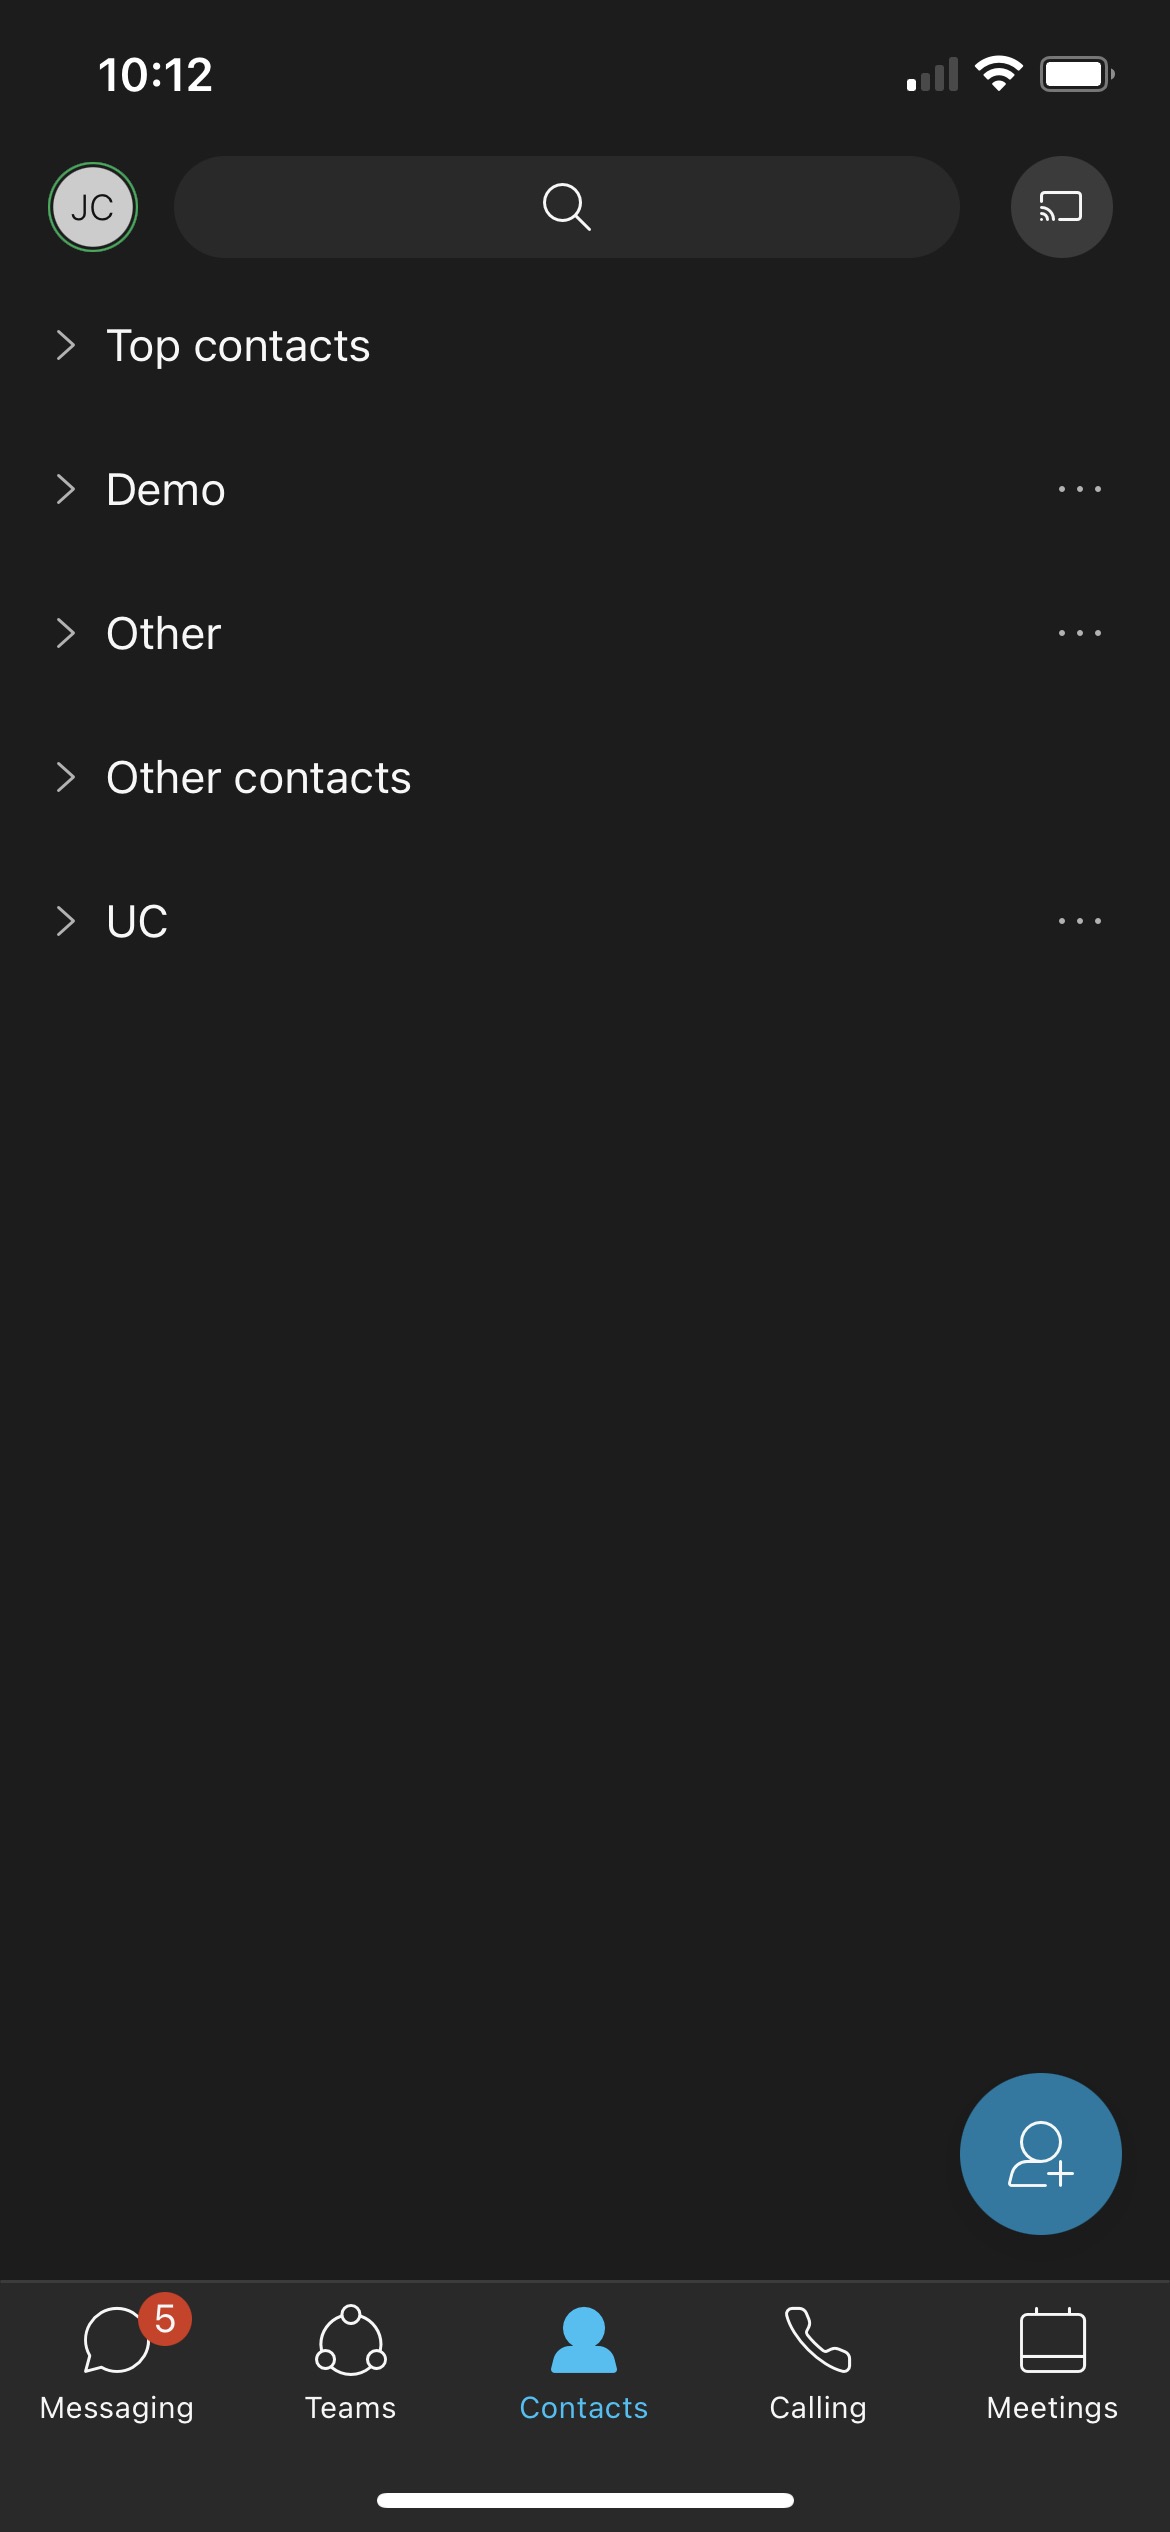
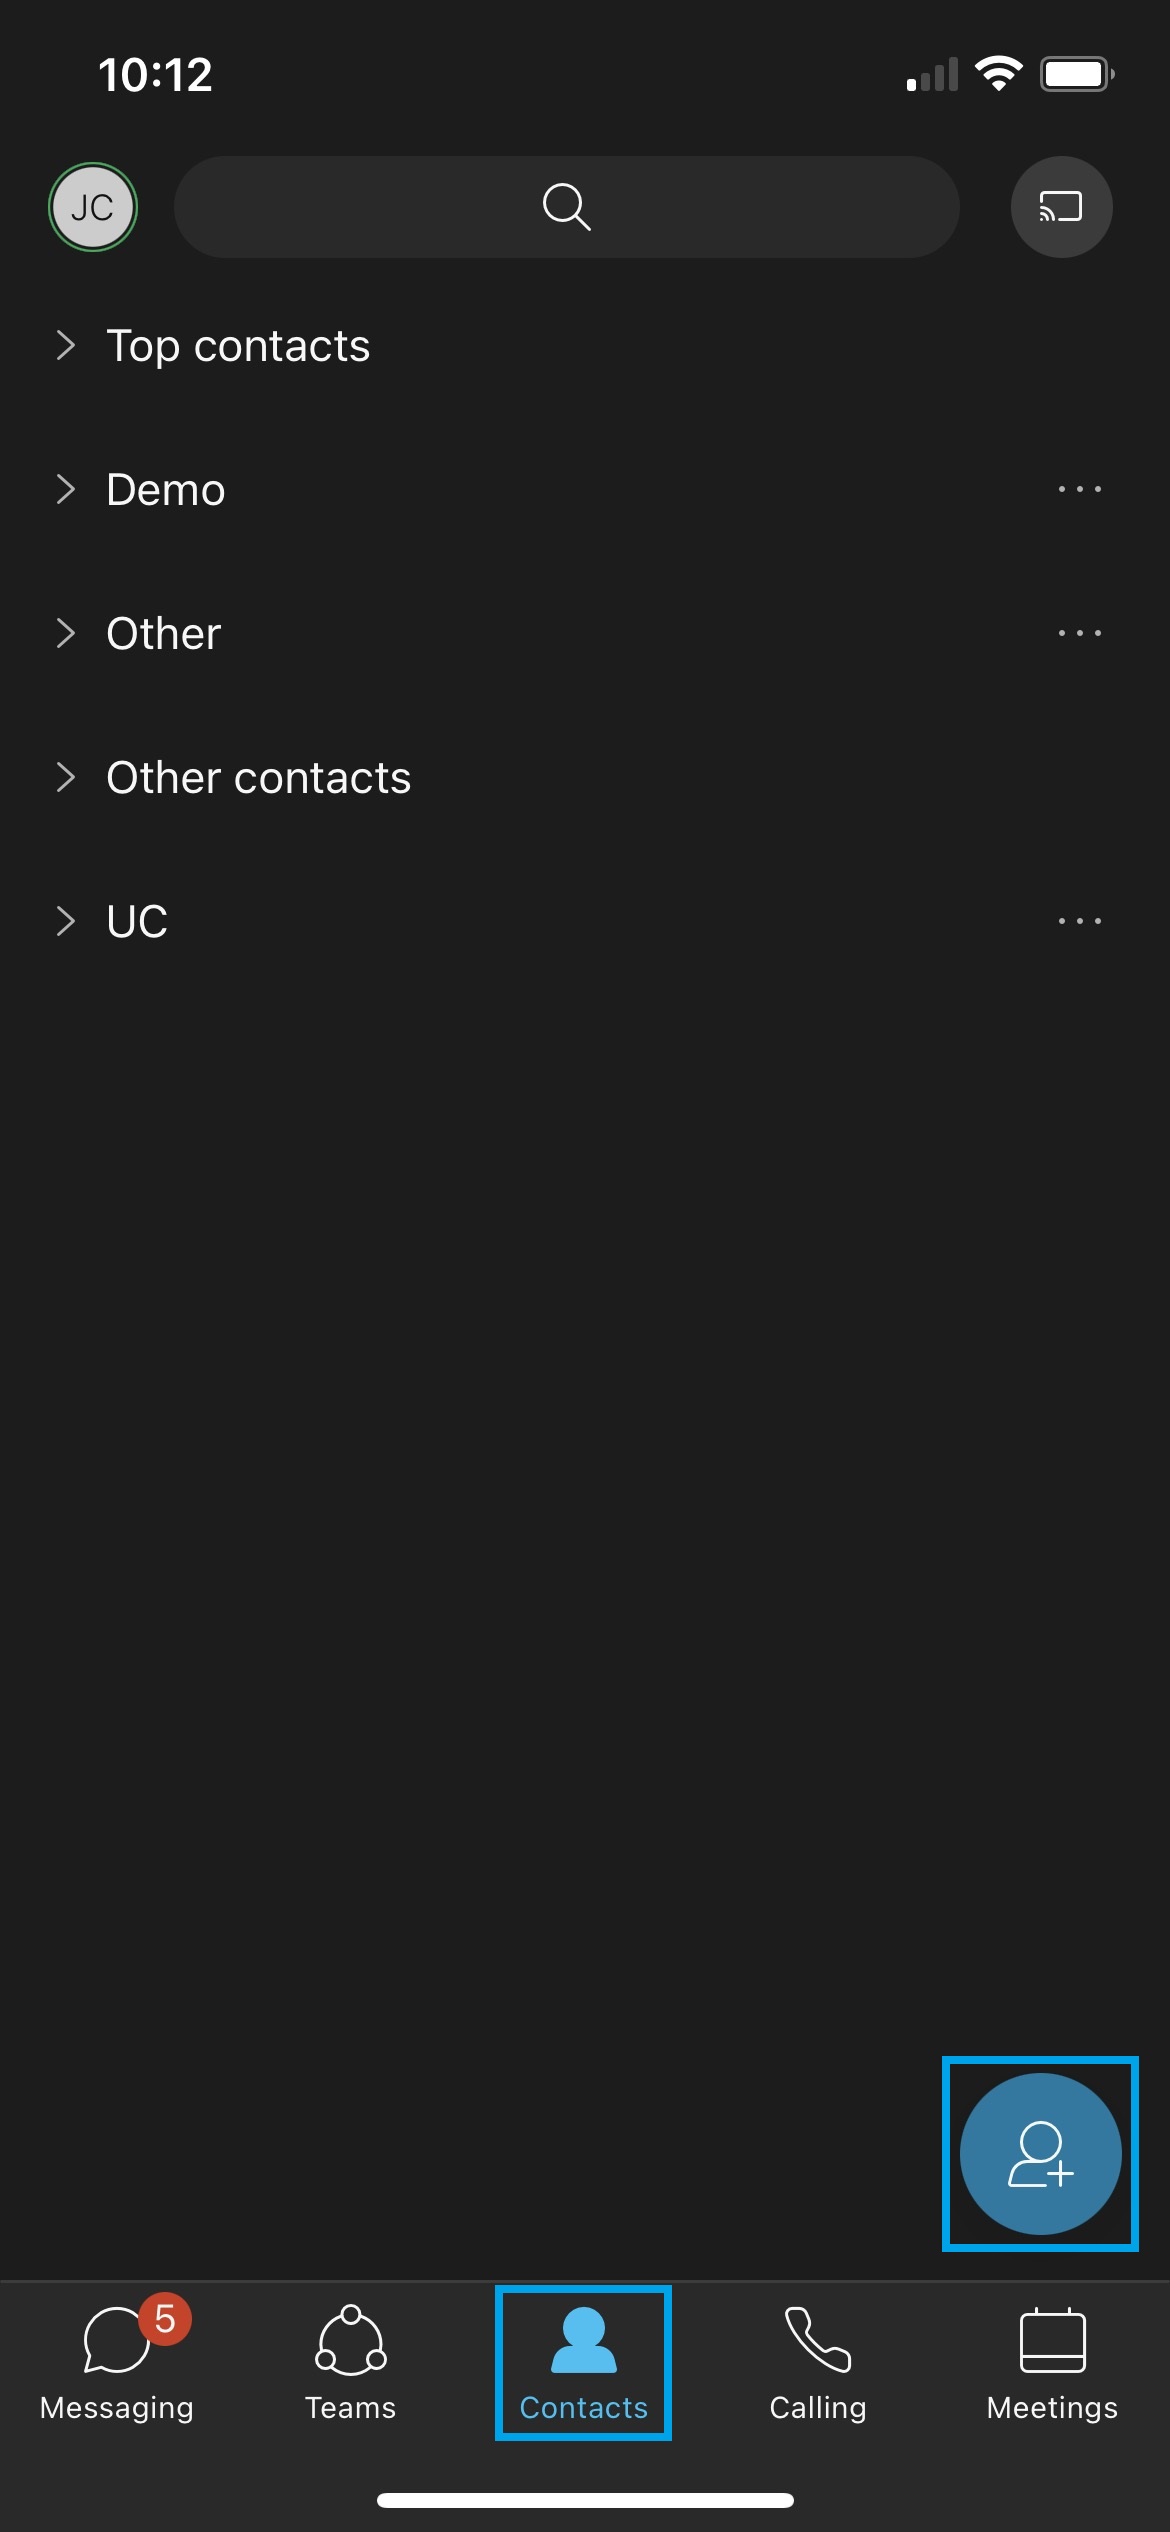
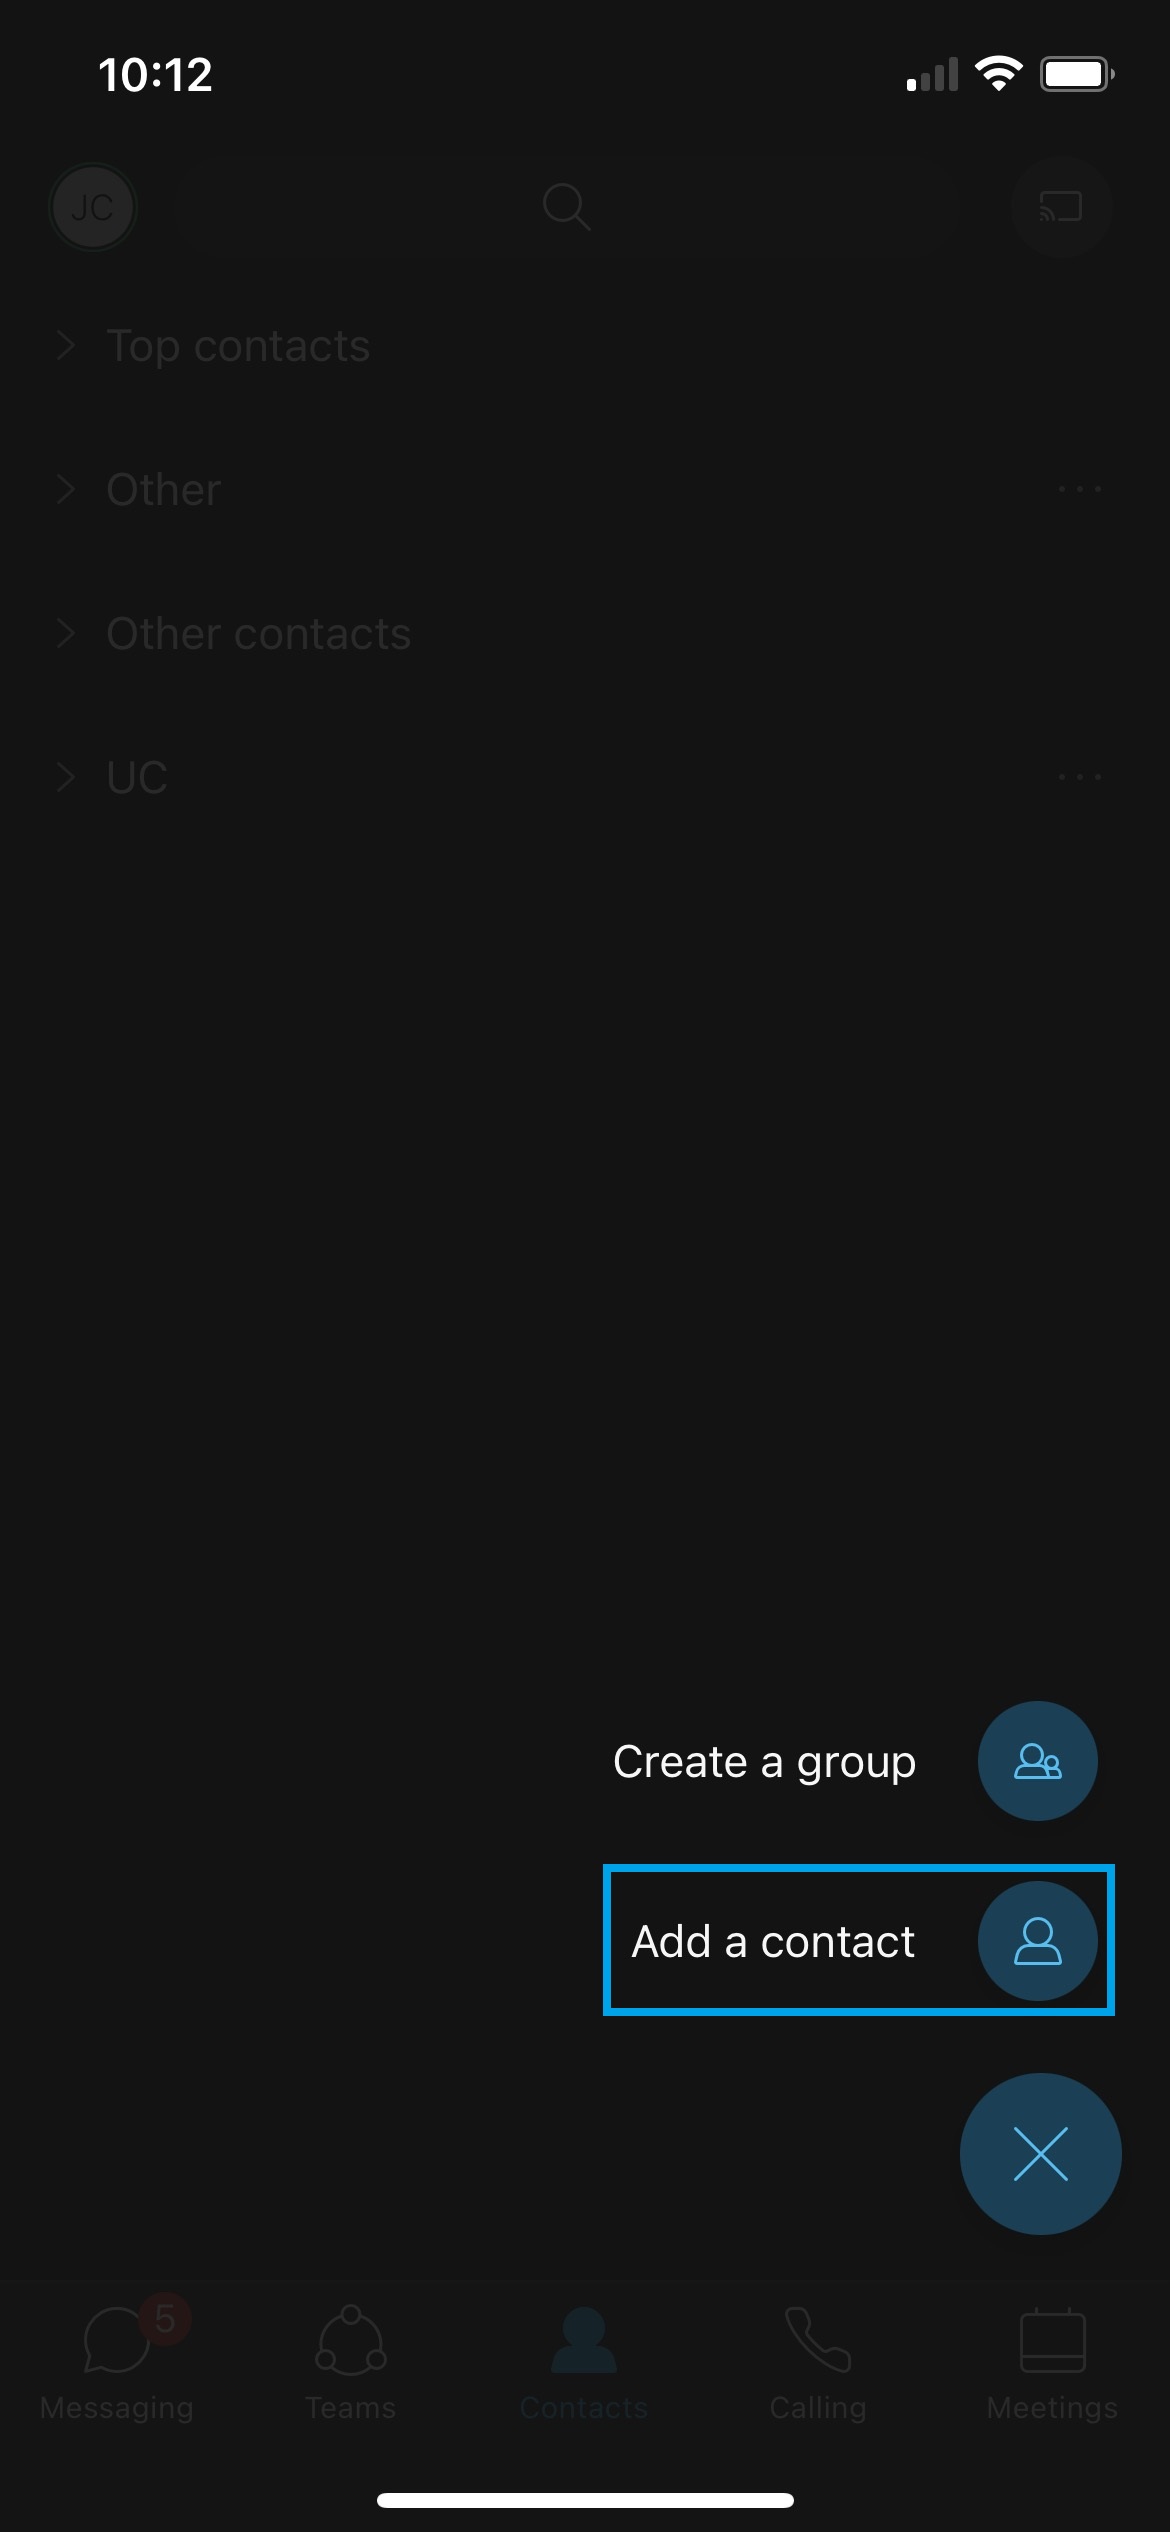
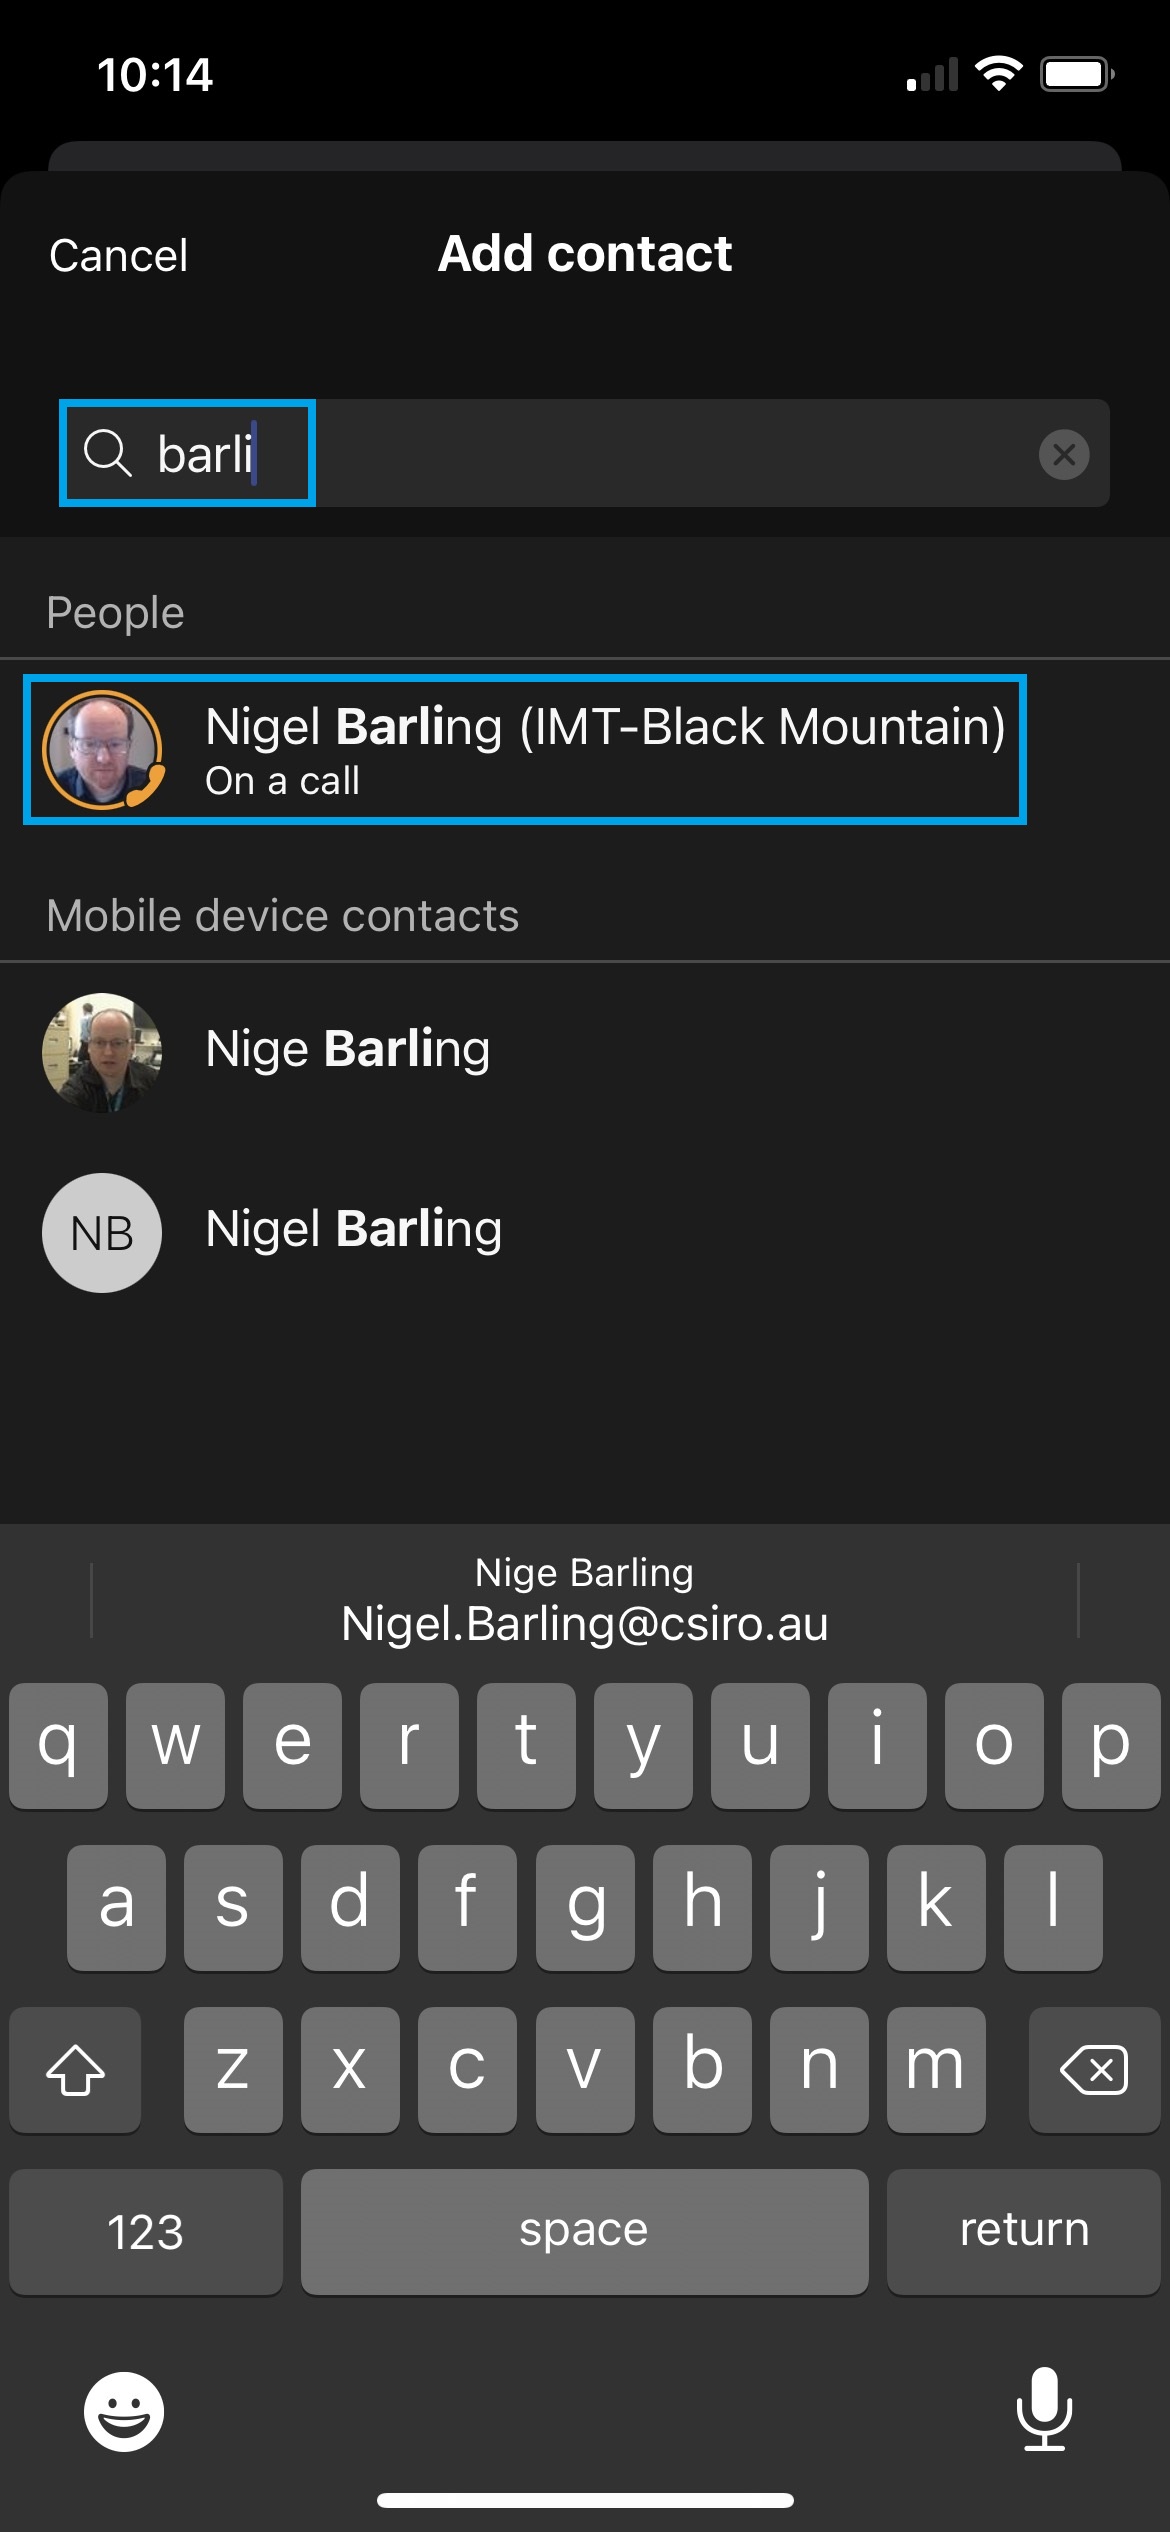
To add a contact:
- Press the 'Contacts' tab and then press the new contact icon
- Press 'Add a contact'
- Search for the person you wish to add and select the appropriate result
- Repeat for as many contacts as you wish to add
-
Select the group you wish to add the contact(s) to and press 'Done'.
Presence>
Webex App shows the presence status of contacts so that you can tell when they are free or busy. Presence consists of a coloured circle around a contact's name/profile picture (green for active, orange for busy, black for inactive, red for do not disturb), an automatically set status (active, inactive, in a meeting, on a call, out of office), as well as status text providing more information (e.g. working from home, back in X hours).
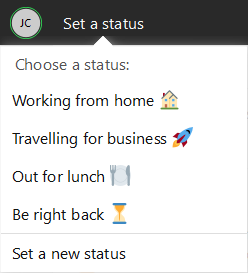
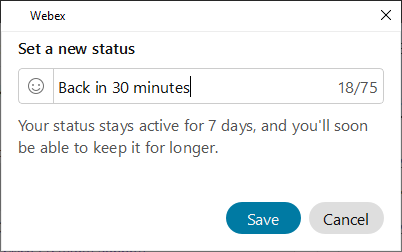
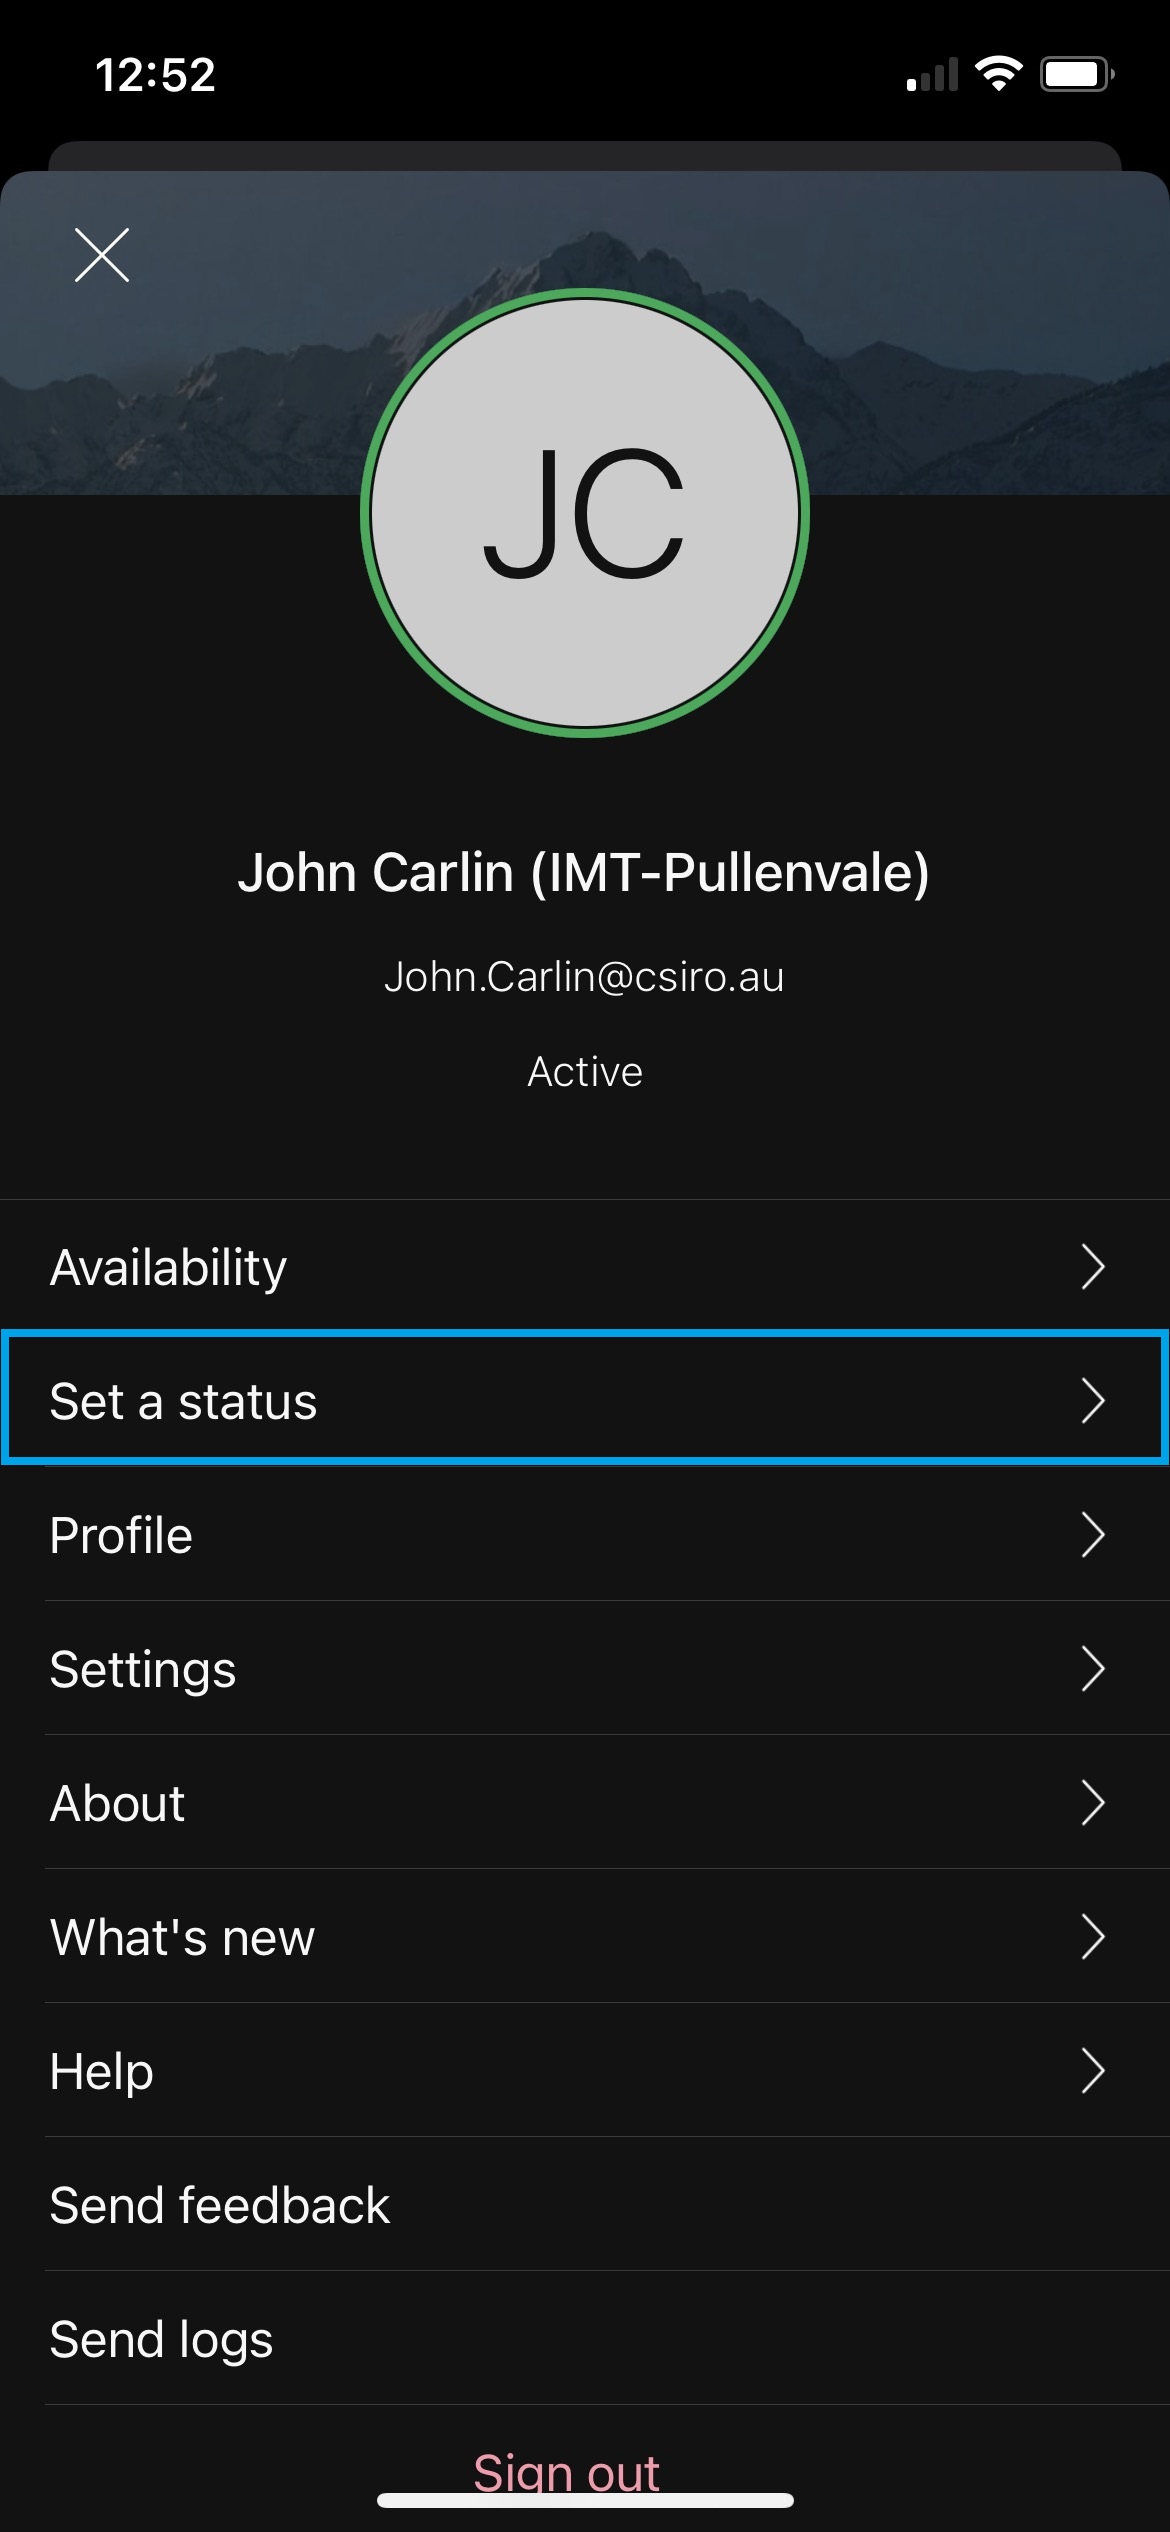
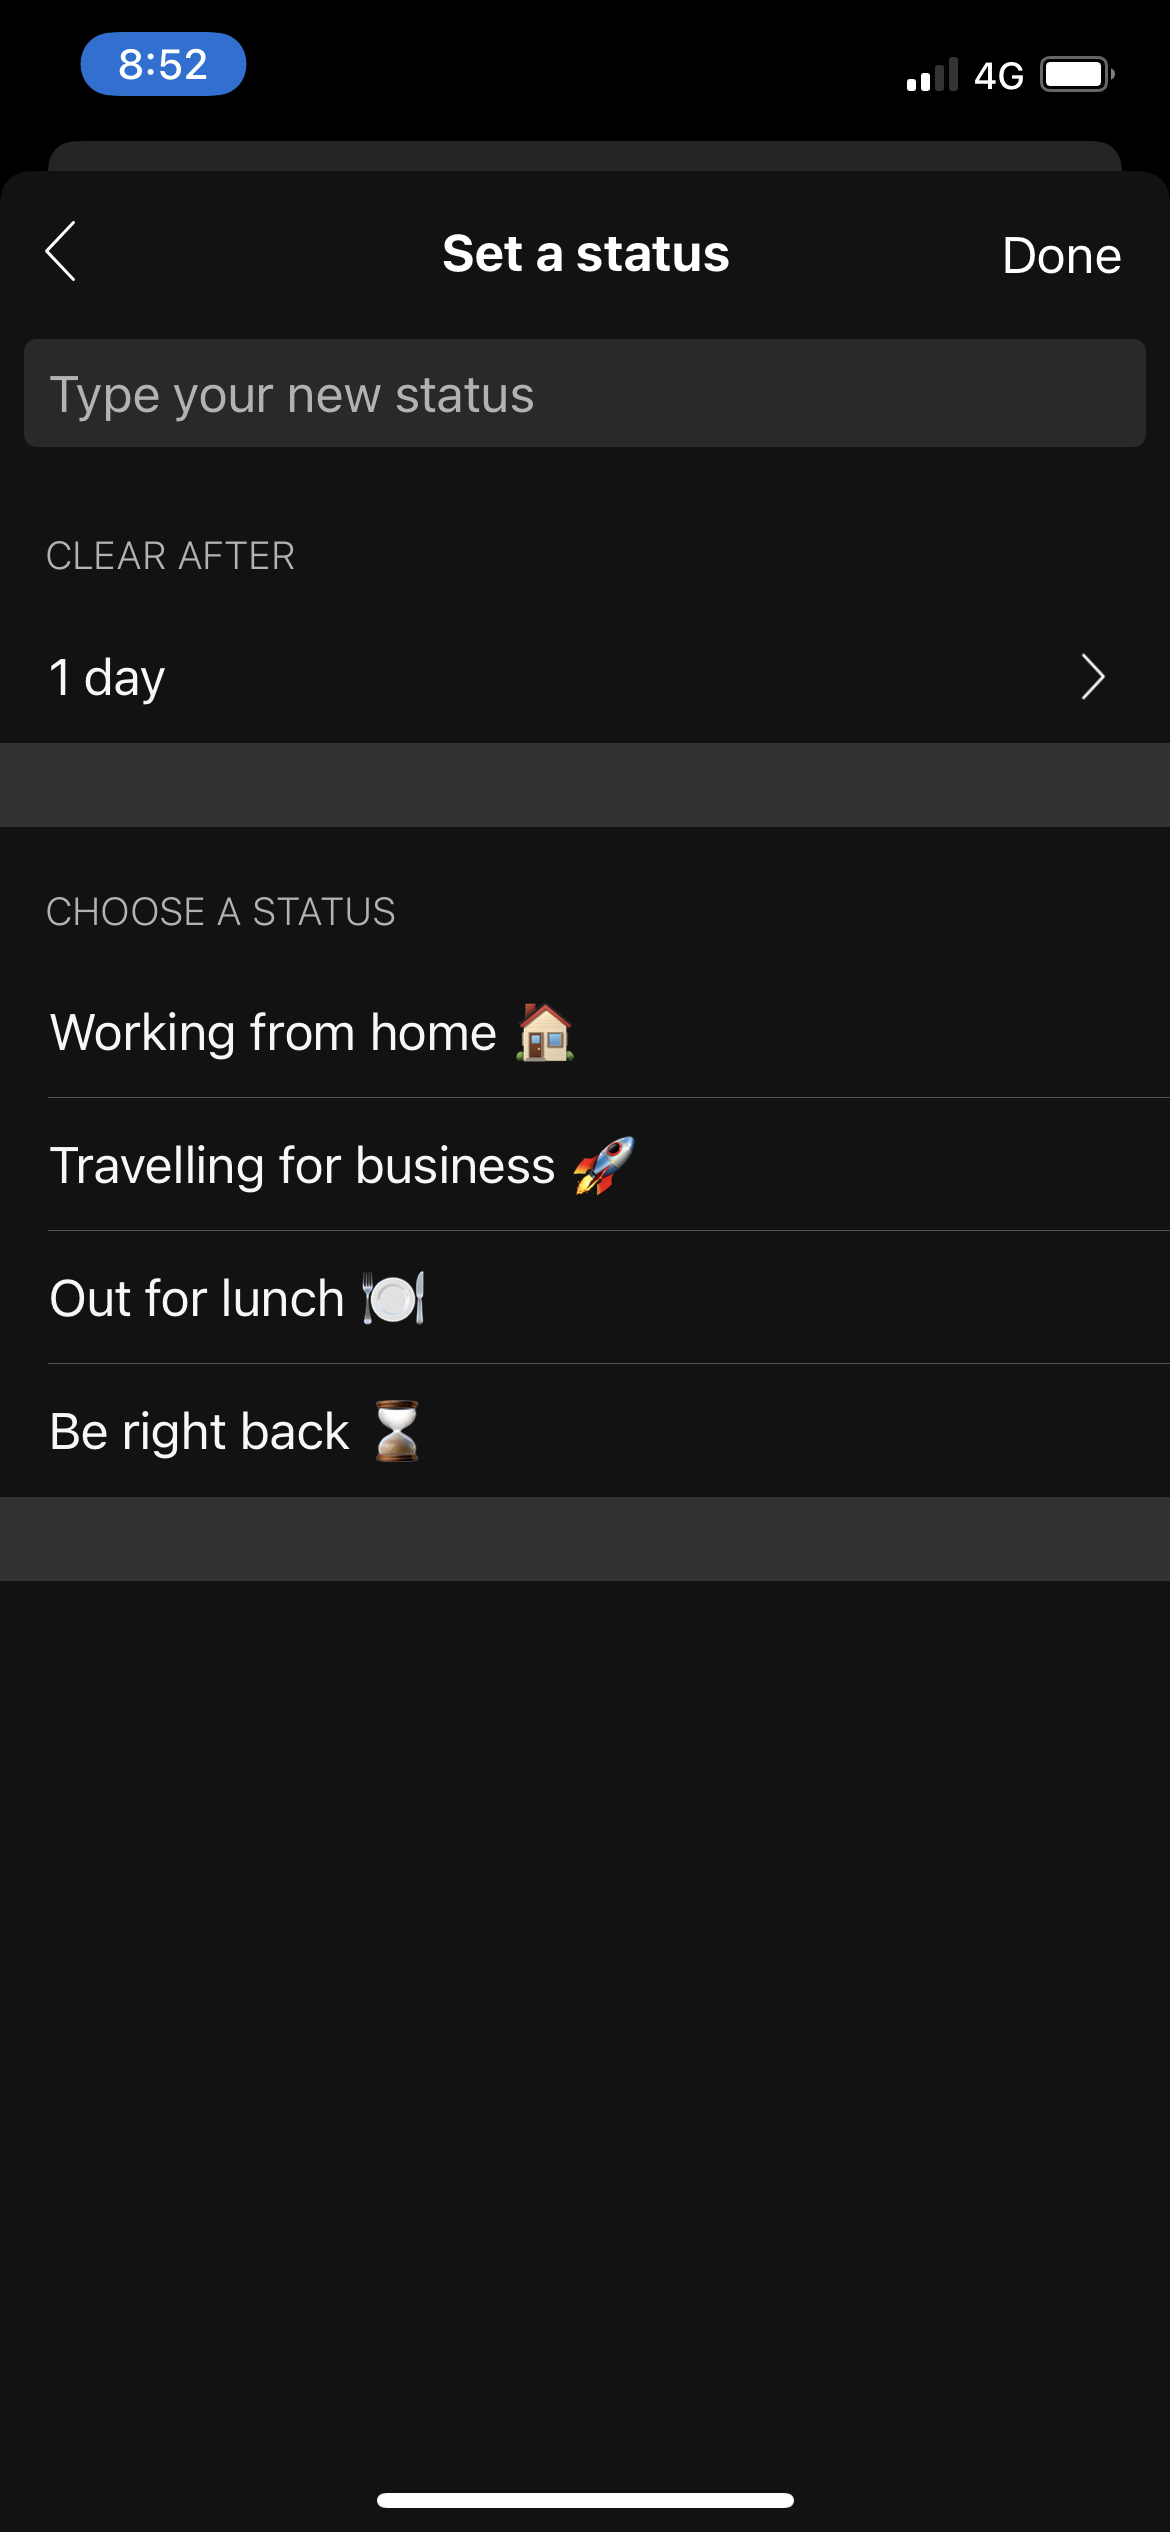
To set custom status text:
- Click your current status in the top left corner
-
Select from one of the existing options, or click 'Set a new status'.
- Press your profile icon in the top left corner
- Press 'Set a status'
- Select from one of the existing options, or 'Type your new status'
-
Press 'Done'.

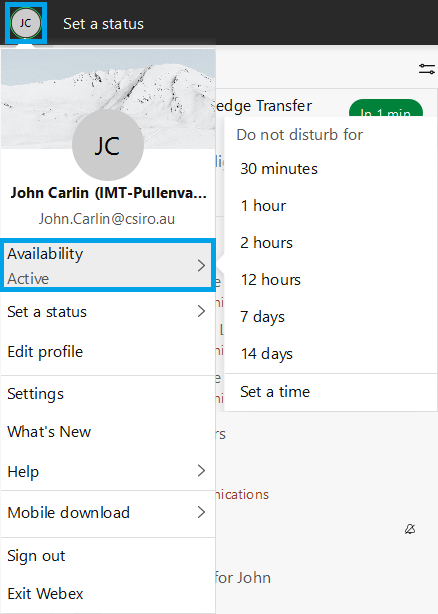
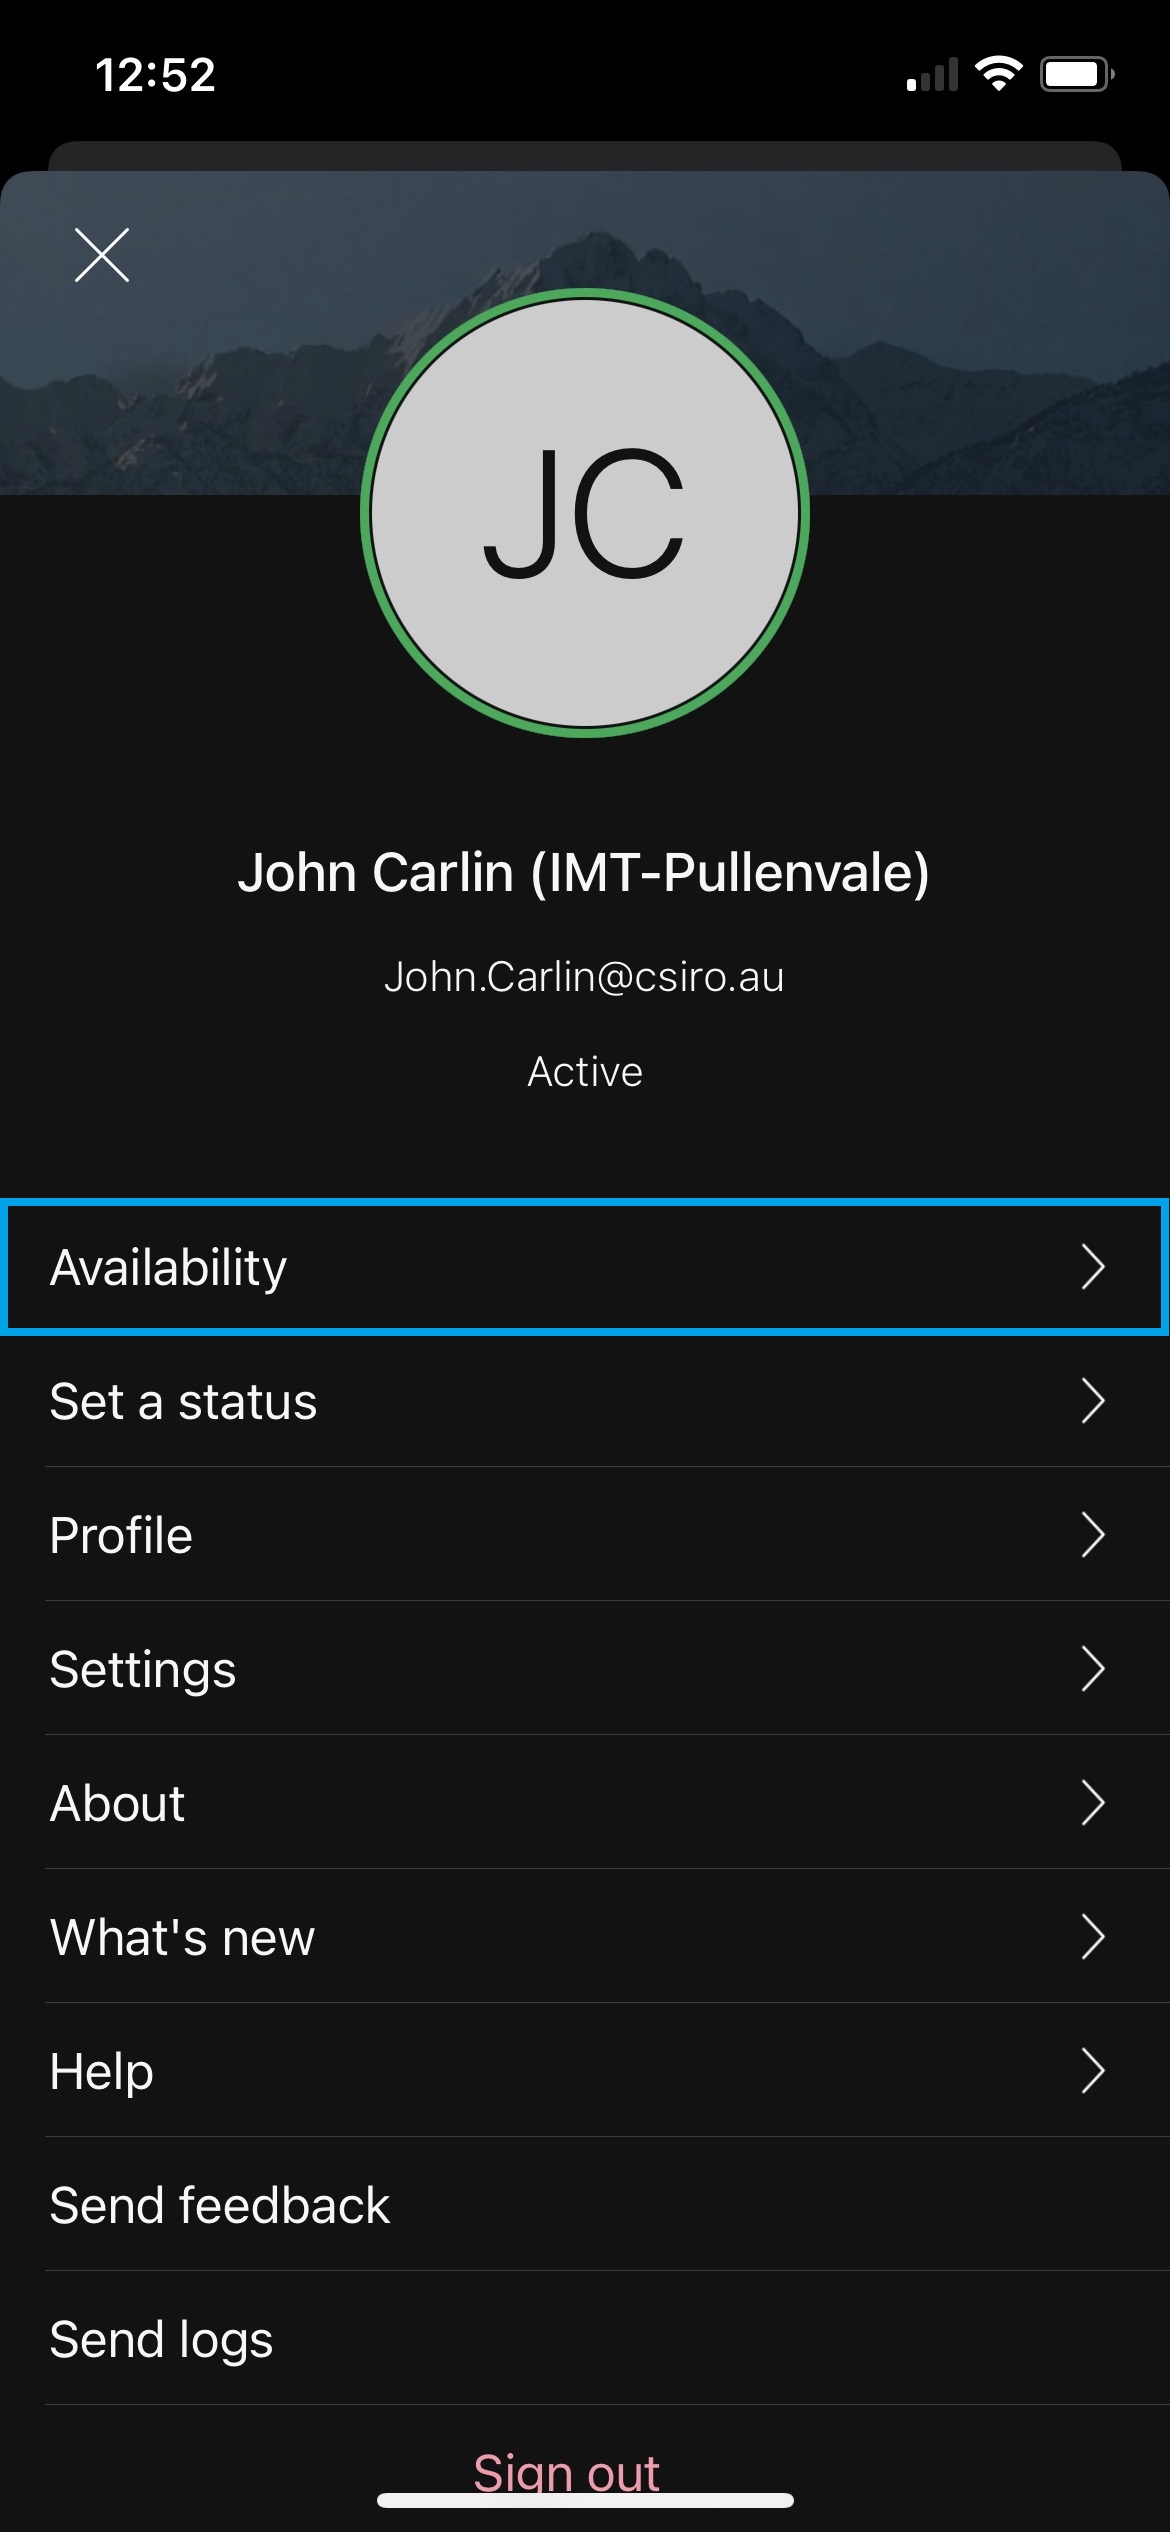
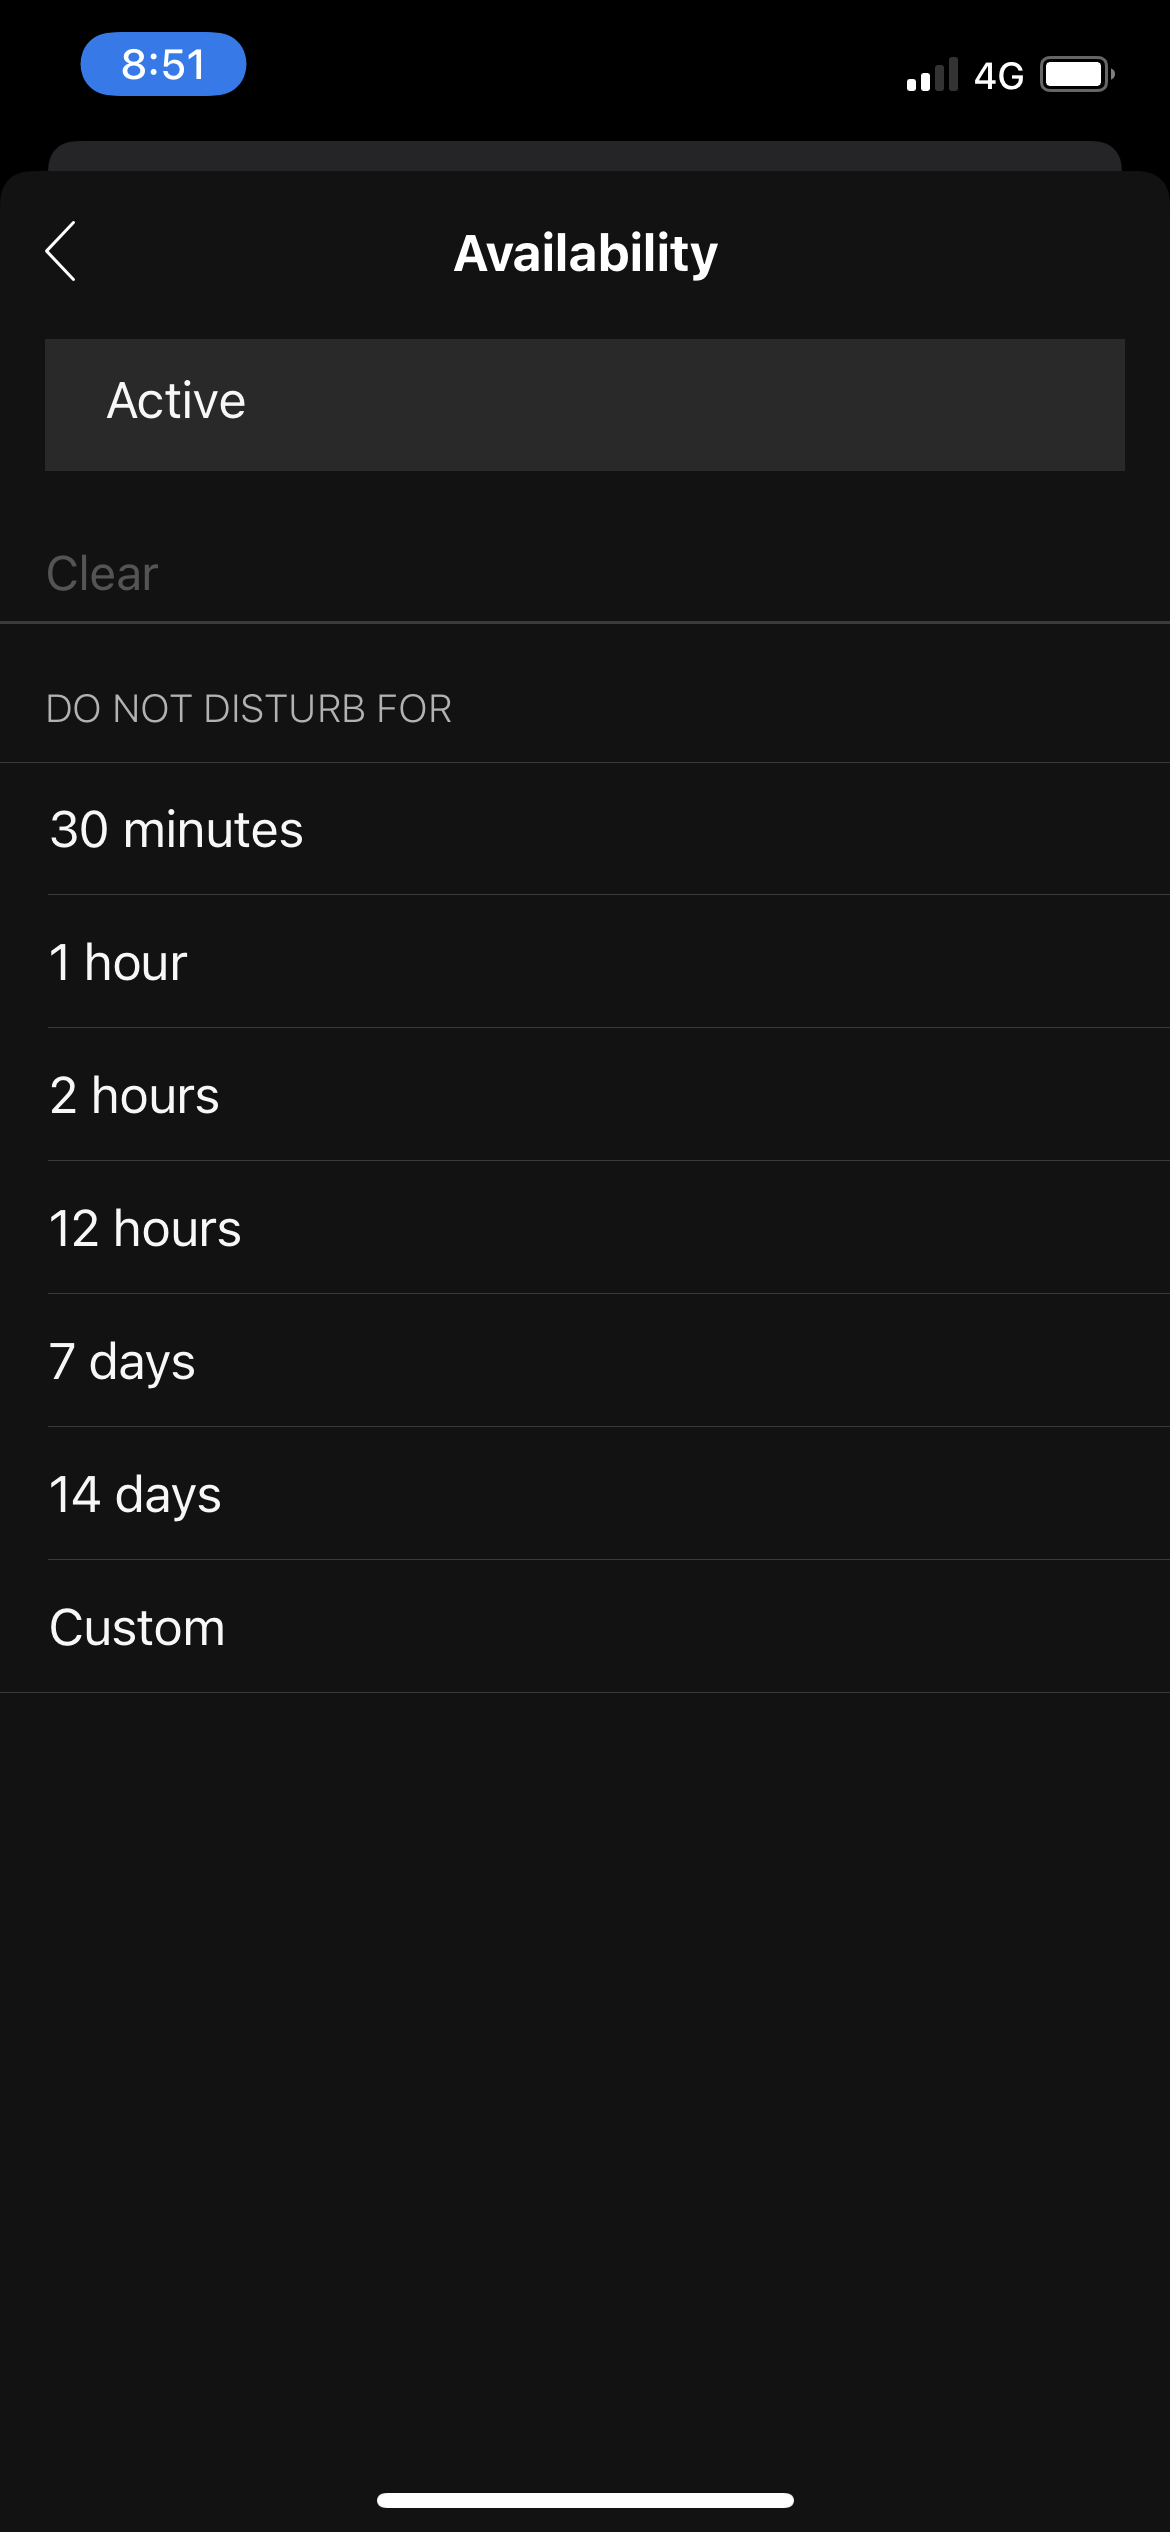
Do not disturb mode mutes notifications you would otherwise get for messages and incoming calls. To set your status to 'do not disturb':
- Click your profile icon in the top left corner
- Click 'Availability'
-
Select how long you would like to be in 'do not disturb' mode.
- Press your profile icon in the top left corner
- Press 'Availability'
-
Select how long you would like to be in 'do not disturb' mode.

Phone control>
Webex App can be used in conjunction with your desktop phone to place and receive calls. When used in this mode, your phone handset/headset is used to send and receive audio - video is not possible in this mode.
To change to phone mode:
- Click 'Connect to a device' (top right corner)
-
Click your desktop phone located in the 'Personal devices' section.
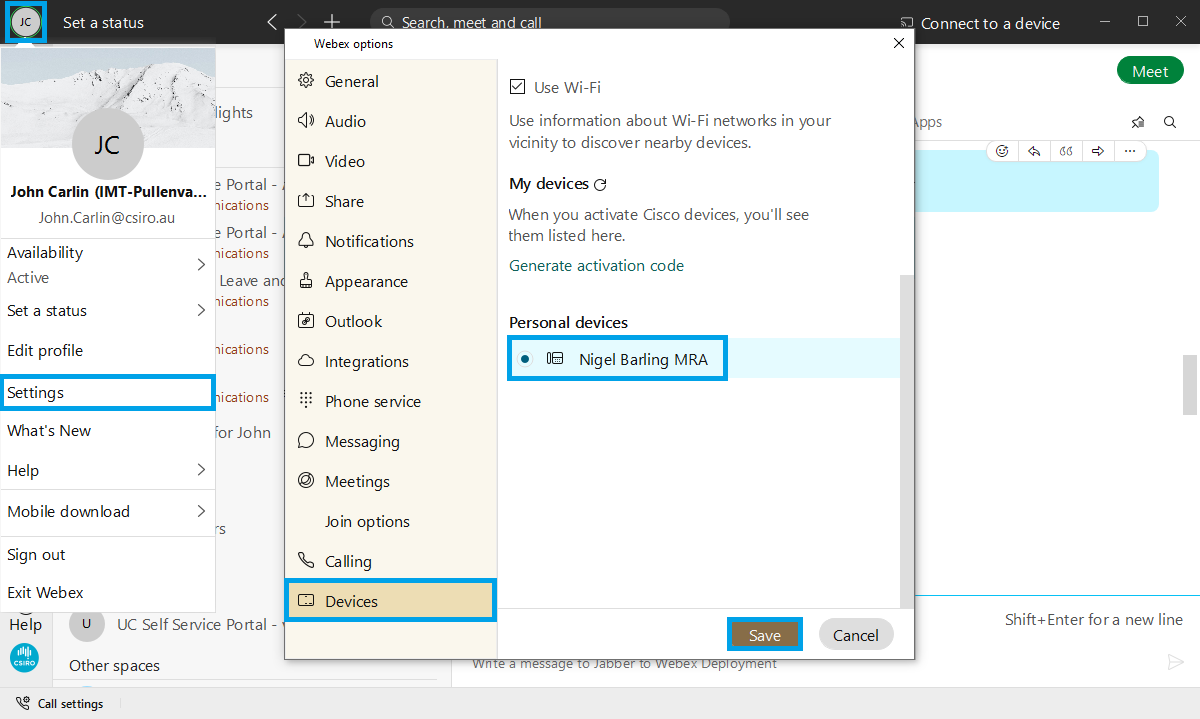
Alternatively:
- Click your profile icon in the top left corner
- Click 'Settings'
- Click 'Devices'
-
Select your physical phone and click 'Save'.
Pairing with video conferencing units>
Webex App can be used to pair with video conferencing (VC) units for the purpose of wirelessly sharing your laptop screen, or to join Webex Meetings using the paired unit allowing you to control the unit's microphone and speaker using your laptop.
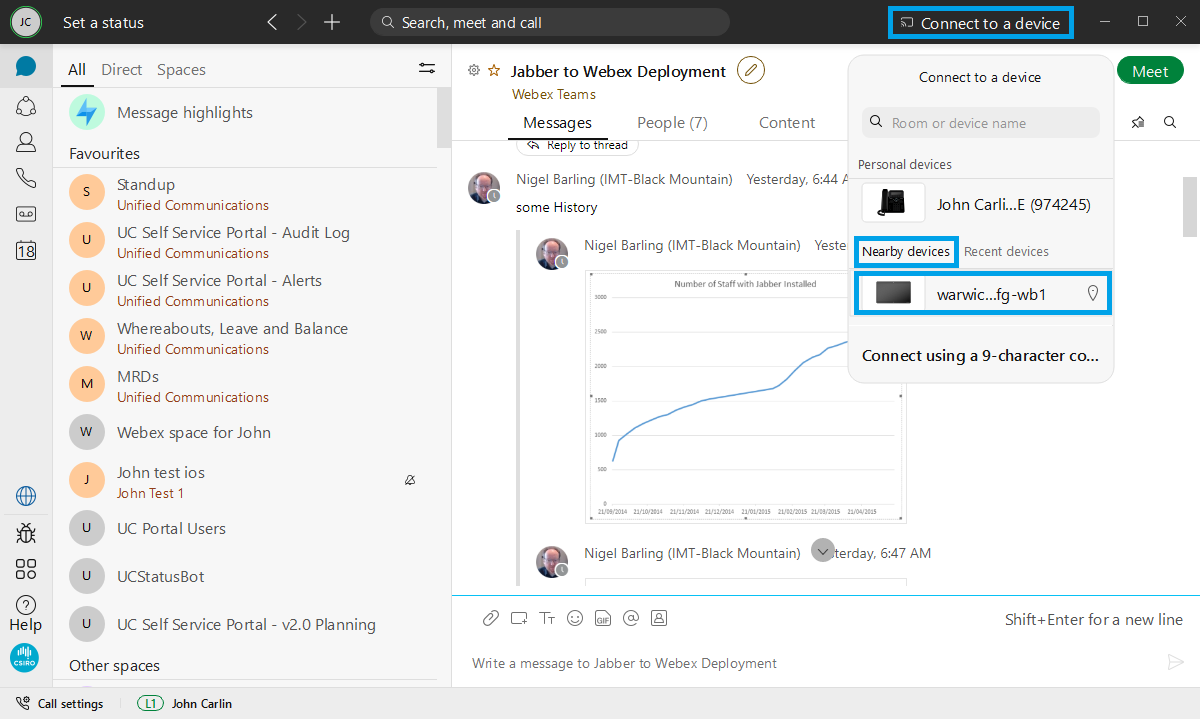
To pair with a video conferencing unit:
- Click 'Connect to a device'
- Click 'Nearby devices' and select a device
-
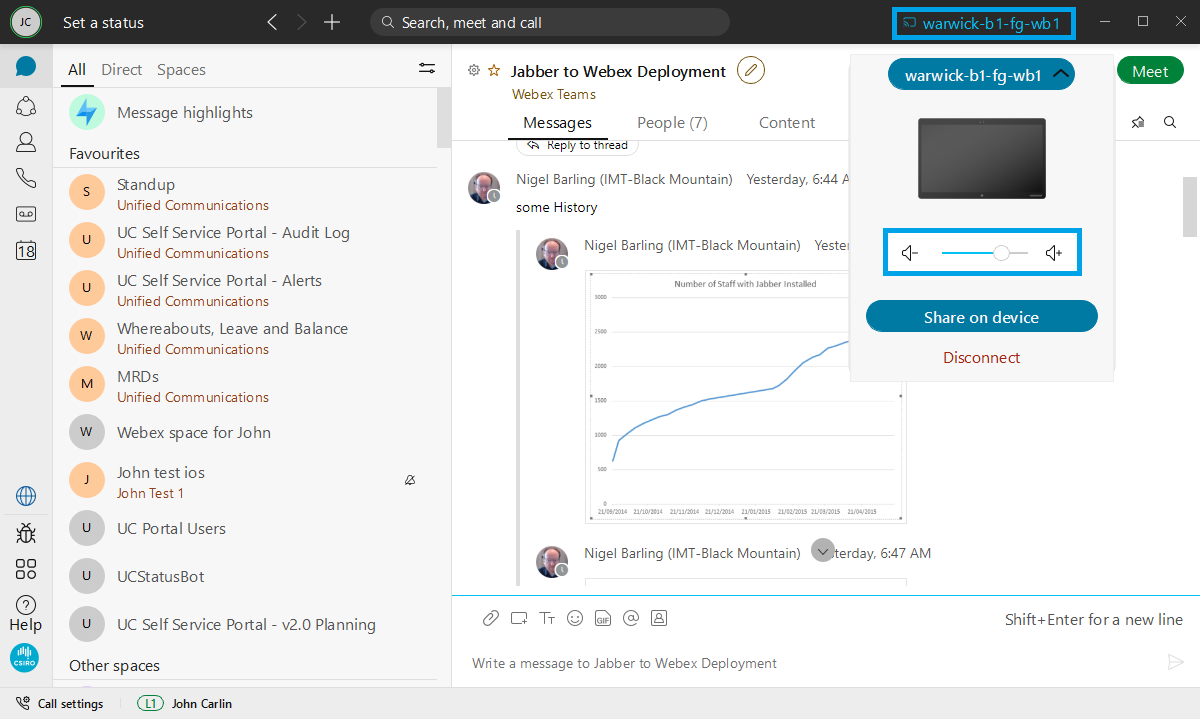
Once paired you can share your screen wirelessly and control the VC unit volume using your laptop.
To join a Webex Meeting using a paired device:
- Click 'Join' or 'Start' on the meeting popup
- Click 'Start meeting'
-
You can then control the VC unit microphone and volume using your laptop, and share your screen wirelessly in the meeting.
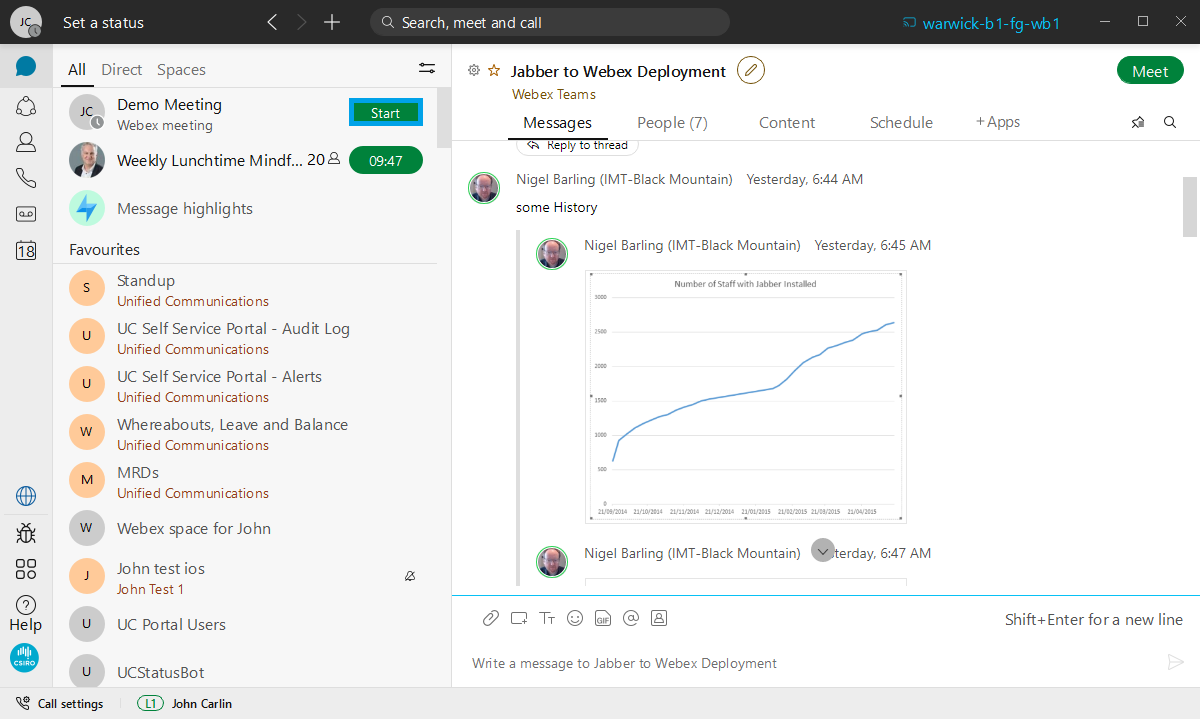
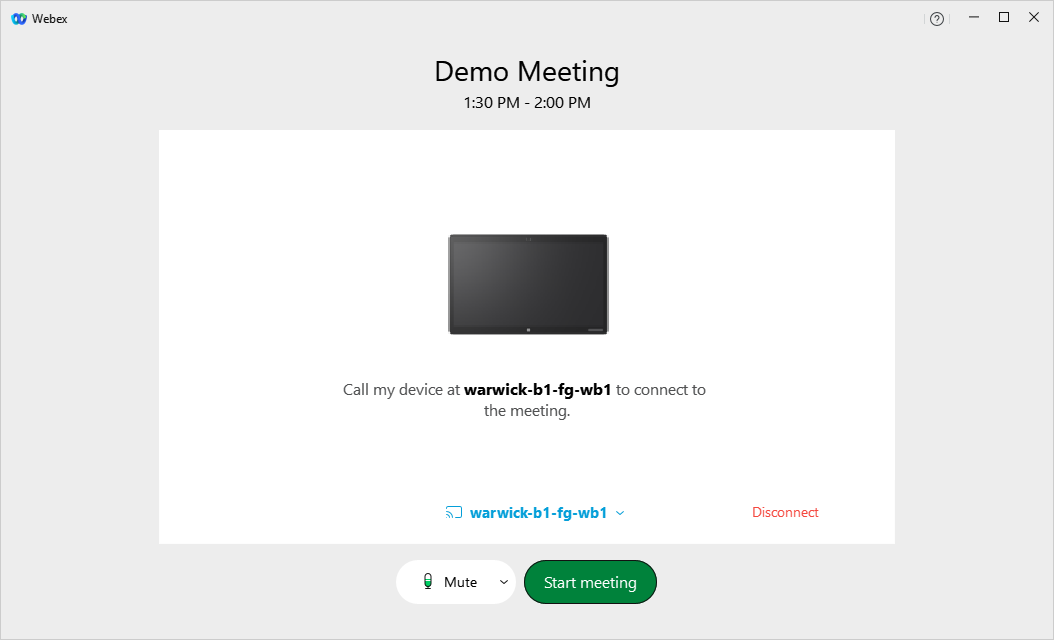
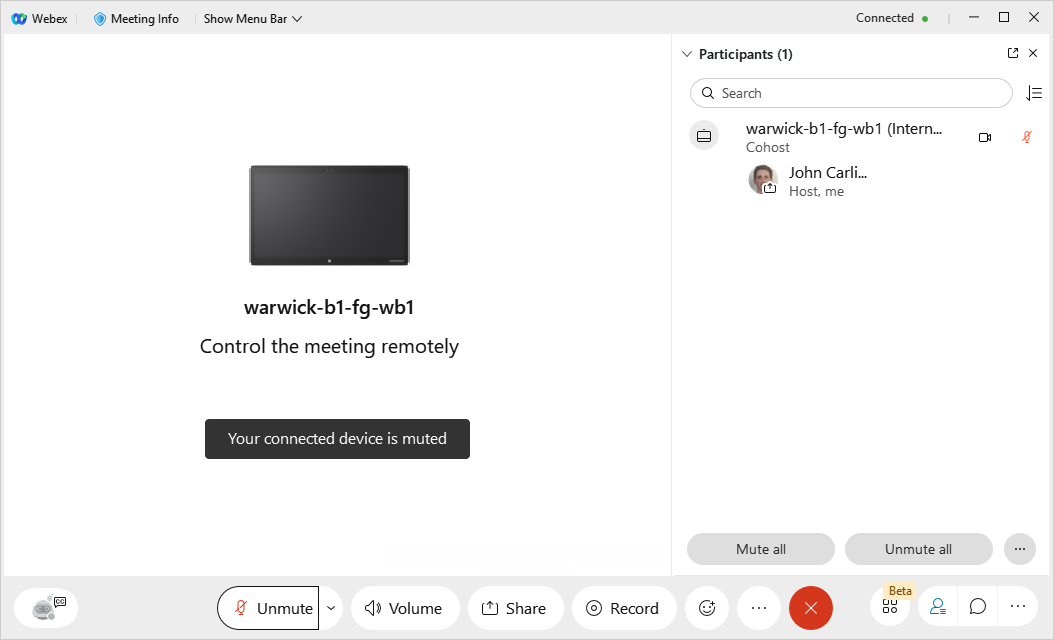
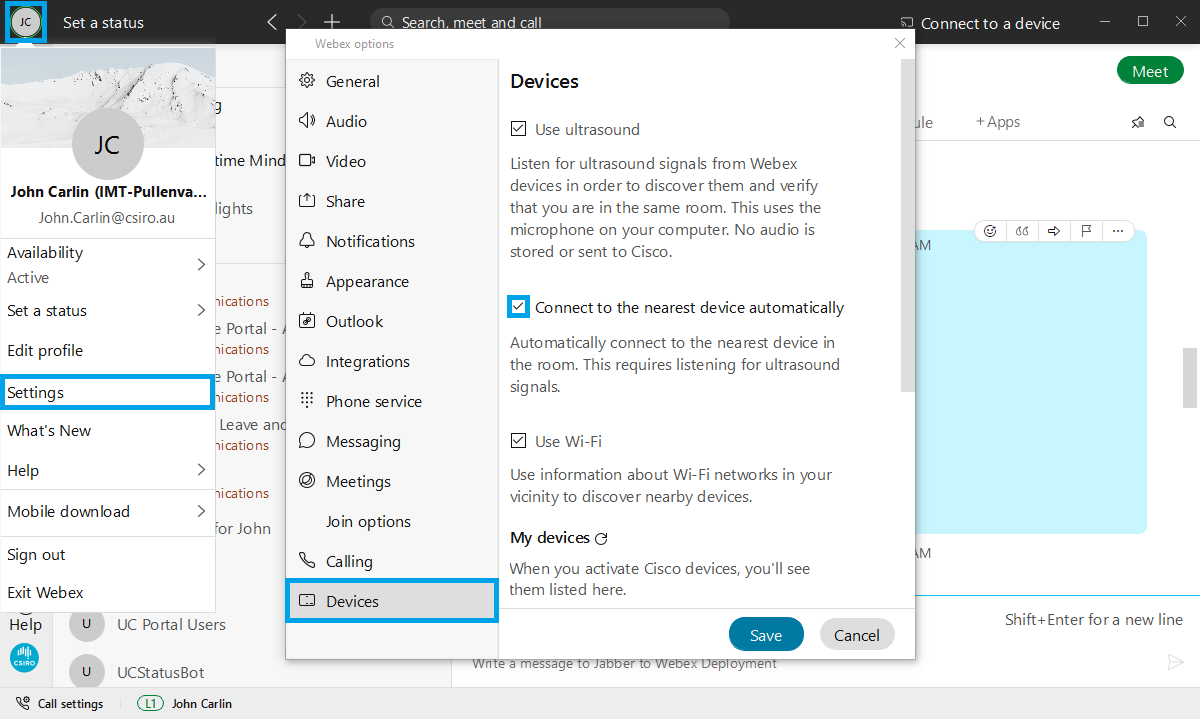
Webex App automatically pairs with nearby devices. If you would like to disable automatic pairing:
- Click your profile icon in the top left corner
- Click 'Settings'
- Click 'Devices'
- Untick the 'Connect to the nearest device automatically' option
-
Click 'Save'.
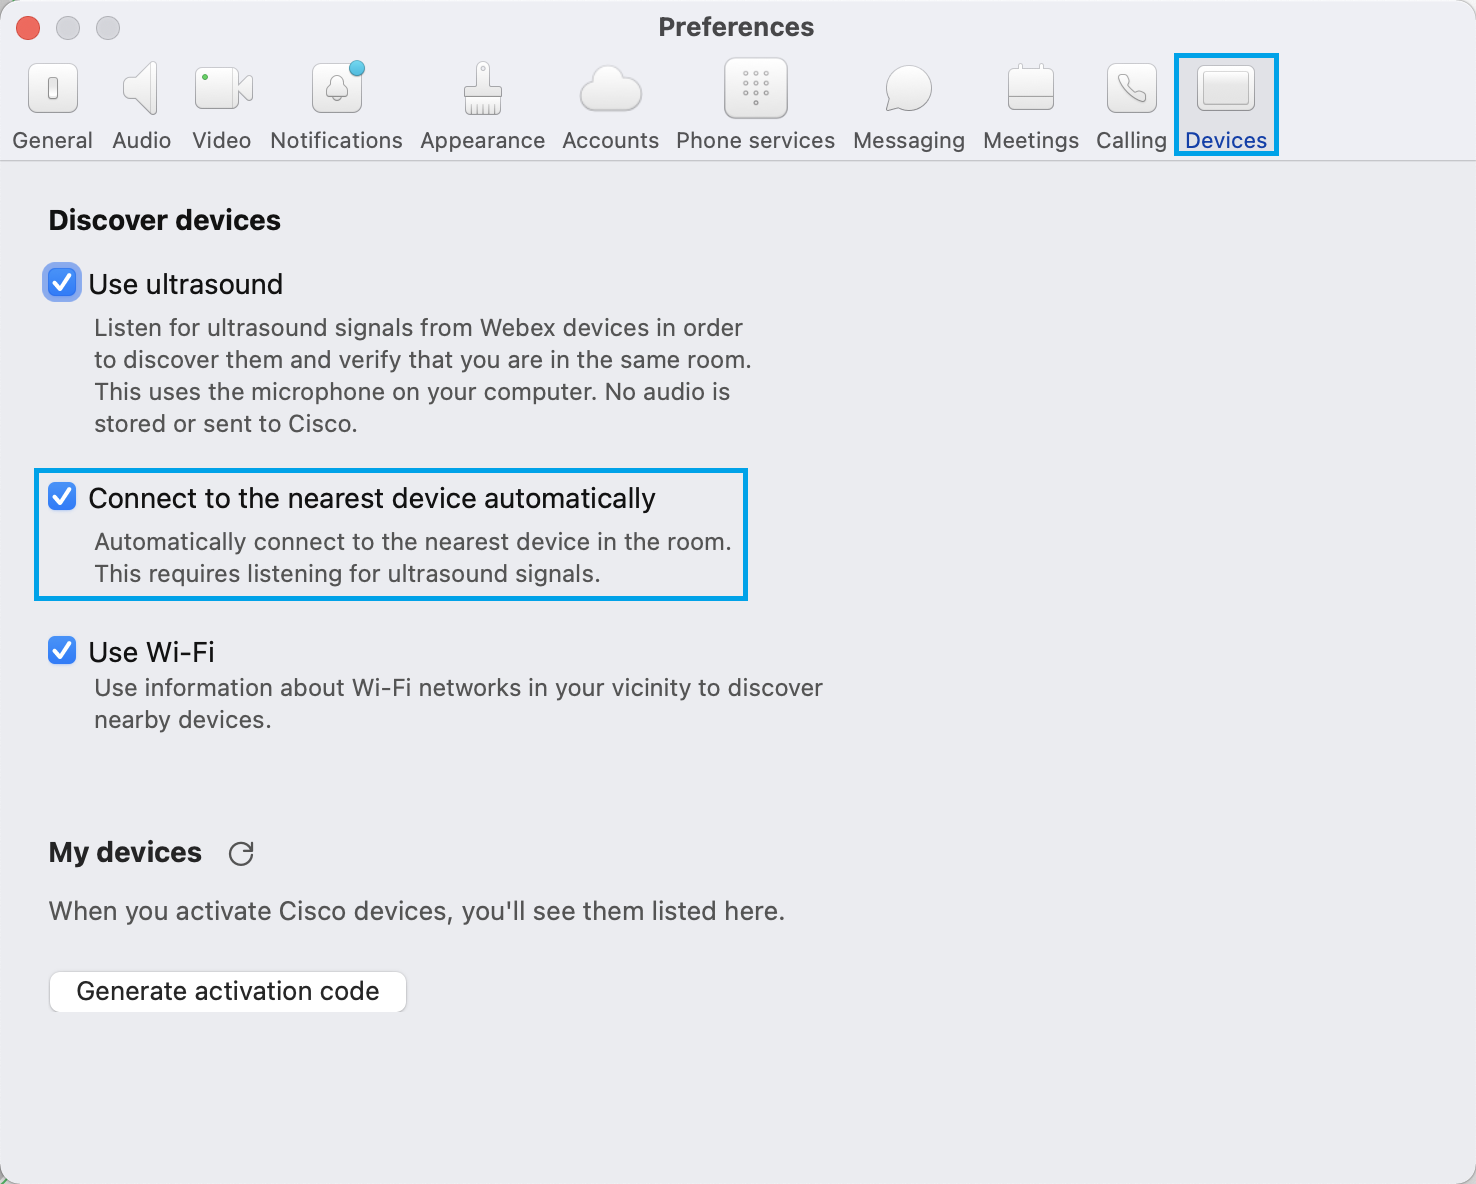
Webex App automatically pairs with nearby devices. If you would like to disable automatic pairing:
- Click 'Webex' and then click 'Preferences'
- Click 'Devices'
-
Untick the 'Connect to the nearest device automatically' option.

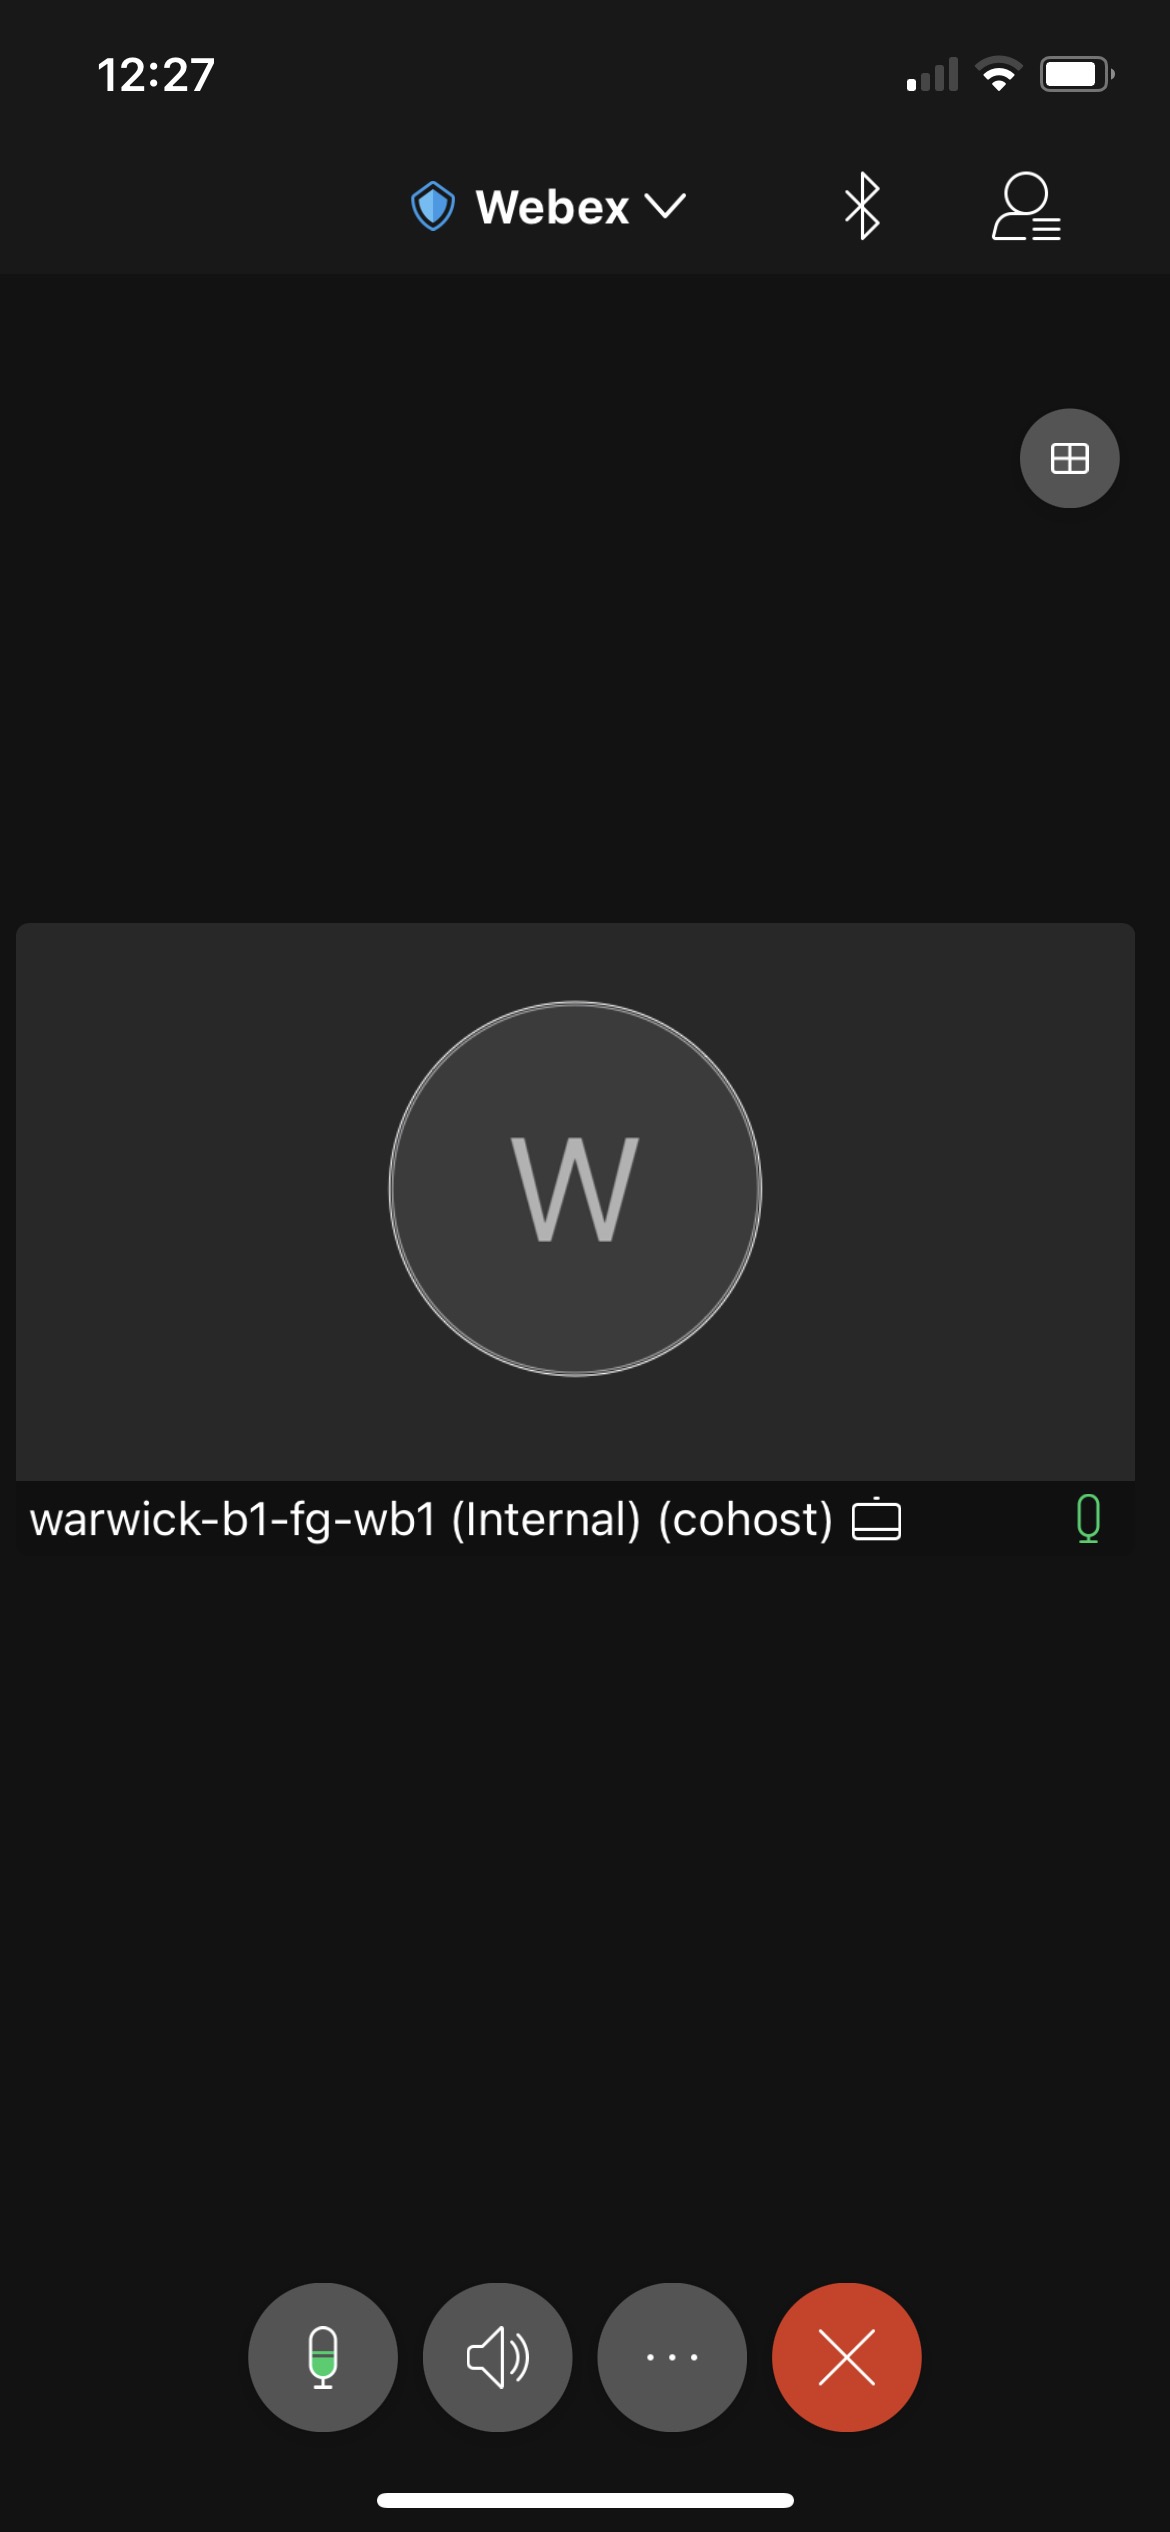
Webex App can be used to pair with video conferencing (VC) units for the purpose of wirelessly sharing your laptop screen, or to join Webex Meetings using the paired unit allowing you to control the unit's microphone and speaker using your mobile.
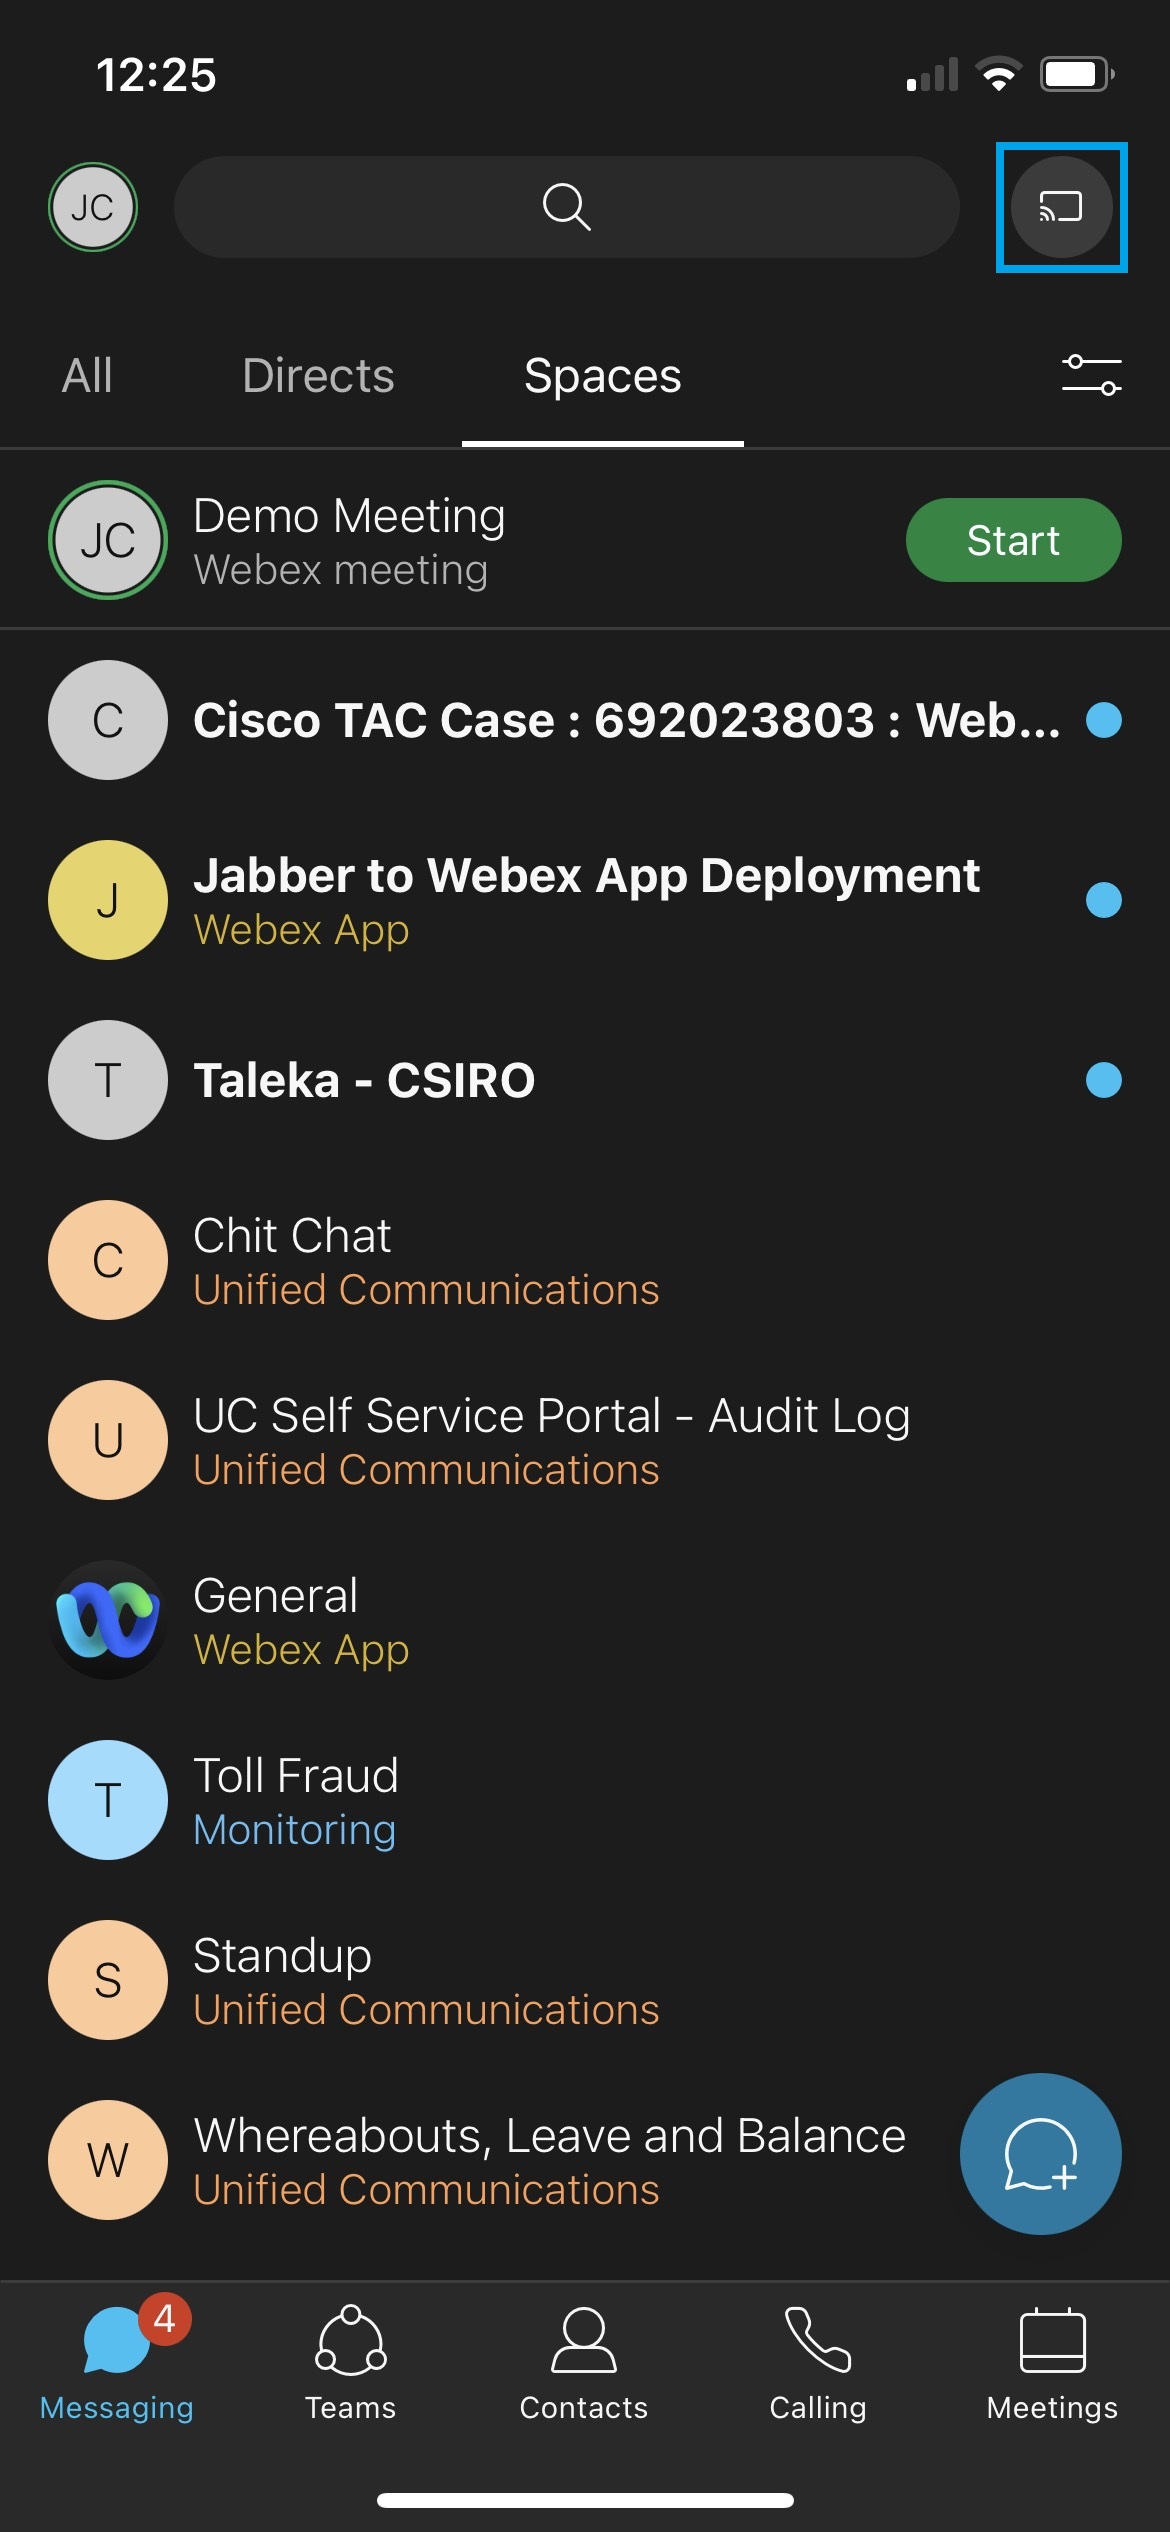
To pair with a video conferencing unit:
- Press the 'Connect to a device' icon in the top right corner
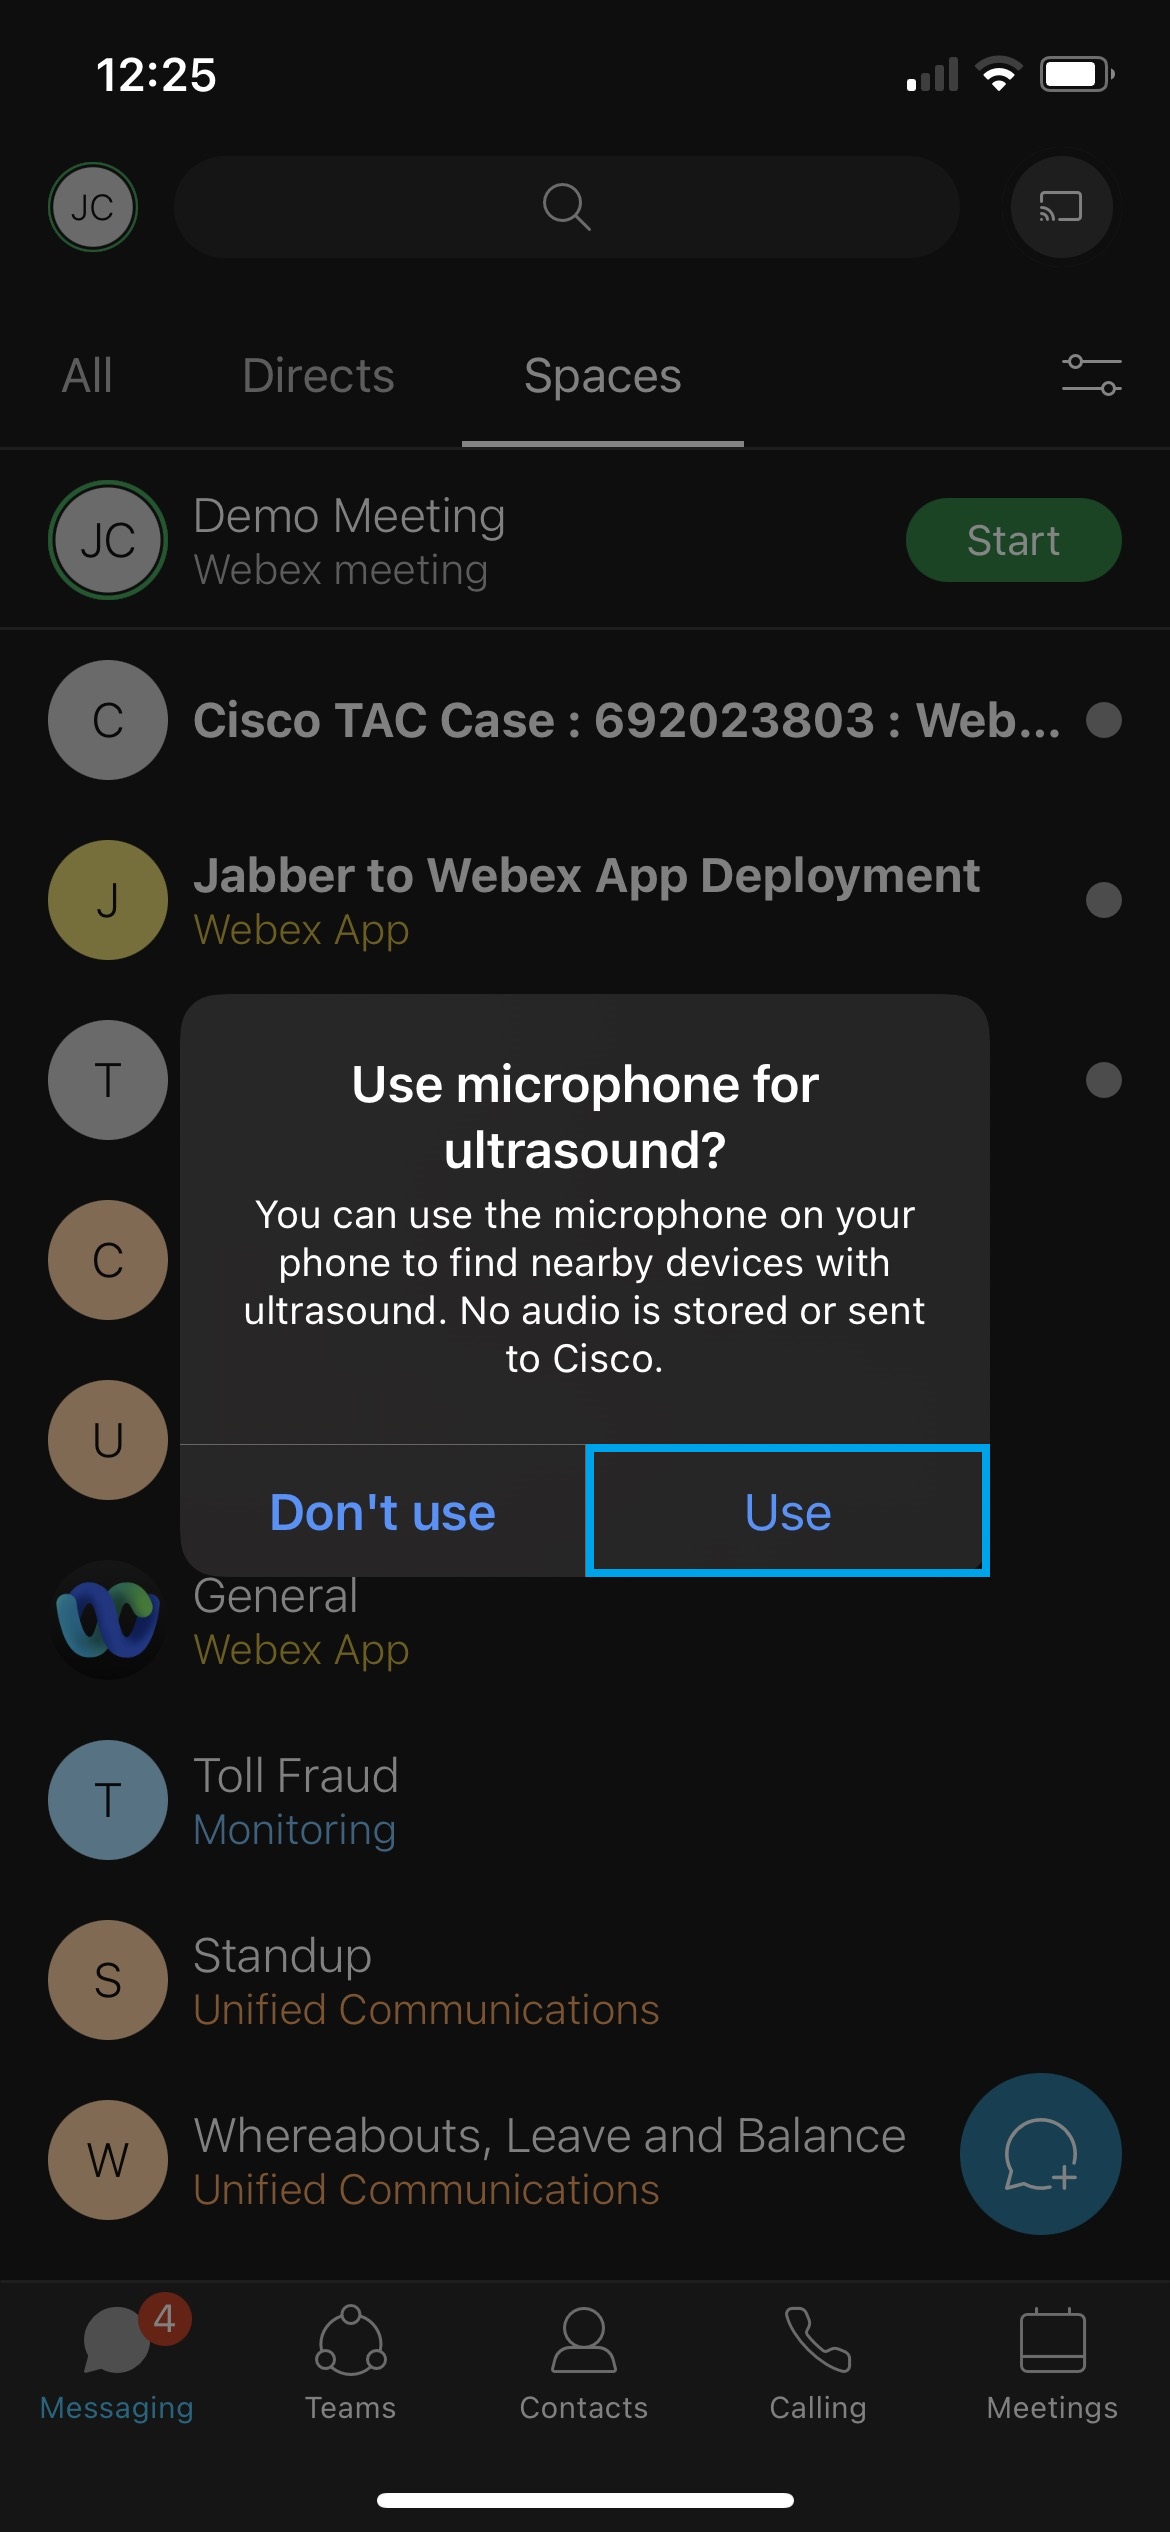
- When prompted if you want to enable your microphone for ultrasound pairing, press 'Use'. This will allow your mobile to detect nearby devices automatically
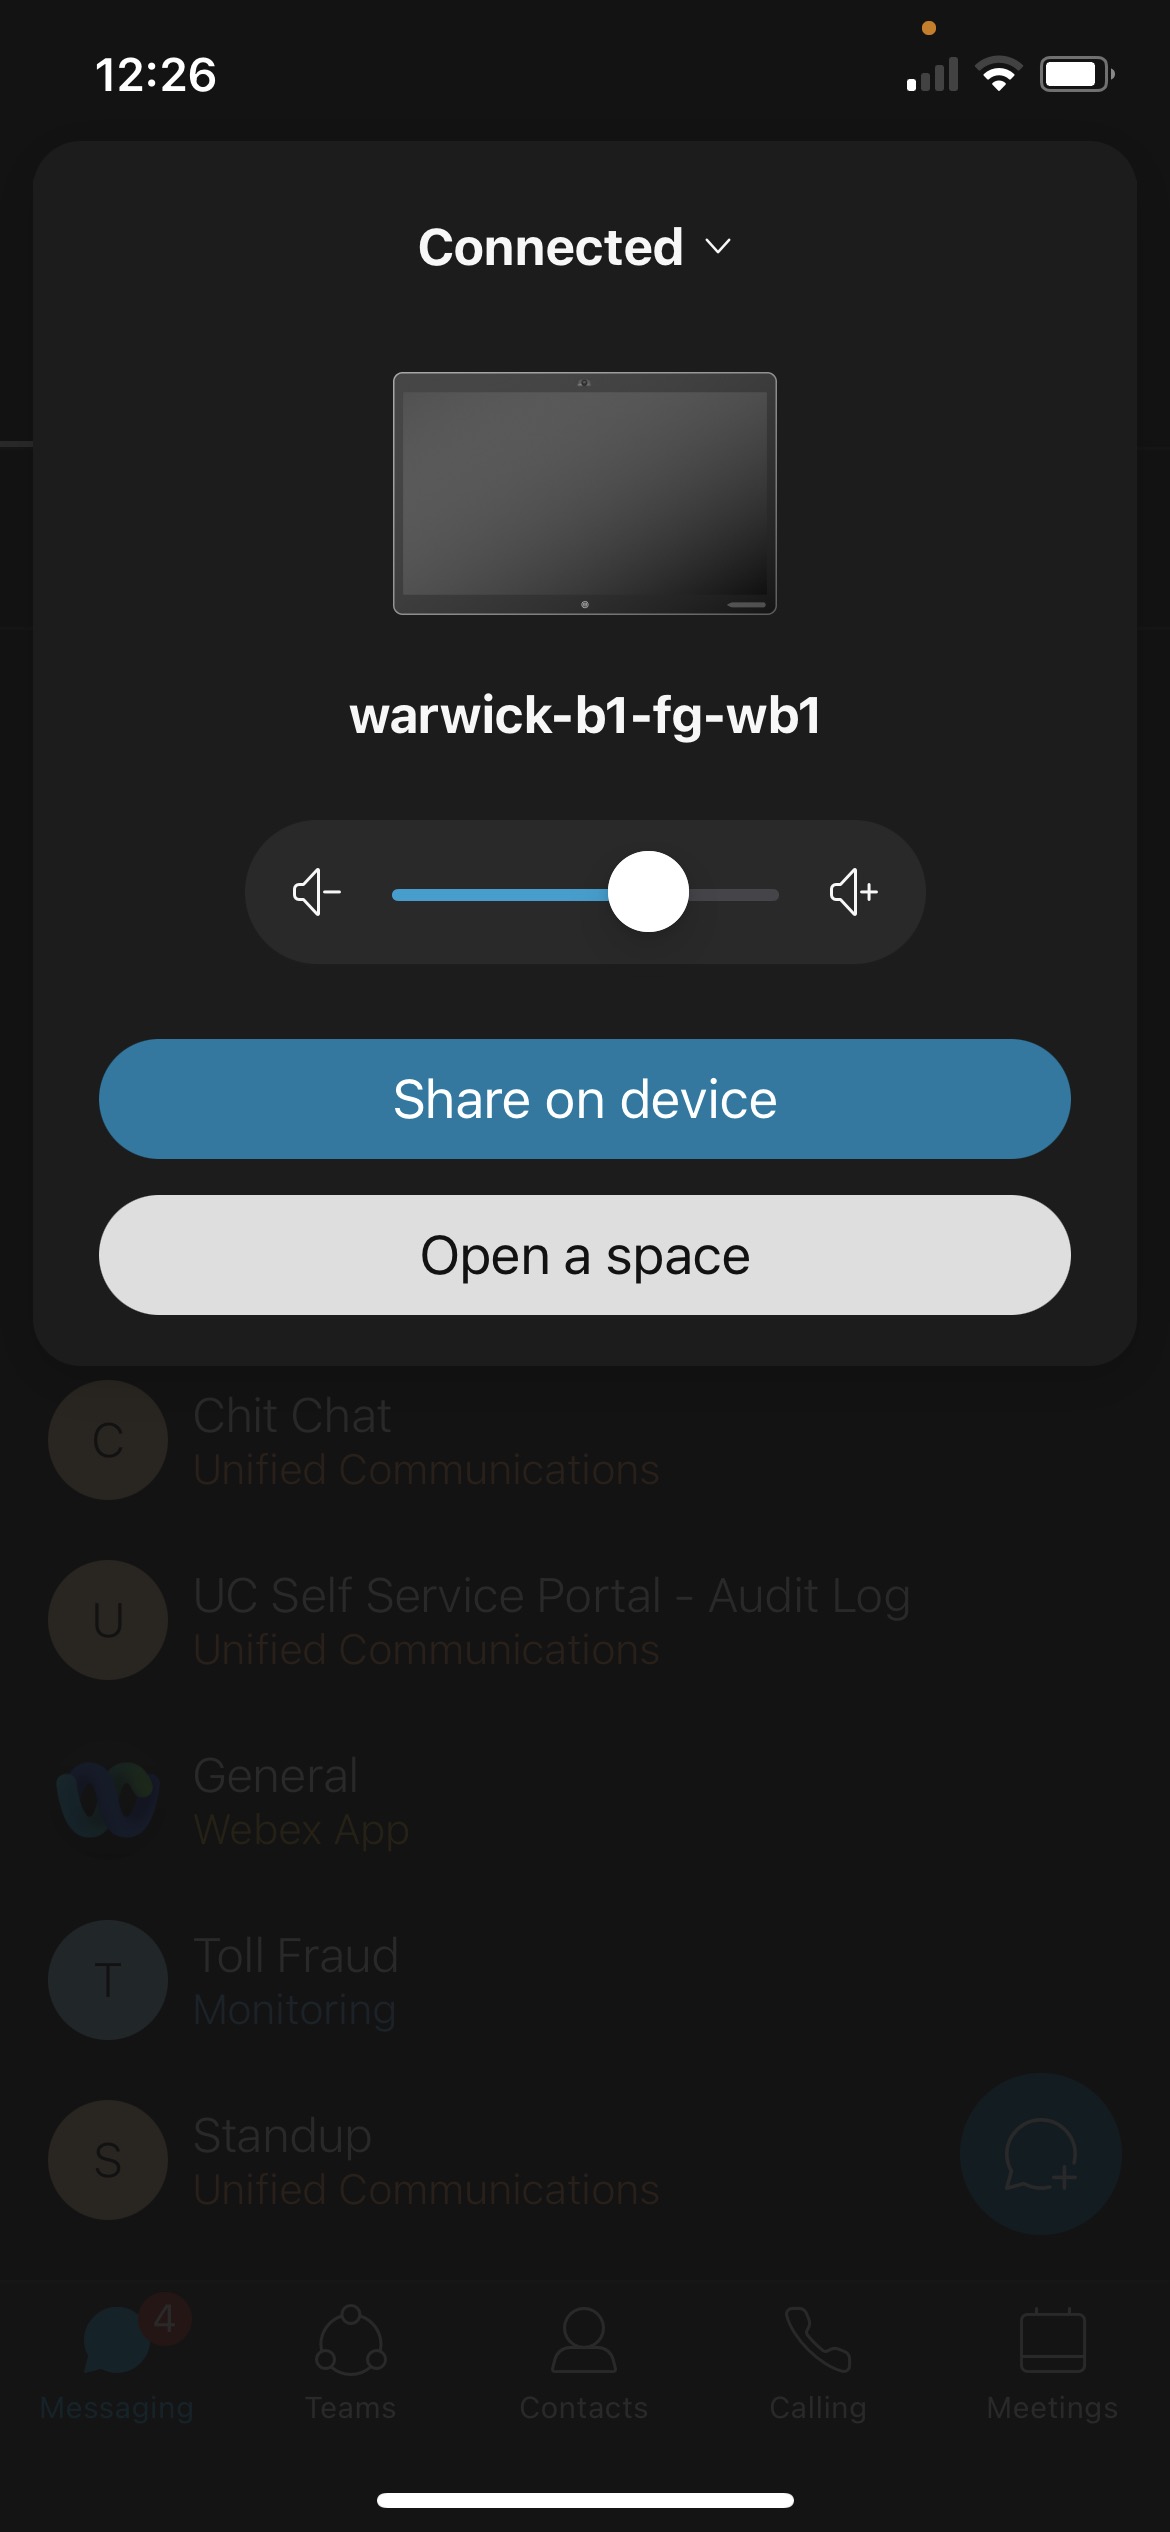
-
Once paired the name of the device will be shown.
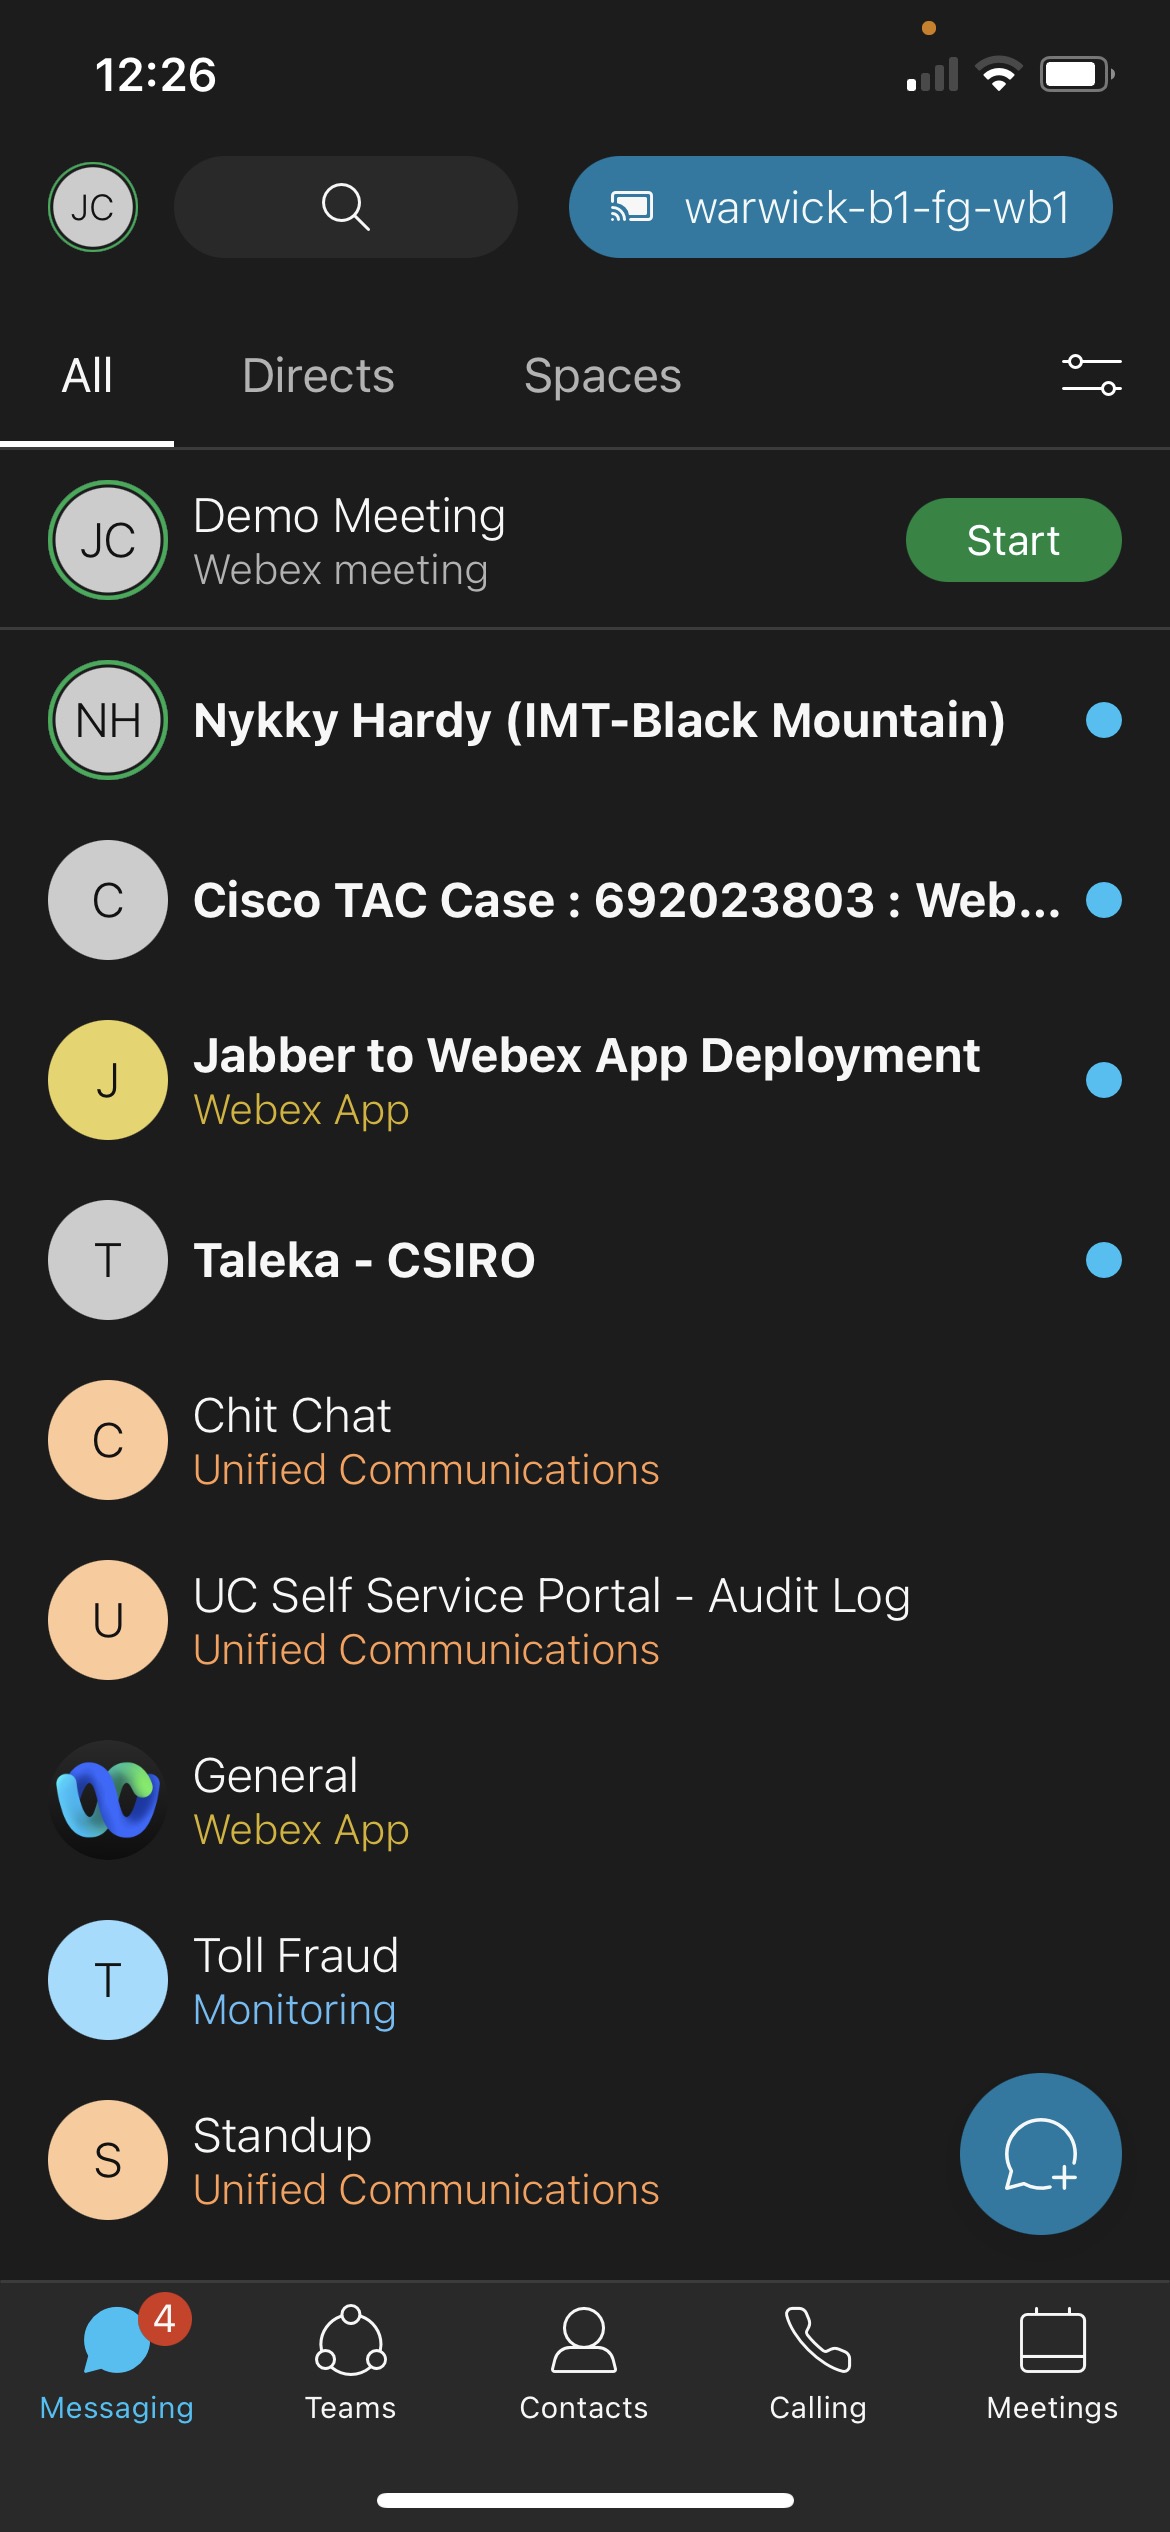
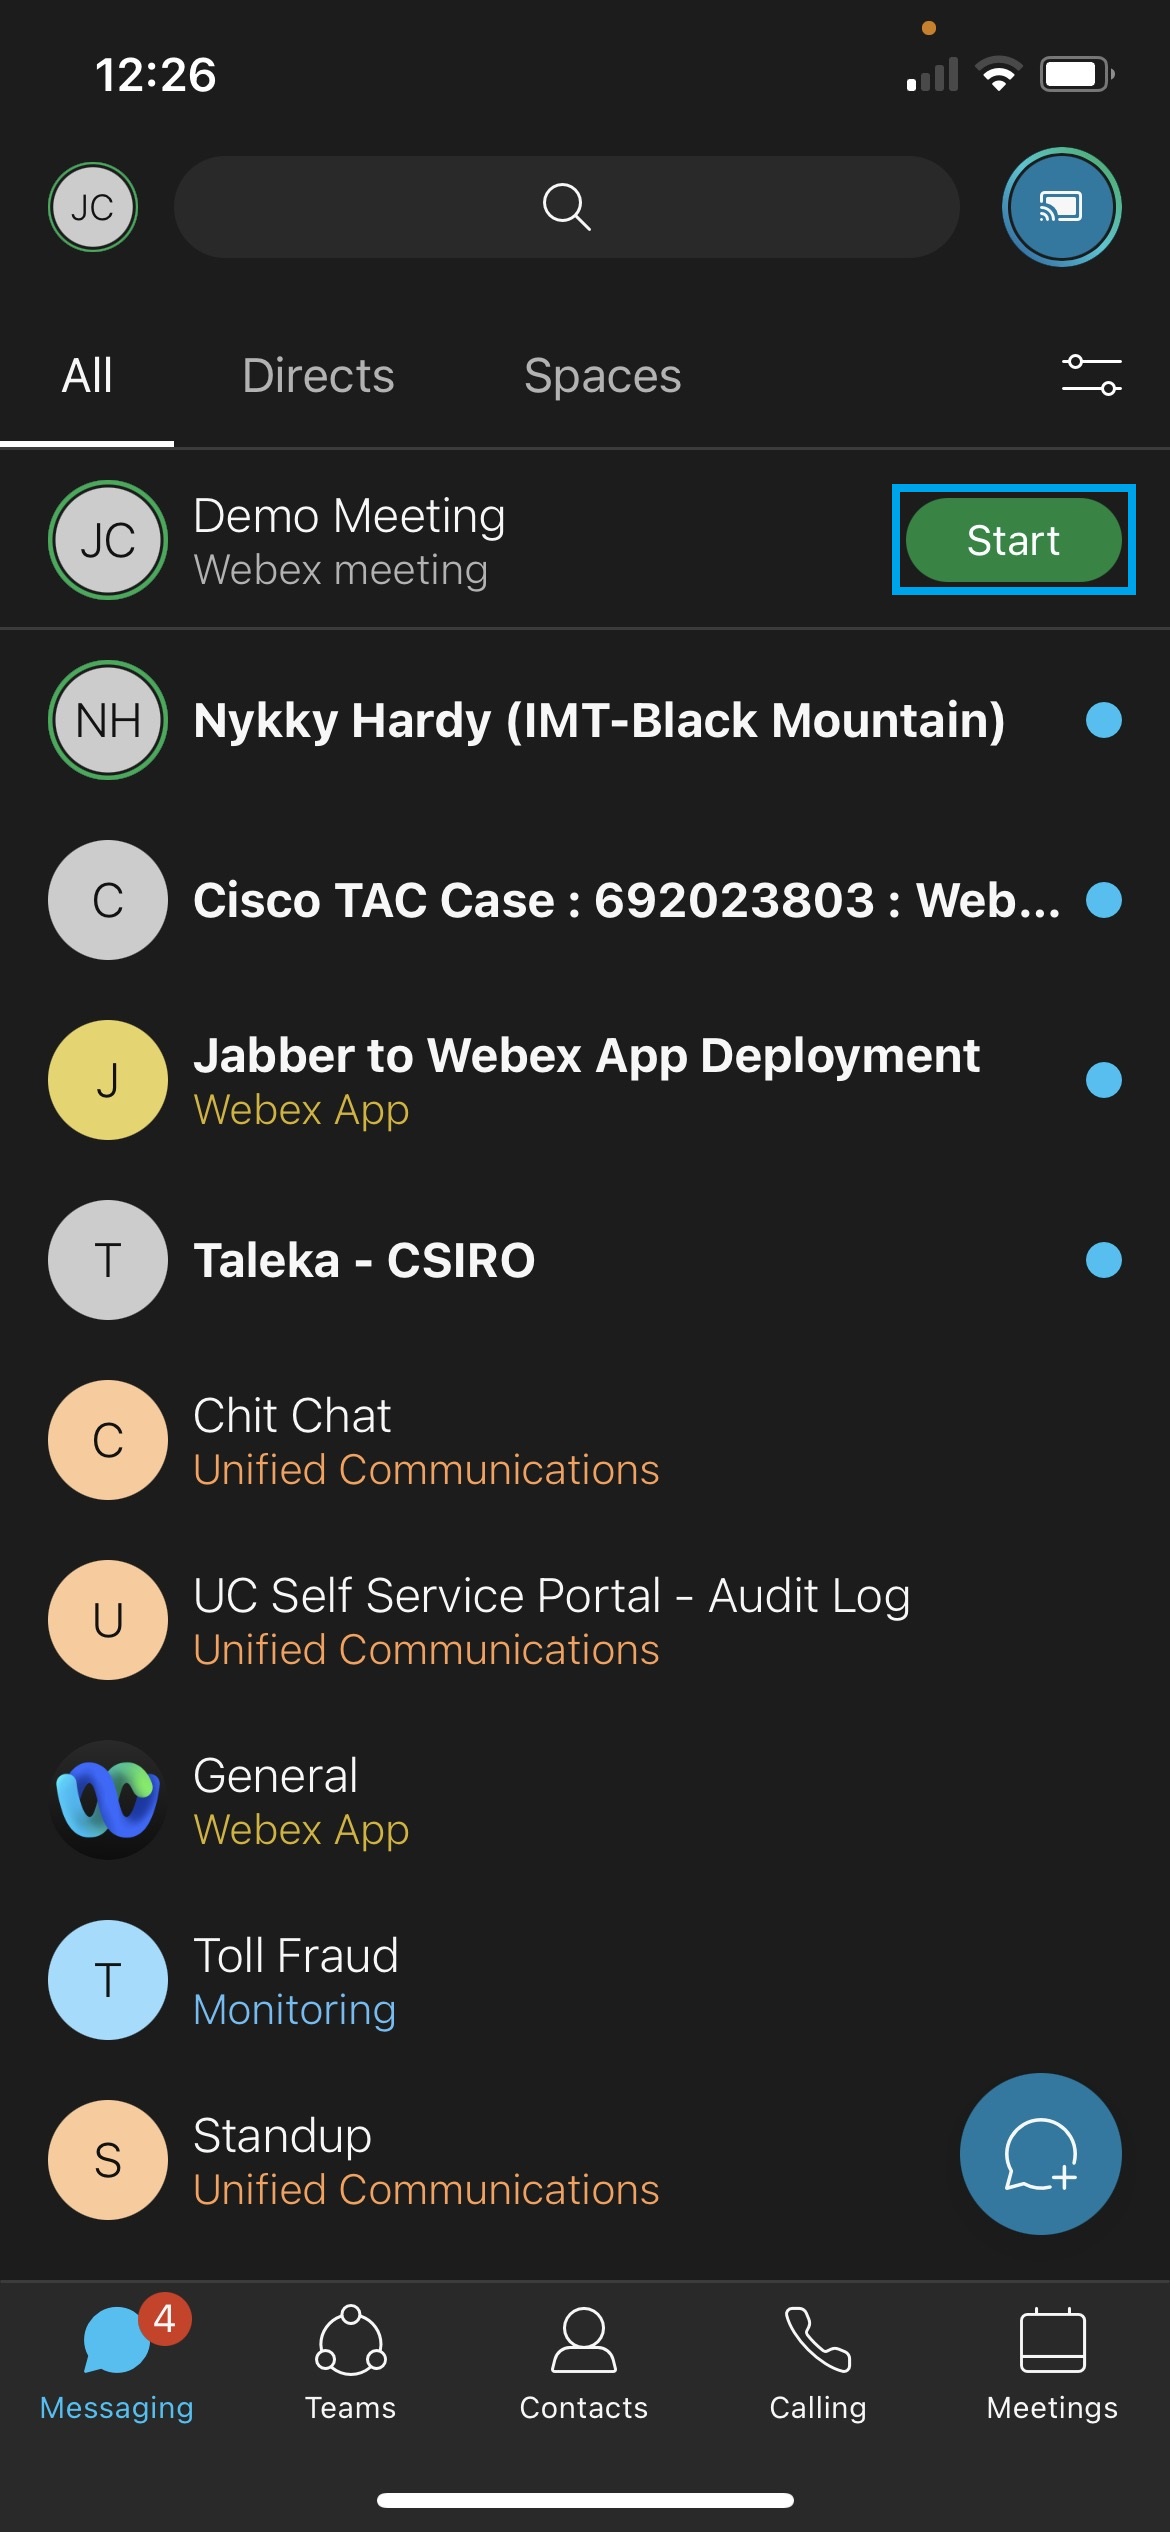
To join a Webex Meeting using a paired device:
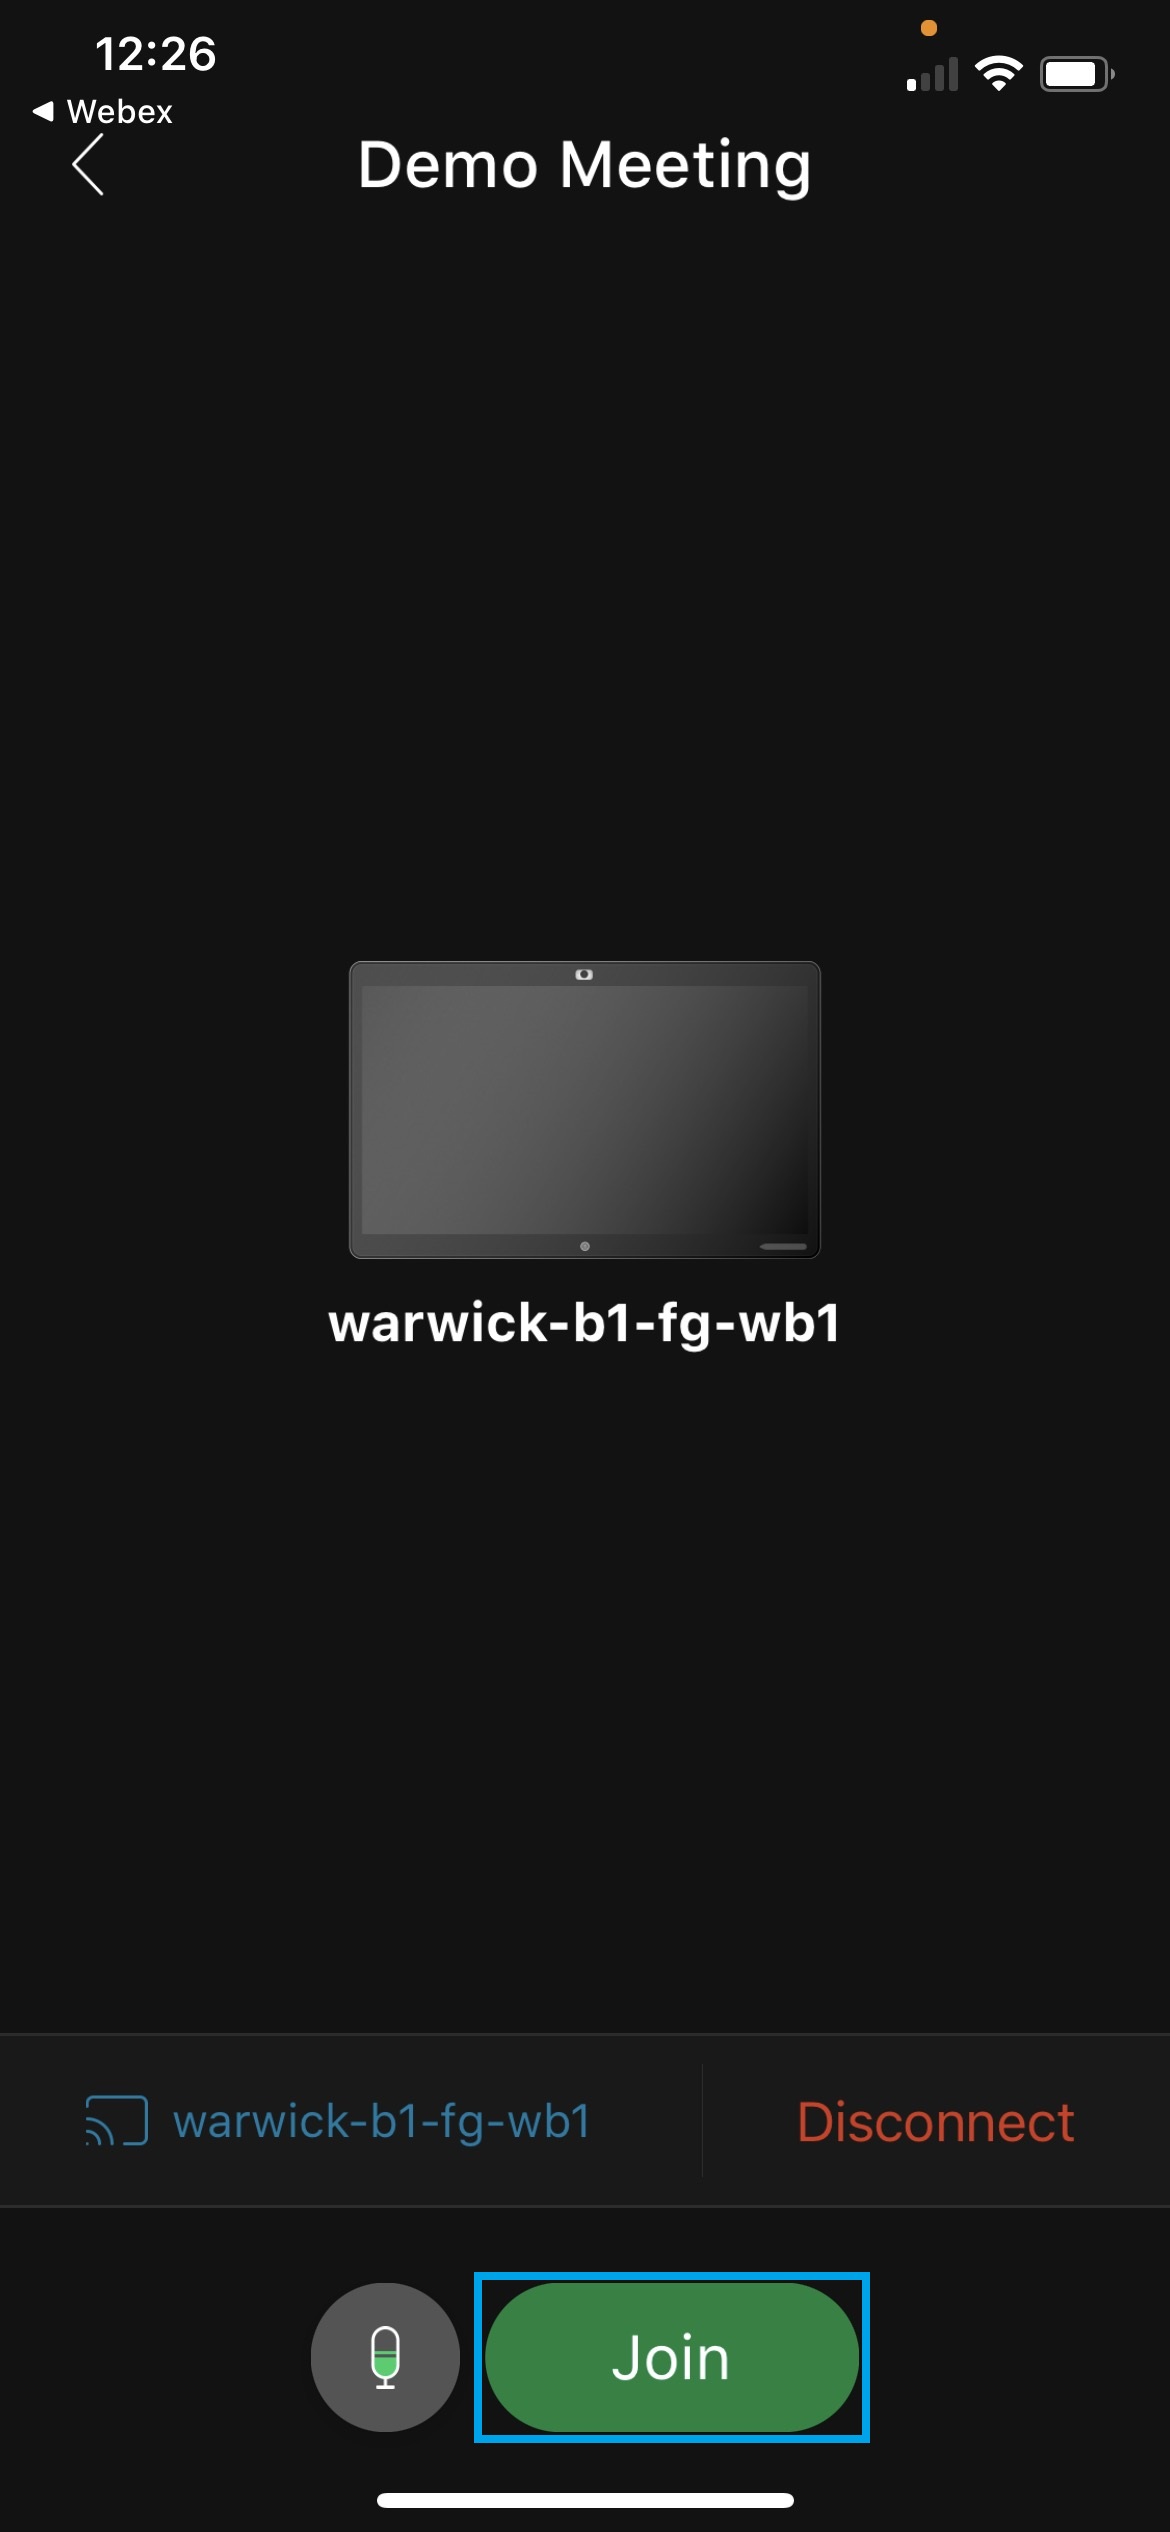
- Press 'Join' or 'Start' on the meeting popup
- Press 'Join' again
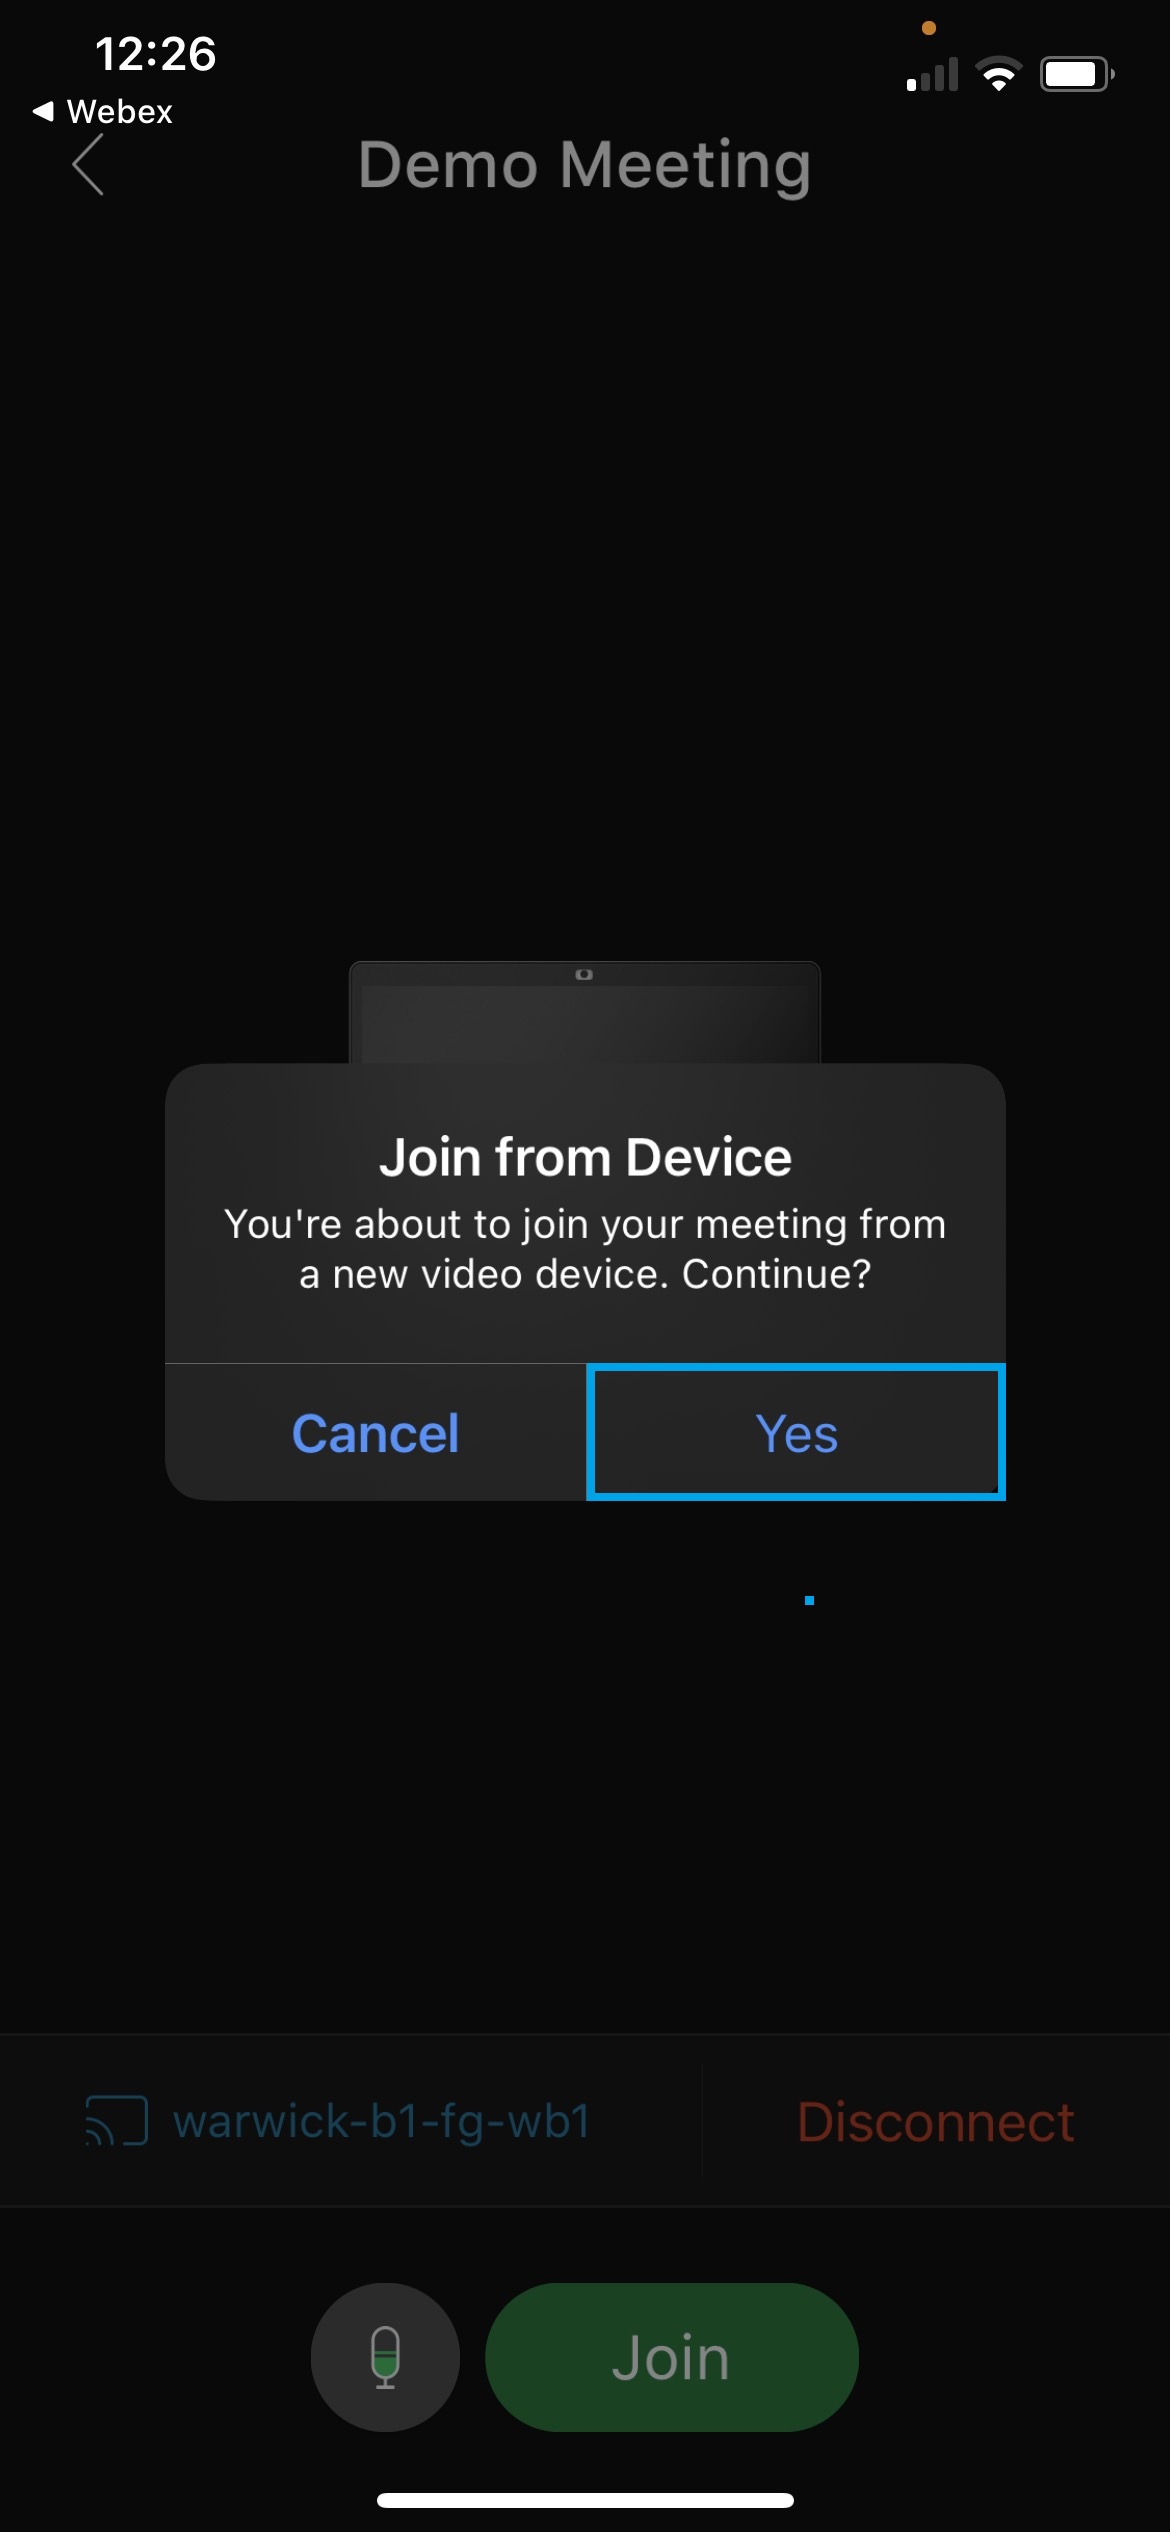
- When prompted press 'Yes'
-
You can then control the VC unit microphone and volume using your mobile.
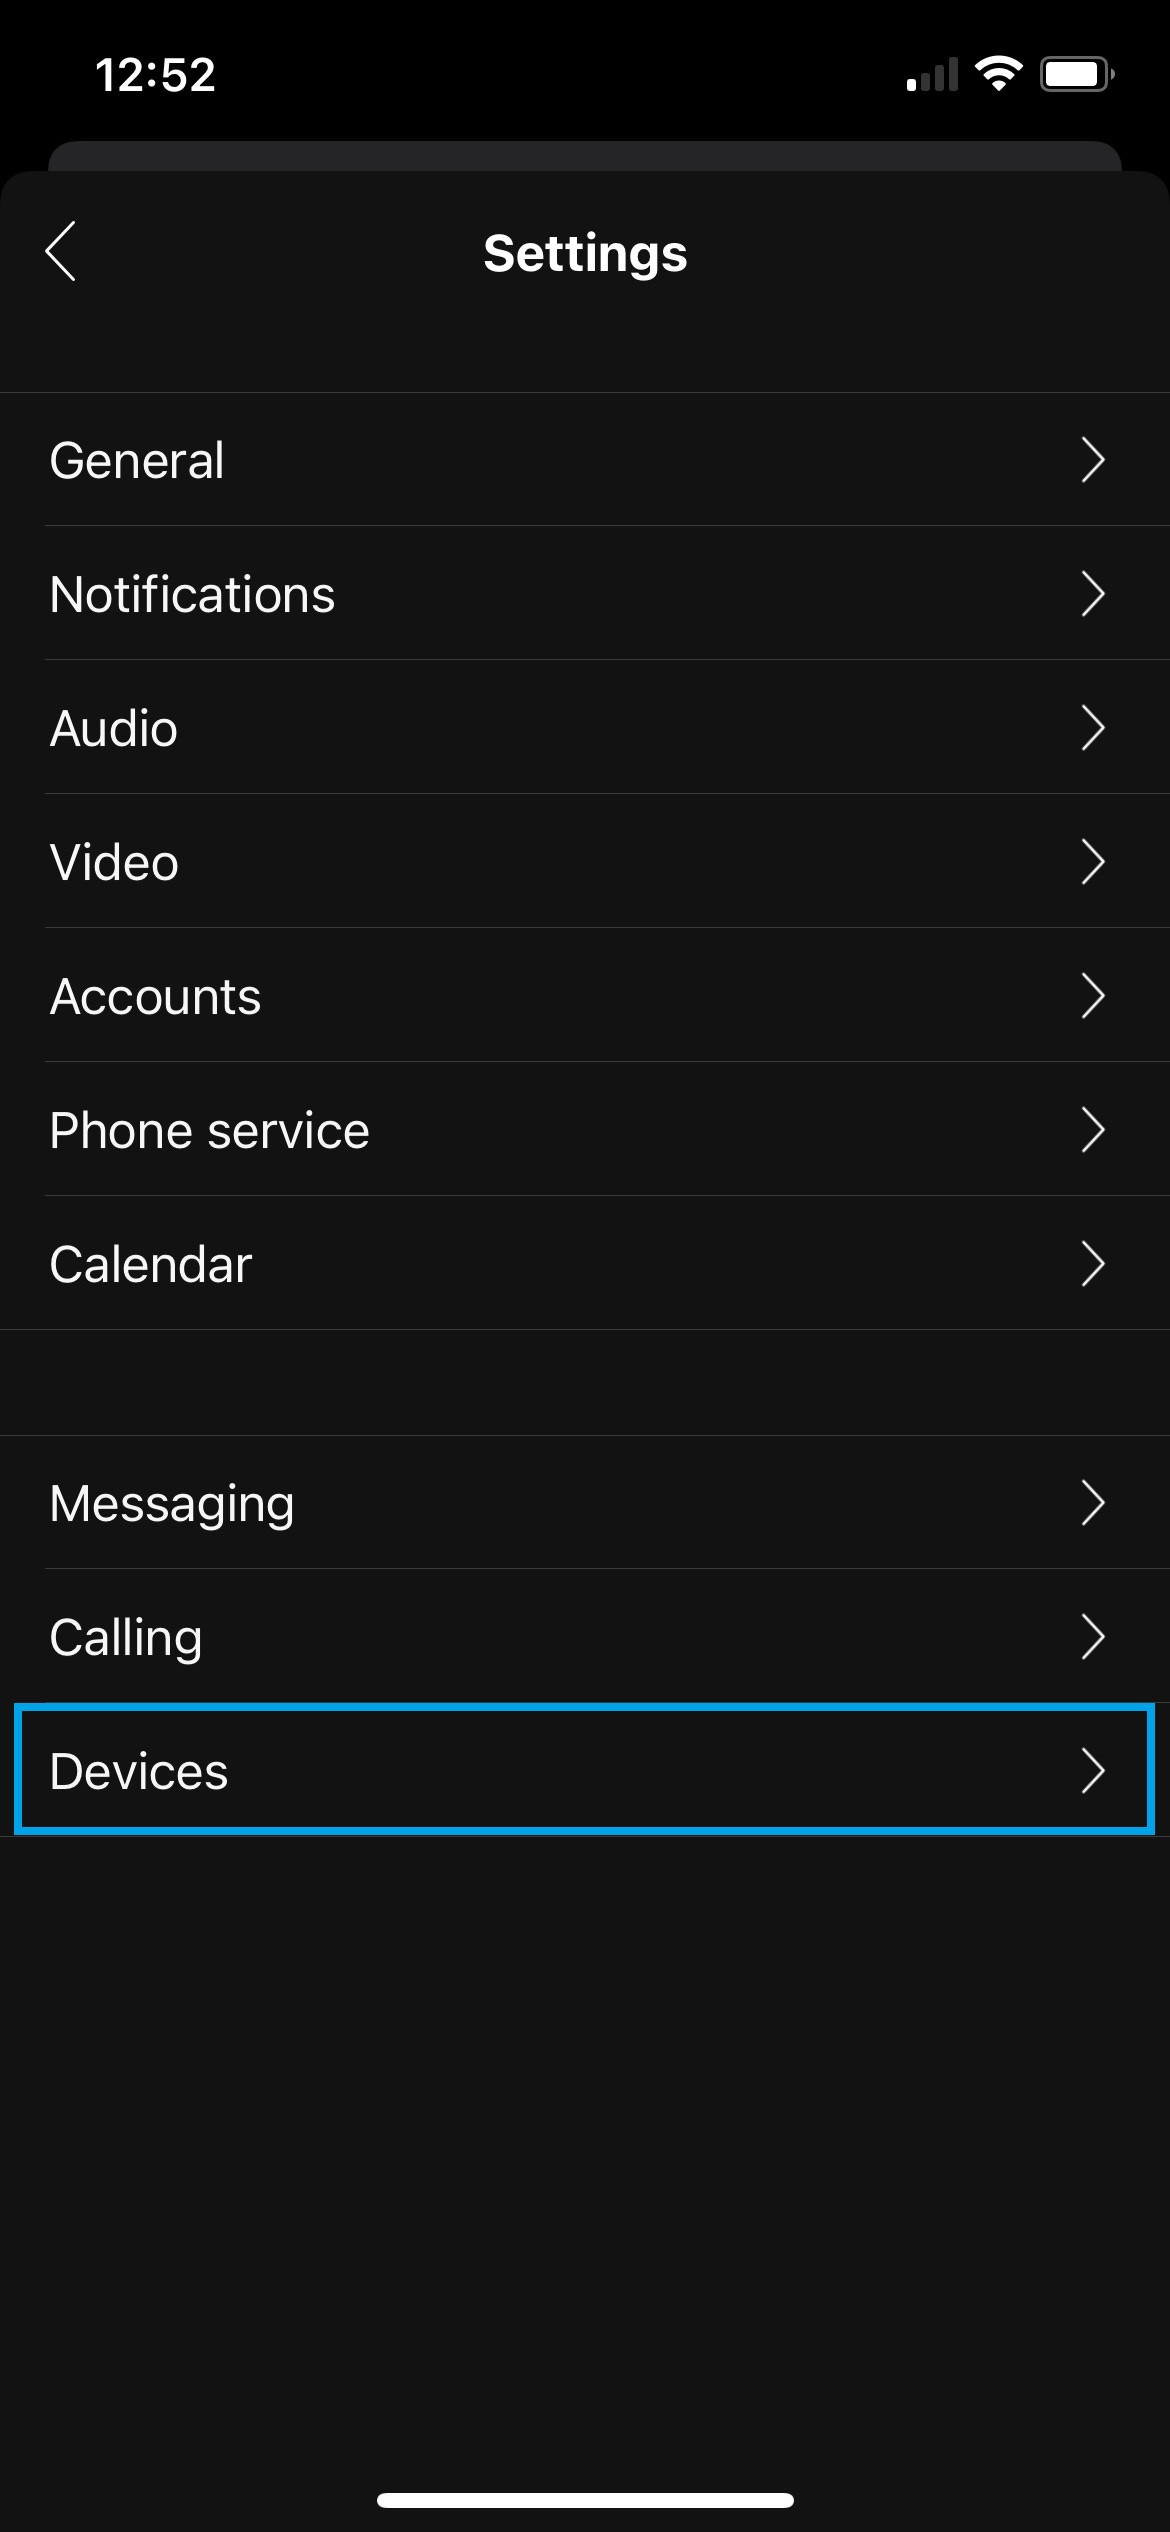
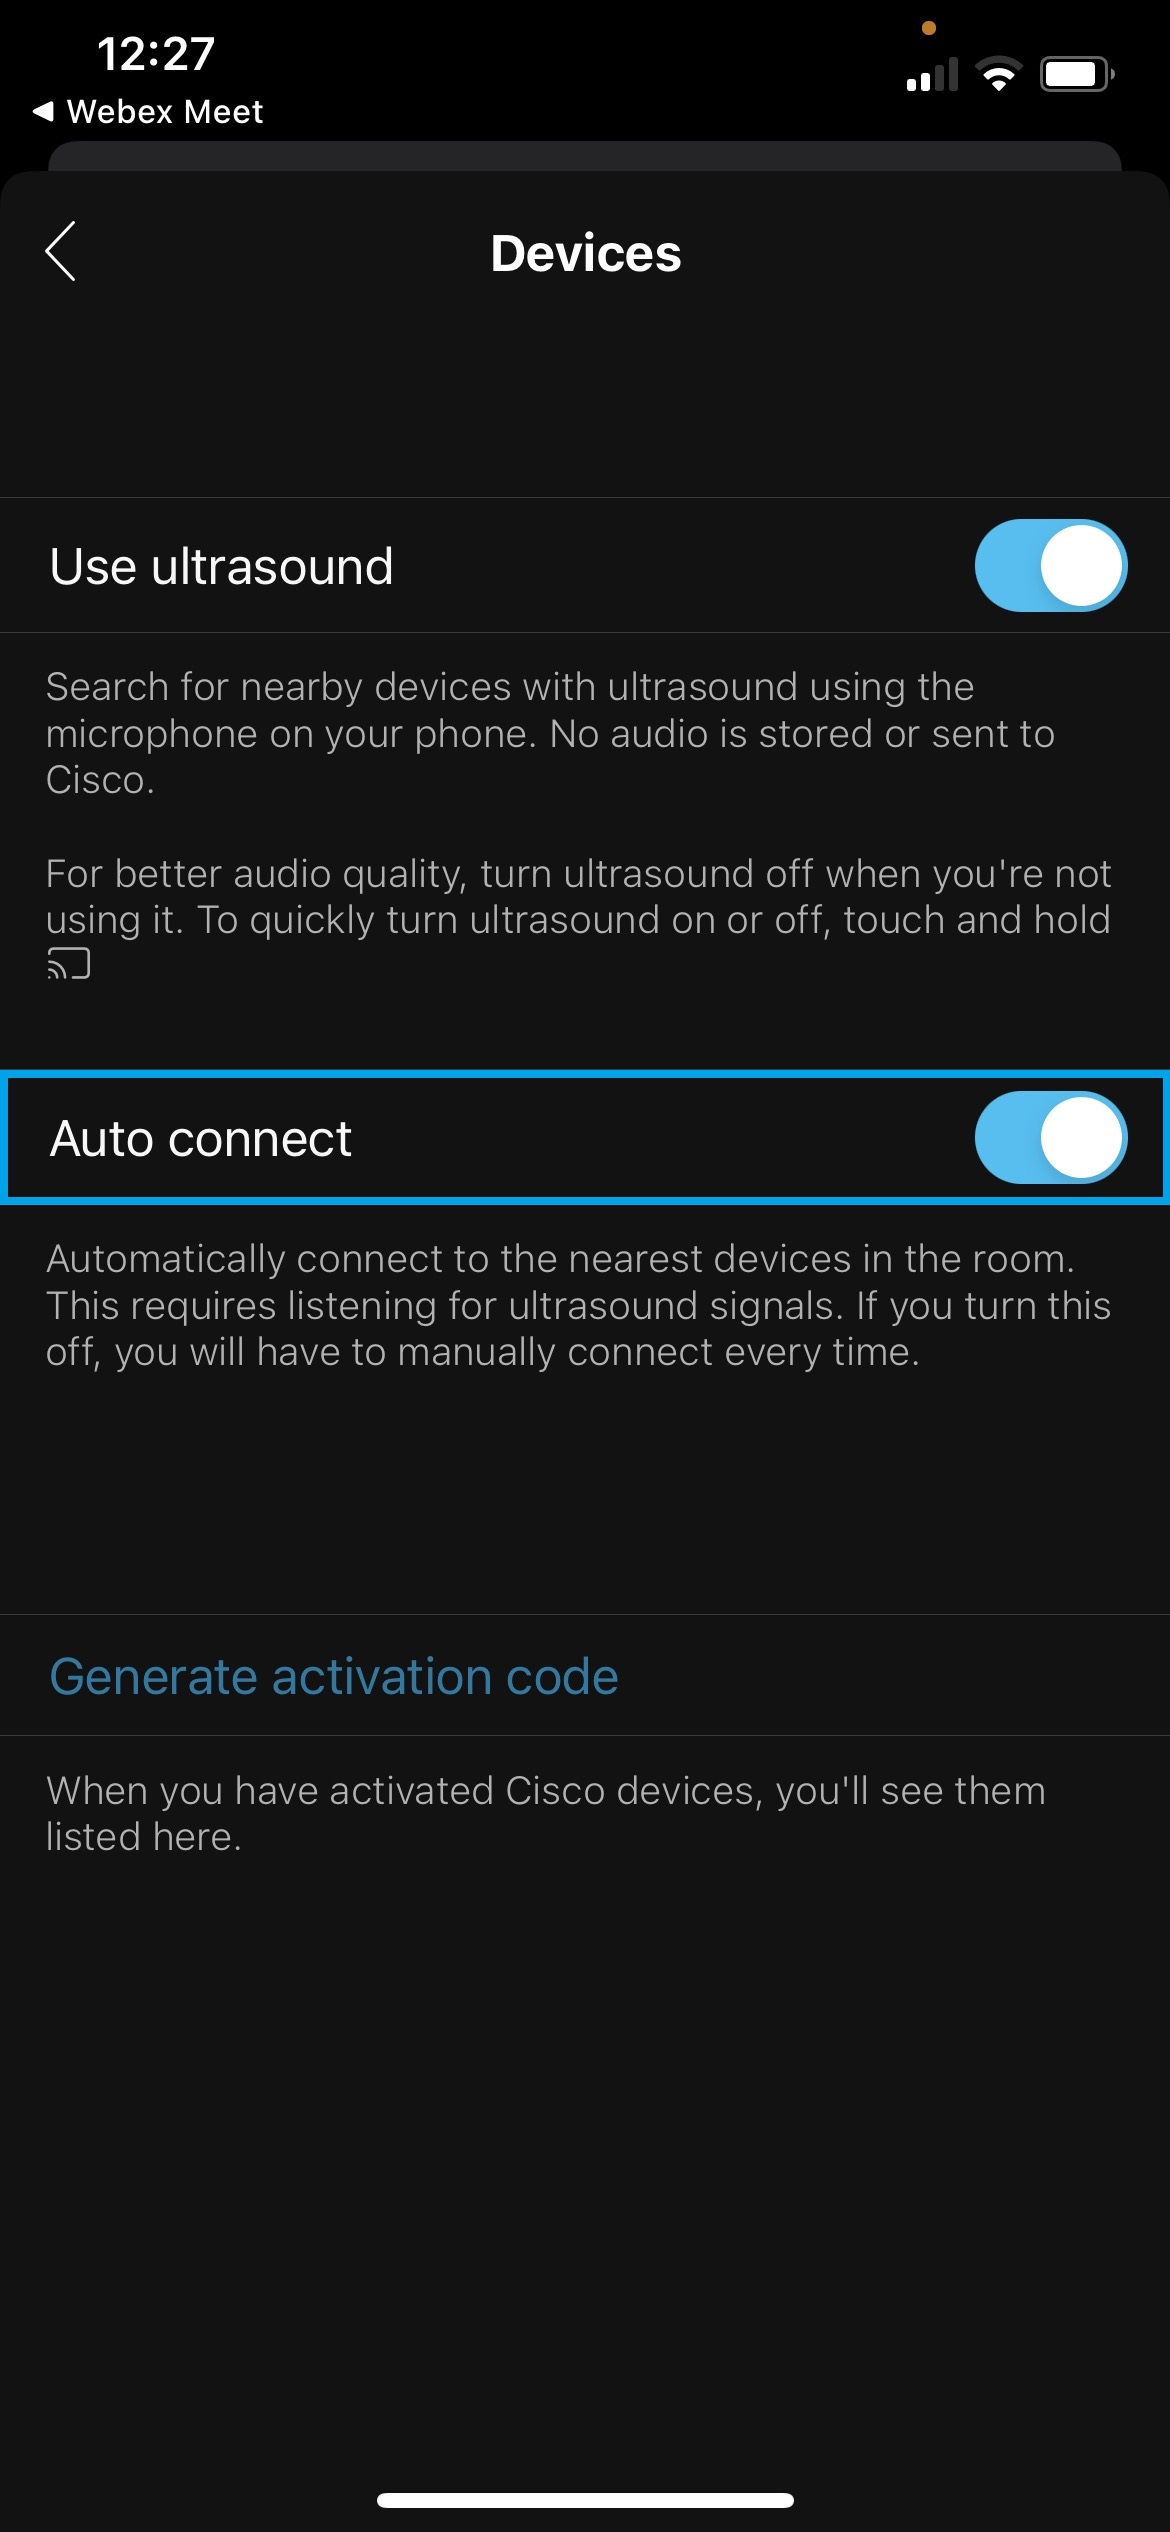
Webex App automatically pairs with nearby devices. If you would like to disable automatic pairing:
- Press your profile icon in the top left corner
- Press 'Settings'
- Press 'Devices'
-
Untick the 'Auto connect' option.


More information>
For more help with using Webex App, please visit the official help.webex.com site.


