Webex Meetings is a video conferencing system available to CSIRO staff on Windows, Mac, iPhone, iPad, and Android devices. A web application is also available for Linux devices. Webex Meetings has the same functionality when working from home as it does when working in the office.
Webex Meetings remains CSIRO's primary conferencing platform for CSIRO meetings as documented on the What tool when? page.
Install
Cisco Webex Meetings will automatically be installed on Windows and Mac OS X machines free of charge when joining a Webex Meeting for the first time. If you would like to install it on your iPhone / iPad or Android, you can do so by clicking the appropriate icon below.

installer


installer
Operate
Select your operating system or device.
Windows
Mac OS X
Linux
iPhone / iPad / Android
Video Conferencing Room
Click on each heading to expand a section and learn more.
https://conferencing.csiro.au/webex-meetings.php?ref=logging_in_mobileTo login to the Webex Meetings app using your CSIRO account:
- Open the app and from the home screen press 'Sign In'
- Enter your CSIRO email address, then press 'Next'
-
From the list of available Webex Meetings sites select 'csiro.webex.com'
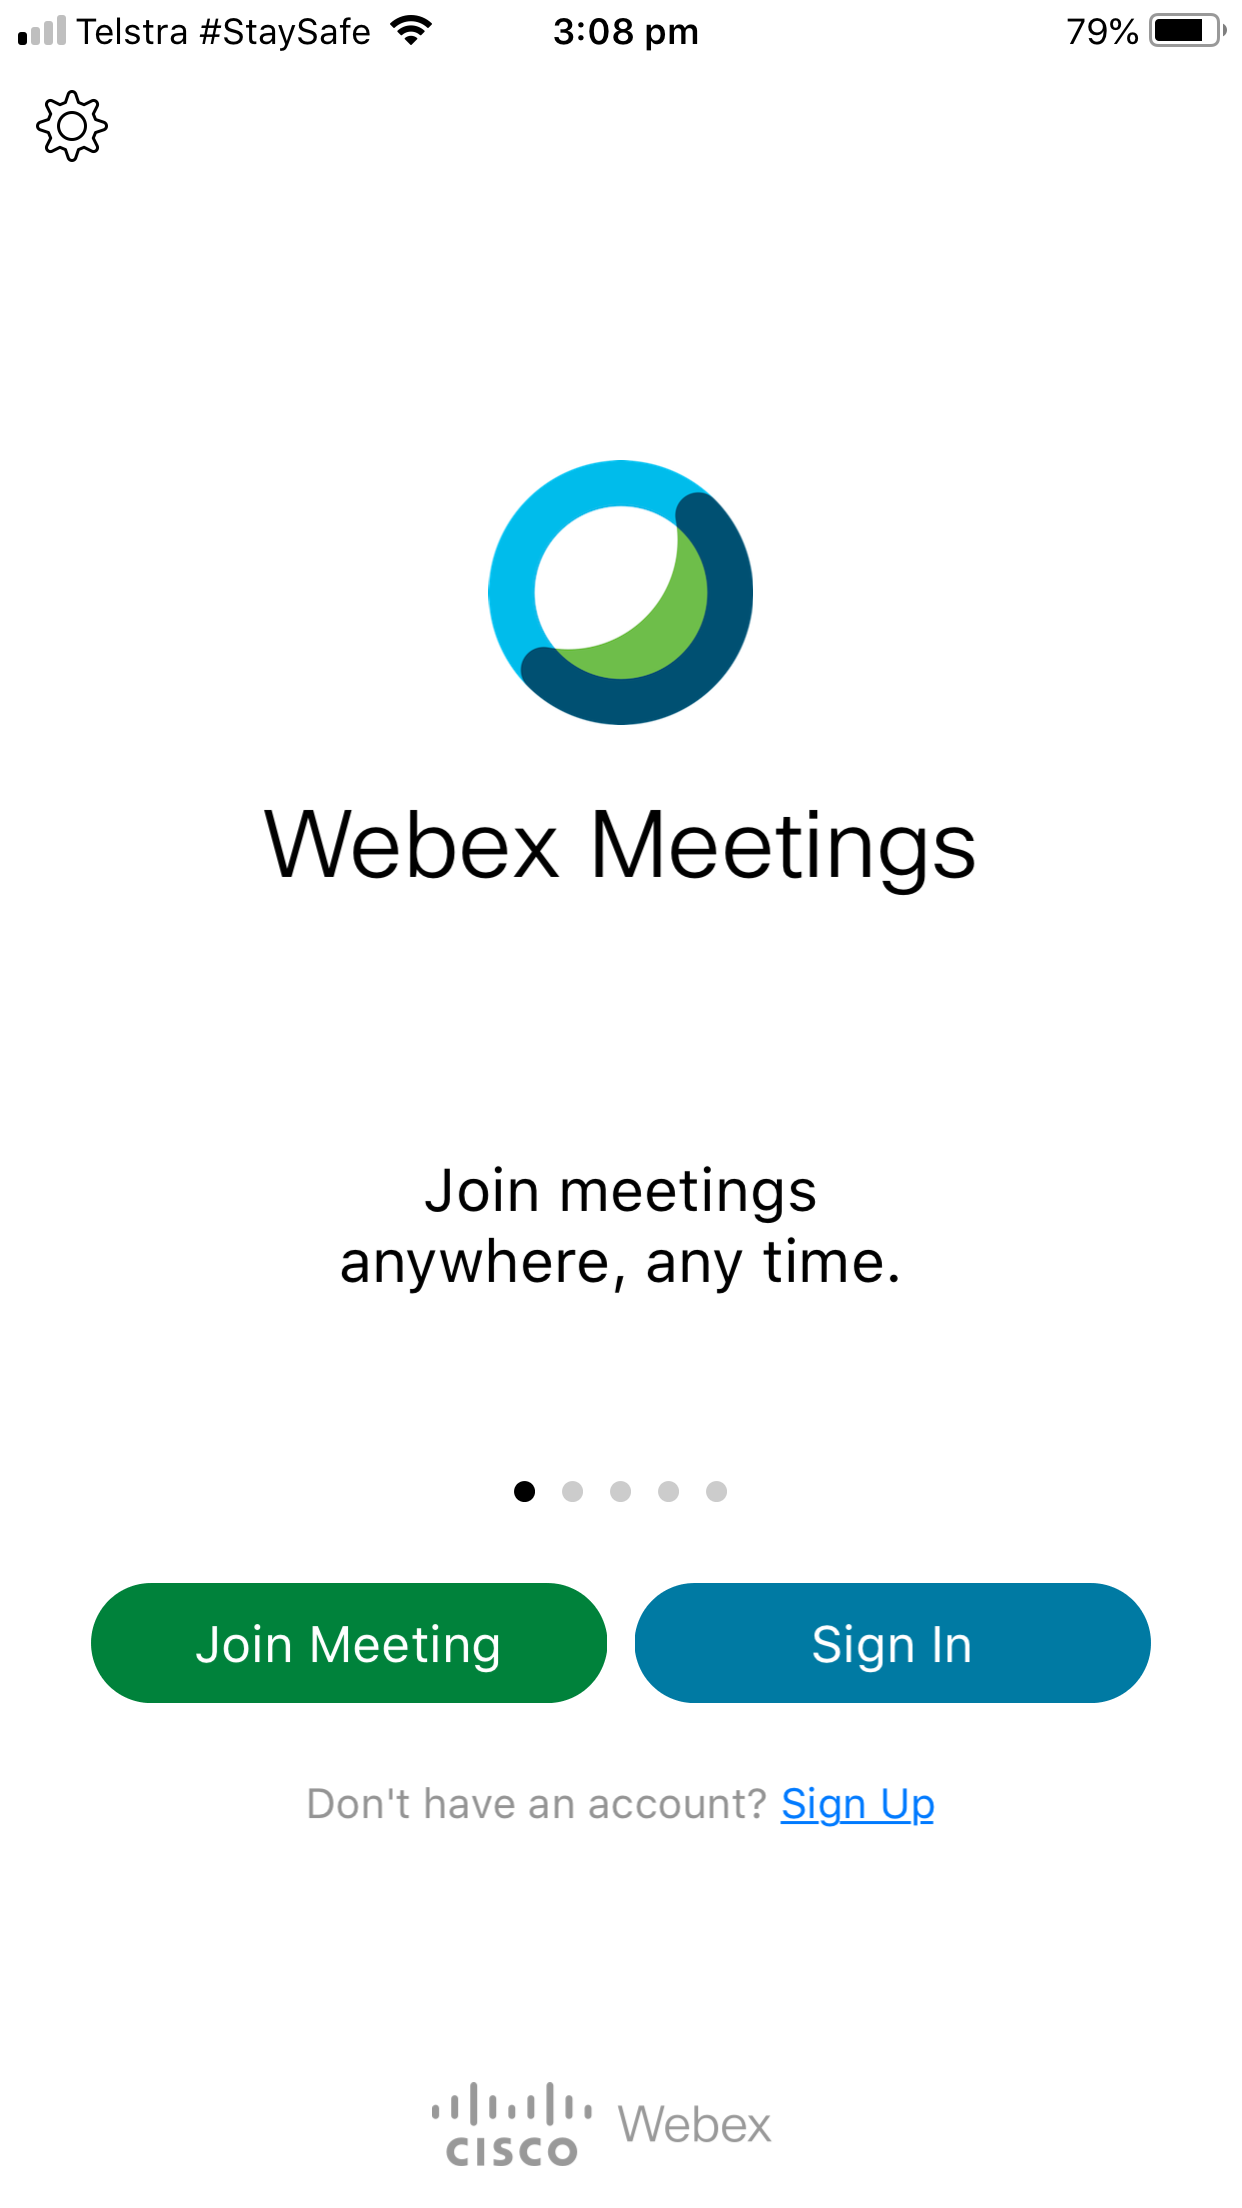
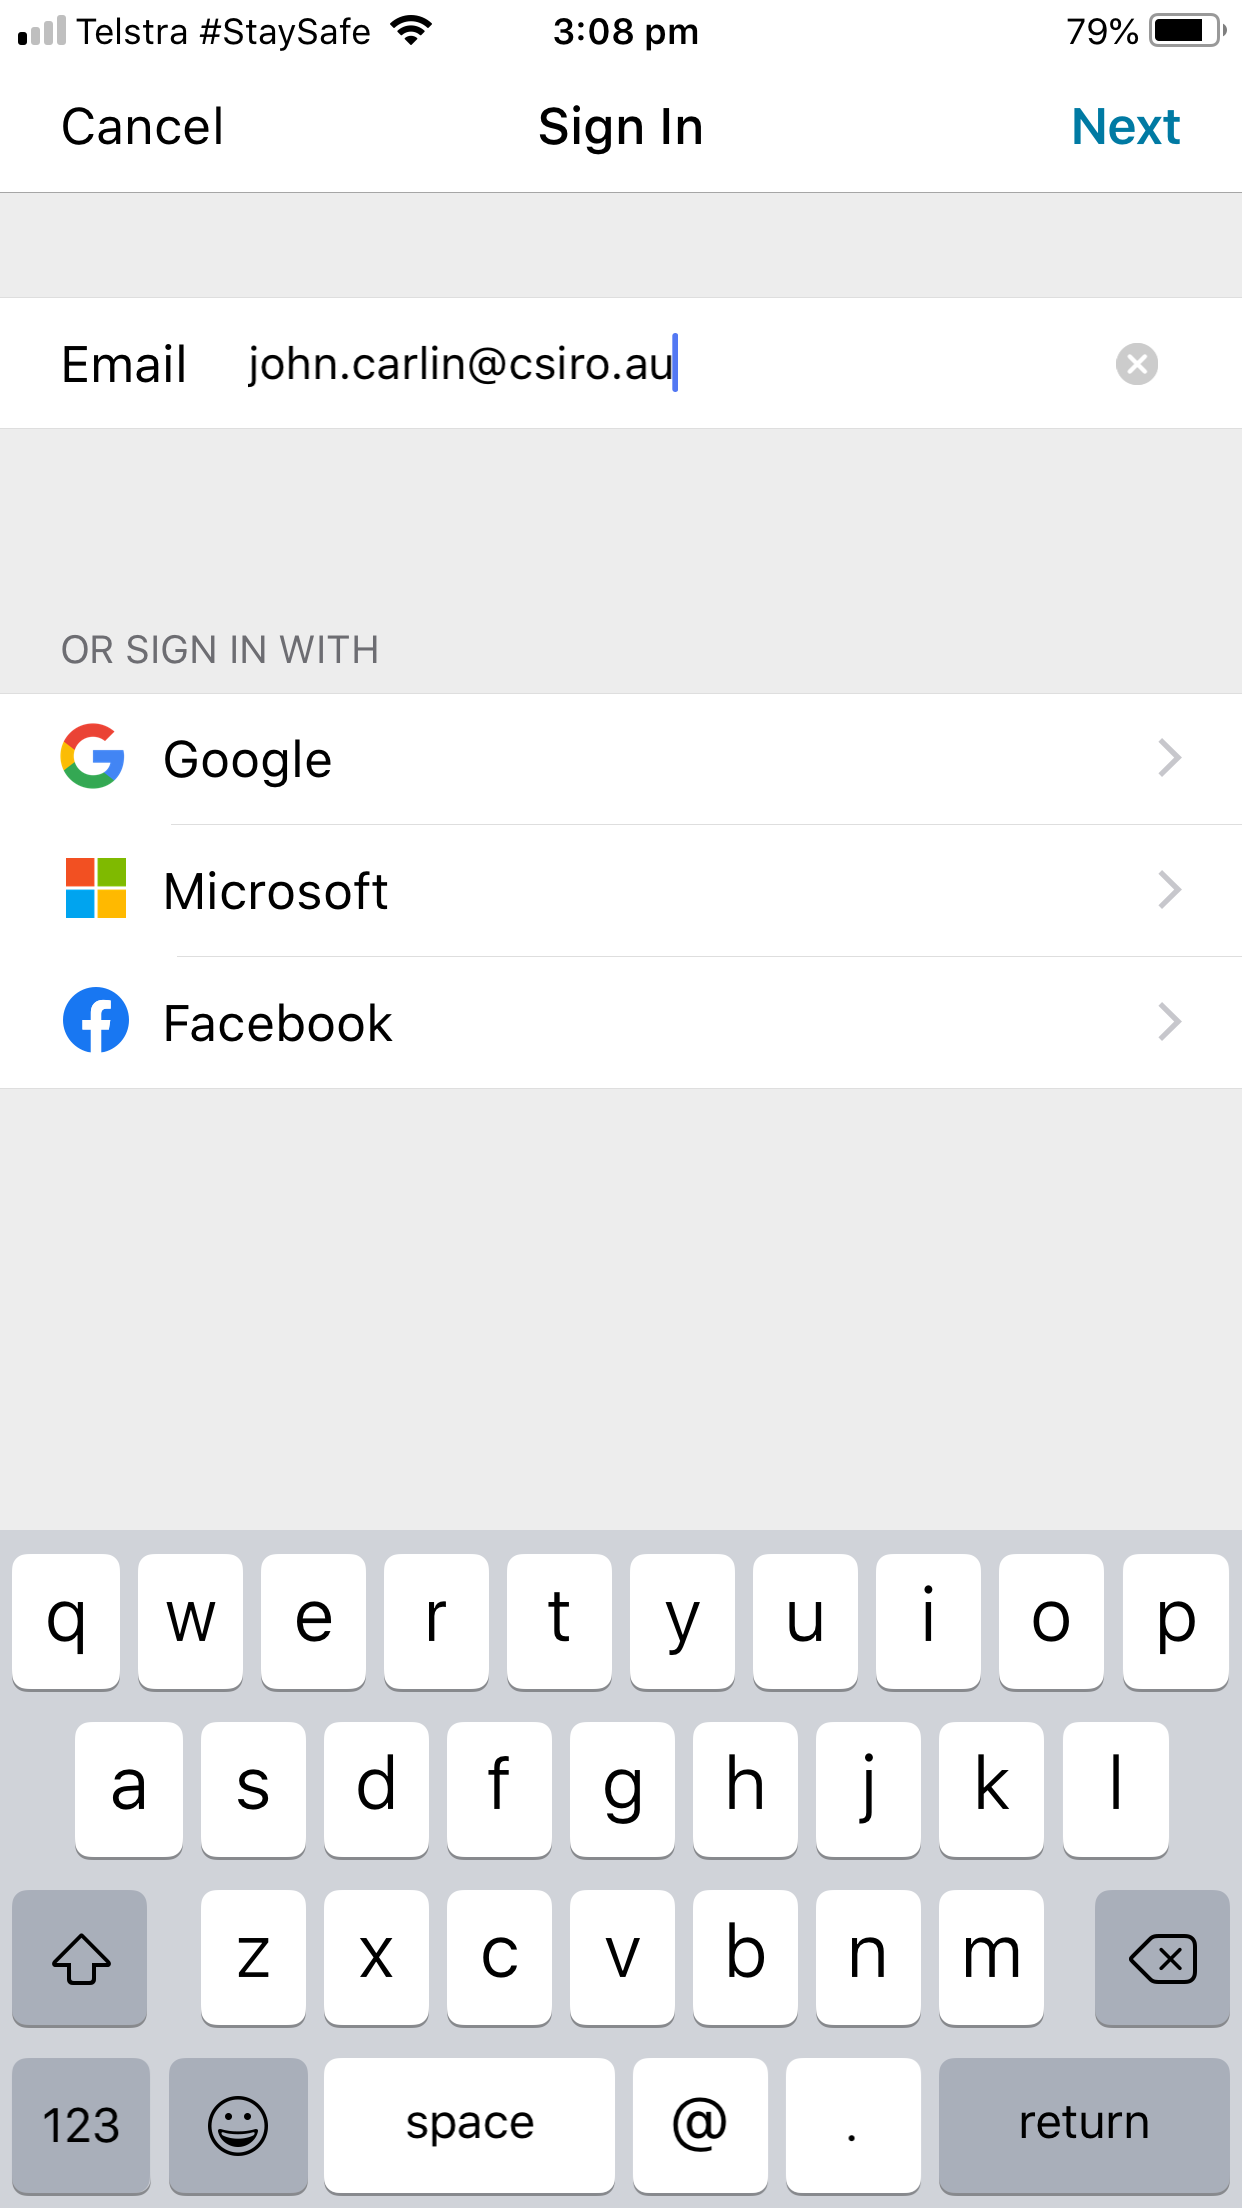
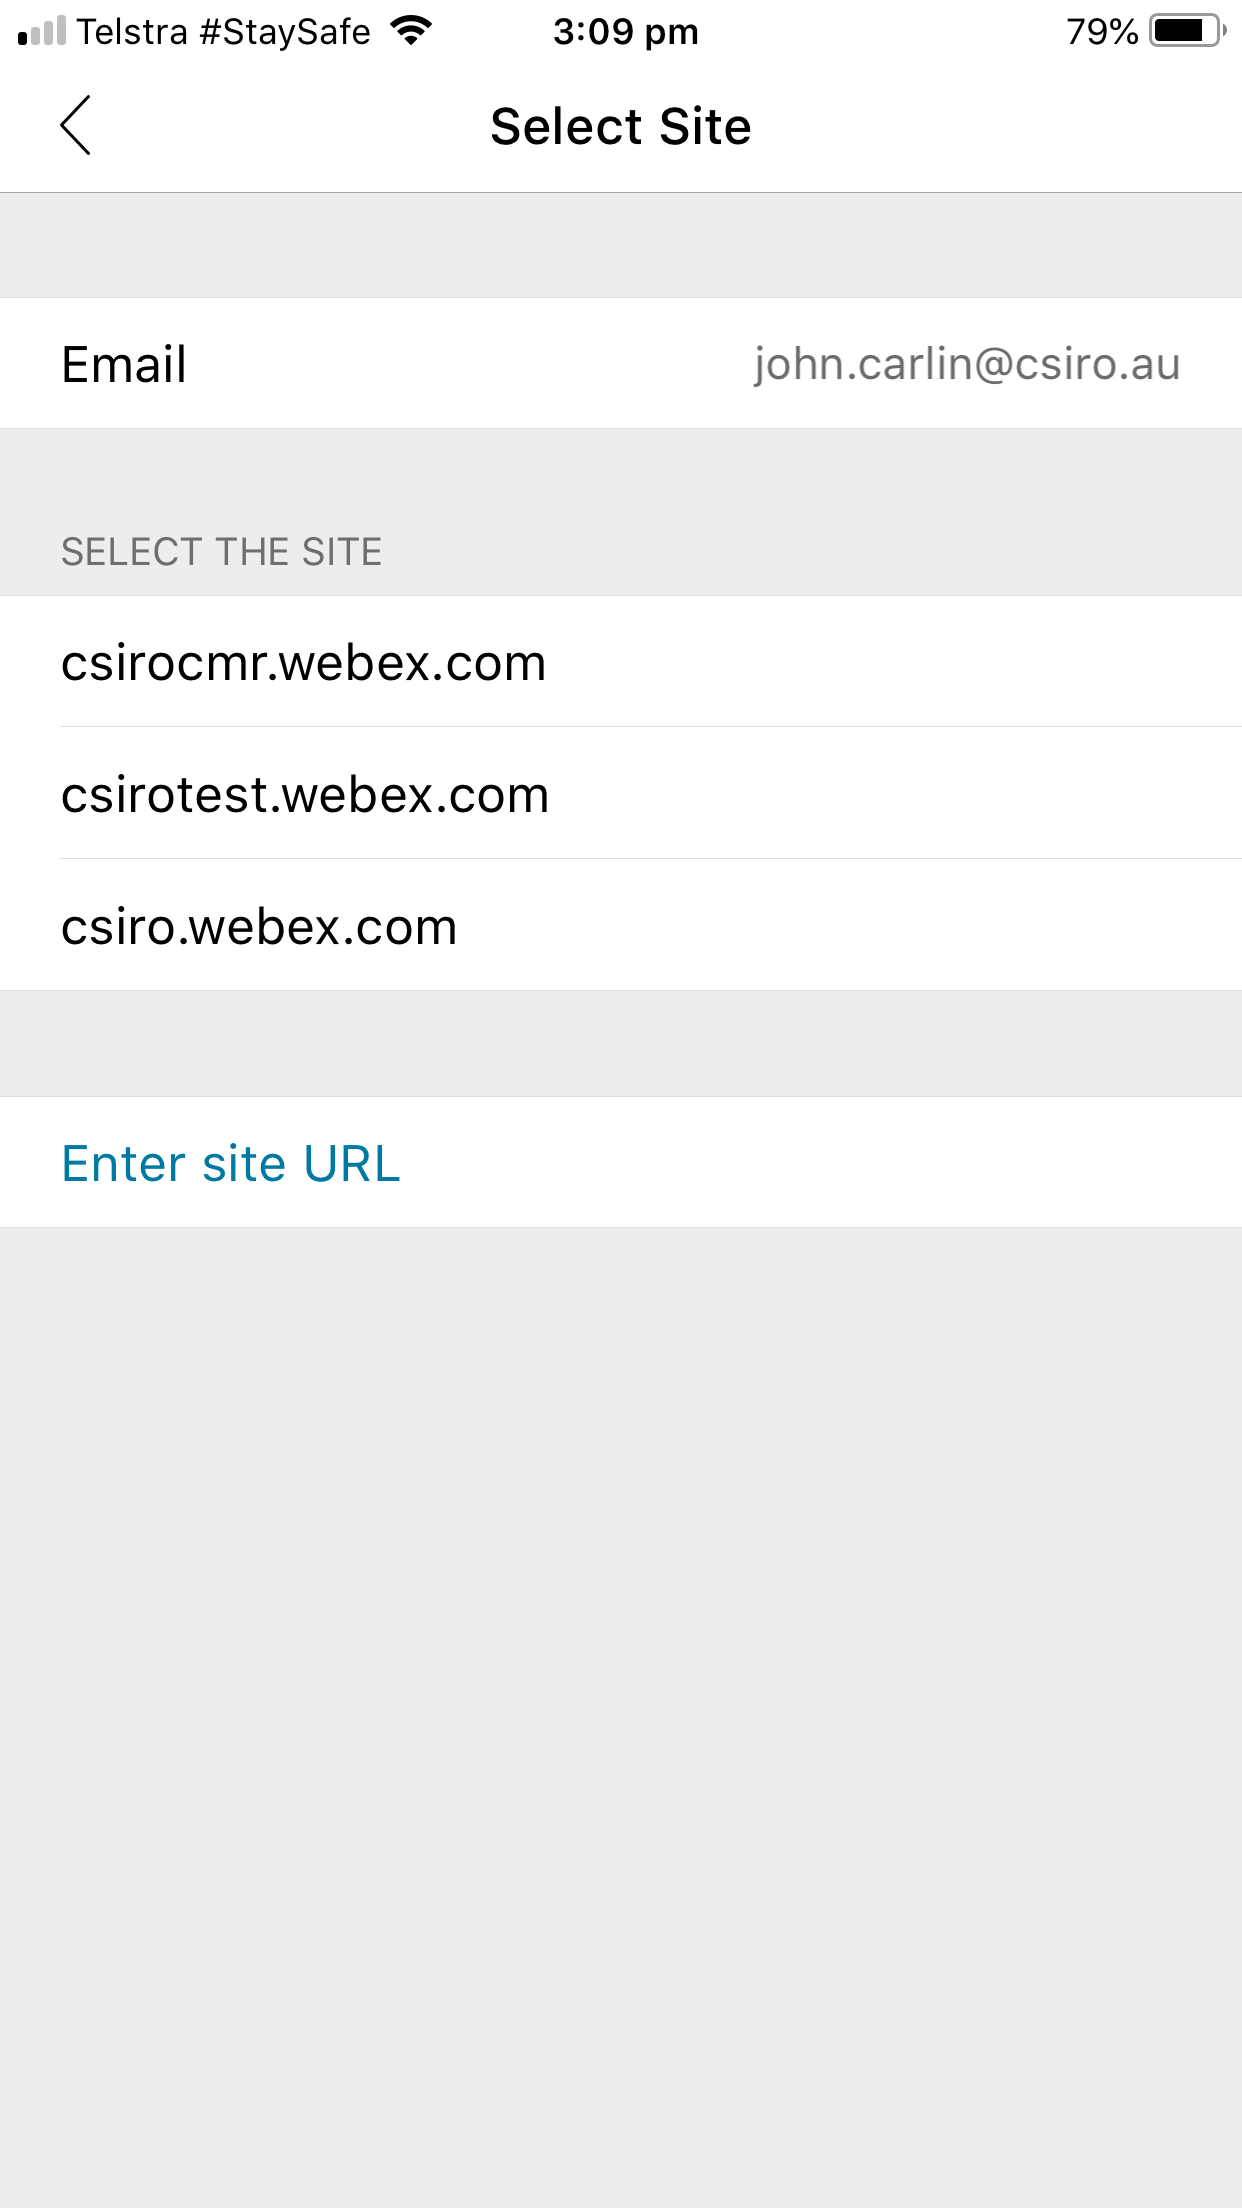
- When prompted, enter your CSIRO ident and password, then press 'Sign in'
-
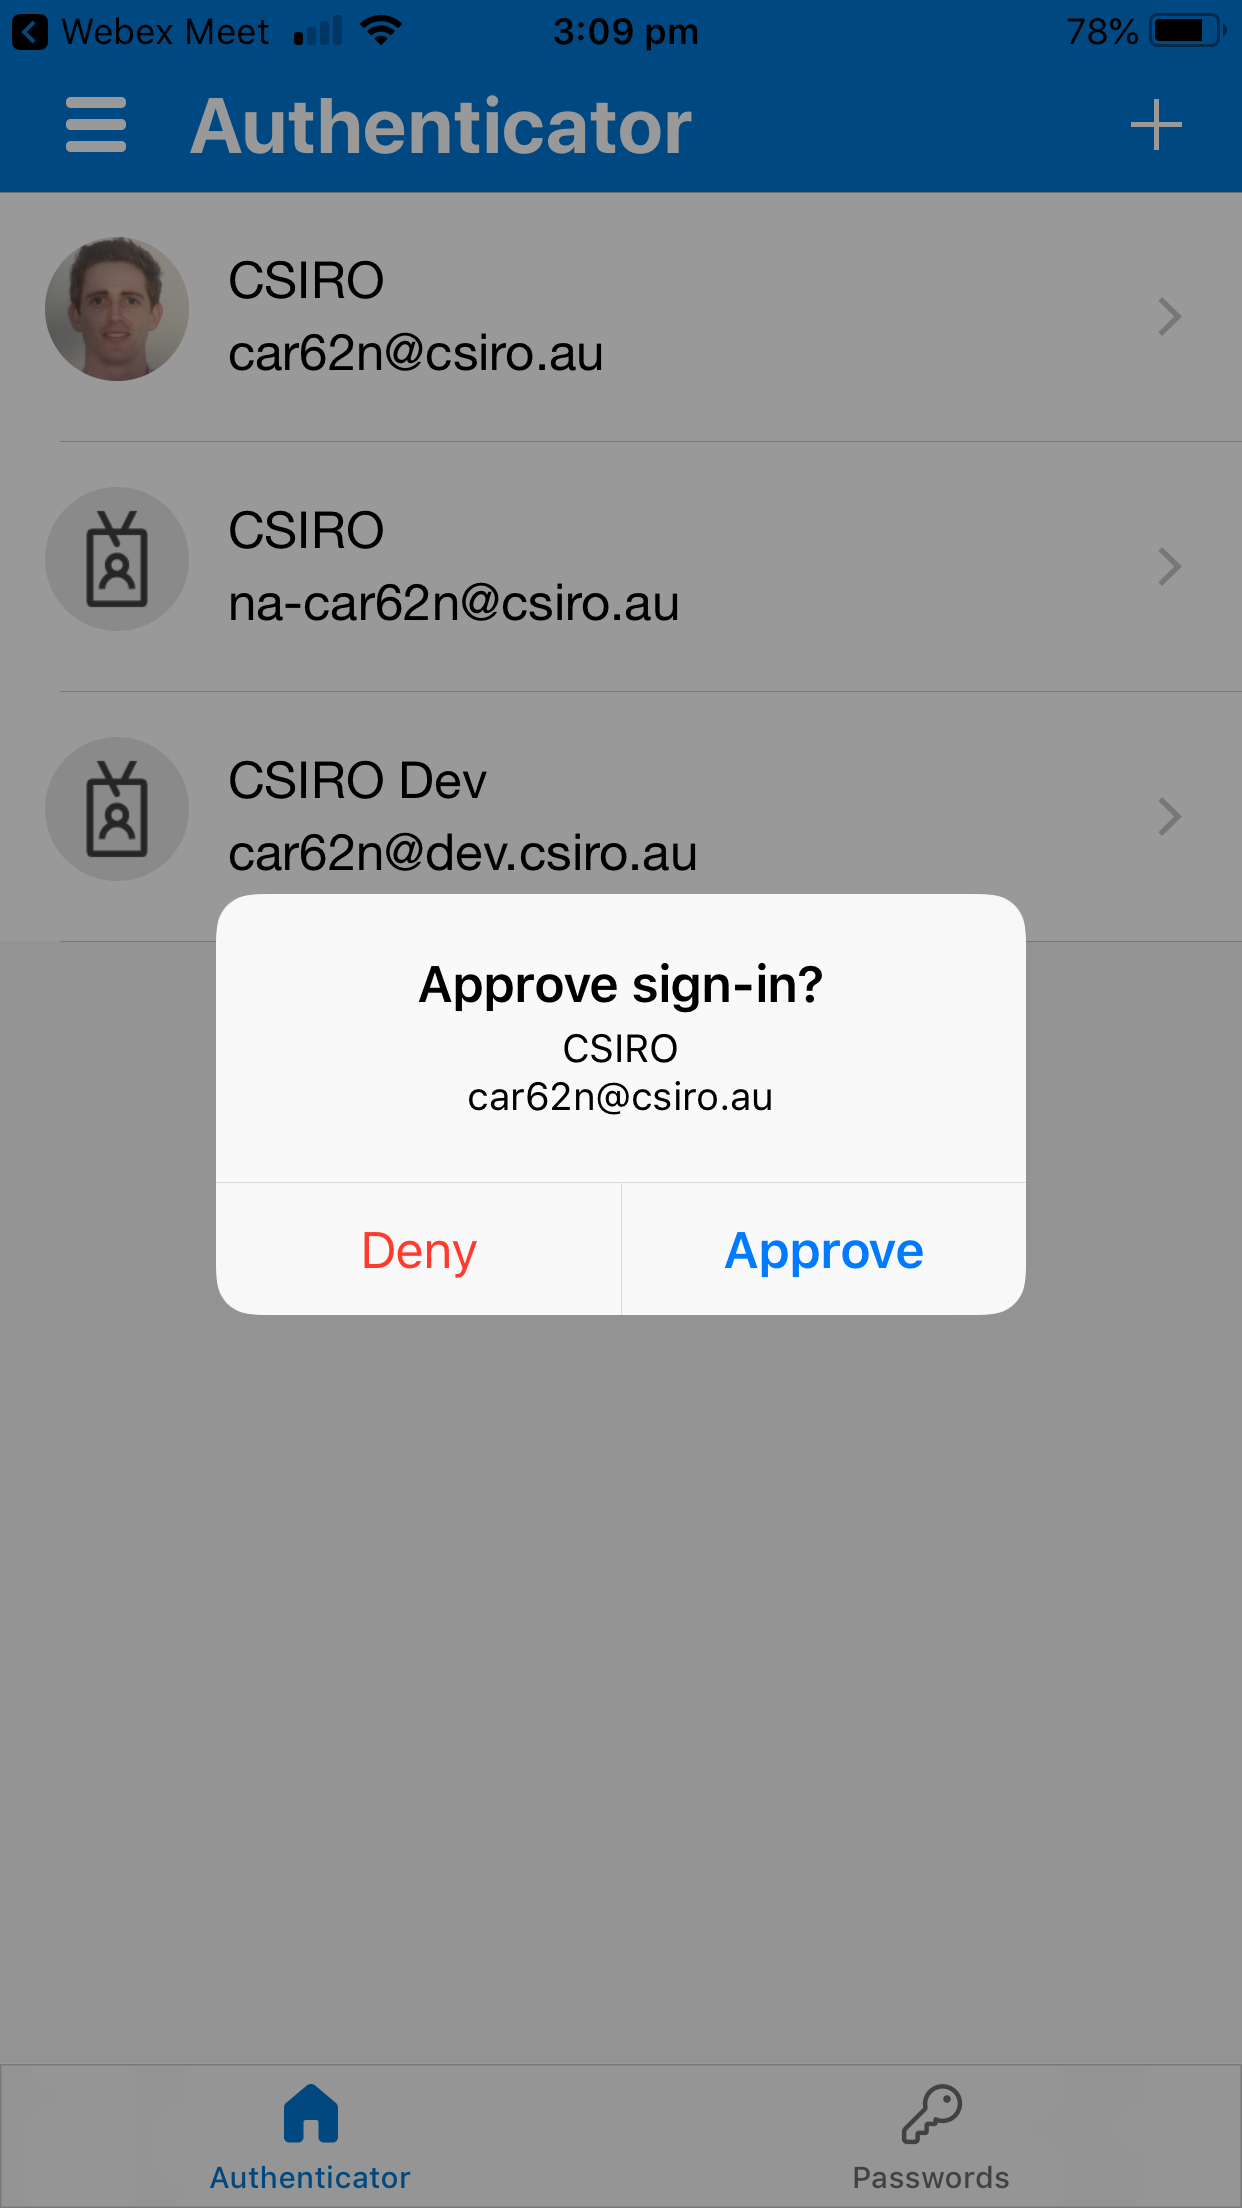
When prompted, approve the sign-in request using the Microsoft Authenticator app
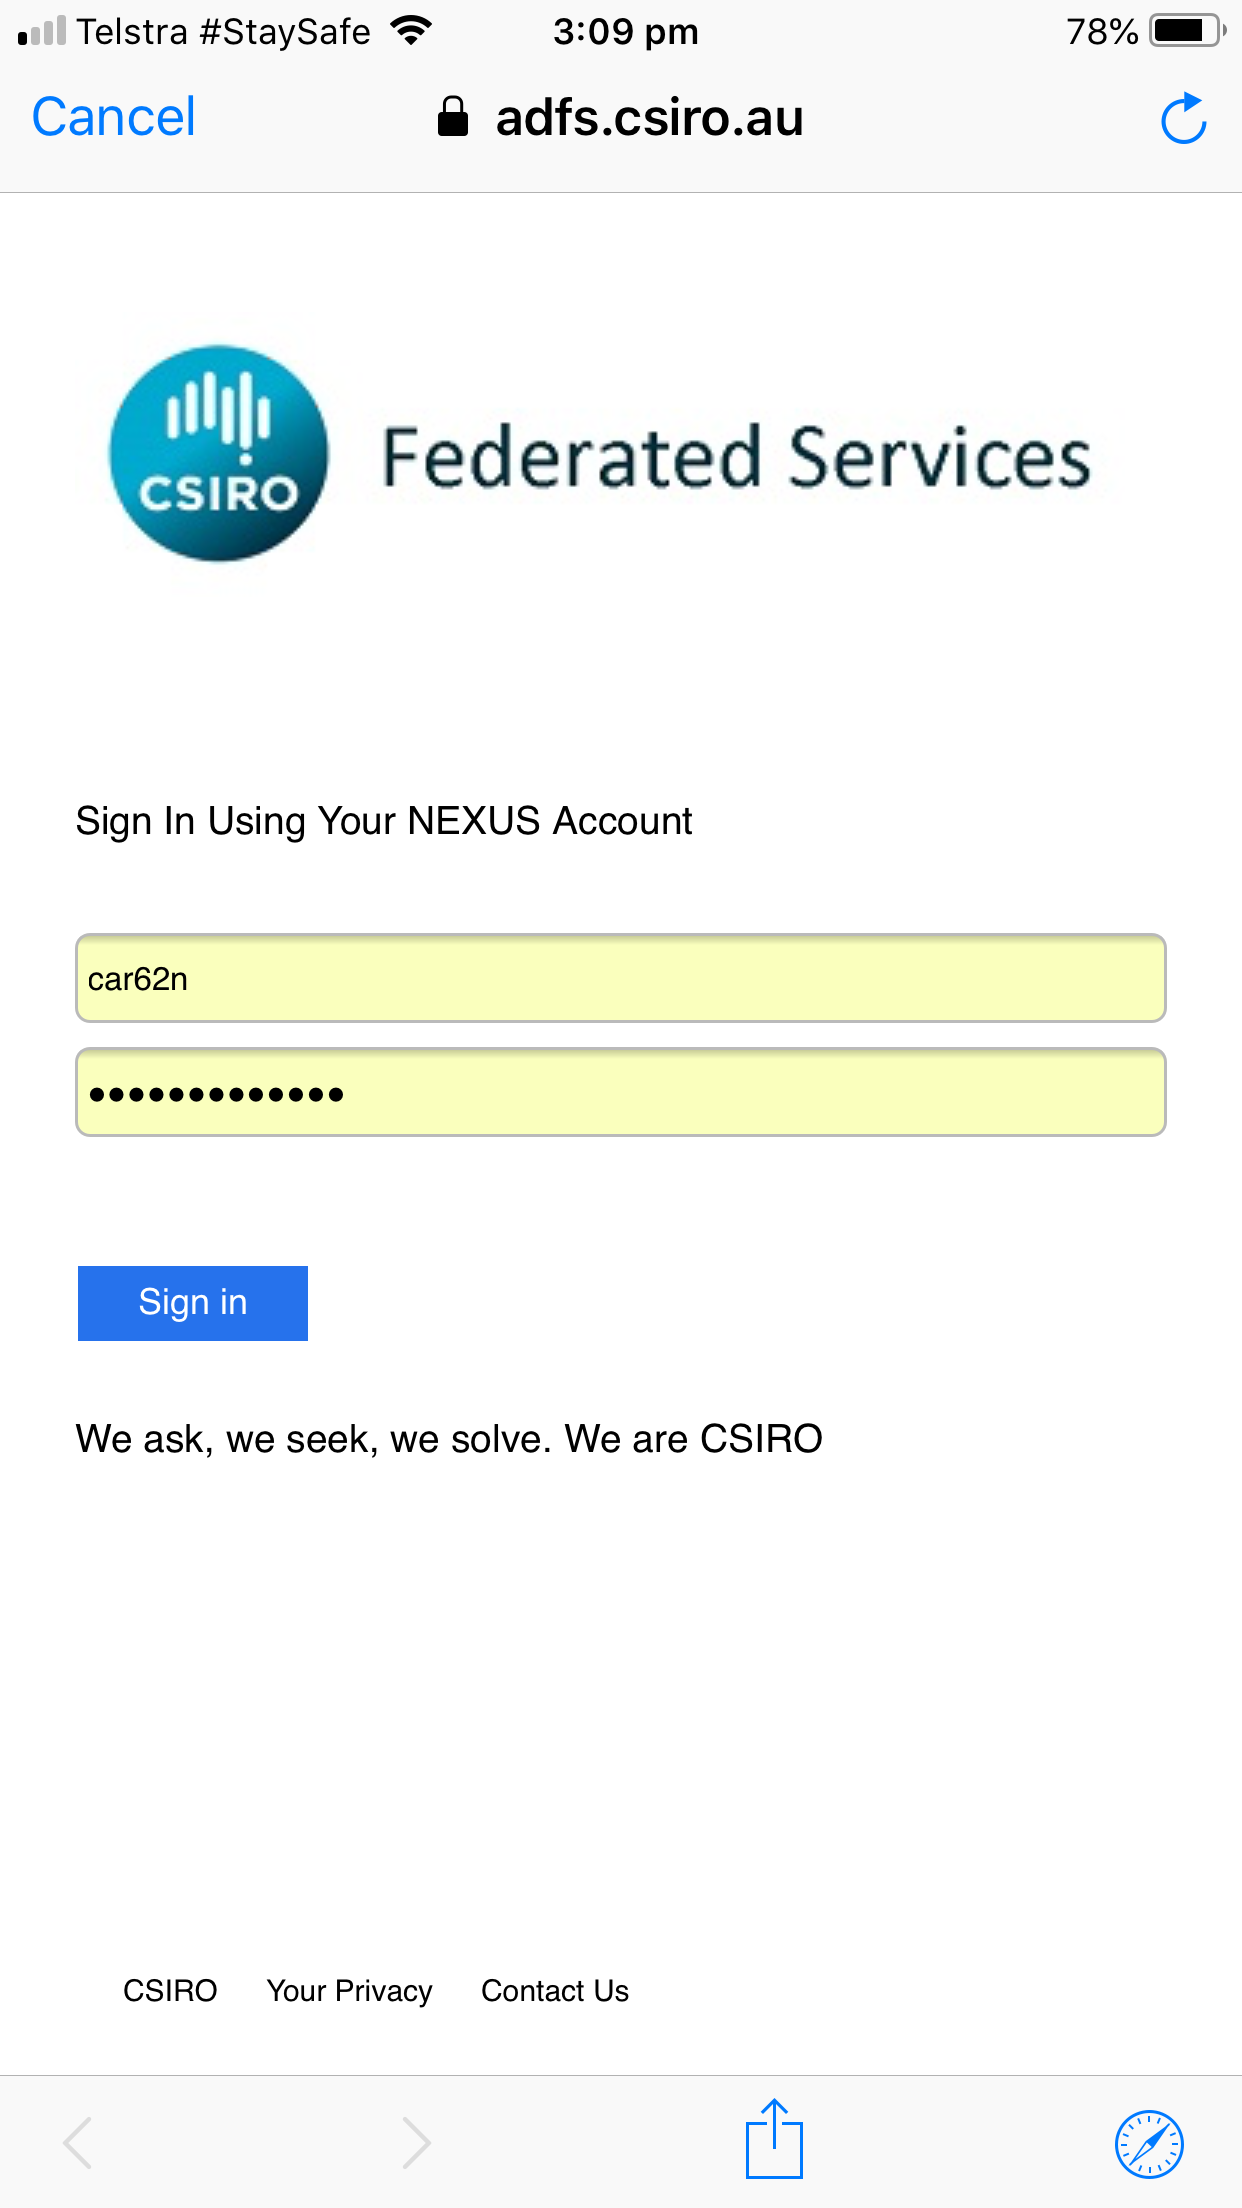
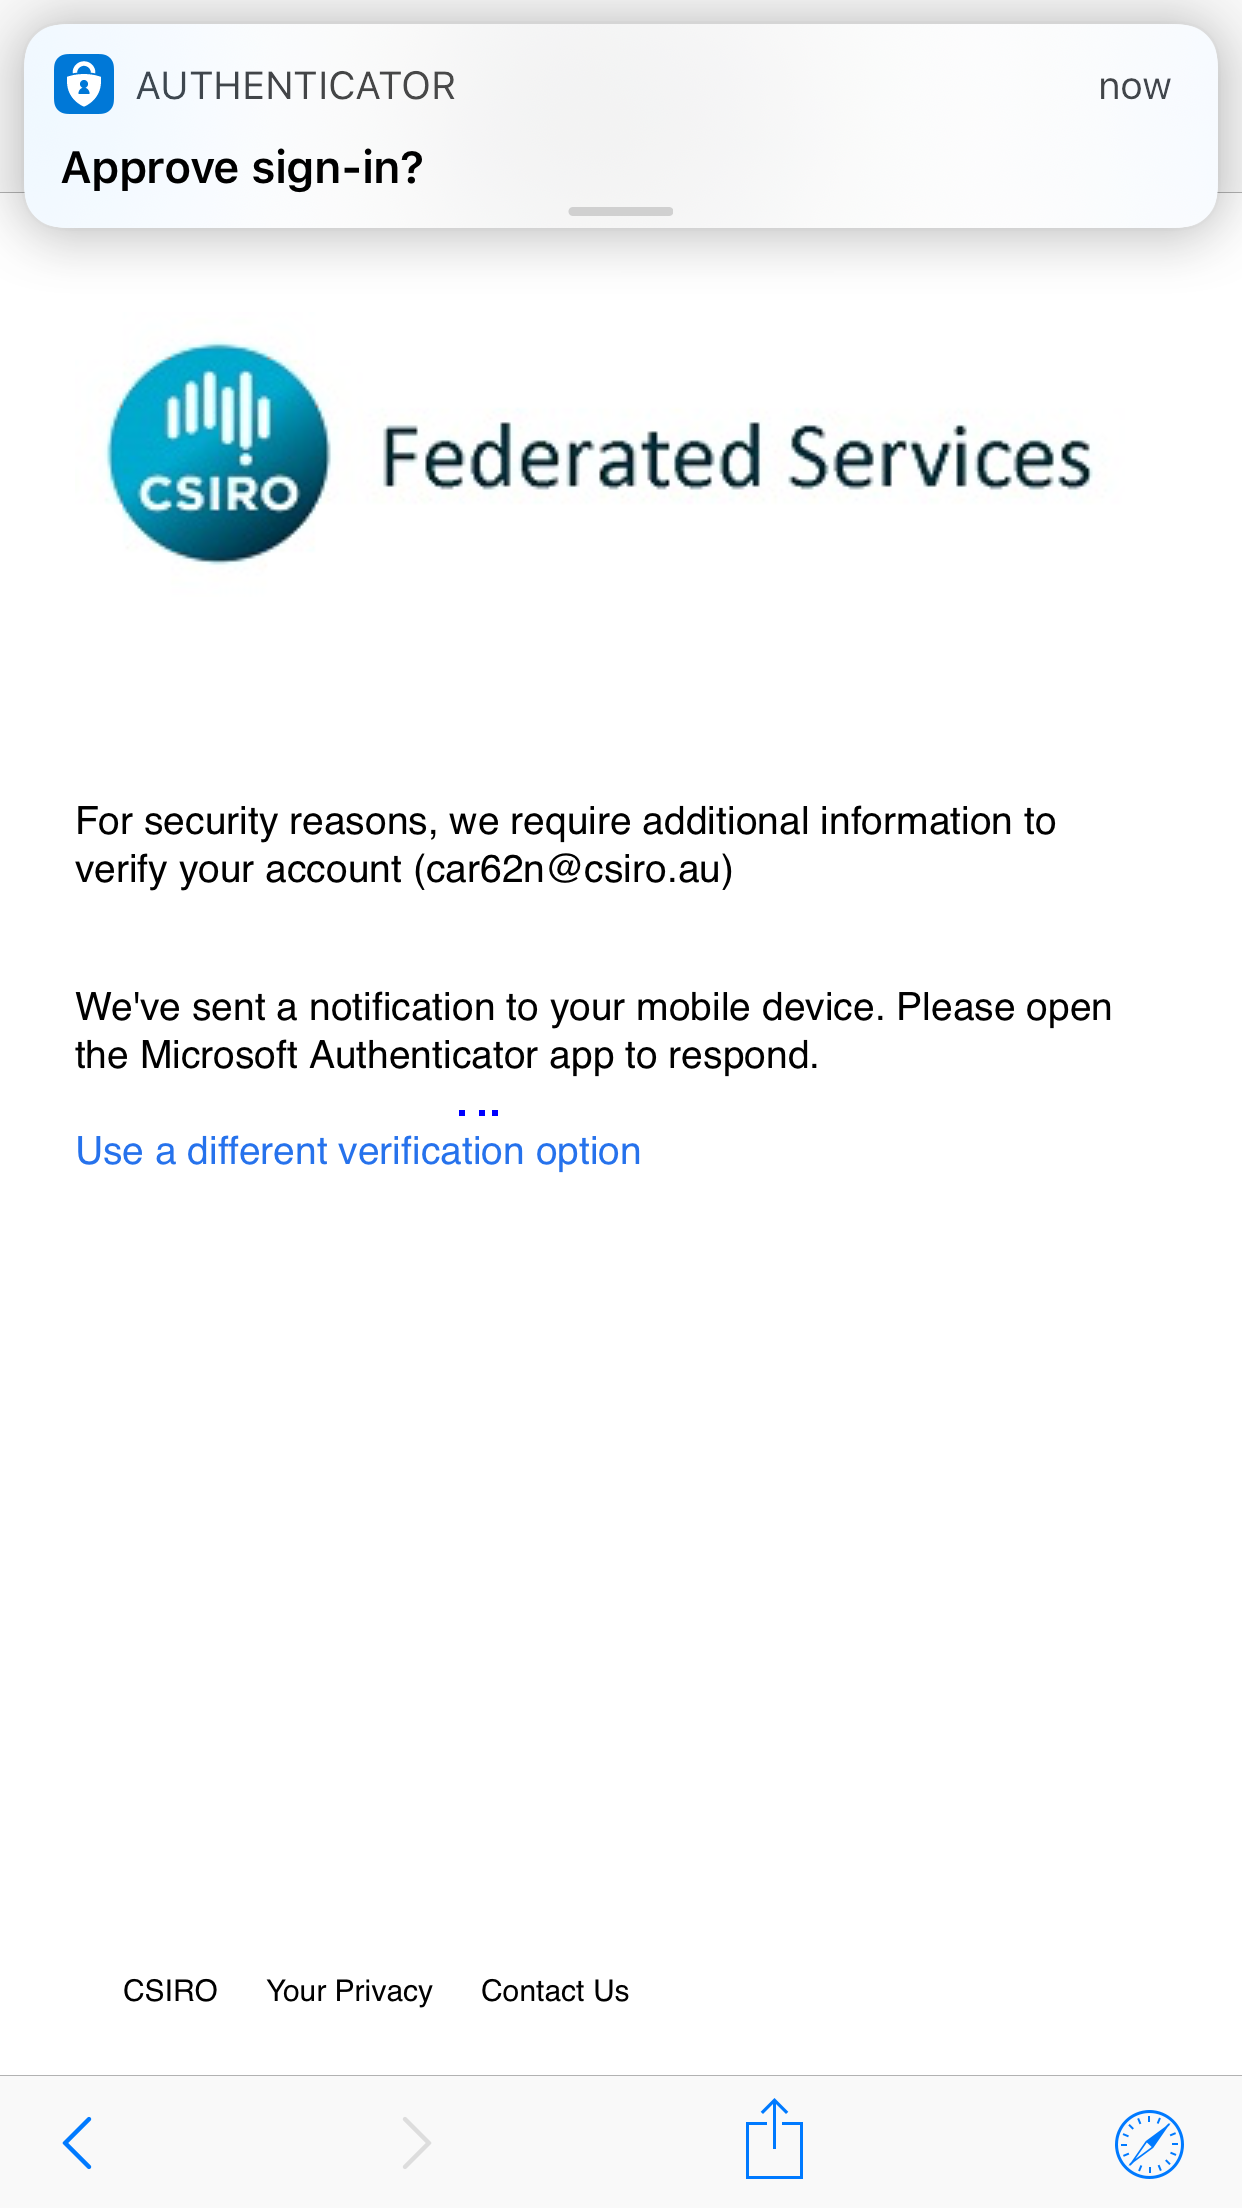
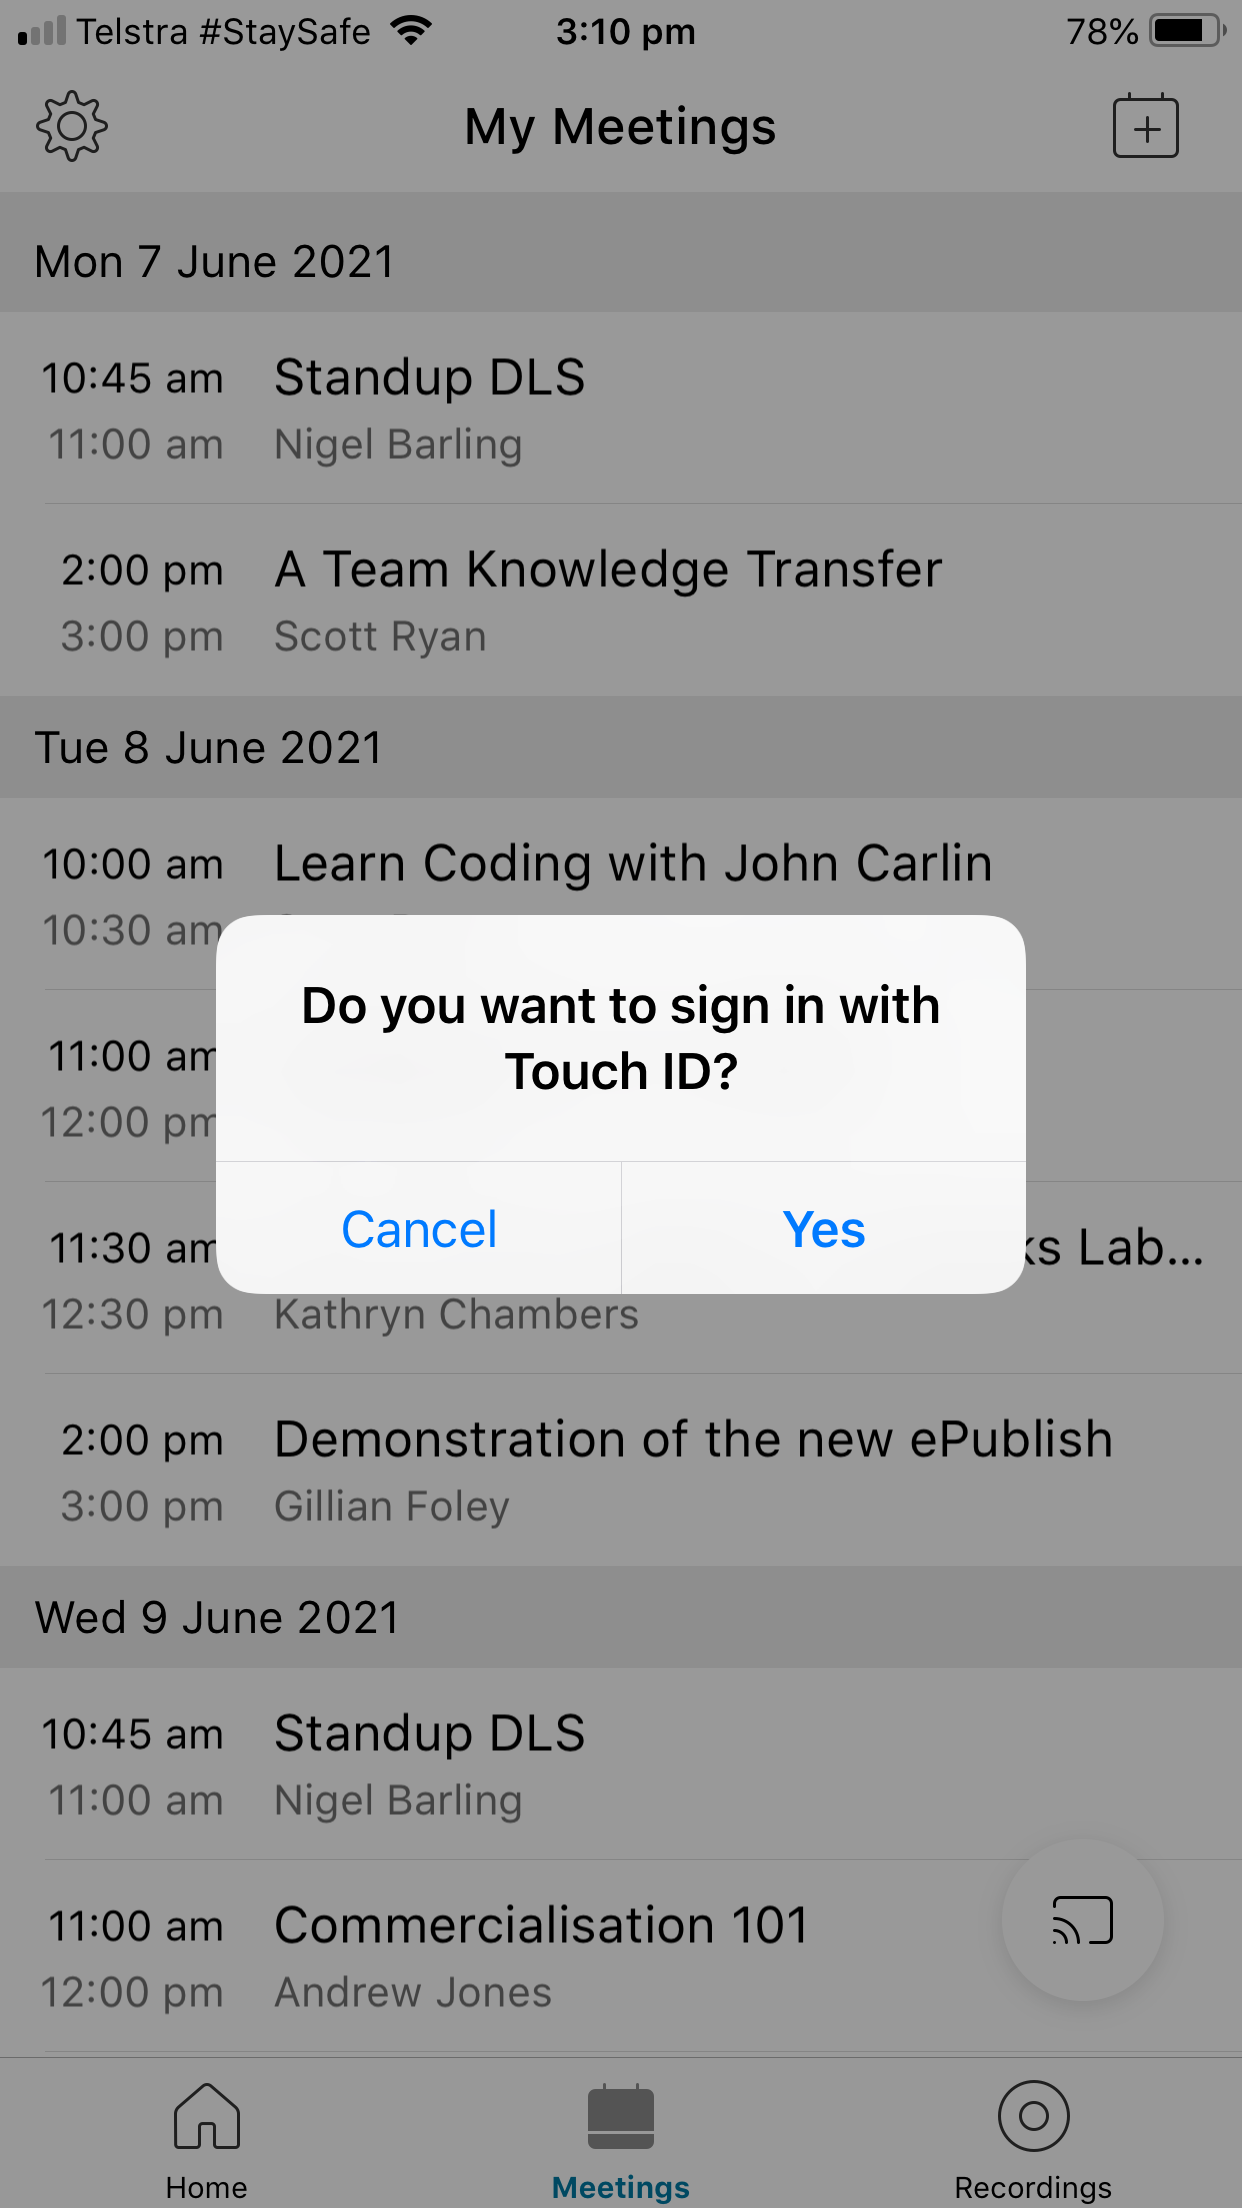
- Optional: enable Touch ID for logging into the Webex Meetings app in the future
-
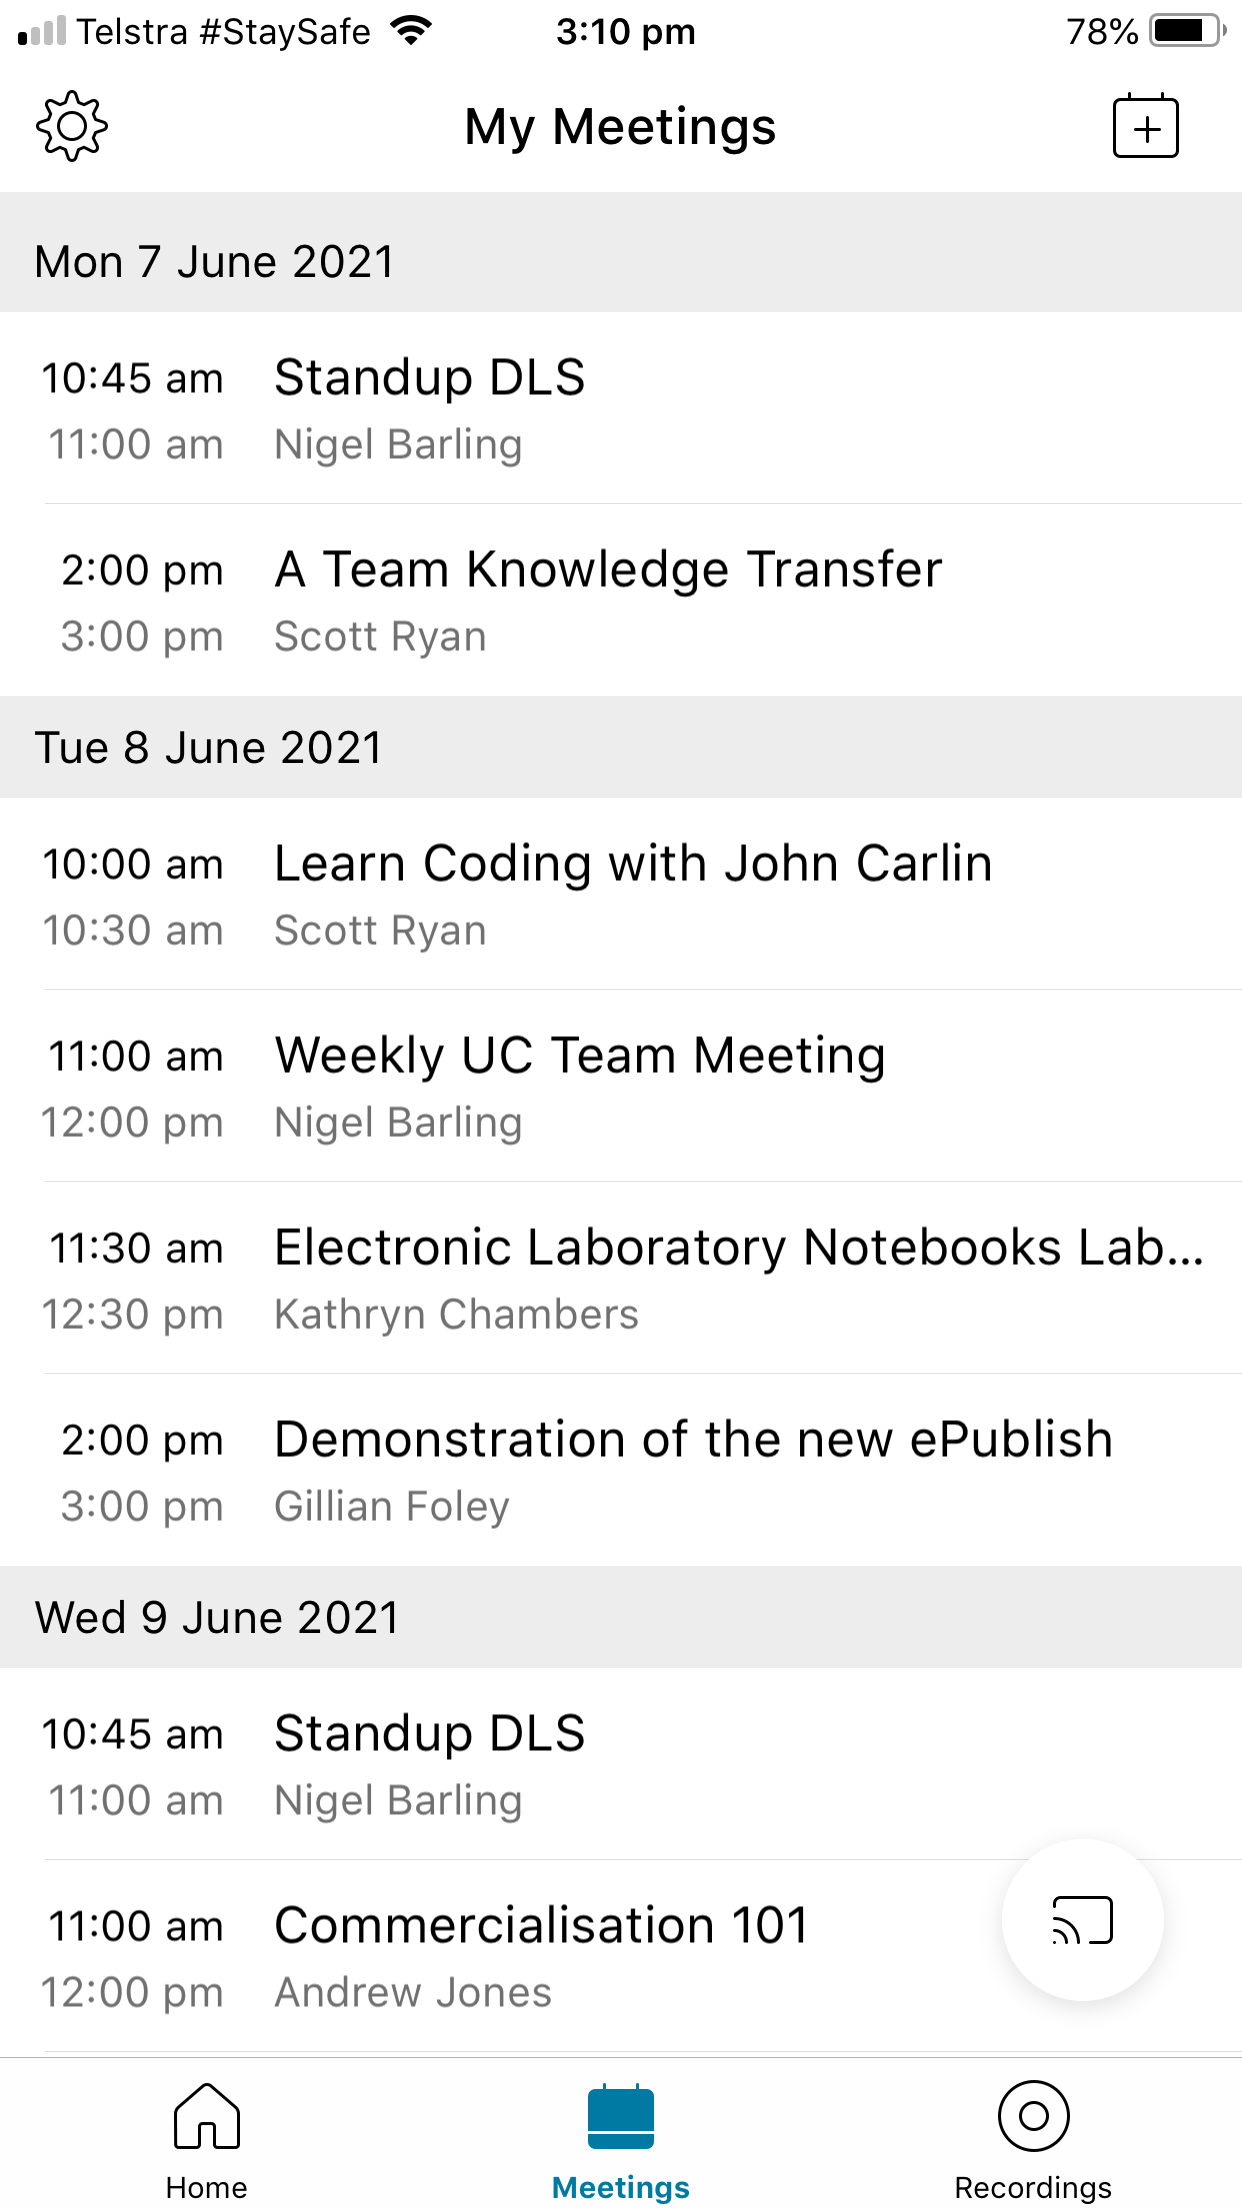
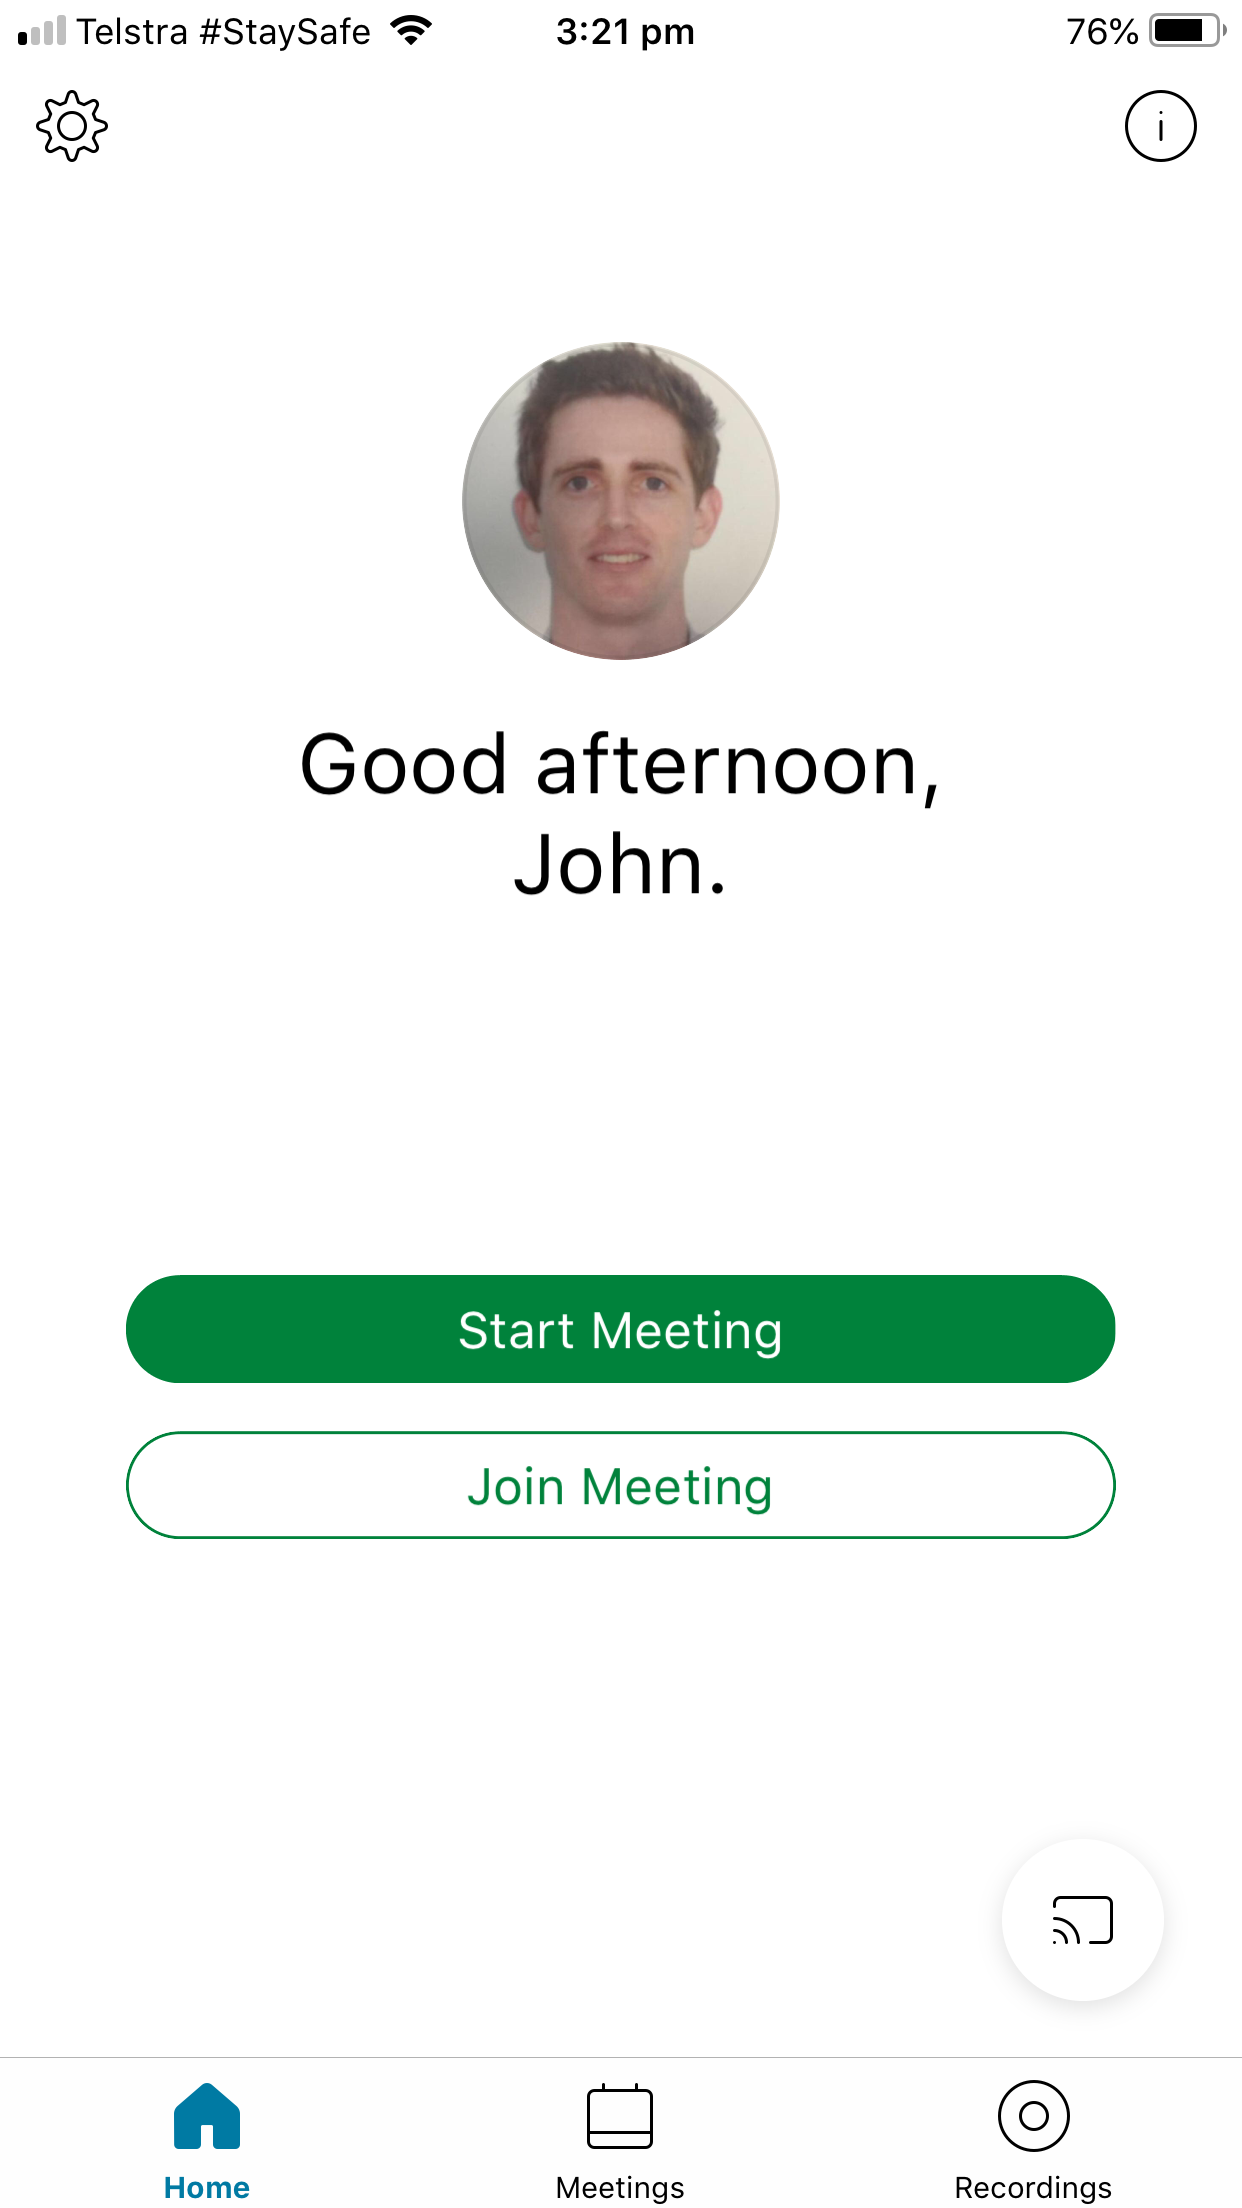
All done. You can see all upcoming Webex Meetings that you are hosting or have been invited to using the 'Meetings' tab at the bottom of the screen. If you want to join a meeting by entering a meeting ID manually, use the 'Home' tab.
Show transcript
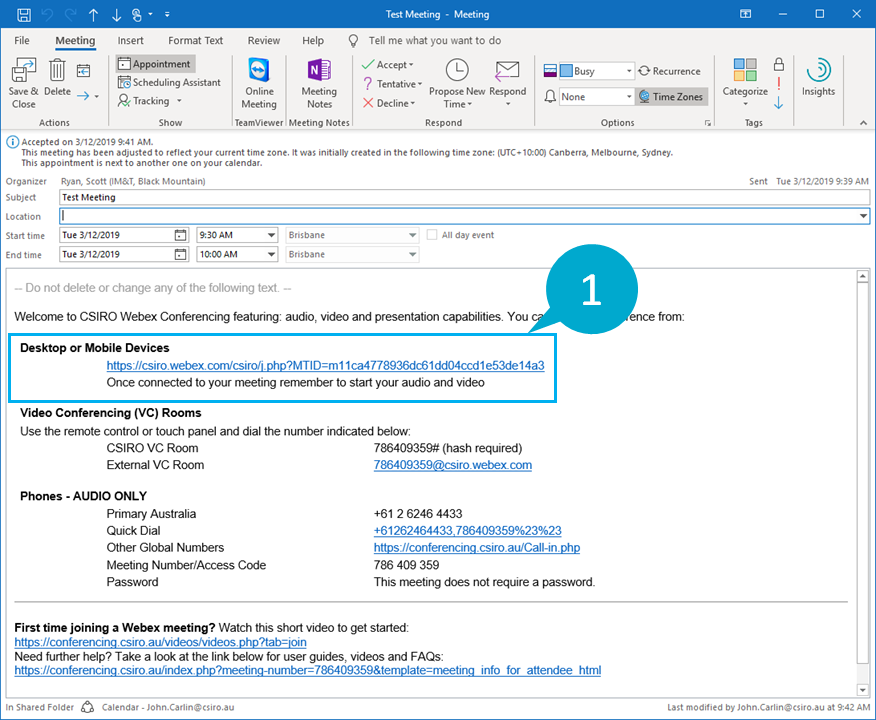
To join a Webex Meeting open your calendar invite and click the Desktop or Mobile Devices link.
If you are a CSIRO staff member click login otherwise enter your name, email address and click join. At this point the Meeting Centre window will load which is where all the action takes place.
Take a moment to select your preferred Audio and Video Connection methods. If you have a computer USB or wireless headset us the Call Using Computer option. Make sure you test that the right devices have been selected by clicking More options and then clicking Test to hear playback sounds and gently tapping your microphone to make sure the microphone bar lights up.
If you don’t have a computer headset it’s recommended that you use the Call Me option. This allows you to get Webex Meetings to call you on a phone anywhere in the world. To do so simply select the correct country code and then enter your full national number.
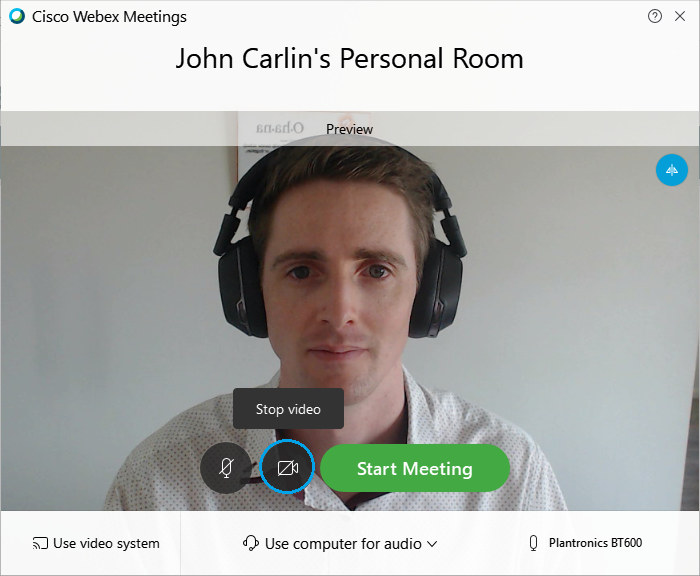
Setting up video is nice and easy, just make sure that you can see yourself in the Preview image. If you can’t, select a different camera device from the drop-down list and check again.
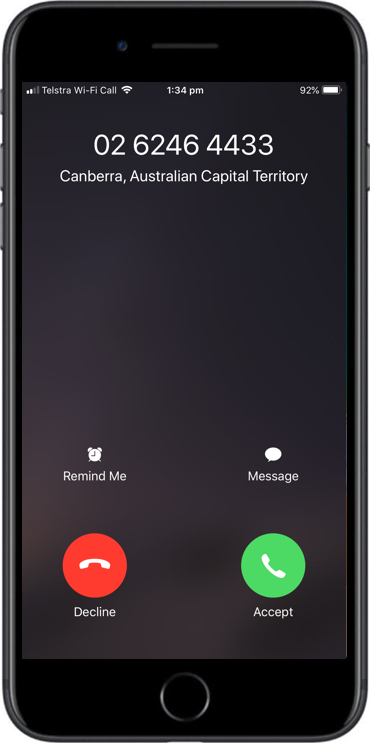
Once you’re happy with these settings click Connect Audio and Video. If you selected the Call Me option, your phone will now ring, just answer the call and press 1 to be connected.
And that’s it, you’ve just successfully joined a Webex Meeting.
To join a Webex Meeting using the desktop app:
- Click the 'Desktop or Mobile Devices' link in your invitation up to 5 minutes before the scheduled start.
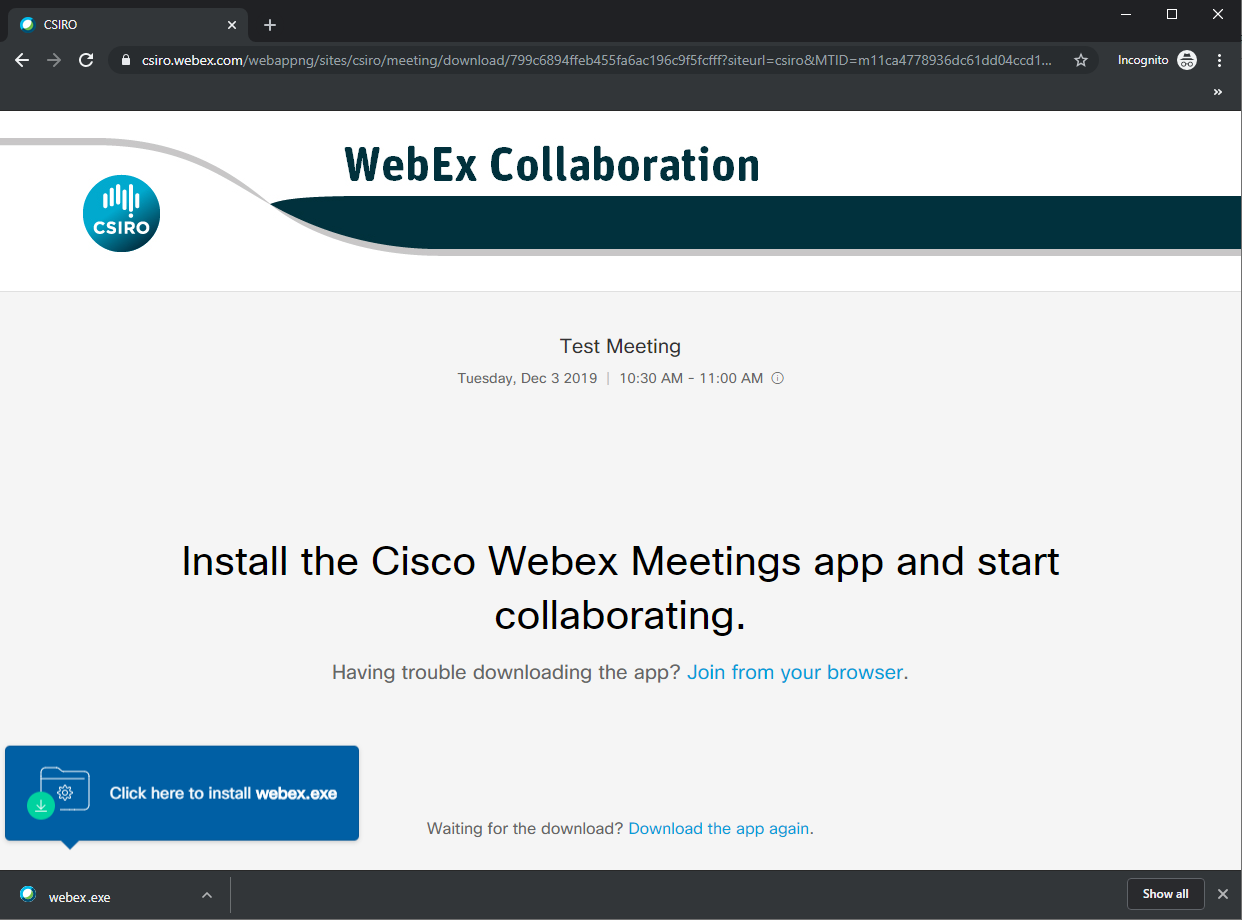
- If this is your first time joining a Webex Meeting you may be prompted to install the Webex Meetings app. Follow the prompts to install 'webex.exe'.
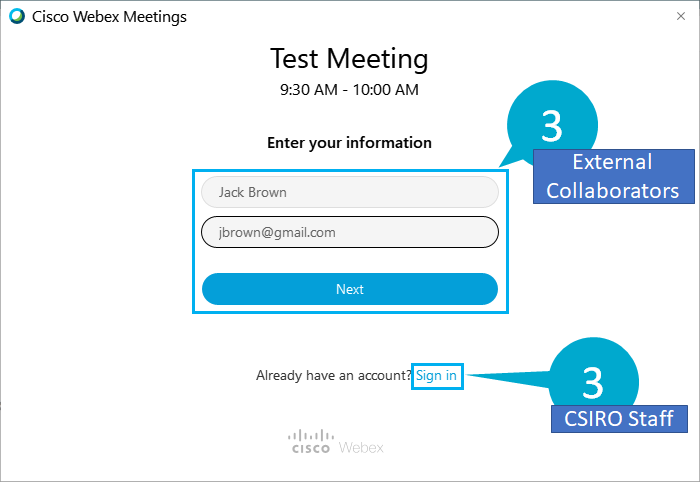
- If you're an external collaborator, enter your 'Name' and 'Email Address' and click 'Next'. If you're a CSIRO staff member, click 'Sign In'.
-
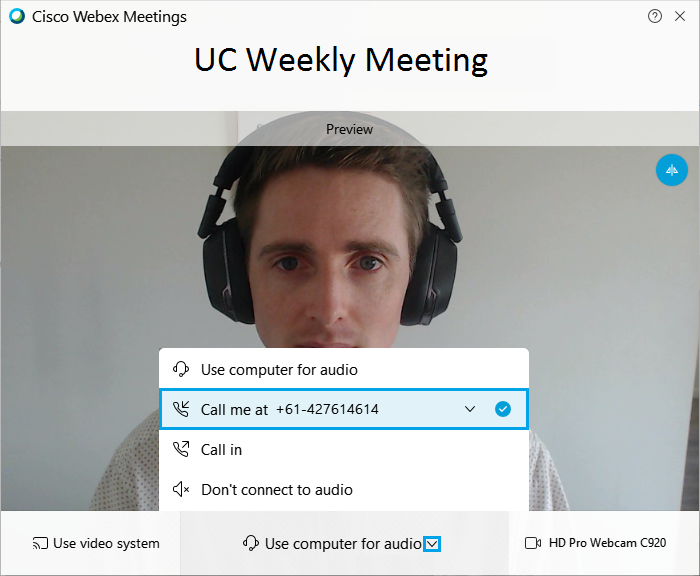
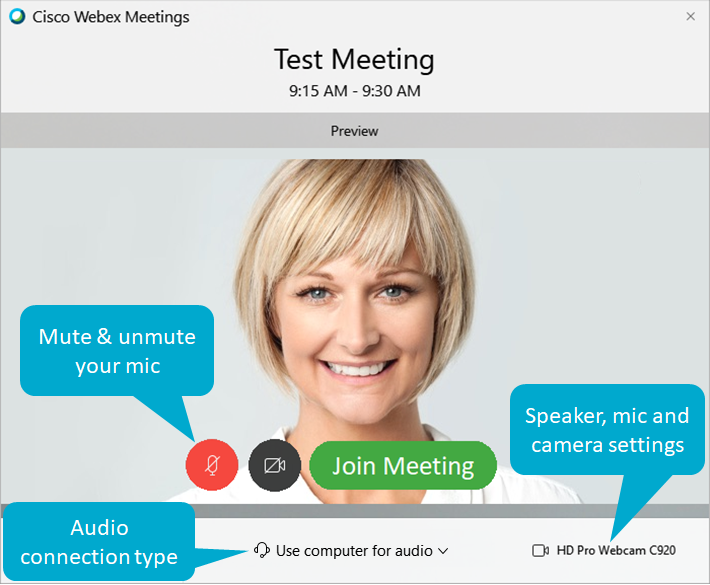
Use the preview screen to test and connect your audio and video before joining the meeting. Start with your audio connection:
-
Use computer for audio
This is CSIRO's recommended option. Make sure you have a good quality USB headset and network connection, and remember to test your speaker and microphone devices by clicking 'Speaker, mic and camera settings'. -
Call me at...
If you don't have a computer headset or are having issues with audio quality, use this option. Get the Webex Meetings system to call your phone by entering in your country code and phone number. -
Call in
This is the audio option of last resort if the above two options do not work. Remember to enter your Attendee ID as displayed on screen.
-
Use computer for audio
If you're having trouble installing the Webex Meetings desktop application, consider trying the web application. The web application does not require anything to be installed so it is suitable if you don't have admin permissions on your machine. To join a Webex Meeting using the web application:
- Click the 'Desktop or Mobile Devices' link in your invitation up to 5 minutes before the scheduled start.
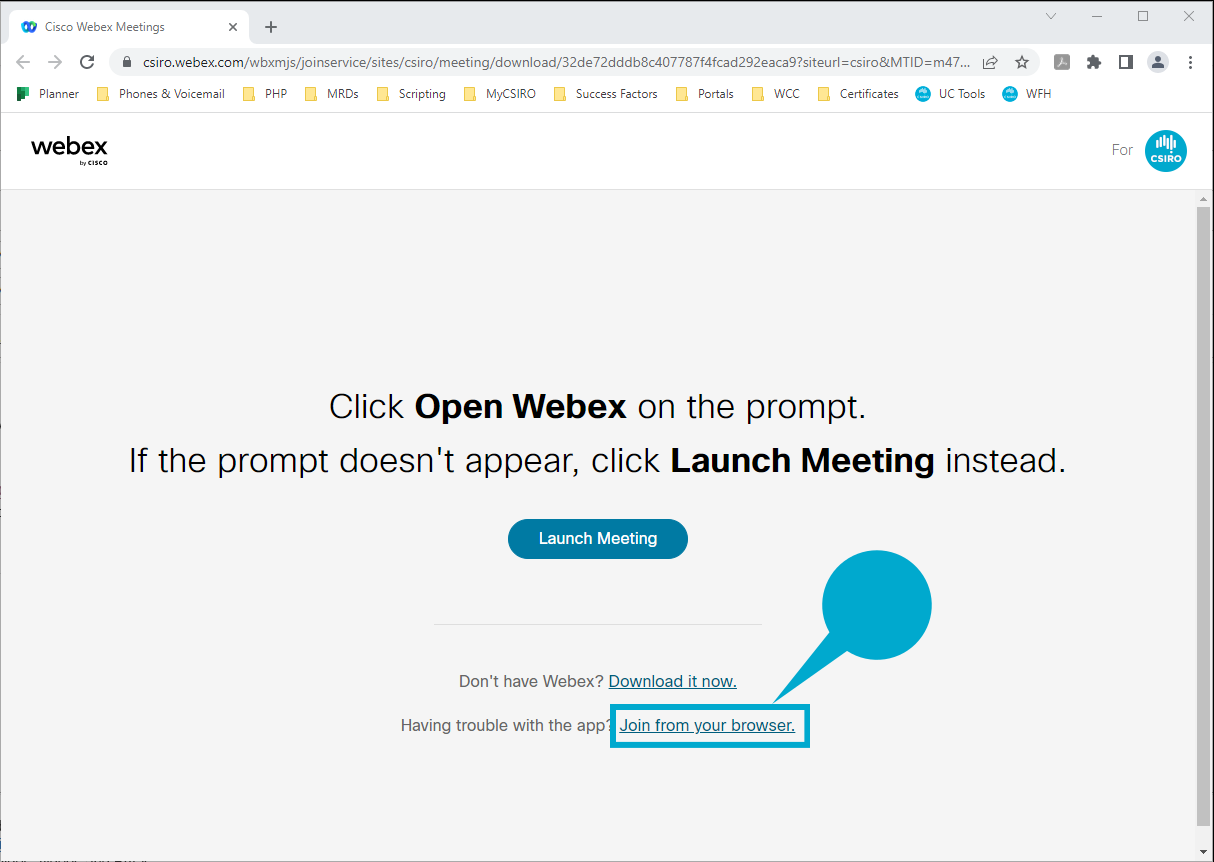
- When prompted to install the Cisco Webex Meetings app, ignore this and instead click 'Join from your browser'.
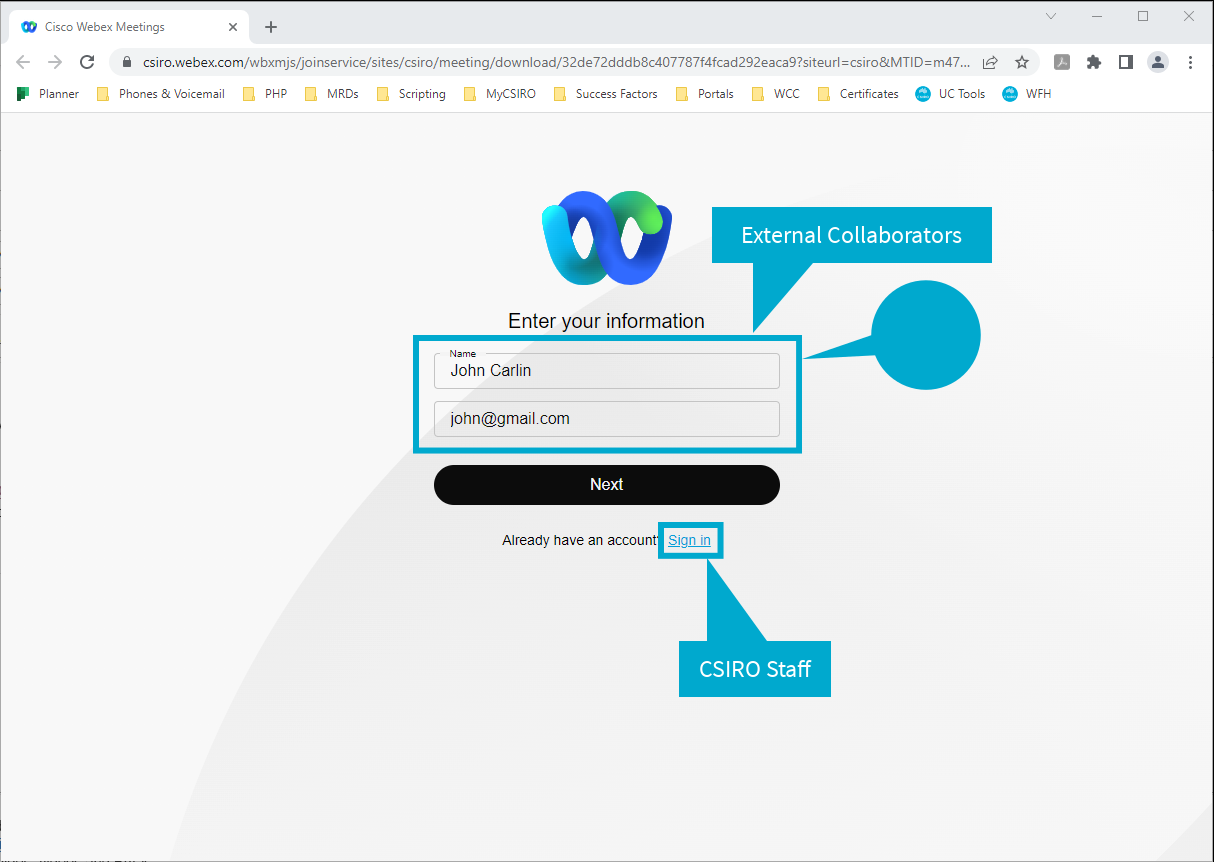
- If you're an external collaborator, enter your 'Name' and 'Email Address' and click 'Next'. If you're a CSIRO staff member, click 'Sign In'.
-
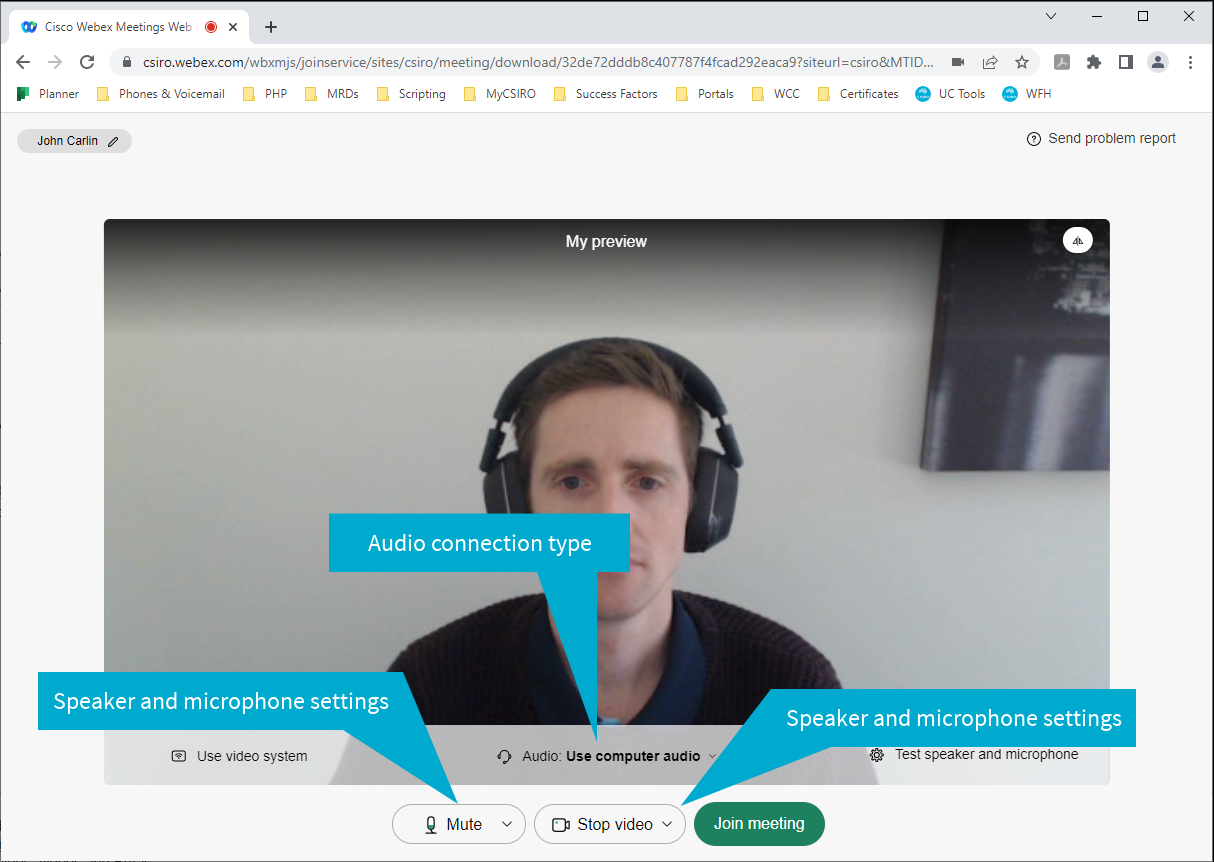
Use the preview screen to test and connect your audio and video before joining the meeting. Start with your audio connection:
-
Use computer for audio
This is CSIRO's recommended option. Make sure you have a good quality USB headset and network connection, and remember to test your speaker and microphone devices by clicking 'Speaker, mic and camera settings'. -
Call me at...
If you don't have a computer headset or are having issues with audio quality, use this option. Get the Webex Meetings system to call your phone by entering in your country code and phone number. -
Call in
This is the audio option of last resort if the above two options do not work. Remember to enter your Attendee ID as displayed on screen.

-
Use computer for audio
Note: If you don't have access to a smartphone you can still connect with audio only using a traditional phone. Simply dial one of the global call-in numbers and enter your Webex Meeting ID (found in the 'Phone - AUDIO ONLY' section of your invite) when prompted.
To join from your mobile device you will need to have first installed the Webex Meetings app - refer to the Install section at the start of this page for more information.
To join a Webex Meeting using the Webex Meetings app:
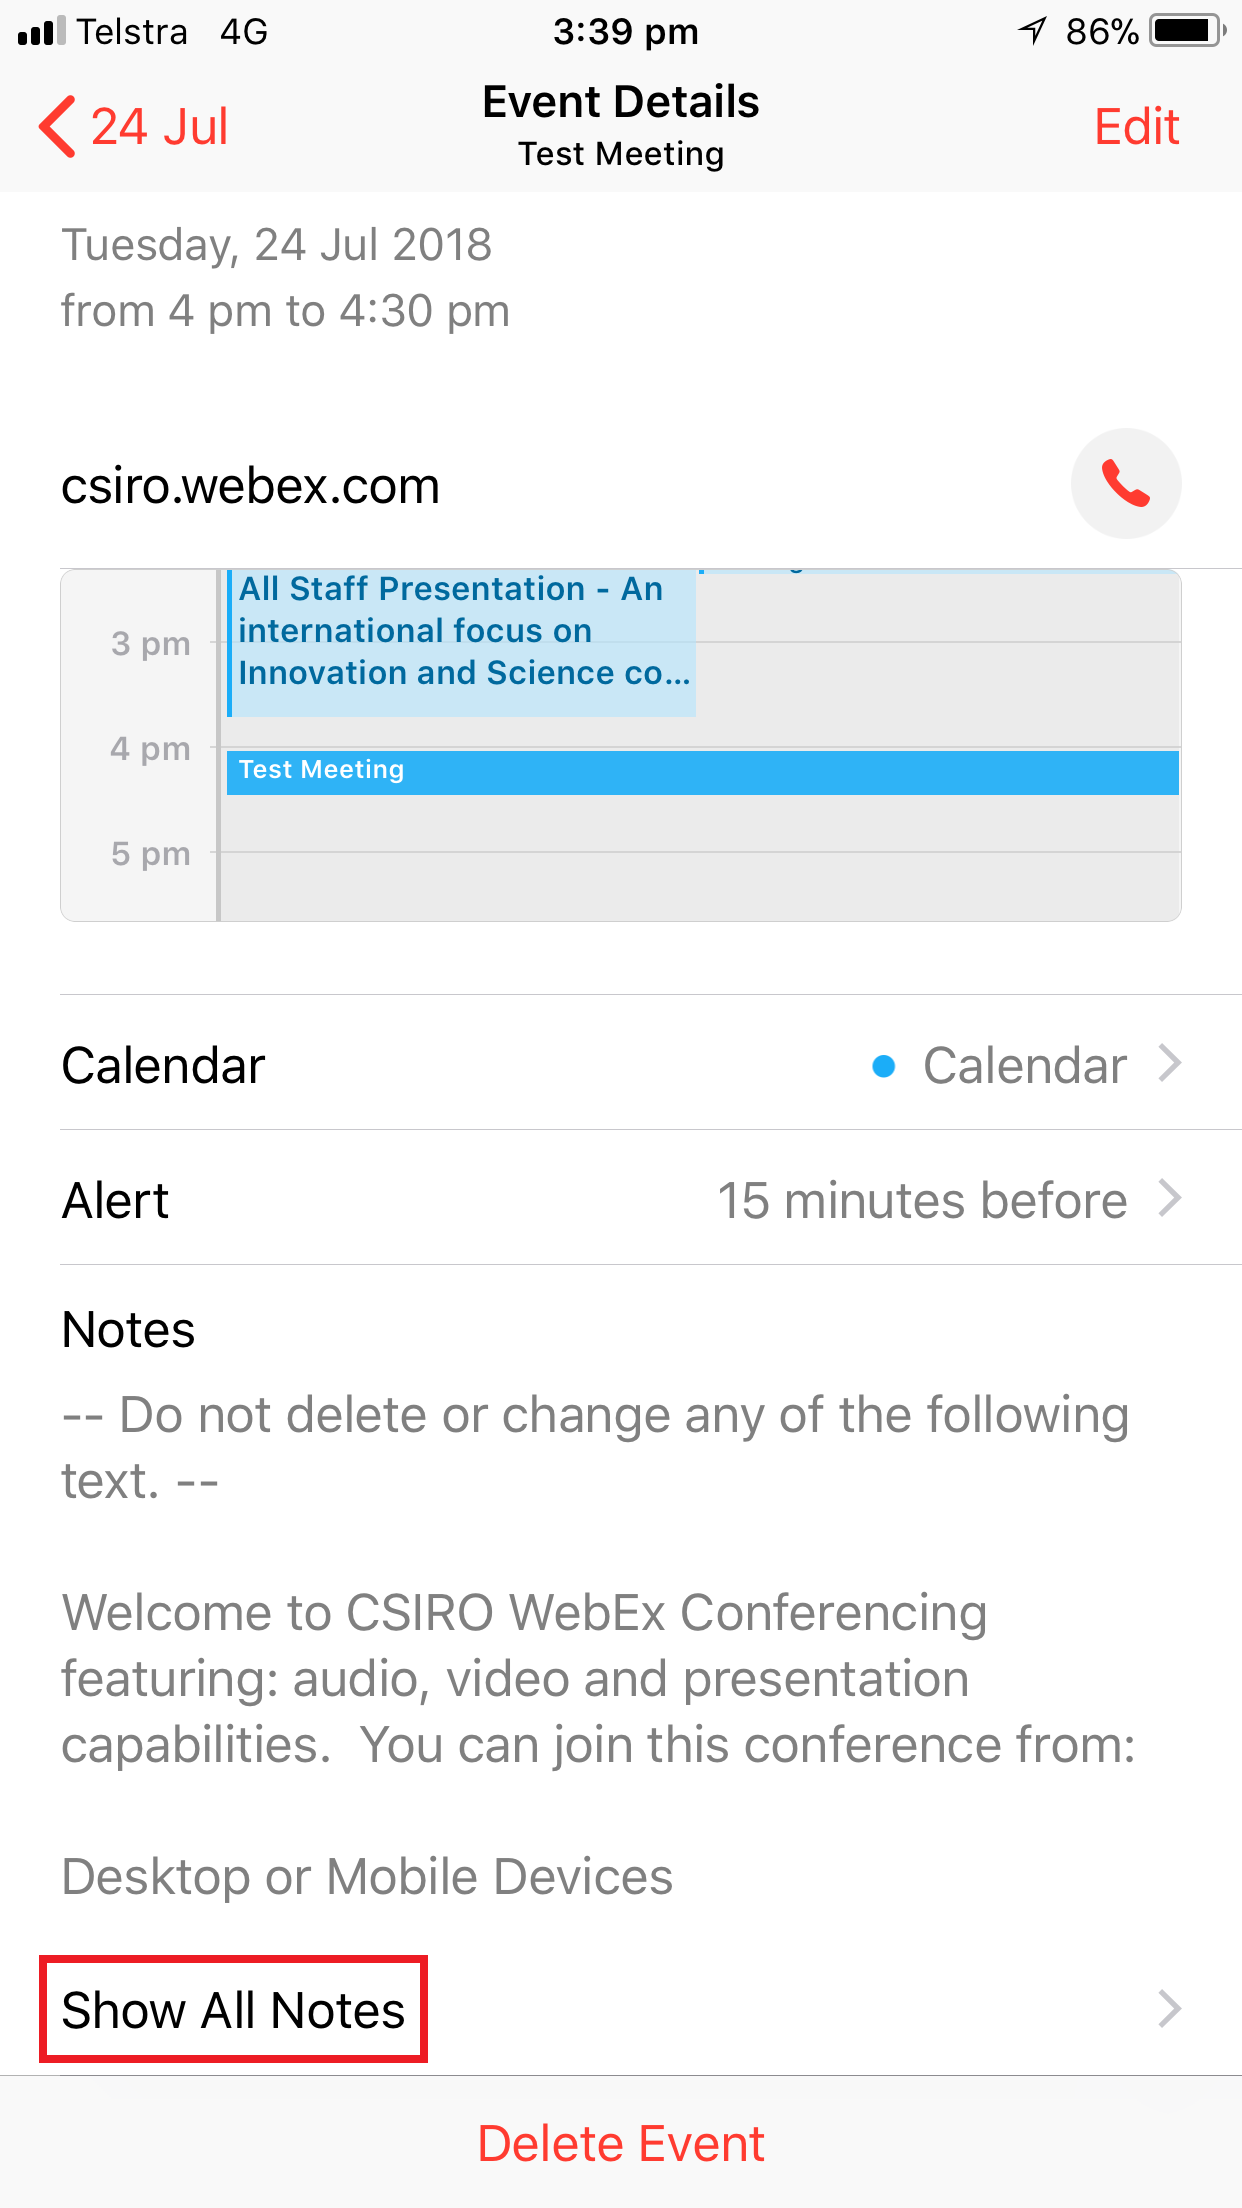
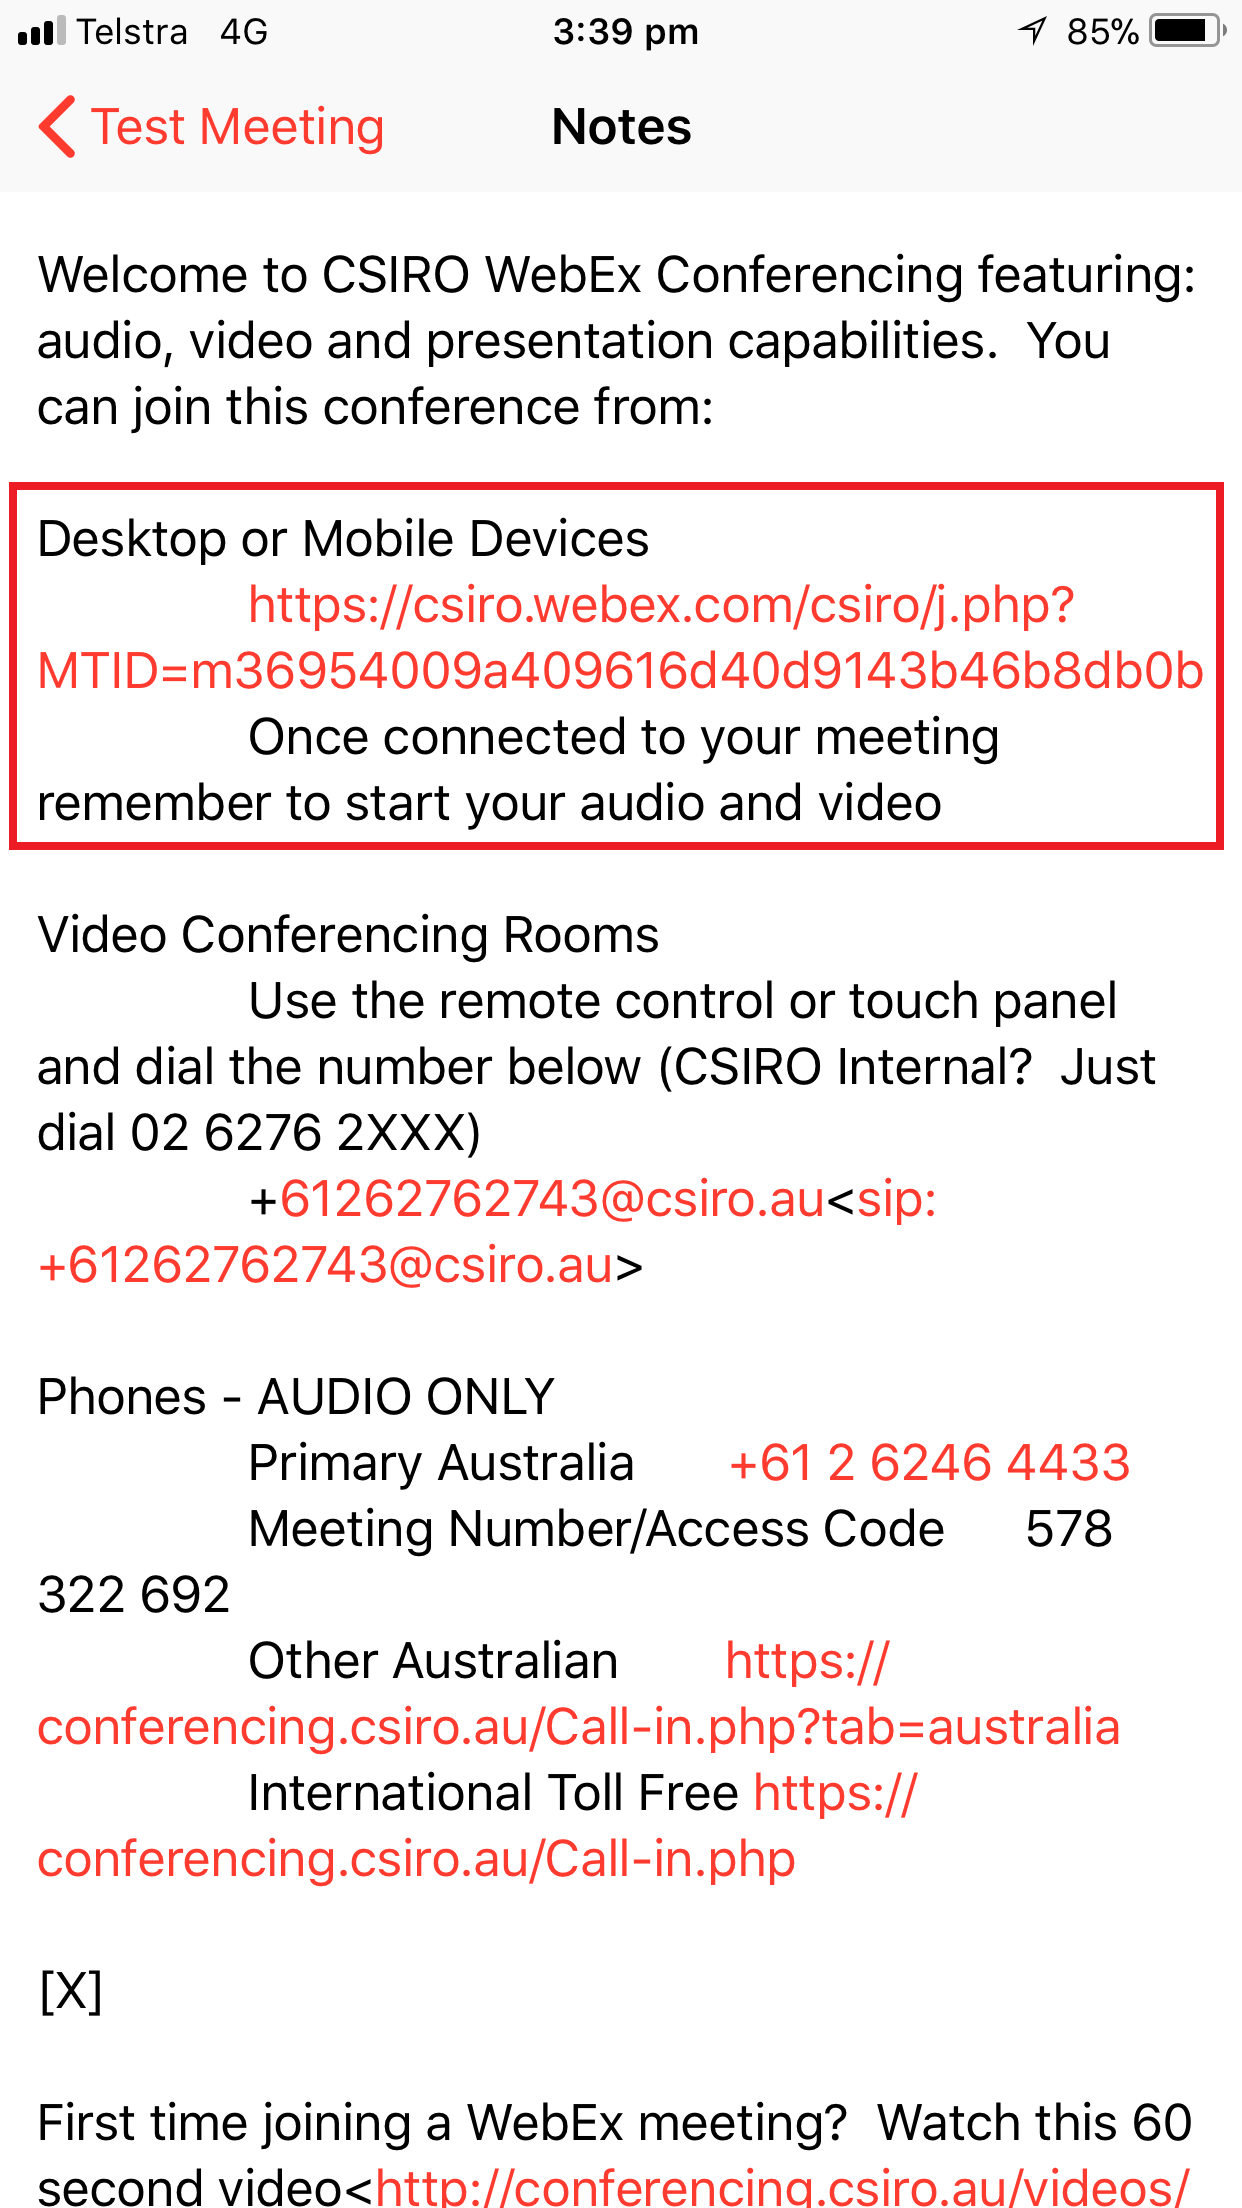
- Open your calendar invite and tap 'Show All Notes'.
- Tap the 'Desktop or Mobile Devices' link.
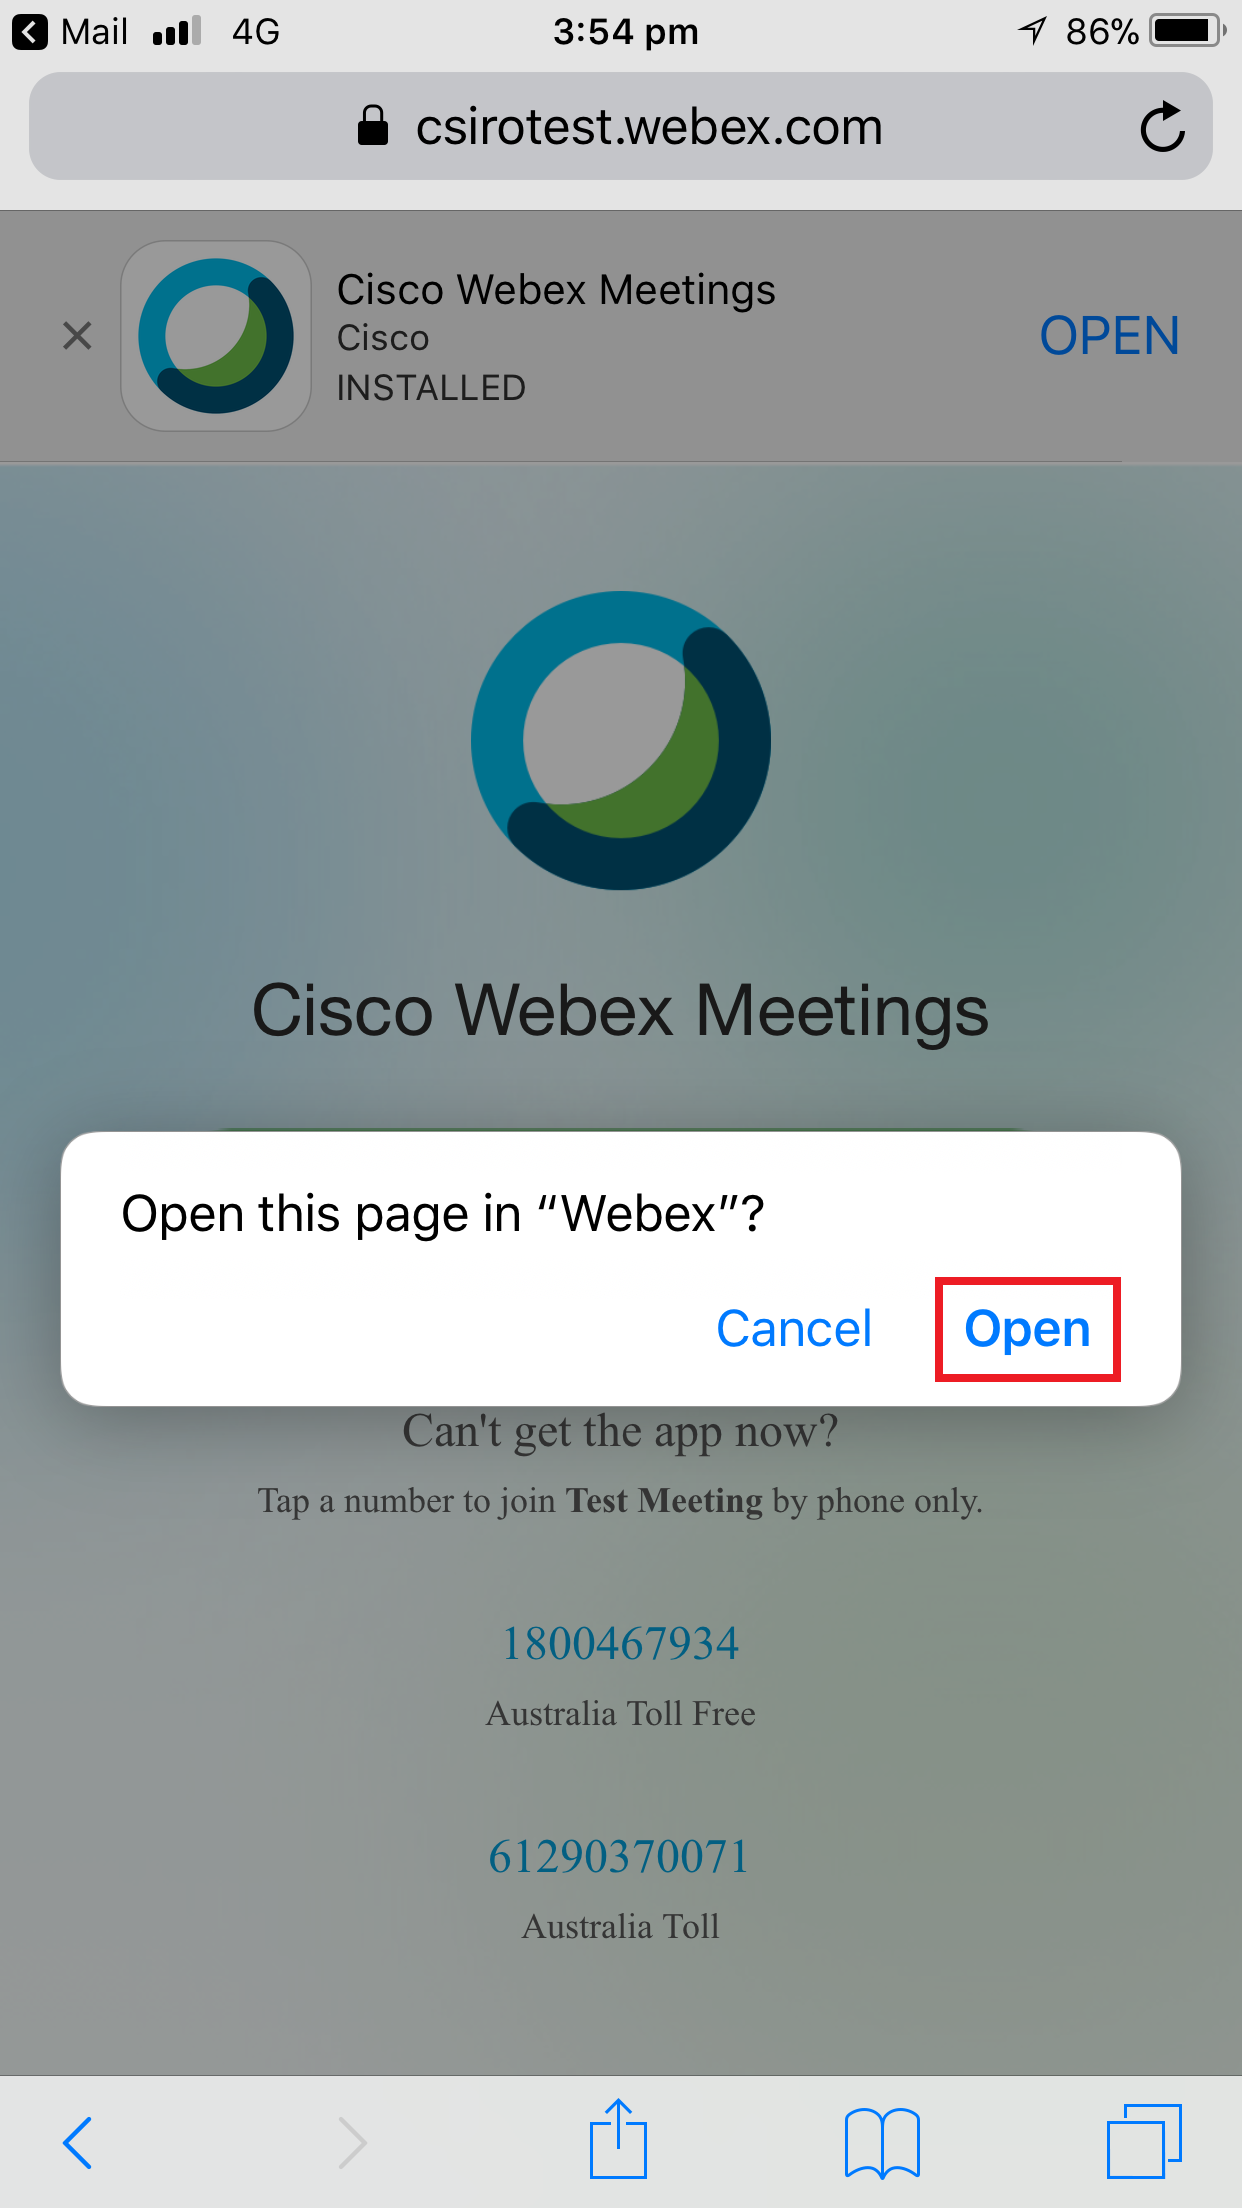
- When prompted to open the Webex Meetings app, tap 'Open'.
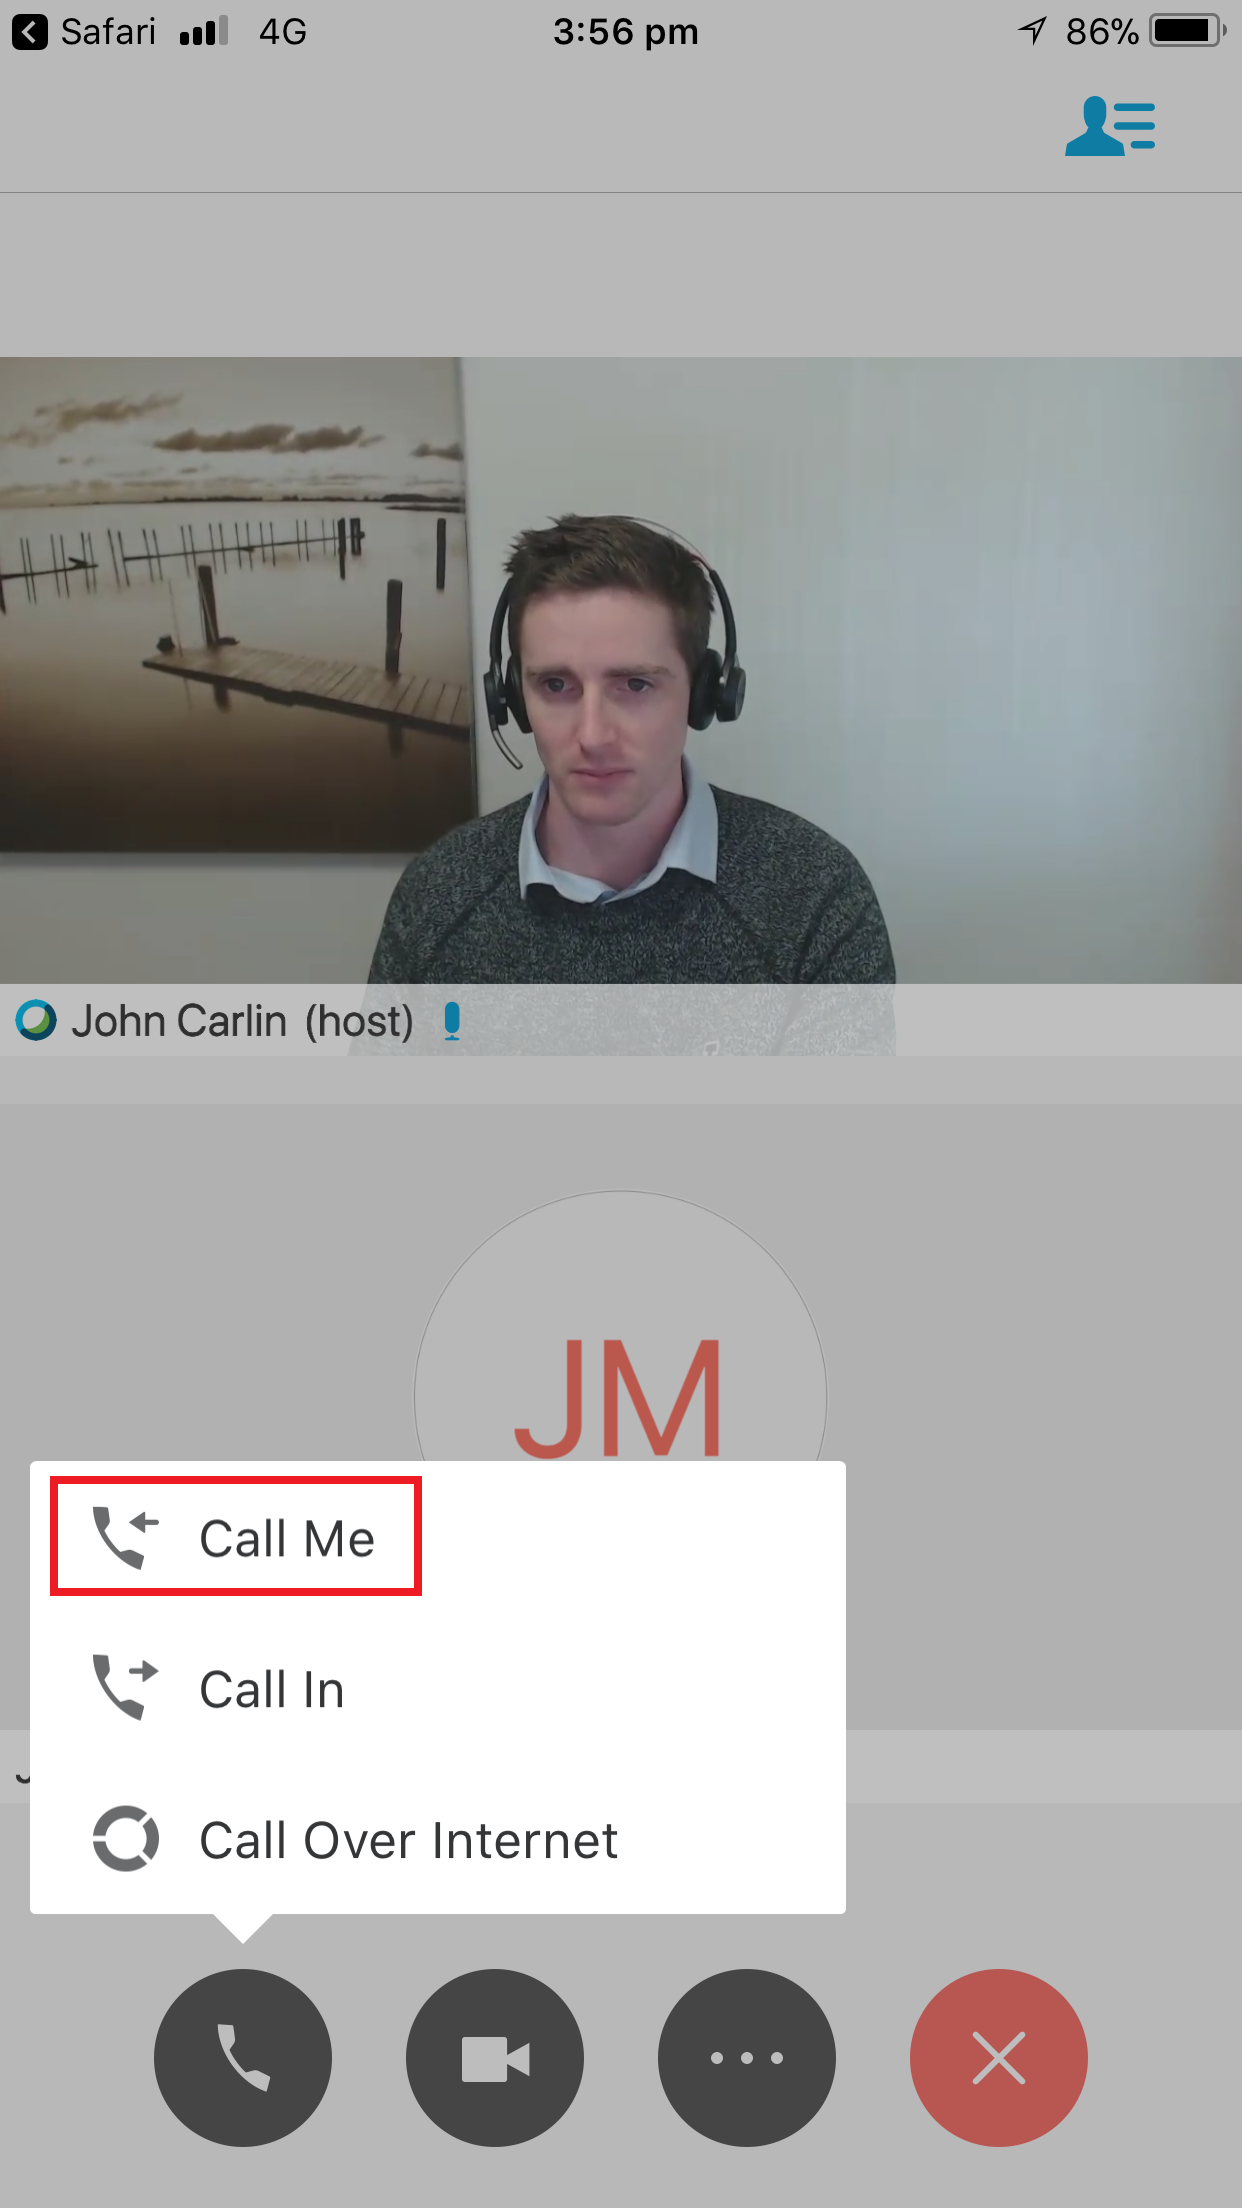
- Tap 'Call Me'
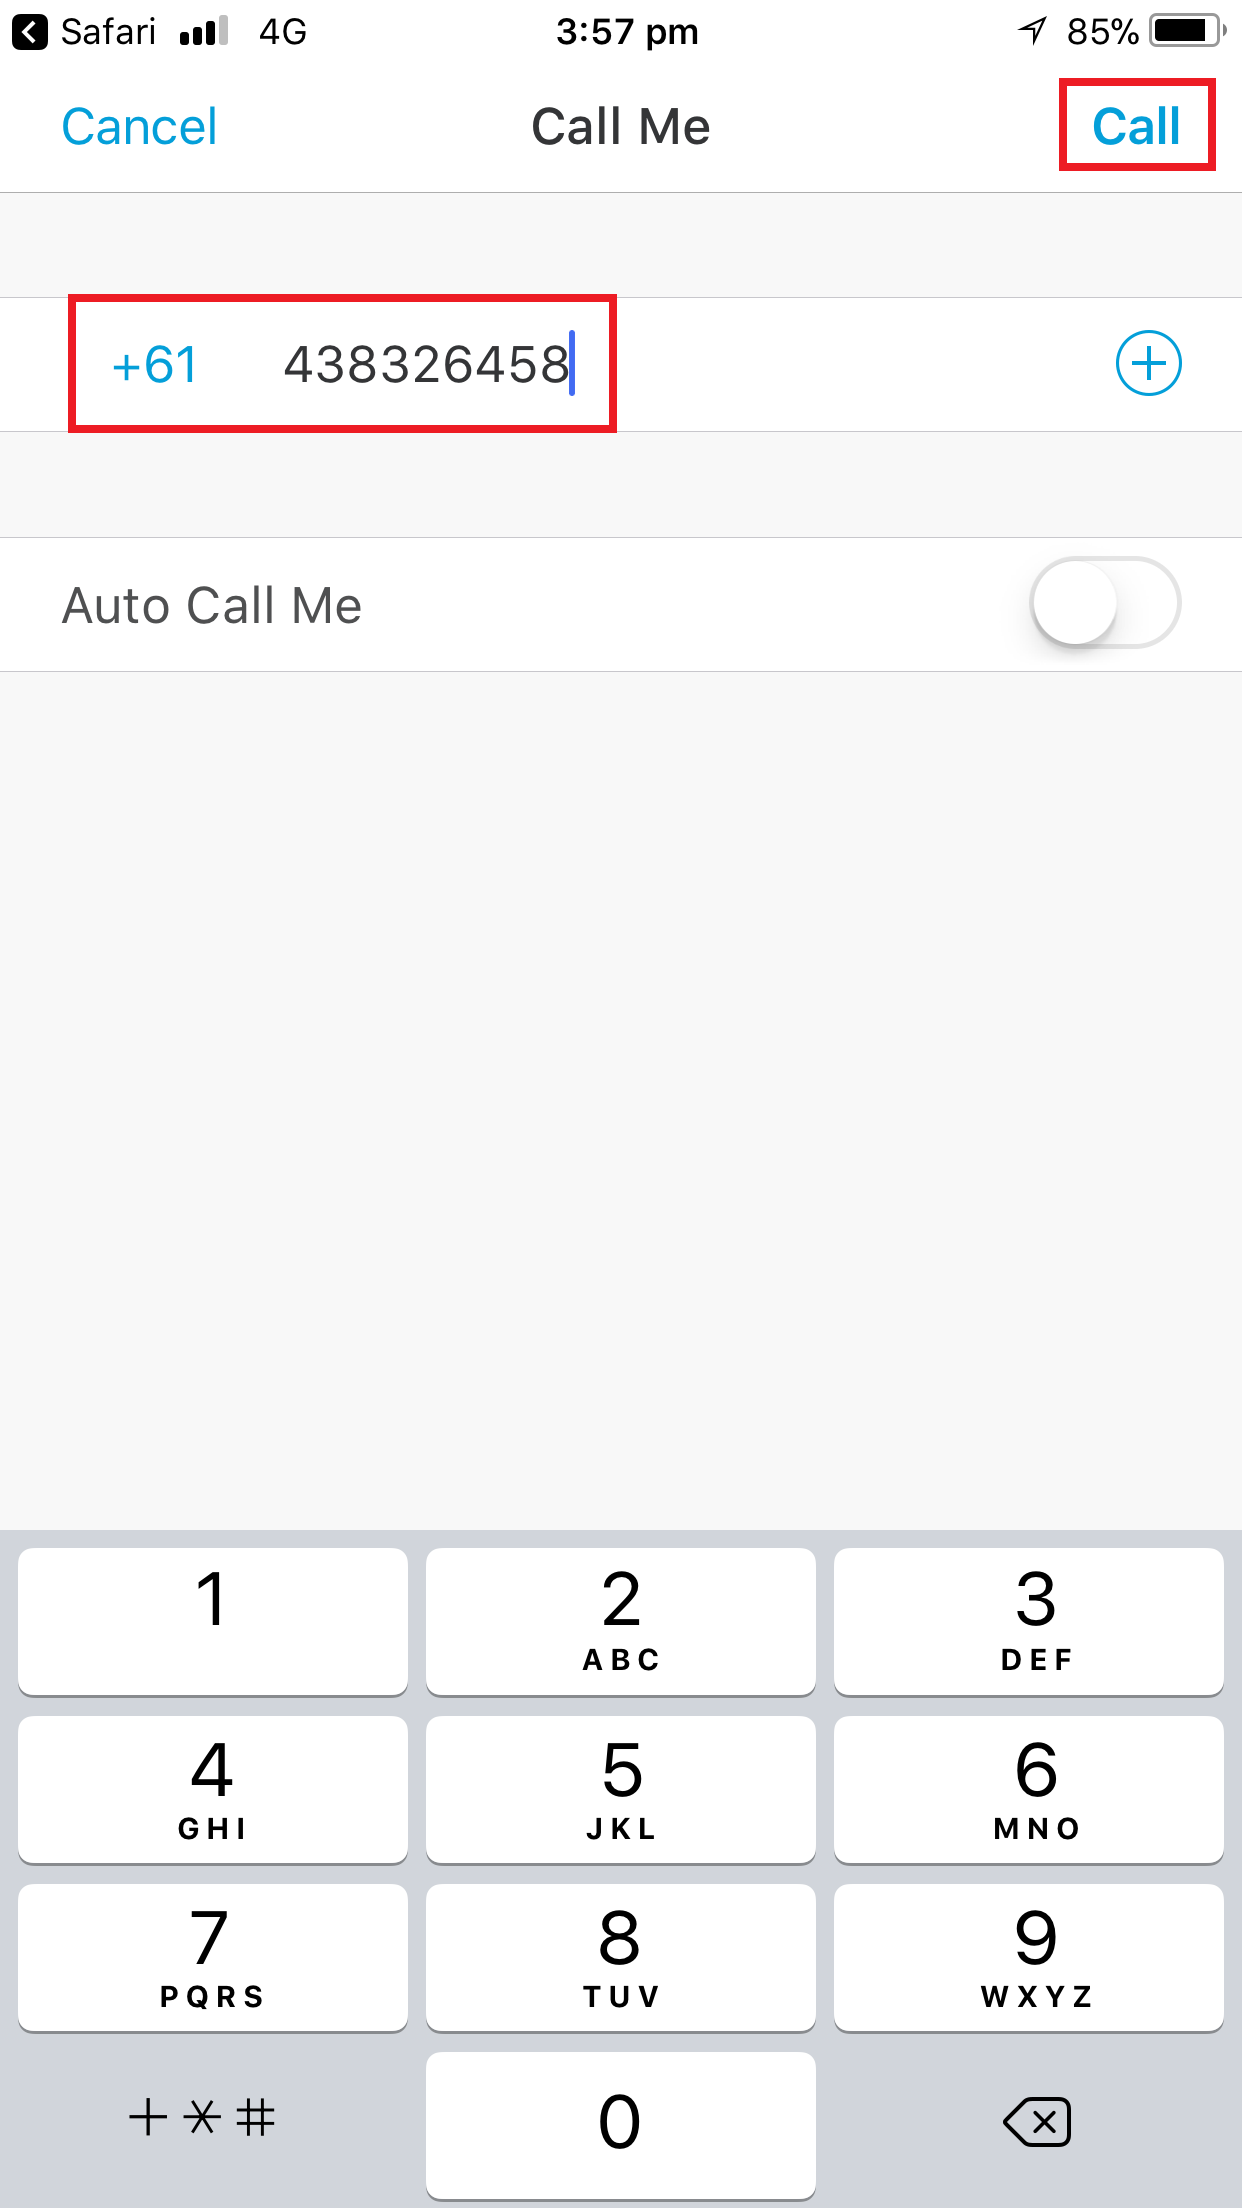
- Enter your mobile number and tap 'Call'. Answer the call.
-
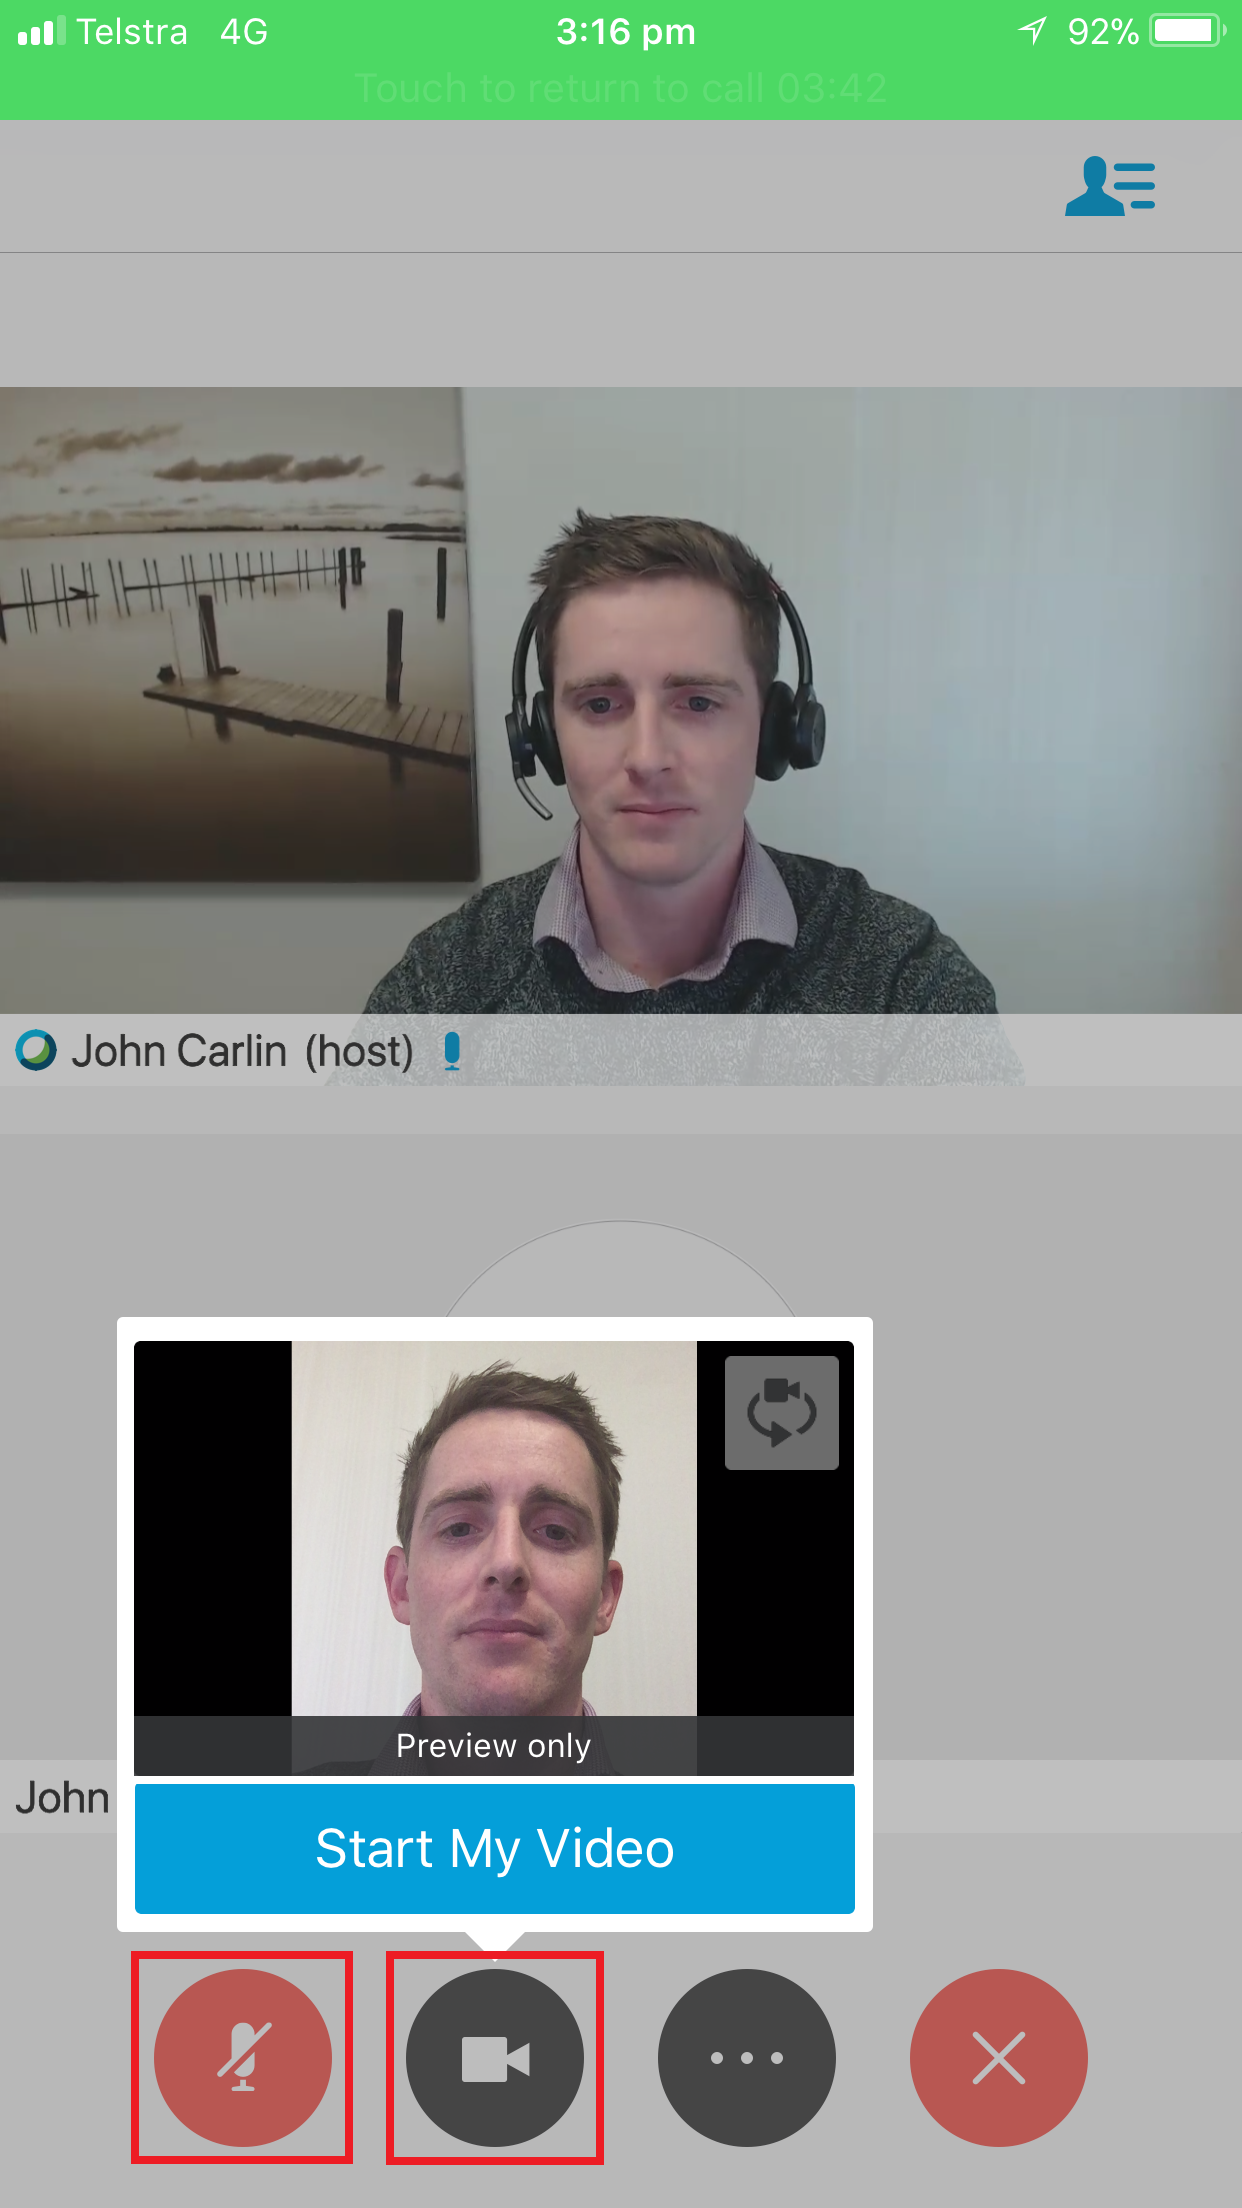
Return to the Webex Meetings app, mute your microphone, and start your video.
Show transcript
To join a Webex Meeting from a video conferencing room, dial the video conference number included in your Webex Meetings invite using the room touch panel or remote control. This should be dialled as a normal 10 digit Australian phone number. For example, if the number you have been provided with is +61262762601, dial 02 6276 2601 using the room touch panel or remote control.
Audio and video will connect automatically, and if someone is sharing a presentation you will see that as well. Say hello, then mute the room microphone to prevent background noise from entering the conference.
To share your own presentation, plug in your laptop using one of the table connections. If your room has a touch panel you will be prompted to share your laptop – tap share. If your room has a remote control or lectern touch panel, operate the room in the same way you would for a normal TelePresence conference.
If you are hosting the meeting from the room or would simply like to be able to view a list of all Webex Meetings participants, bring your laptop into the room and click the join from a Desktop or Mobile Device link in your invite. Wait for the Meeting Centre window to load and that’s all you need to do. There's no need to connect your audio or video because the room is already fully connected.
And lastly, when you're finished with the meeting, hang up the call. And that’s all there is to it. You’ve just successfully joined a Webex Meeting from a video conferencing room.
Instructions for operating the equipment in CSIRO Video Conferencing Rooms can be found on the Meeting Rooms site. External collaborators are encouraged to visit https://conferencing.csiro.au/webexmeetings.php to view detailed connection information.
To join a Webex Meeting:
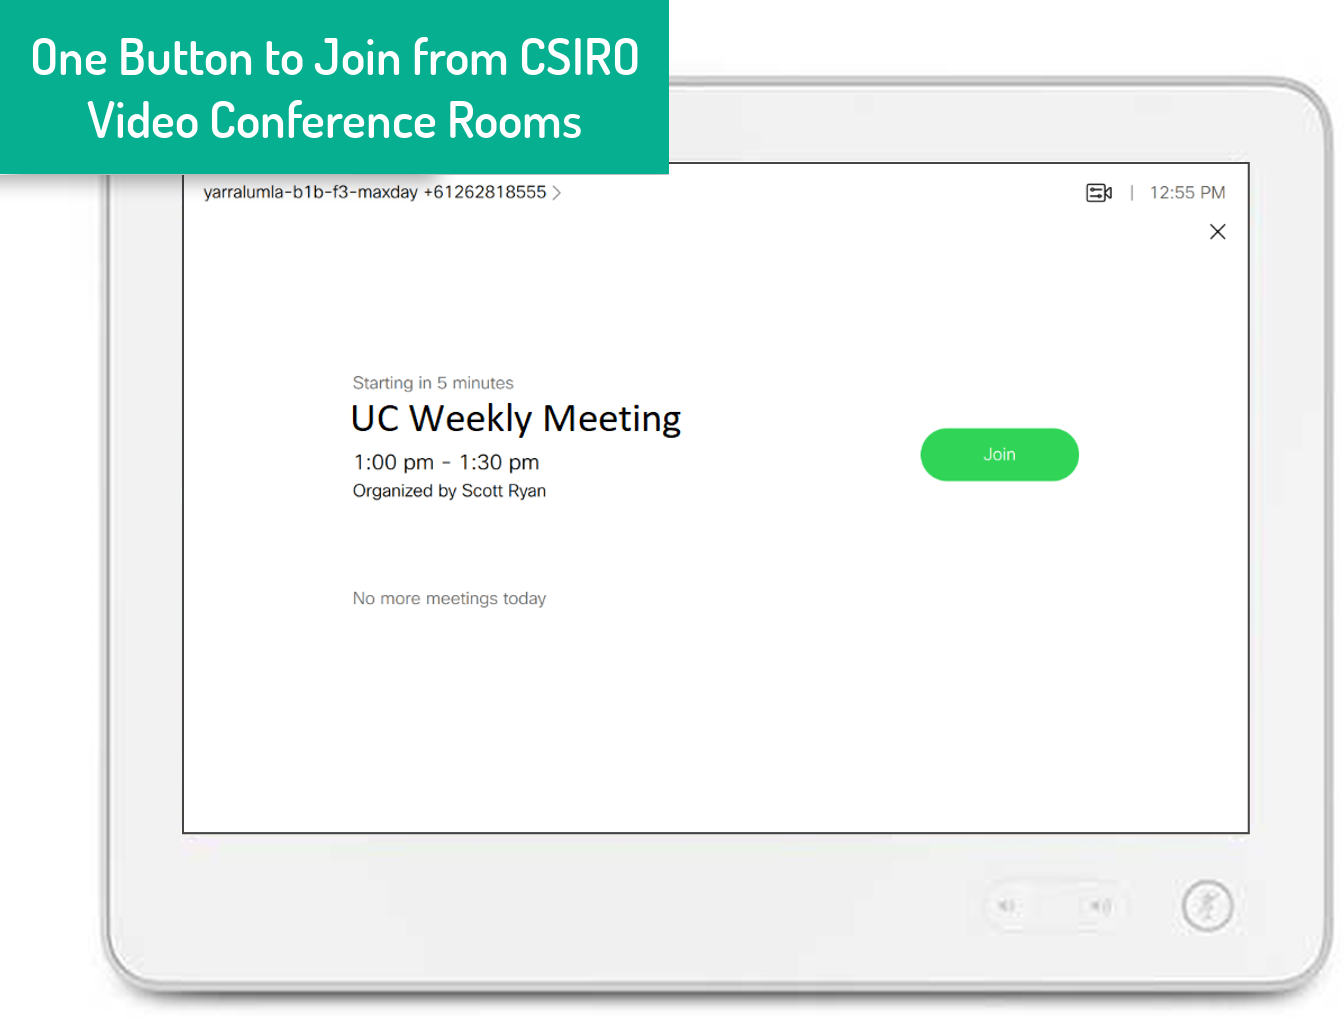
- If your meeting appears on the touch panel, simply press 'Join' to automatically connect. To close the One Button to Join window, press the 'X' in the top right corner.
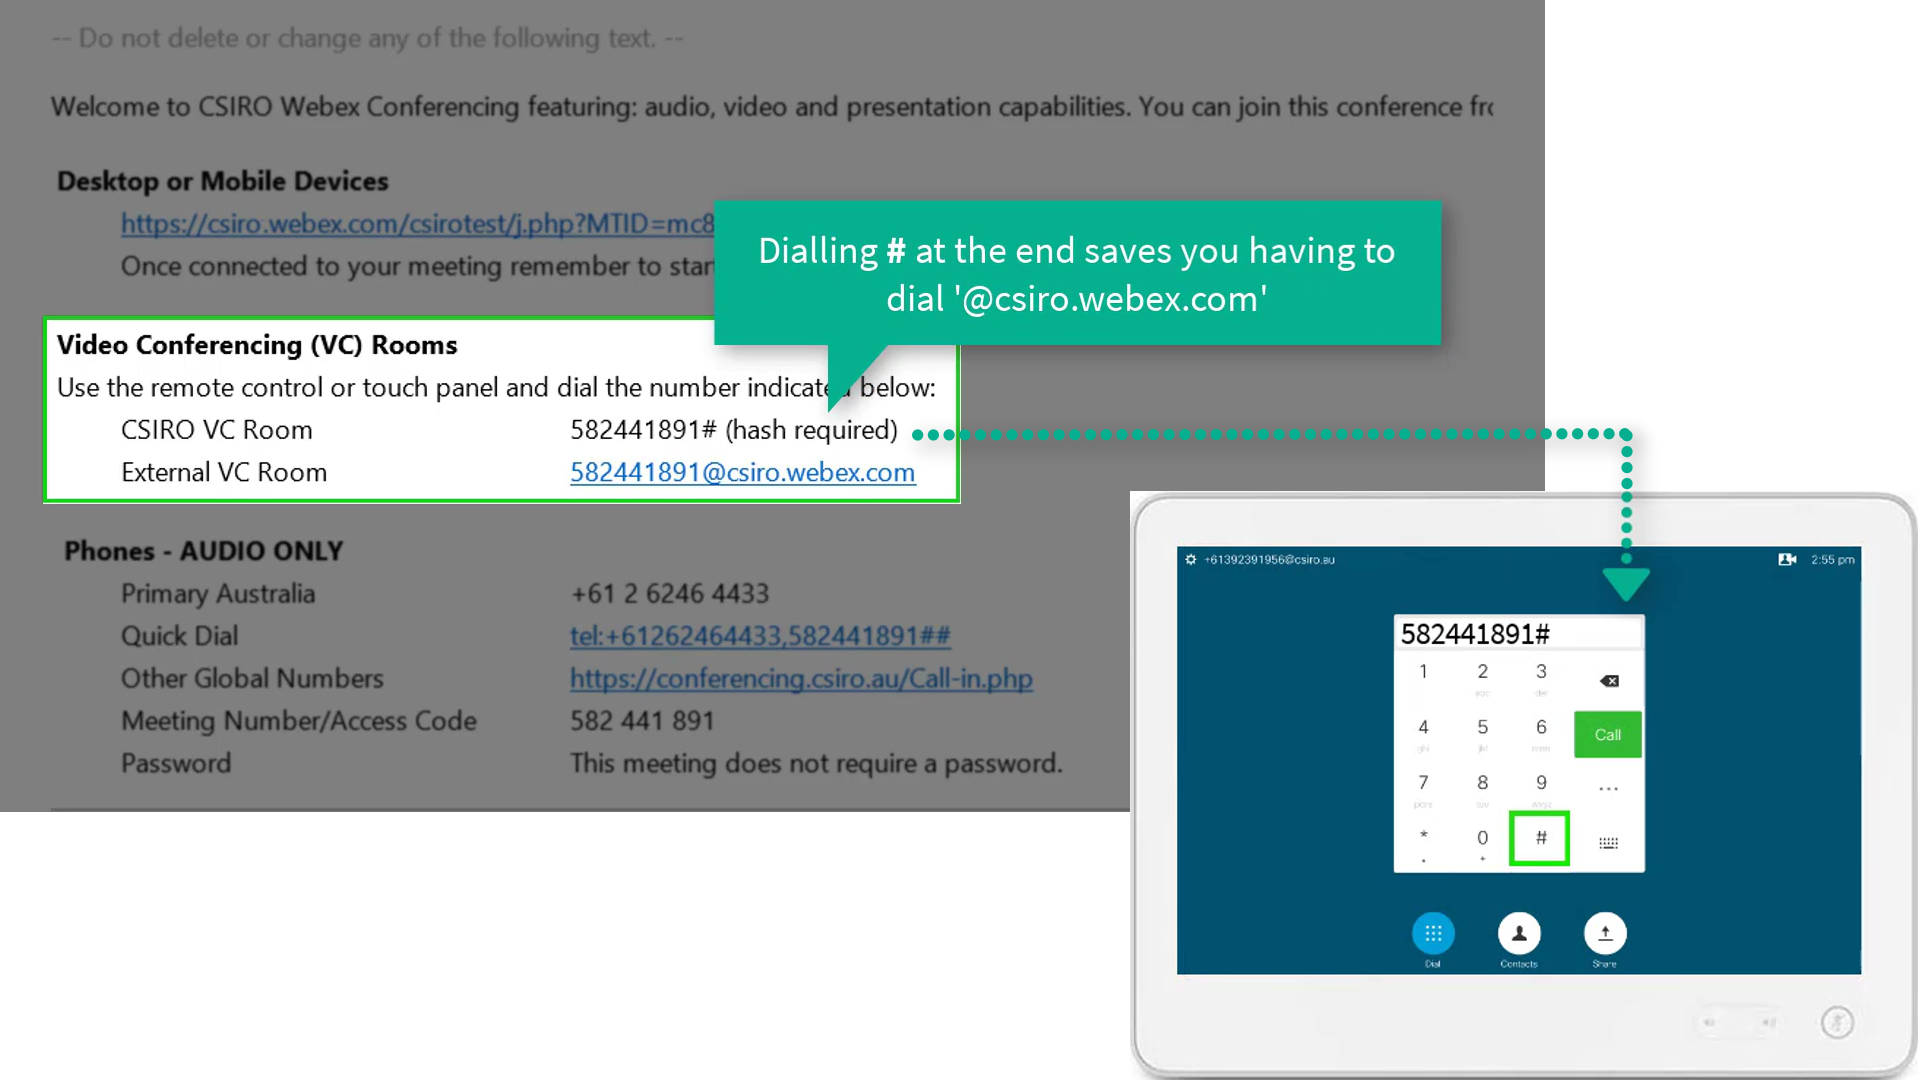
- If your meeting does not appear on the touch panel, press the 'X' in the top right corner to close the One Button to Join window, then dial the 'Video Conferencing (VC) Rooms' number included in your invite.
-
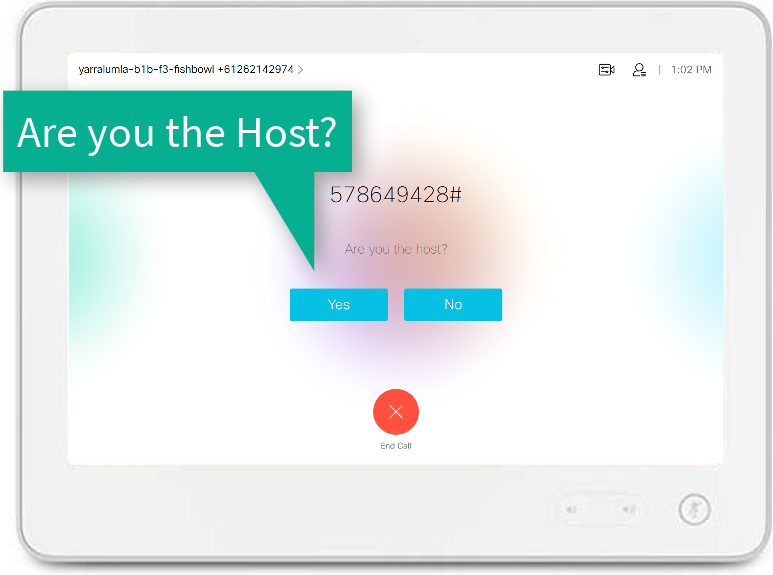
If you join a meeting before the Host has joined, you may be prompted with a question on the touch panel - 'Are you the Host?'.
- If you're not the Host, or are the Host but don't require access to Host-only features on the touch panel, simply press 'No' to join the meeting.
- If you are the Host and want to access extra Host-only features such as recording and viewing the mute status of participants from the touch panel, press 'Yes'. When prompted enter the Host key (see our guide on how to find the Host key for your meeting).
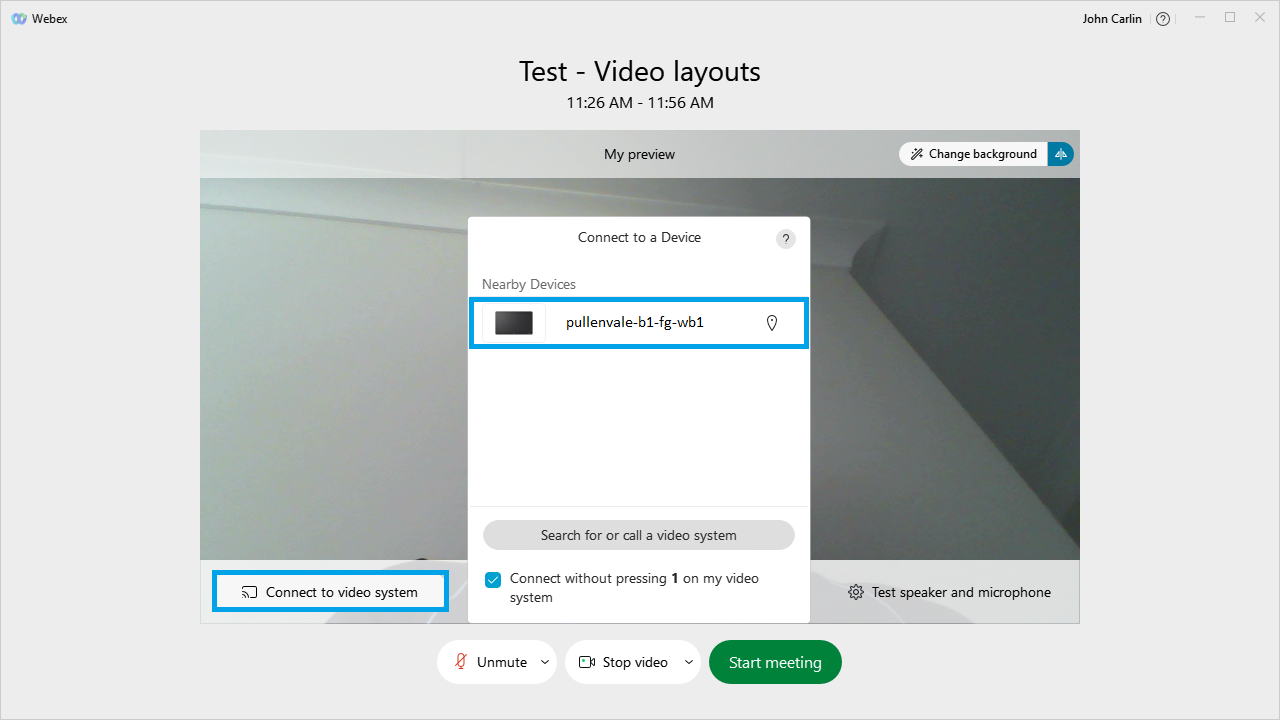
If you're in a video conferencing room and would like to join a Webex Meeting using the room audio and video devices instead of your laptop, you can do so using Webex Meetings's call my video system feature.
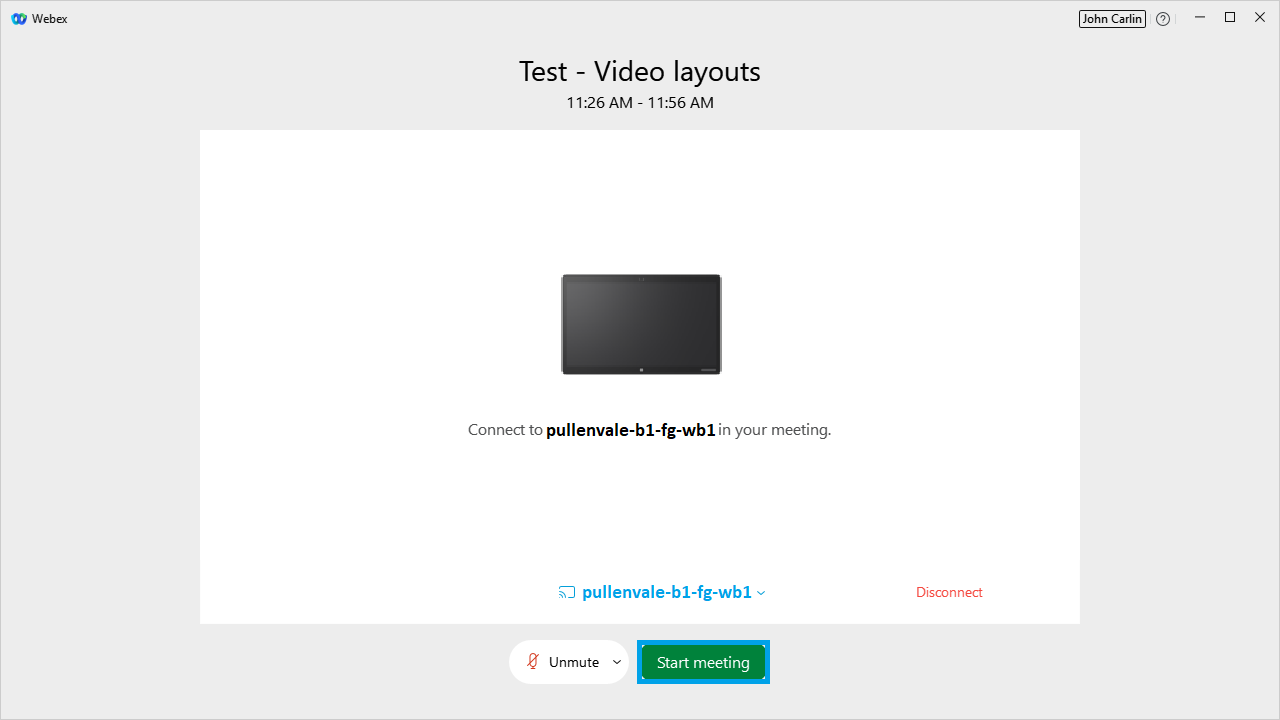
To get Webex Meetings to call your video system:
- On the pre-join screen click 'Connect to video system'.
- Select one of the auto-discovered nearby devices, or search for a system if it's not showing.
-
Click 'Start meeting'.
-
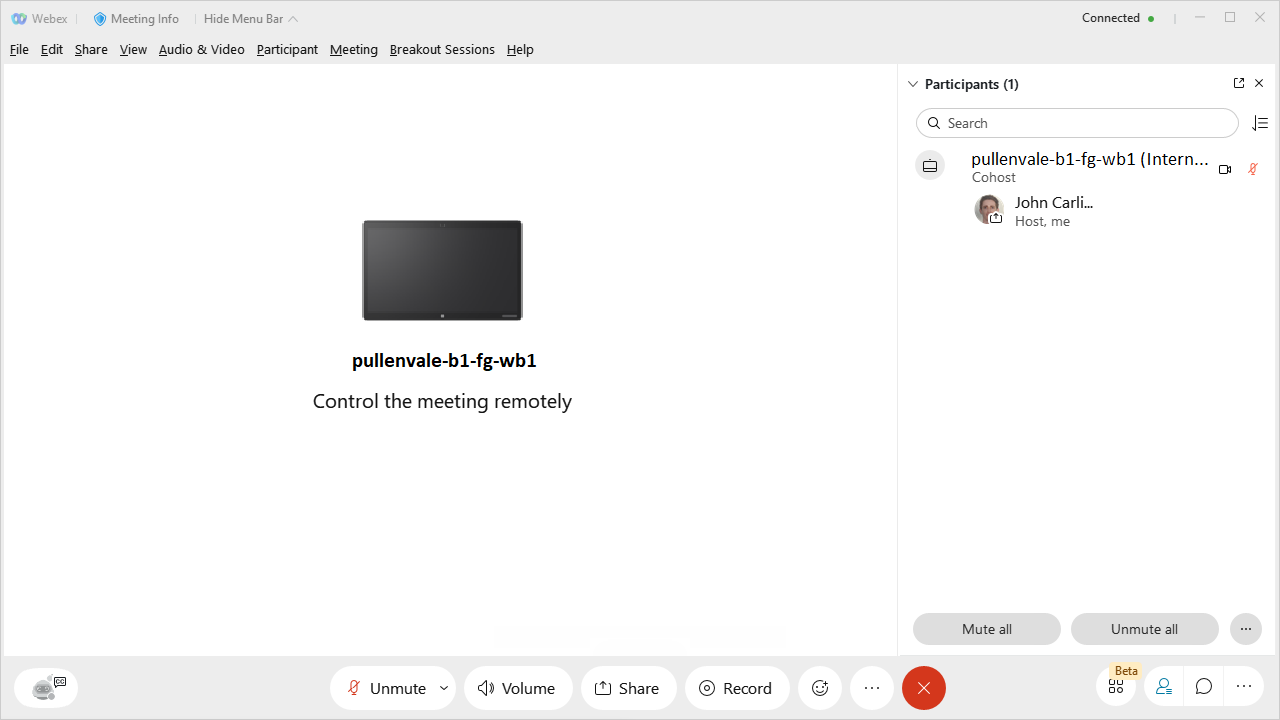
Once connected to the meeting you can use the Webex Meetings mute and sharing controls on your laptop to control the video system.
Note: If you're using the desktop app and calling in, it is recommended that you enter your attendee ID when prompted so that your audio and video are linked. To find your attendee ID, please follow the instructions in the Finding your call-in attendee ID.
Australia
These numbers are a local call to the area listed. If your area is not listed please either call the nearest capital city, or connect using your computer audio.
| Sydney, NSW | +61-2-9490-5333 |
Toll-free
These numbers are only available from within the country listed. If your country is not listed please call the Australian Toll number (+61 2 6246 4433), or connect using your computer audio. If you are in Australia please refer to the Australian call-in numbers listed above.
| Argentina Toll | +54-11-5246-8606 |
| Argentina Toll Free | 0800-345-0956 |
| Bahrain Toll Free | 8000-6499 |
| Belarus Toll Free | 8-820-0011-0977 |
| Belgium Toll | +32-2-620-0869 |
| Belgium Toll Free | 0800-58-808 |
| Brazil | 08000474087 |
| Brazil Toll | +55-21-2018-0032 |
| Brazil Toll (Sao Paulo) | +55-11-3878-8454 |
| Brazil Toll Free | 0800-724-8539 |
| Bulgaria Toll | +359-2-935-8691 |
| Bulgaria Toll Free | 0800-18-039 |
| Canada | 1-844-344-7534 |
| Canada Toll | +1-438-239-7195 |
| Canada Toll Free | 1-833-311-4104 |
| Chile | 800395269 |
| Chile Toll | +56-2-2988-4904 |
| Chile Toll Free | 800-004-130 |
| China | 4001-206276 |
| China 400 Shared | 4008428397 |
| China Hong Kong Toll | +852-307-10192 |
| China Hong Kong Toll Free | 800-931-093 |
| China North Toll Free | 108001402663 |
| China South Toll Free | 108007142645 |
| China Toll Free | 800-990-7627 |
| Colombia Toll | +57-4-590-5774 |
| Colombia Toll Free | 01-800-518-9655 |
| Costa Rica Toll | +506-25-397-662 |
| Costa Rica Toll Free | 08000150736 |
| Croatia Toll | +385-1-884-8053 |
| Croatia Toll Free | 0800-989-087 |
| Cyprus Toll | +357-2200-9801 |
| Cyprus Toll Free | 800-77-319 |
| Czech Republic Toll | +420-2-2529-6946 |
| Czech Republic Toll Free | 800-023-143 |
| Denmark Toll | +45-35-158-879 |
| Denmark Toll Free | 80-400-386 |
| Dominican Republic Toll | +1-829-954-8893 |
| Dominican Republic Toll Free | 1-800-148-5452 |
| Ecuador Toll Free | 1-800-001-173 |
| Egypt Toll Free | 0800-000-9941 |
| El Salvador Toll | +503-21-36-7247 |
| Estonia Toll | +372-880-1814 |
| Estonia Toll Free | 800-2055 |
| Finland Toll | +358-9-81710-283 |
| Finland Toll Free | 0800-525-066 |
| France | 0800-90-3903 |
| France Toll | +33-1-8514-8837 |
| France Toll Free | 0805-98-12-98 |
| Georgia Toll | +995-70-677-0643 |
| Germany | 0800-1822034 |
| Germany Toll | +49-32-221-863-873 |
| Germany Toll Free | 0800-627-3026 |
| Greece Toll | +30-21-1990-2397 |
| Greece Toll Free | 0800-3315-5998 |
| Hungary Toll | +36-1-429-2378 |
| Hungary Toll Free | 06-80-180-451 |
| Iceland Toll Free | 800-4336 |
| India | 000-800-8522-032 |
| India Toll (Bangalore) | +91-80-6480-0008 |
| India Toll (Delhi) | +91-11-6480-0008 |
| India Toll (Hyderabad) | +91-40-6480-0008 |
| India Toll (Mumbai) | +91-22-6480-0008 |
| India Toll Free | 000800-050-1880 |
| Indonesia | 0018-038-529-212 |
| Indonesia Toll Free | 001-803-4924-260-0463 |
| Ireland Toll | +353-1-533-9984 |
| Ireland Toll Free | 1-800-832-769 |
| Israel Toll | +972-3-737-0088 |
| Israel Toll Free | 180-122-0475 |
| Italy | 800-799-140 |
| Italy Toll | +39-06-9974-8091 |
| Italy Toll Free | 800-694-184 |
| Japan | 0034-800-400045 |
| Japan Toll | +81-36-634-4974 |
| Japan Toll Free | 0120-458-019 |
| Jordan Toll Free | 0800-22159 |
| Kenya Toll Free | 0800-221-046 |
| Latvia Toll | +371-6868-8264 |
| Latvia Toll Free | 802-05-415 |
| Lithuania Toll | +370-52141-931 |
| Lithuania Toll Free | 8-800-00-419 |
| Luxembourg Toll | +352-2-730-0076 |
| Luxembourg Toll Free | 800-40559 |
| Malaysia | 1800-818-462 |
| Malaysia Toll | +60-3-20-585-341 |
| Malaysia Toll Free | 1800-38-3519 |
| Malta Toll | +356-2778-0329 |
| Mexico Toll | +52-55-5091-8086 |
| Mexico Toll Free | 01-800-040-8549 |
| Netherlands | 0800-0228-956 |
| Netherlands Toll | +31-20-721-9852 |
| Netherlands Toll Free | 0800-401-0008 |
| New Zealand | 0800-880-576 |
| New Zealand Toll | +64-9-33-90-175 |
| New Zealand Toll Free | 0800-482-306 |
| Norway Toll | +47-2-3503-759 |
| Norway Toll Free | 800-625-39 |
| Panama Toll | +507-8388-538 |
| Panama Toll Free | 00800-203-7376 |
| Peru Toll | +51-1-706-3273 |
| Philippines Toll Free | 1-800-1110-2968 |
| Poland Toll | +48-22-536-4069 |
| Poland Toll Free | 0800-256-586 |
| Portugal Toll Free | 800-600-124 |
| Puerto Rico Toll | +1-939-475-1983 |
| Puerto Rico Toll Free | 1-833-939-0054 |
| Qatar Toll Free | 00-800-100-233 |
| Romania Toll | +40-31-1305-286 |
| Romania Toll Free | 0800-672-424 |
| Russia Toll | +7-495-228-4394 |
| Russia Toll Free | 8-800-500-2914 |
| Saudi Arabia Toll Free | 8008146635 |
| Singapore | 800-852-3177 |
| Singapore Toll | +65-6703-6952 |
| Singapore Toll Free | 800-852-8266 |
| Slovakia Toll | +421-2-5011-2321 |
| Slovakia Toll Free | 0800-500-059 |
| Slovenia Toll | +386-1-888-9021 |
| Slovenia Toll Free | 080-688-819 |
| South Africa | 0800-98-4637 |
| South Africa Toll | +27-21-672-2343 |
| South Africa Toll Free | 0800-555-430 |
| South Korea Toll | +82-26-465-0273 |
| South Korea Toll Free | 0808-220-261 |
| Spain Toll | +34-91-215-8239 |
| Spain Toll Free | 800-000-890 |
| Sweden Toll | +46-85-199-2513 |
| Sweden Toll Free | 020-120-3477 |
| Switzerland Toll | +41-22-567-5907 |
| Switzerland Toll Free | 0800-247-270 |
| Taiwan Toll Free | 0809-090-450 |
| Thailand Toll Free | 1-800-012-931 |
| Turkey Toll | +90-850-390-2284 |
| Turkey Toll Free | 0800-621-5151 |
| Ukraine Toll | +380-89-320-2397 |
| Ukraine Toll Free | 0800503809 |
| United Arab Emirates Toll Free | 800-033-05916 |
| United Kingdom | 0800-092-2328 |
| United Kingdom Toll | +44-20-7660-8152 |
| United Kingdom Toll Free | 0800-026-6278 |
| United States | 1-844-267-3690 |
| United States Toll | +1-650-215-5228 |
| United States Toll Free | 1-833-810-5248 |
| Uruguay Toll Free | 000-413-598-5422 |
| Venezuela Toll Free | 0800-136-2310 |
| Vietnam | 120-852-190 |
| Vietnam Toll Free | 1-800-400-226 |
If you're using the Webex Meetings desktop app and calling in, it is recommended that you enter your attendee ID when prompted so that your audio and video are linked.
To find your attendee ID:
- Open the Webex Meetings desktop app by clicking the 'Desktop or Mobile Devices' link in your invite.
- Click 'Meeting Info' at the top of the screen.
- Scroll down to the 'Attendee ID' section.
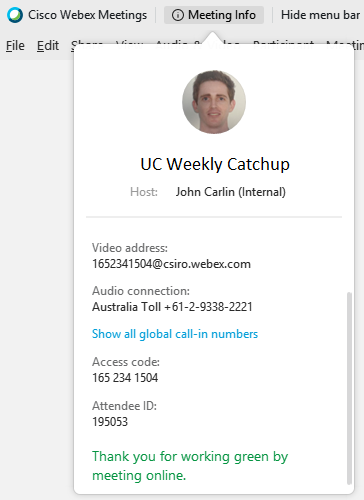
 Finding your attendee ID in a Webex Meeting.
Once you have joined a Webex Meeting you will see the Meeting Center window open up. This is where all the action takes place as described below.

 Overview of controls when participating in a meeting.
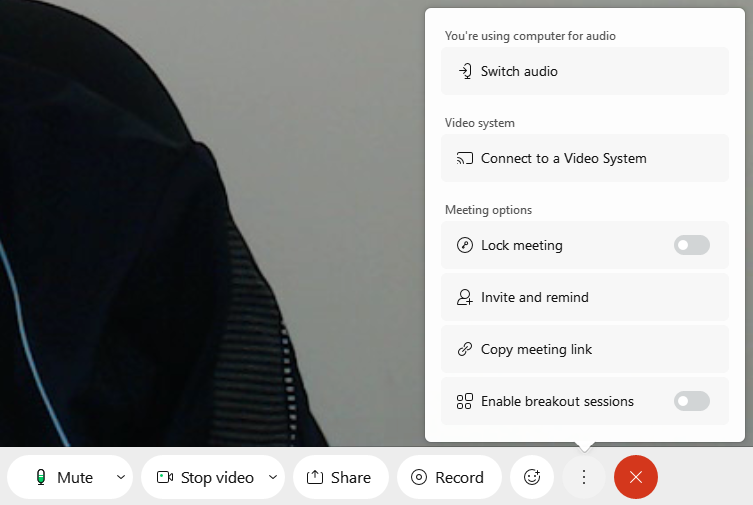
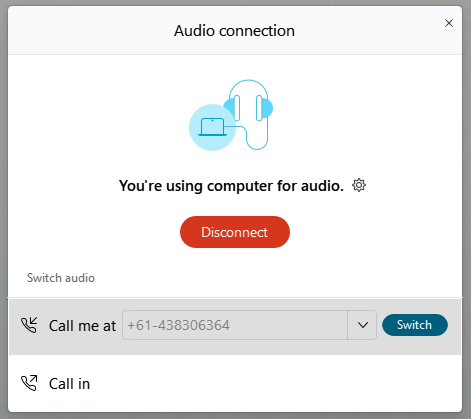
- Connect with audio; if you're already connected click the 3 dots and then click change your 'Audio Connection'. Options include Computer Audio (recommended) which uses your computer speaker and microphone devices, Call In, or Call Me if you would like Webex Meetings to call your phone number (available anywhere in the world).
- Mute or unmute your microphone, or start or stop your camera.
-
Share your screen. Note that you can now share videos with audio. To do so:
- Select 'Optimize for motion and video' from the drop-down list.
- Tick 'Share your computer audio'.
-
Click 'Share' on the screen or application you wish to share.
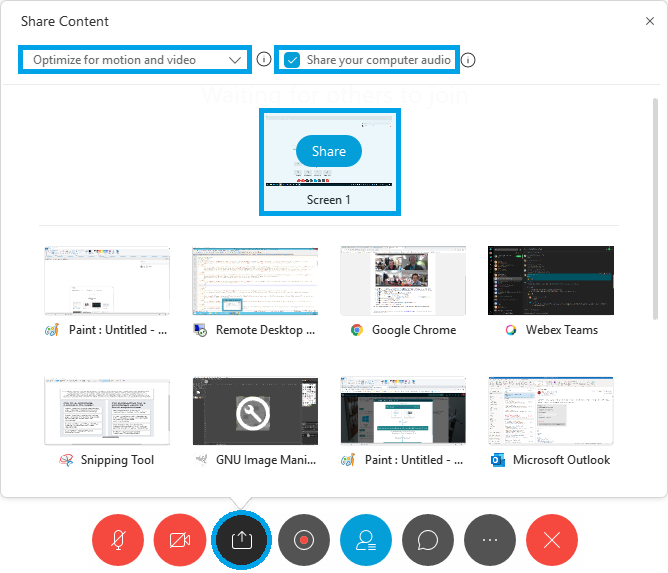
- (Available to Host only) Open the recording dialogue box; from there you can start, stop, pause and resume the recording.
- View a list of other participants in the meeting.
- Chat with other participants in the meeting.
- Access more options such as change audio settings, or copy the meeting invite link.
- Change the video layout or switch to fullscreen mode.
Tip: When viewing a shared screen, right-click on the shared content and expand the 'View' menu to see a range of zoom and fit options.
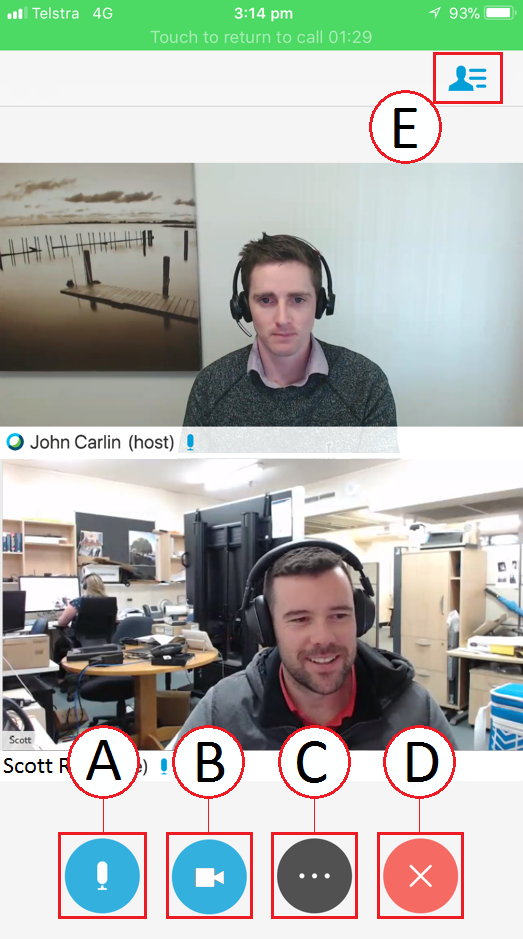
 Overview of controls when participating in a meeting.
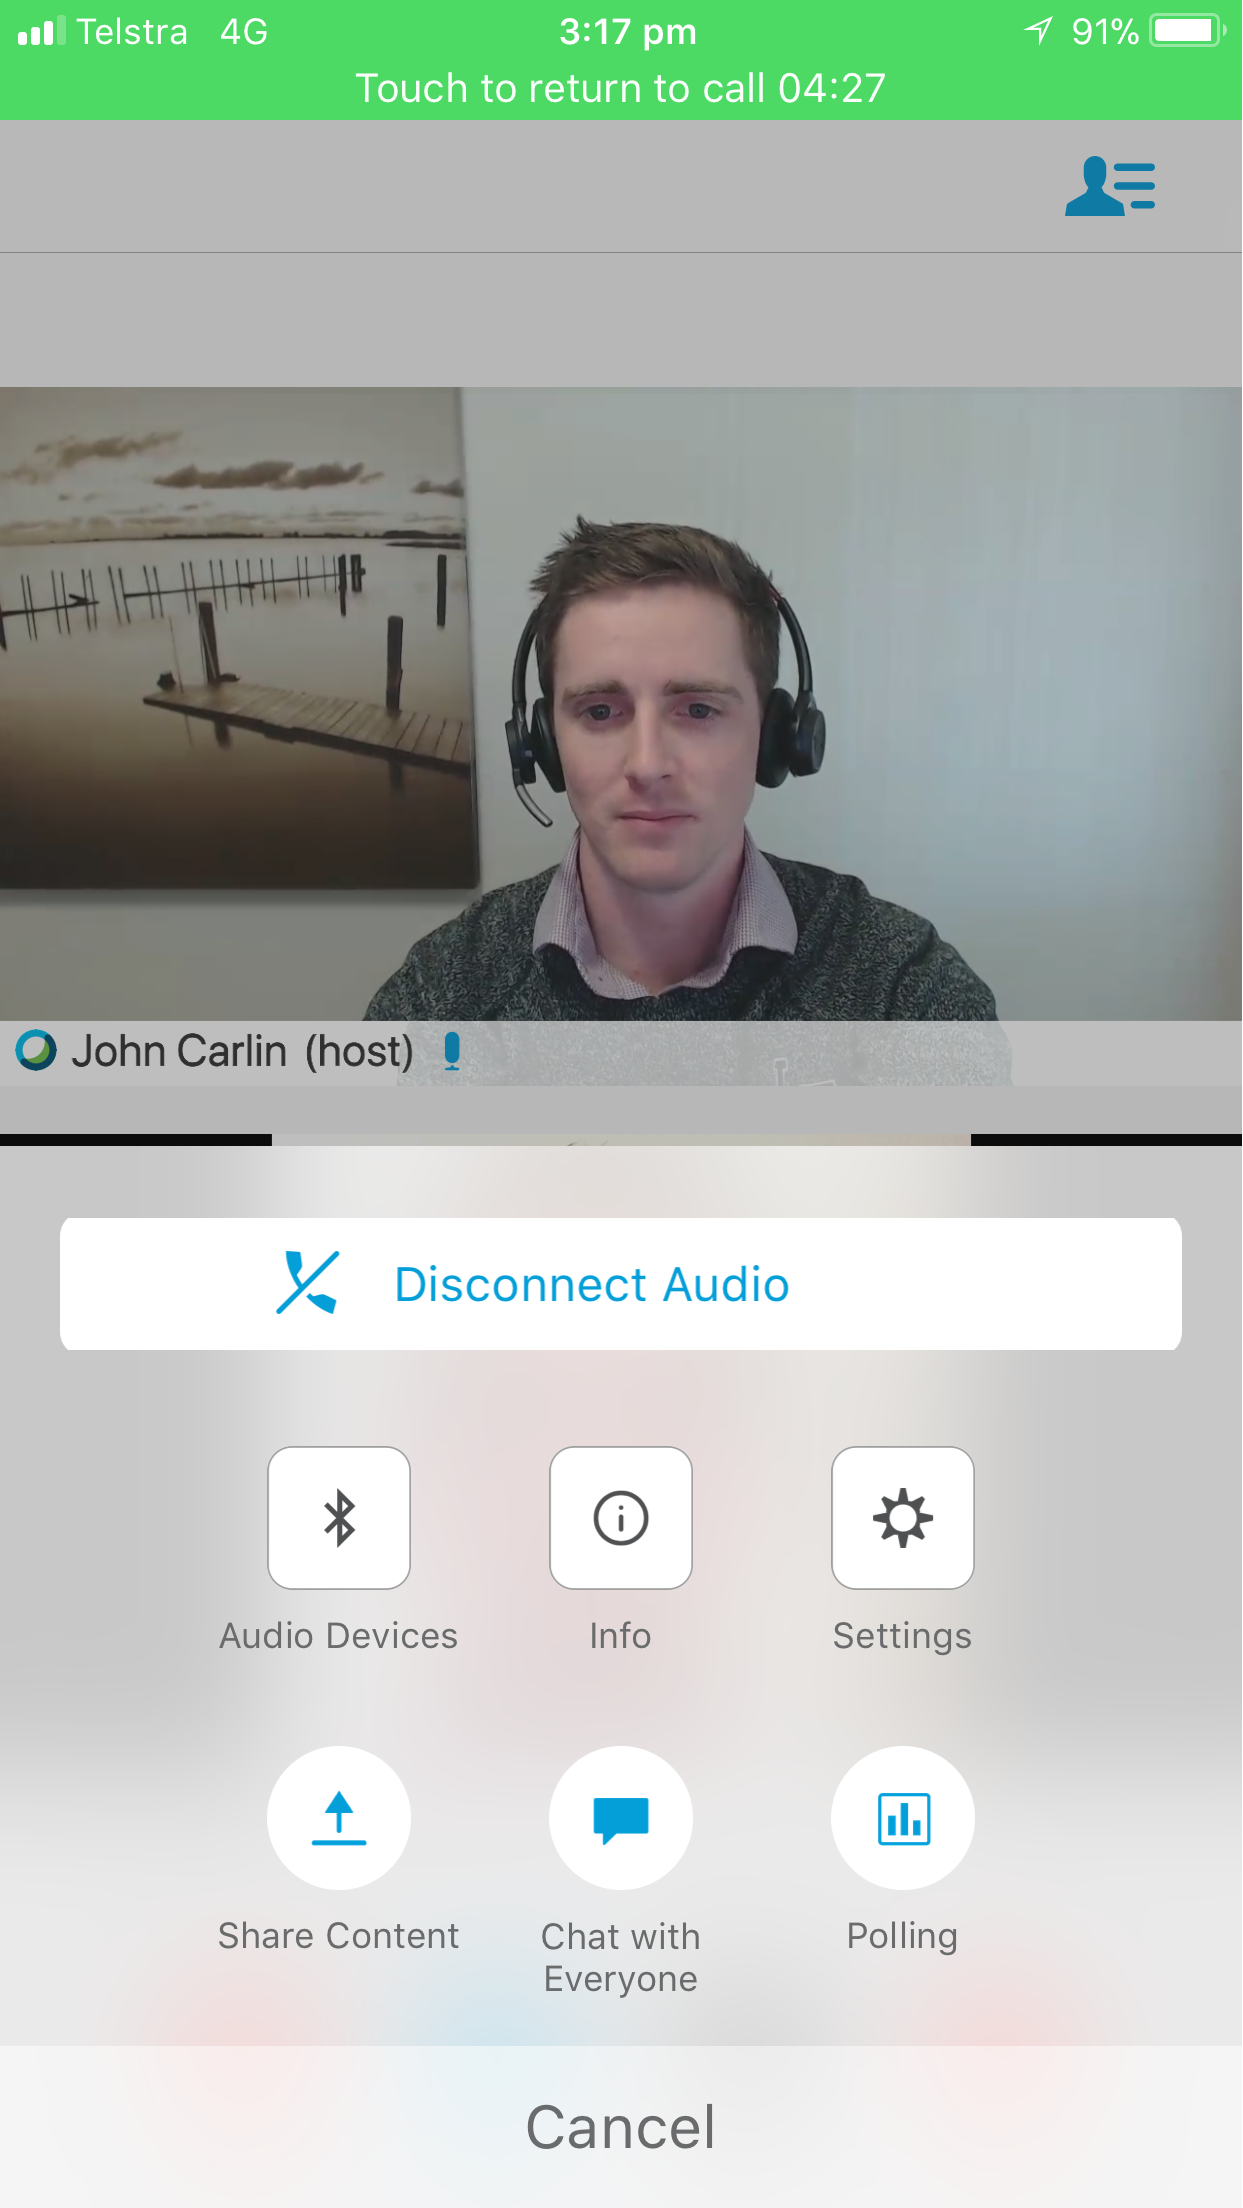
 More options (3 dots) in the Webex Meetings app.
- Mute or unmute your microphone.
- Turn your camera on or off.
- More options including share content, chat, and audio settings.
- Leave or end the meeting.
- View participant list.
Once you've joined a Webex Meeting from a video conferencing room you will automatically have audio, video and screen sharing capabilities. If another participant shares their screen it will automatically be shown on your video system. To share your own screen, simply connect your laptop and tap 'Share' when prompted.
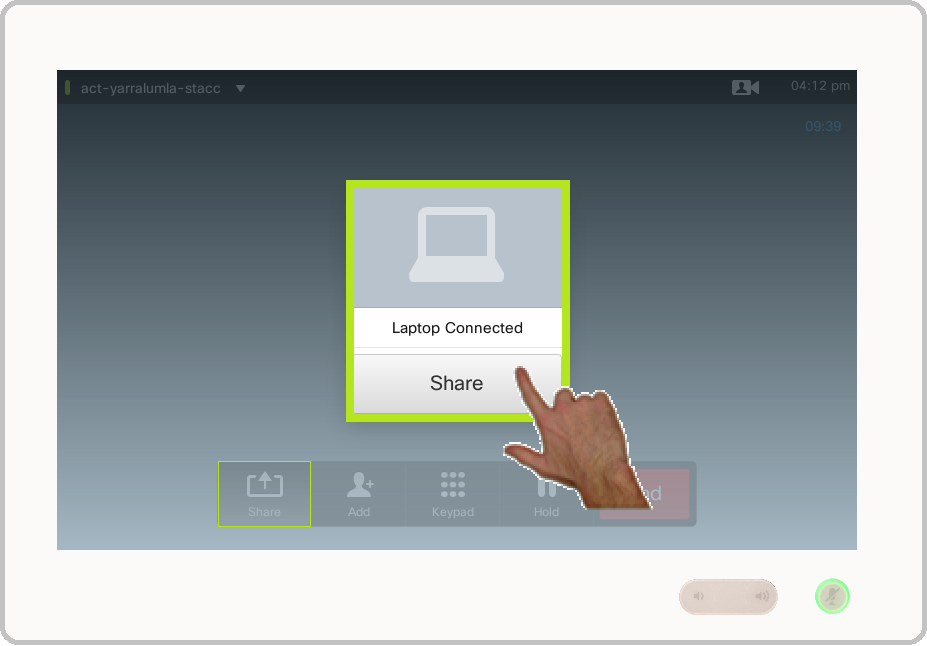
 Share laptop prompt on a Cisco video conferencing unit
Tip: If you're Hosting a meeting from a video conferencing room, open up the Webex Meetings session on your laptop. You won't need to connect audio or video on your laptop because this is already being provided by the video conferencing system. Simply use the Webex Meetings session on your laptop to access the Host features.
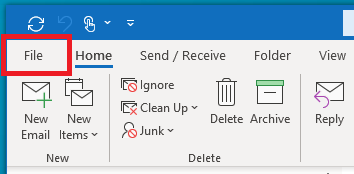
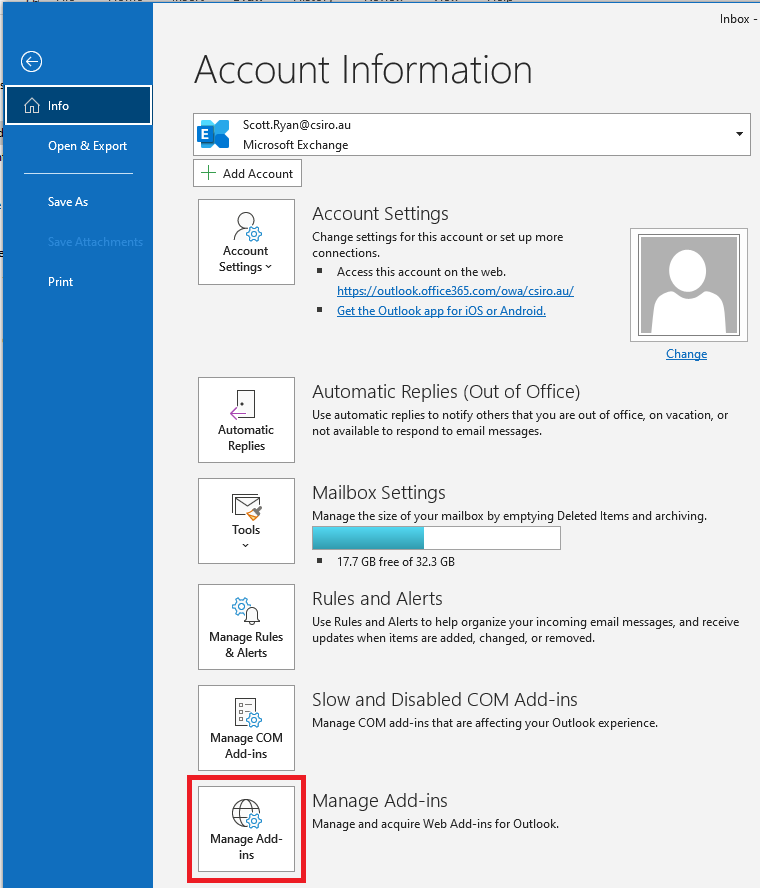
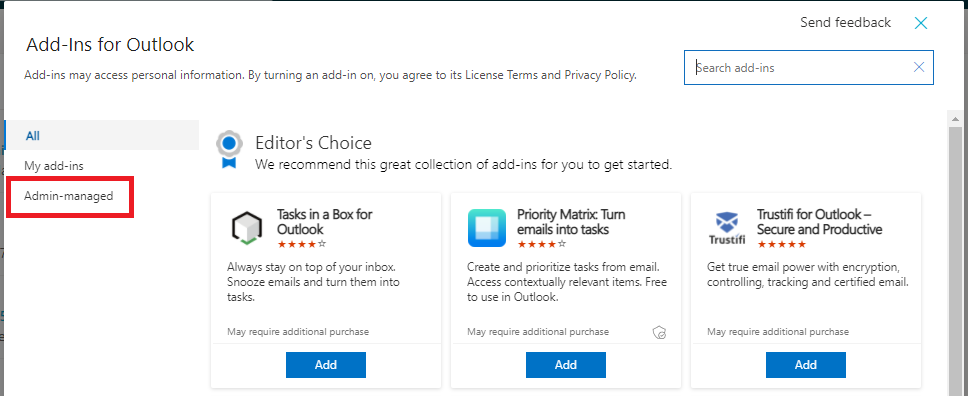
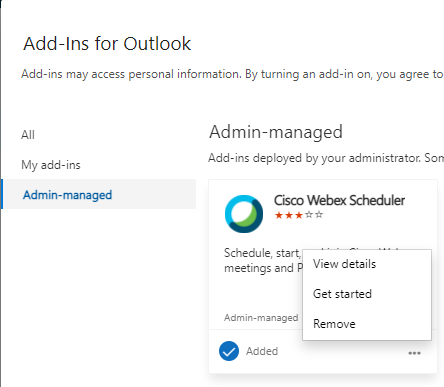
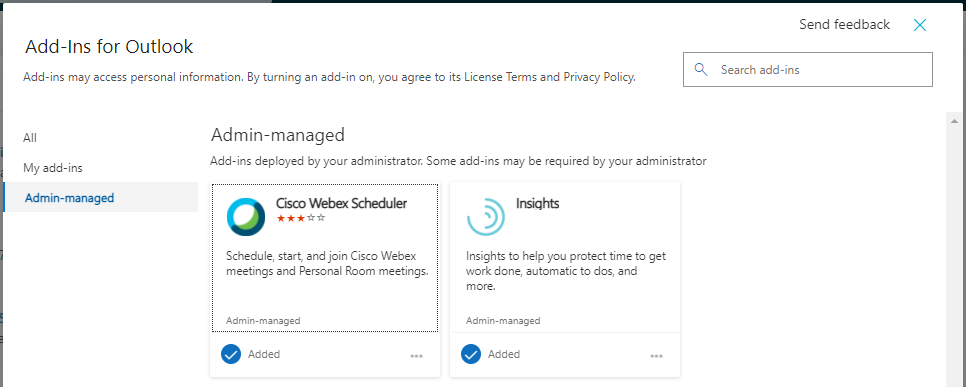
The Cisco Webex Meetings Scheduler is installed automatically. If it is not appearing in Outlook, you can check if it is installed by completing the following:
- In Outlook, Select File
- Click on Manage Add-ins
-
Click on Admin-Managed
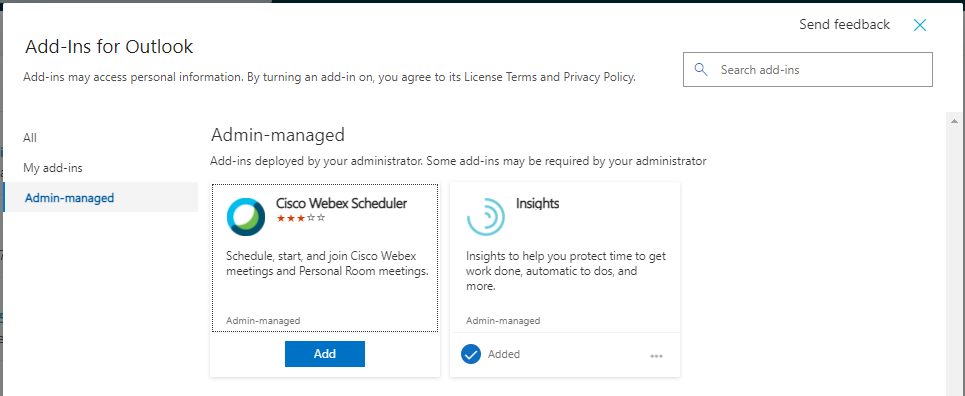
- If the Cisco Webex Meetings Scheduler shows Add, click on Add. If it is already showing as added, click the 3 dots, click Remove and then click on Add to reinstall.
-
Once the Add-in shows Added, it should now be appearing in Outlook. Go to Configuring the Cisco Webex Meetings Scheduler.
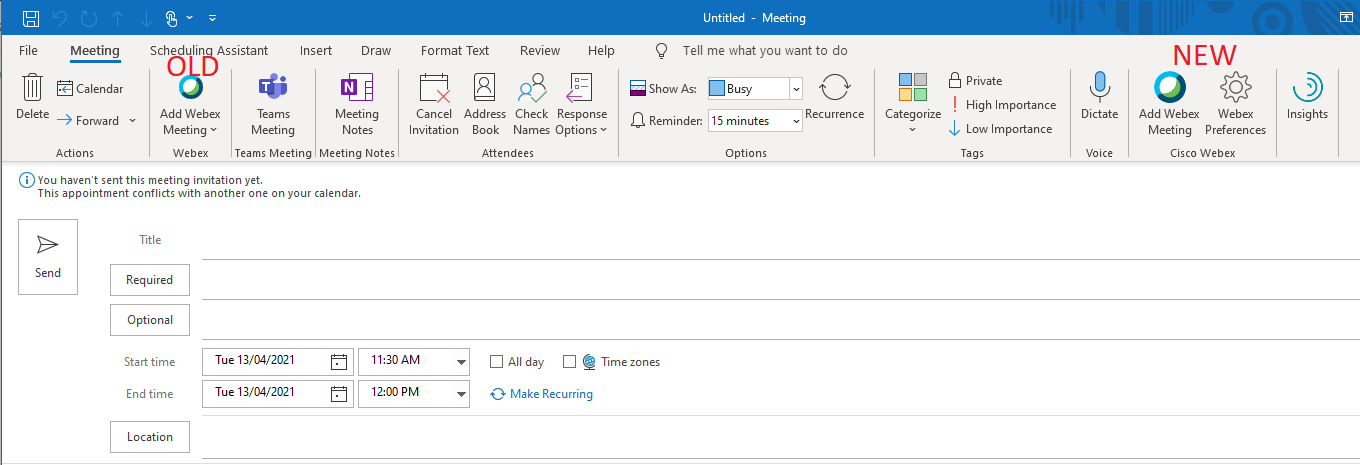
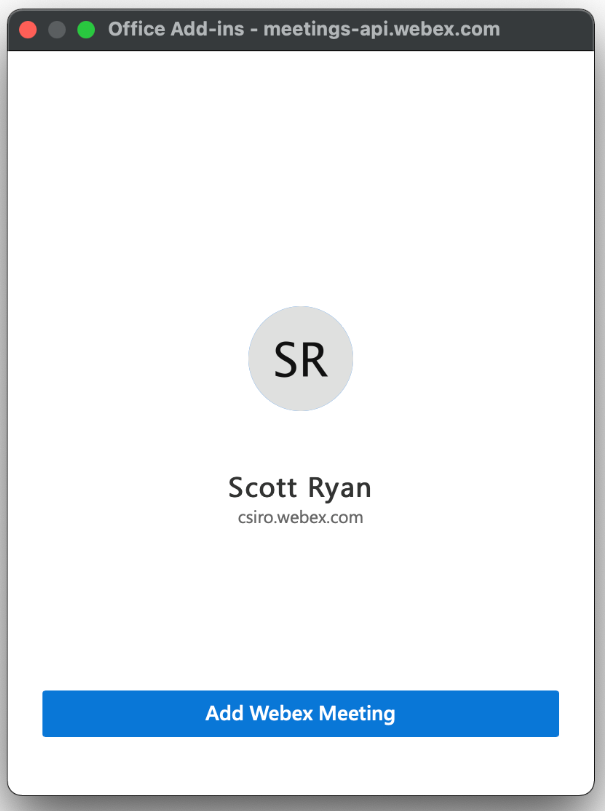
The Cisco Webex Meetings Scheduler allows for CSIRO staff to schedule Webex Meetings enabled meetings using Outlook. To configure the Cisco Webex Meetings Scheduler:
- Create a new meeting invite and then click on the new 'Add Webex Meeting' button. It will be on the far right as seen in the image below.
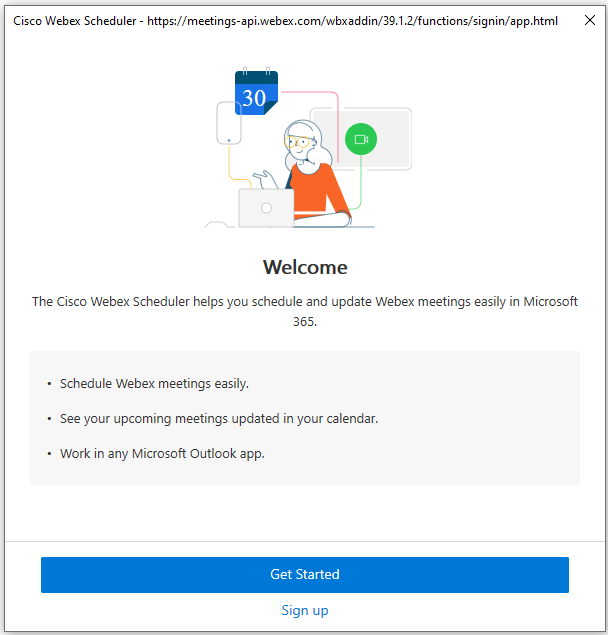
- Click 'Get Started'.
- Enter your ident@csiro.au and then click 'Next'.
-
Login using your CSIRO ident and password.
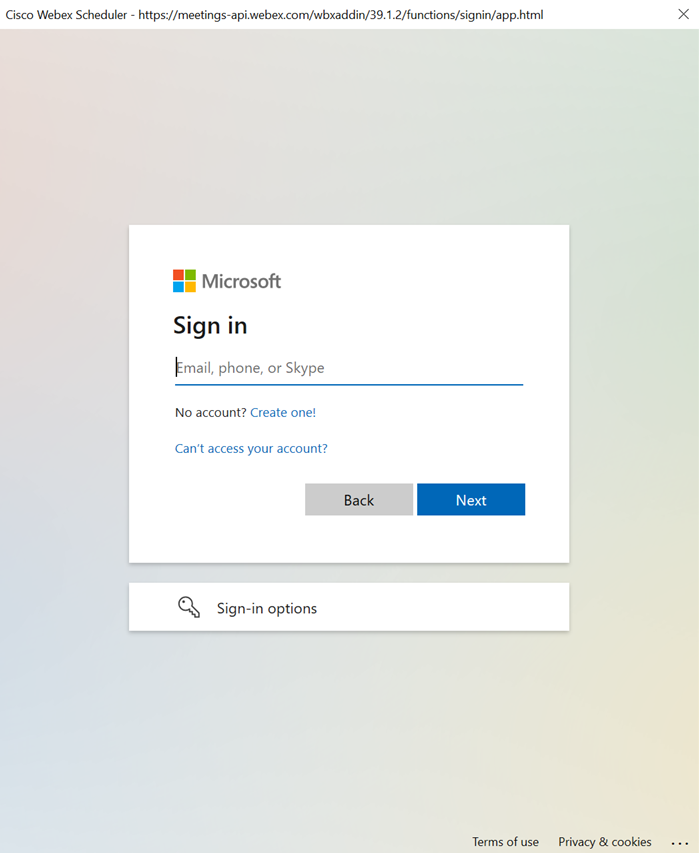
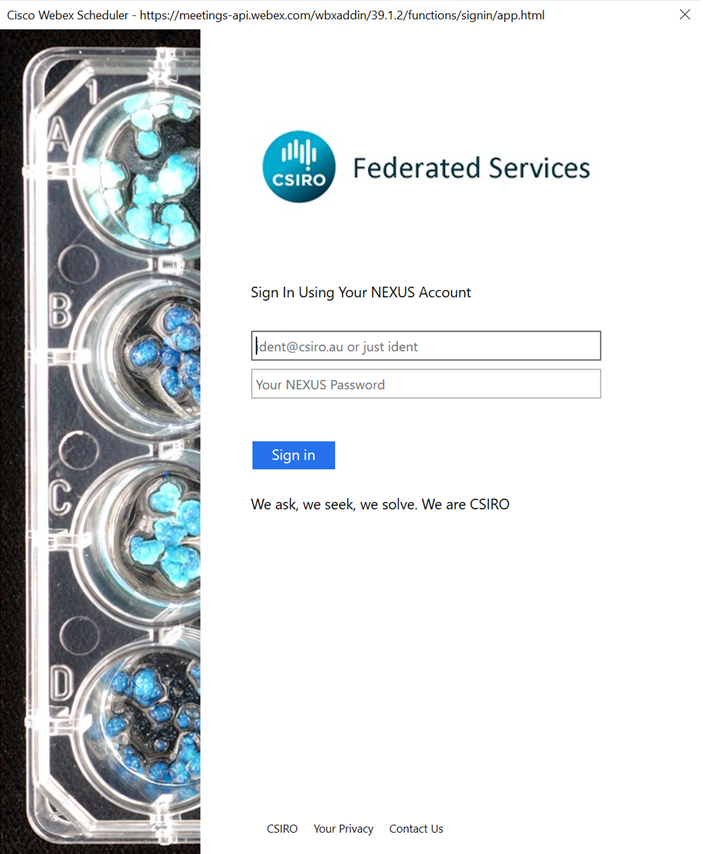
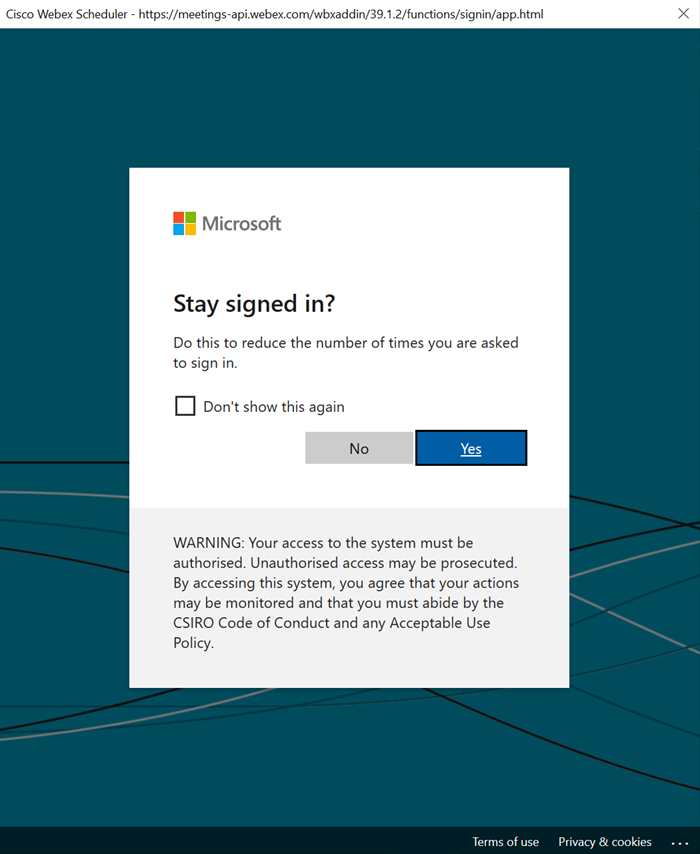
- If prompted, click 'Yes' to stay signed in.
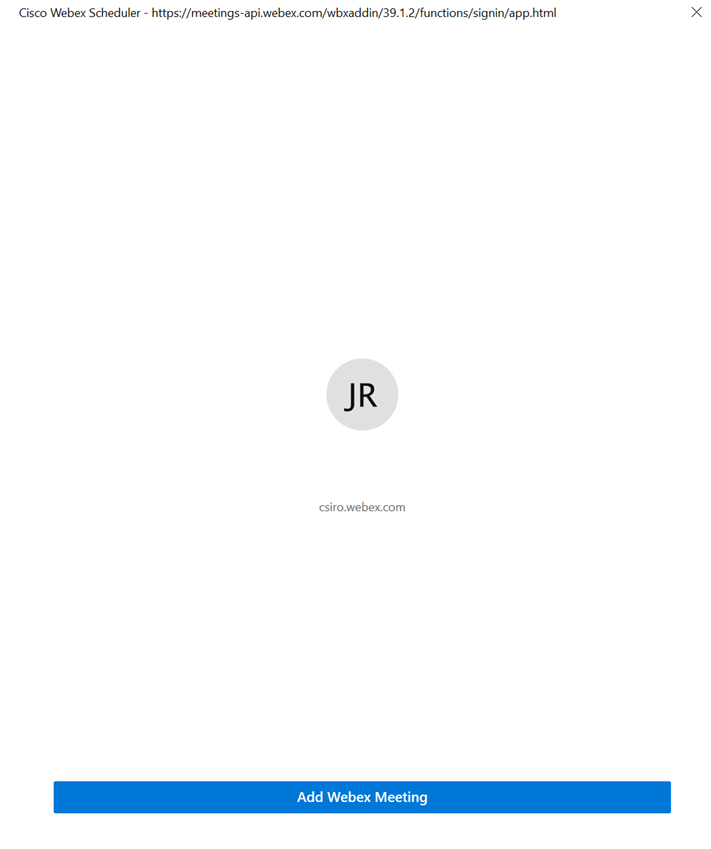
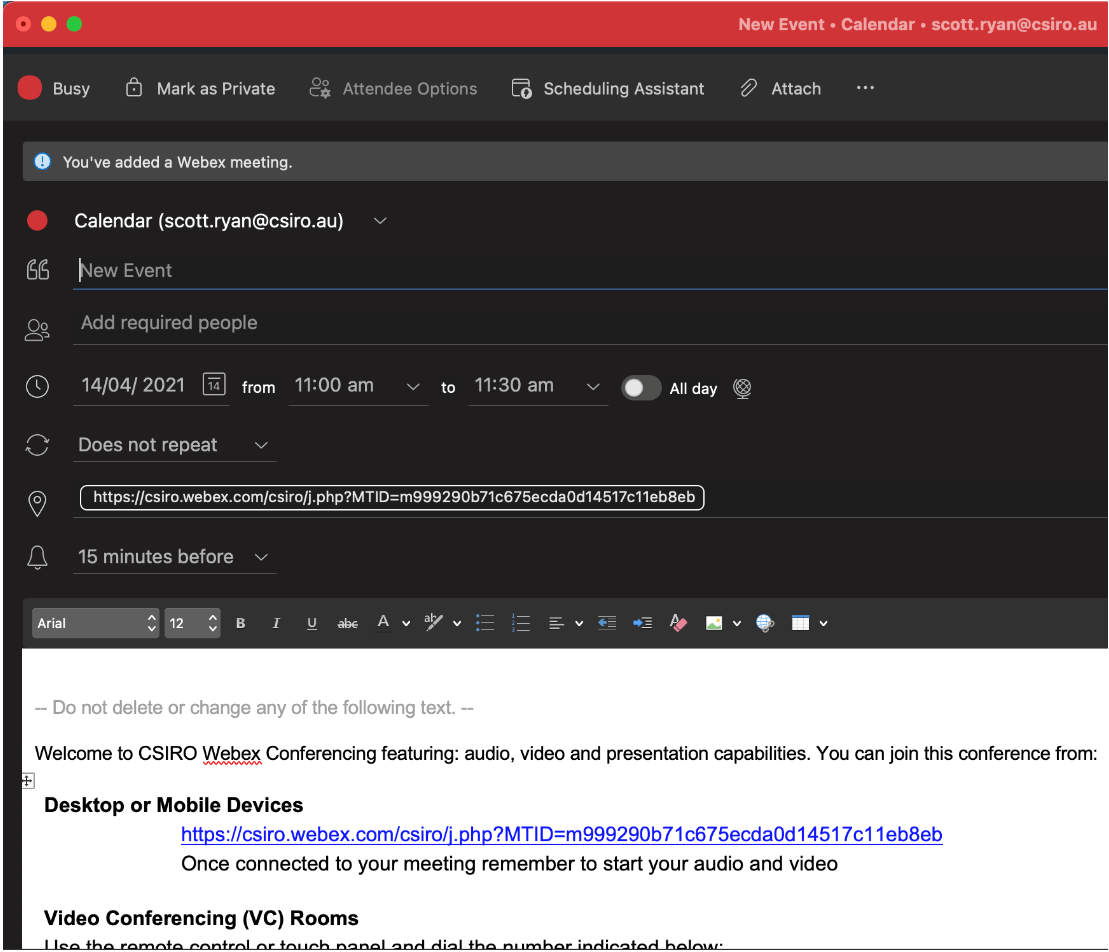
- Click 'Add Webex Meeting' - make sure that the Webex Meeting details appear before proceeding.
- The meeting details will appear before you hit send on the meeting invite.
-
If a Webex Meeting is not added to the calendar invite, create a new meeting invite and click 'Add Webex Meeting' again on the far right. The meeting details should now appear.
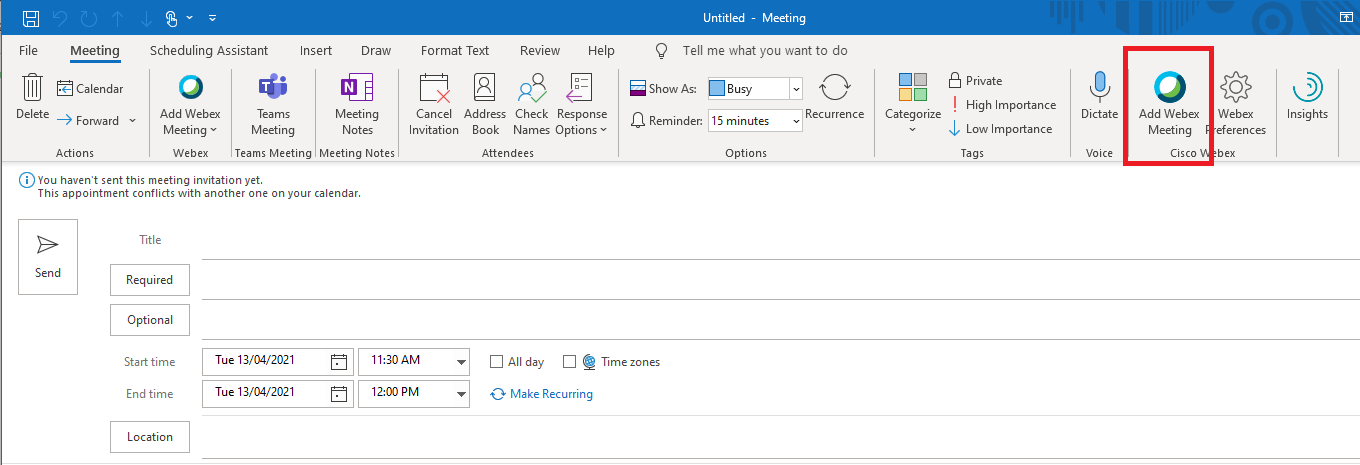
The Cisco Webex Meetings Scheduler allows for CSIRO staff to schedule Webex Meetings enabled meetings using Outlook. To configure the Cisco Webex Meetings Scheduler:
- Create a new meeting invite, click the 3 dots and then select Cisco Webex>Add Webex Meeting.
- Click 'Get Started'.
- Enter your ident@csiro.au and then click 'Next'.
-
Login using your CSIRO ident and password.

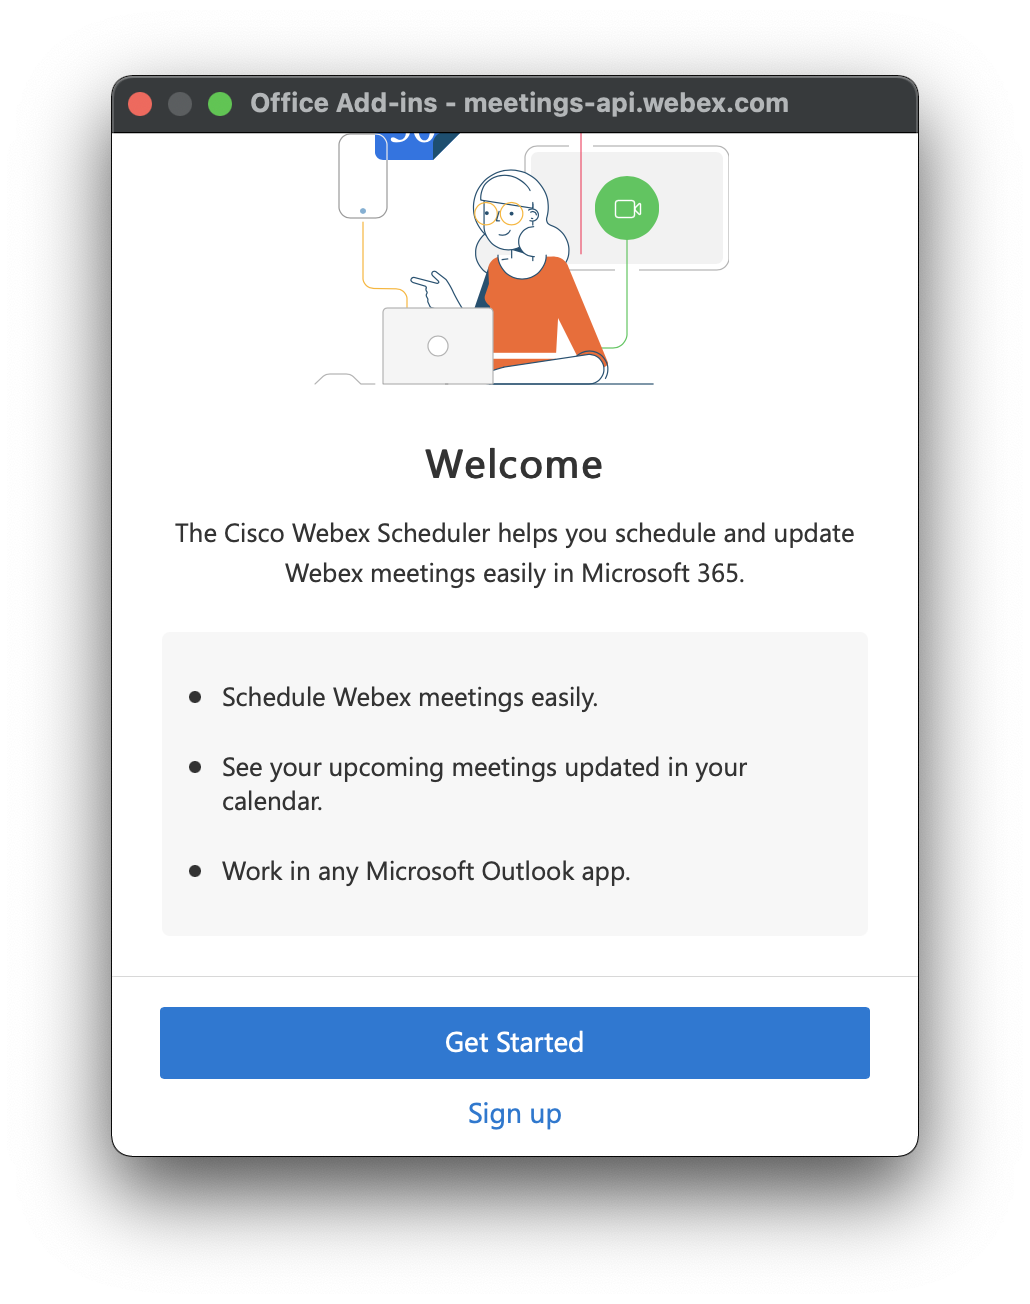
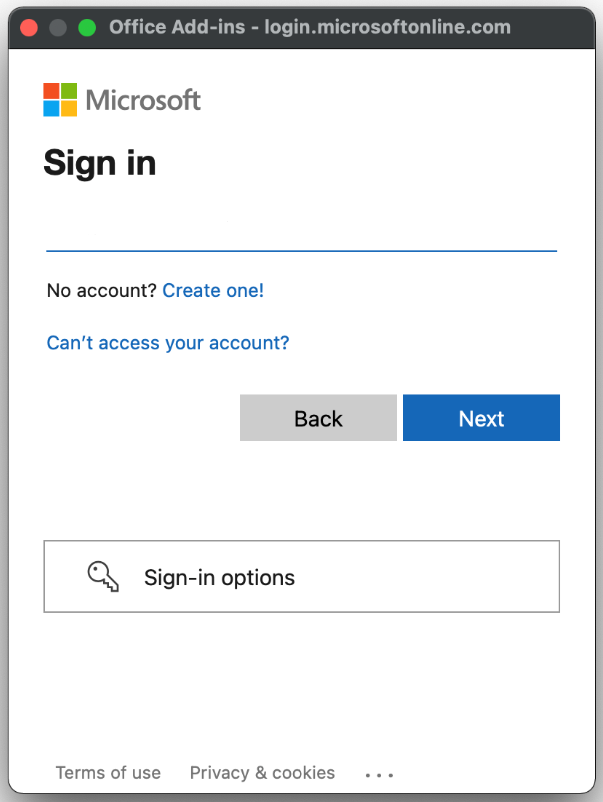

- If prompted, click 'Yes' to stay signed in.
- Click 'Add Webex Meeting' - make sure that the Webex Meeting details appear before proceeding.
- The meeting details will appear before you hit send on the meeting invite.
-
If a Webex Meeting is not added to the calendar invite, create a new meeting invite and click 'Add Webex Meeting' again. The meeting details should now appear.

Important: Only 2 meetings owned by the same Host can be running at any one time, regardless of whether alternate Hosts have been assigned or the original Host is in attendance.
Requirements: To book using Outlook you must have the Cisco Webex Meetings Scheduler installed on a Windows 10 machine with Outlook.
To schedule a Webex Meeting using Outlook:
- Create a new meeting request and complete the 'To', 'Subject', 'Start Time' and 'End Time' fields in the normal manner.
- Click 'Add Webex Meeting' - make sure that the Webex Meeting details appear before proceeding.
- To add Cohosts, adjust the meeting password, or enable Breakout Sessions, click 'Webex Preferences'.
- Review your appointment details and click 'Send'.
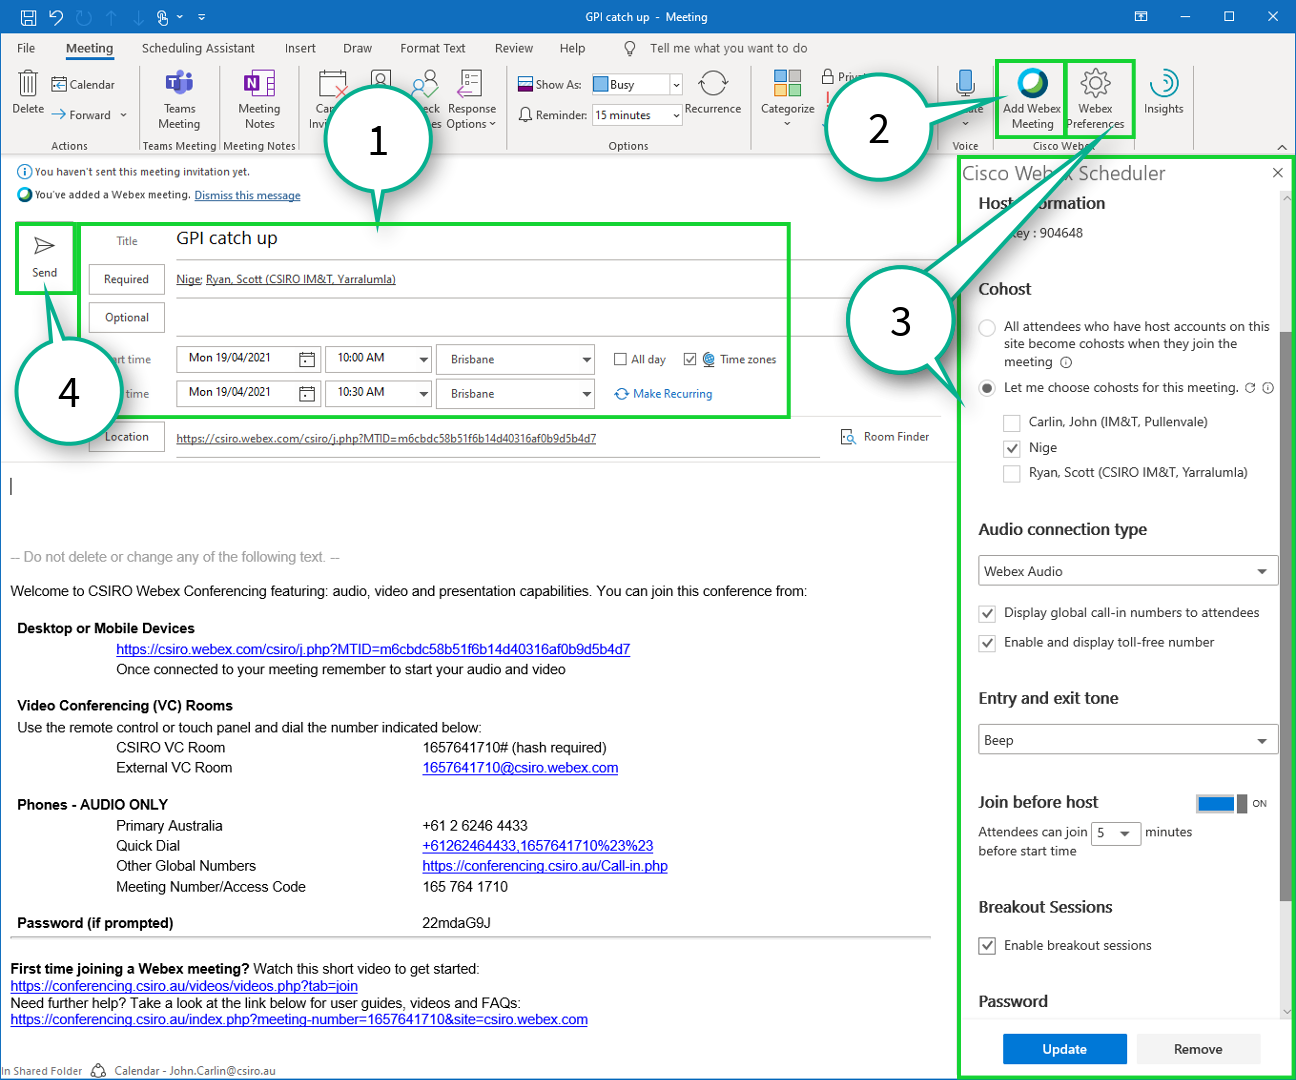
 Scheduling a Webex Meeting using Windows Outlook.
Important: Only 2 meetings owned by the same Host can be running at any one time, regardless of whether alternate Hosts have been assigned or the original Host is in attendance.
Requirements: To book using Outlook you must have the Cisco Webex Scheduler installed on a Mac OSX 10.6-10.11 machine with Outlook.
To schedule a Webex Meeting using Outlook:
- Create a new meeting request and complete the 'To', 'Subject', 'Starts' and 'Ends' fields in the normal manner.
- Click the 3 dots in the title bar, 'Cisco Webex' -> 'Add Webex Meeting' - make sure that the Webex Meeting details appear before proceeding.
- To add Cohosts, adjust the meeting password, or enable Breakout Sessions, click 'Webex Preferences'.
- Review your appointment details and click 'Send'.
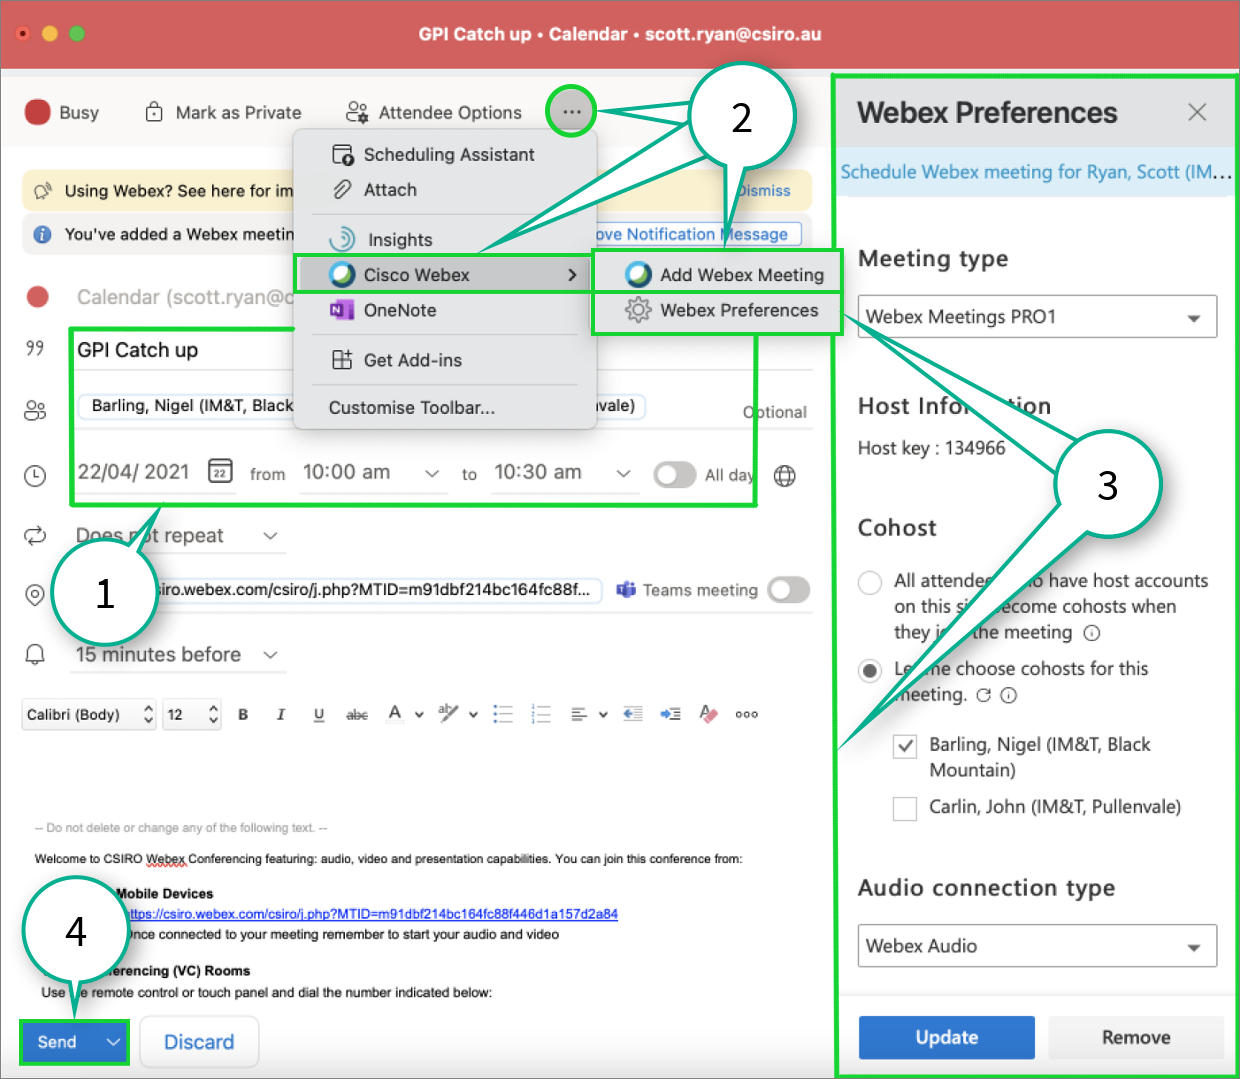
 Scheduling a Webex Meeting using Mac Outlook.
To schedule a Webex Meeting using Outlook online:
- Navigate to https://outlook.office.com and sign in using your CSIRO credentials.
- Create a new meeting request and complete the 'To', 'Subject', 'Start Time' and 'End Time' fields in the normal manner.
- Click the 3 dots in the title bar, 'Cisco Webex Meetings Scheduler' -> 'Add Webex Meeting' - make sure that the Webex Meeting details appear before proceeding.
- To add Cohosts, adjust the meeting password, or enable Breakout Sessions, click 'Webex Preferences'.
- Review your appointment details and click 'Send'.
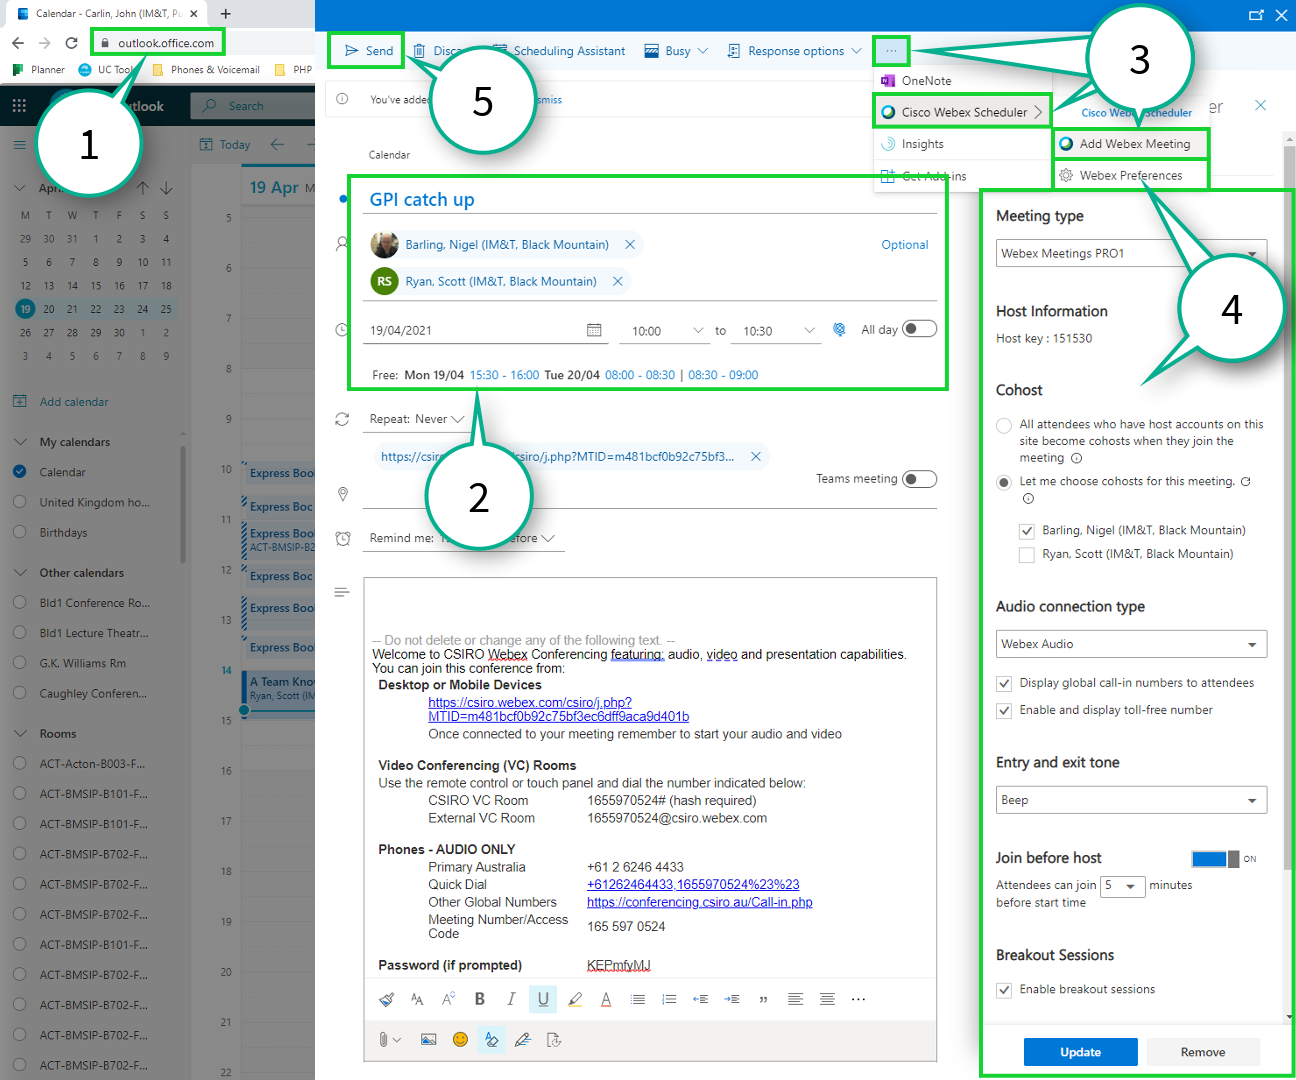
 Scheduling a Webex Meeting using Outlook online.
Important: Only 2 meetings owned by the same Host can be running at any one time, regardless of whether alternate Hosts have been assigned or the original Host is in attendance.
To schedule a Webex Meeting using csiro.webex.com (Citrix or VPN not required):
- Open a web-browser and navigate to https://csiro.webex.com.
- Click 'Sign In' and then click 'Meetings' from the left menu.
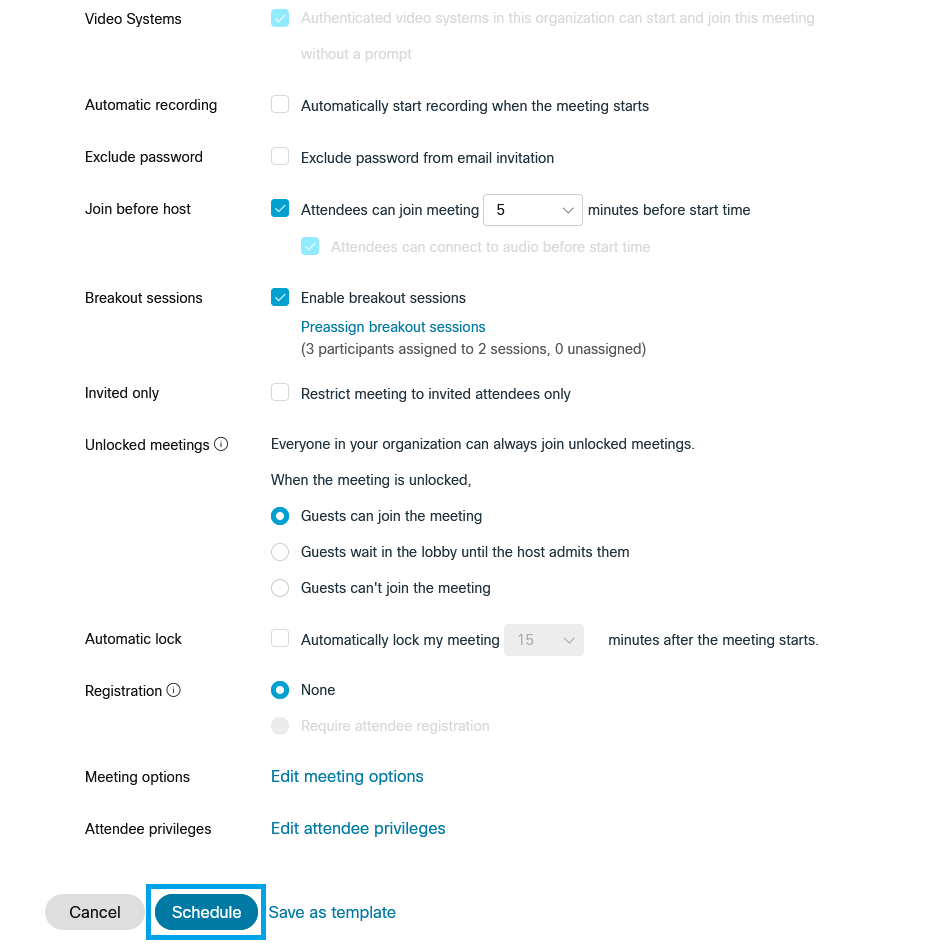
- Click 'Schedule a Meeting'.
- Enter the appropriate meeting details (attendee's can be invited later on).
- Review your booking and click 'Schedule'.
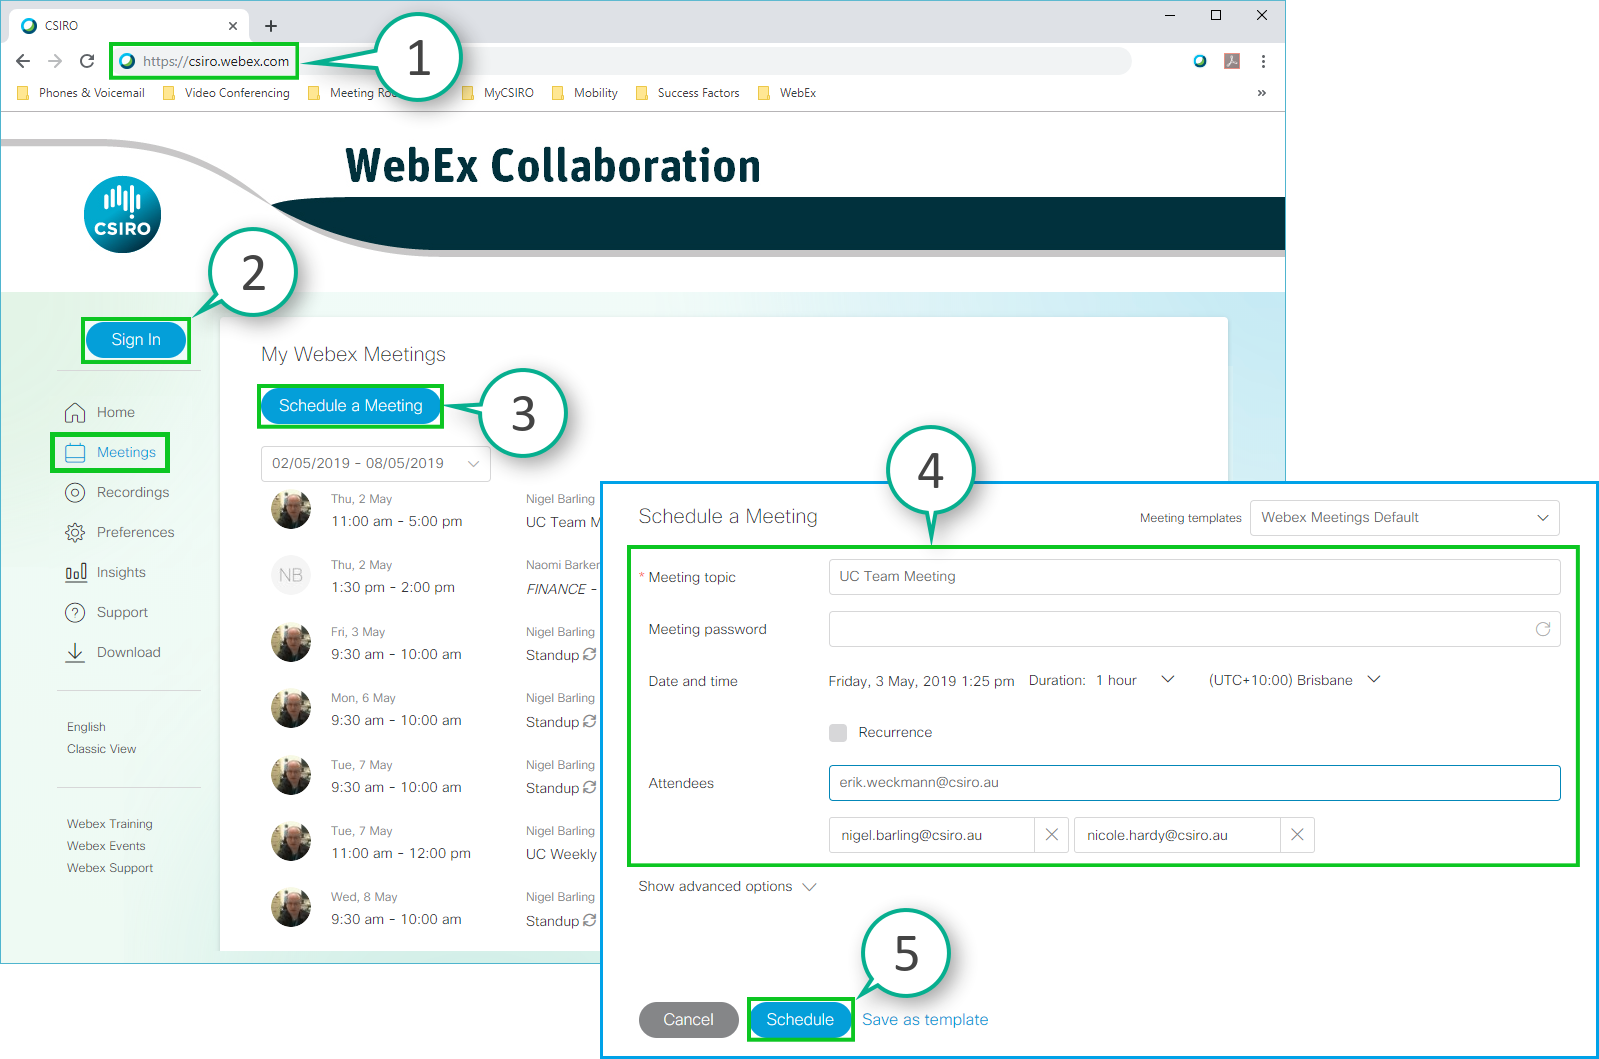
 Scheduling a Webex Meeting using csiro.webex.com.
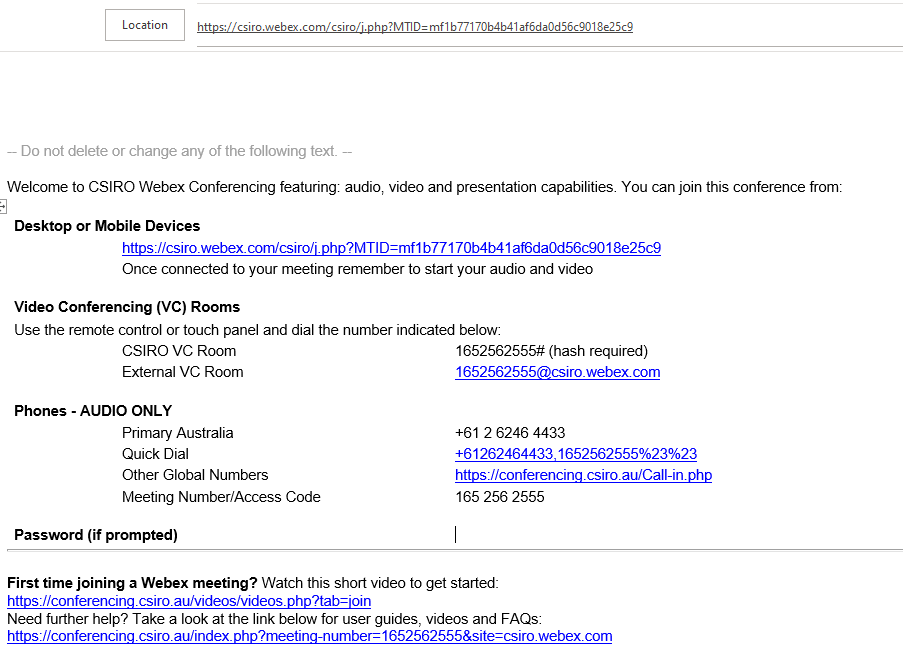
You will receive an email from 'messenger@webex.com' containing the meeting details. Copy these meeting details (Ctrl + A, Ctrl + C) and paste them into a new calendar invite or email message (Ctrl + V), and send it to participants.
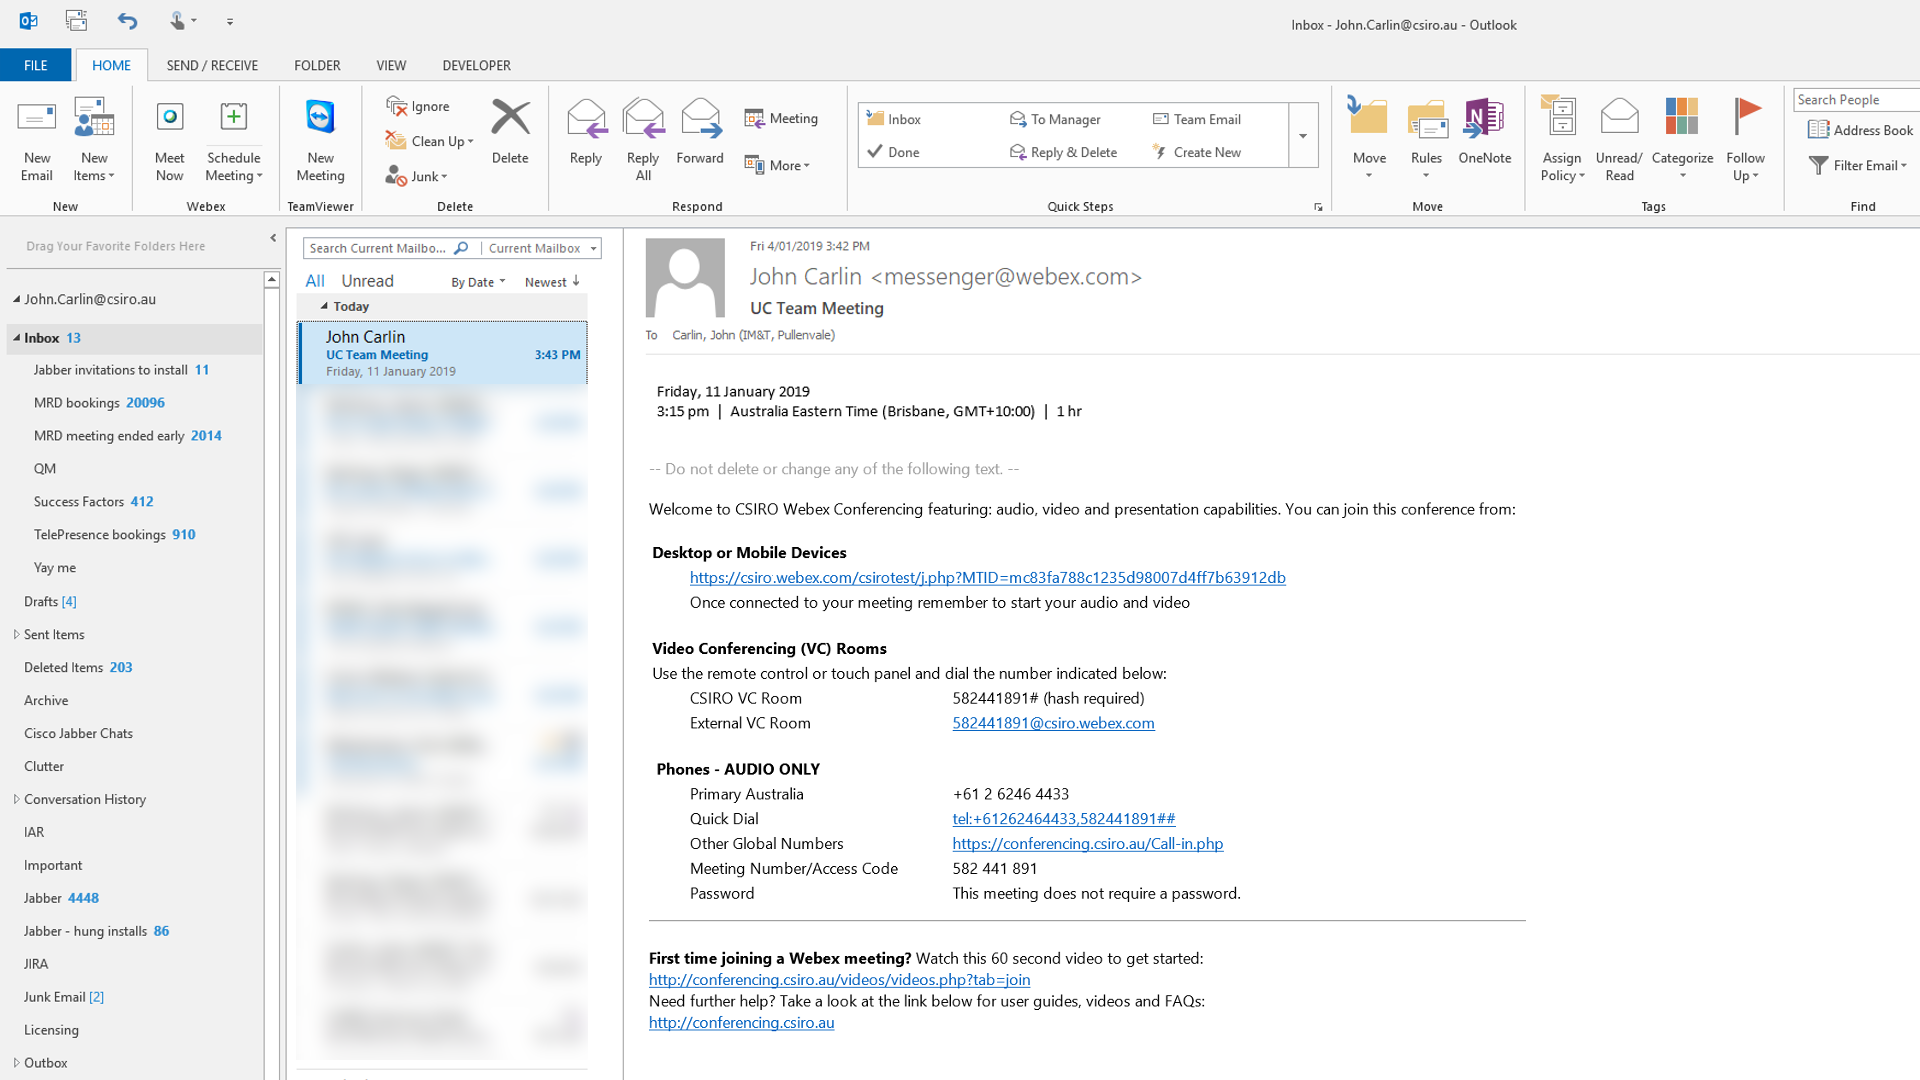
 Example Webex Meeting invite received from messenger@webex.com.
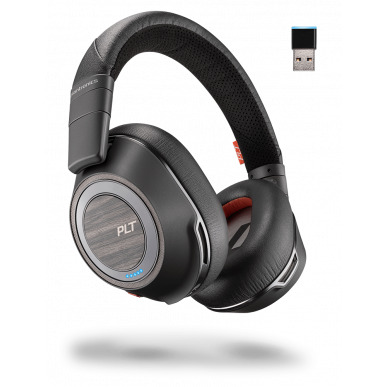
Your office headset can be taken home to help you work efficiently and reduce background noise for you and your colleagues. If you are planning to purchase a headset (and your manager has approved this), there are a wide range of computer headsets that will work well with Webex App. The four headsets shown below have been used by CSIRO staff in the past with success and can be purchased from a number of suppliers. Please note that in the current environment IMT does not recommend one headset vendor over another, nor one headset supplier over another. IMT is also unable to purchase and distribute headsets centrally due to logistical challenges.
Given the recent demand for headsets, some suppliers are experiencing long delays in shipping times. It is recommended that you check with your supplier of choice how long you can expect to wait to receive your headset before placing an order. Some example headset suppliers include Simply Headsets, The Telecom Shop, and Telephones Online.
Click one of the headsets below to learn more.
To learn about the full range of IMT supported headsets and ordering methods, visit the MyCSIRO - Webcams and Headsets (Citrix/VPN required) page.
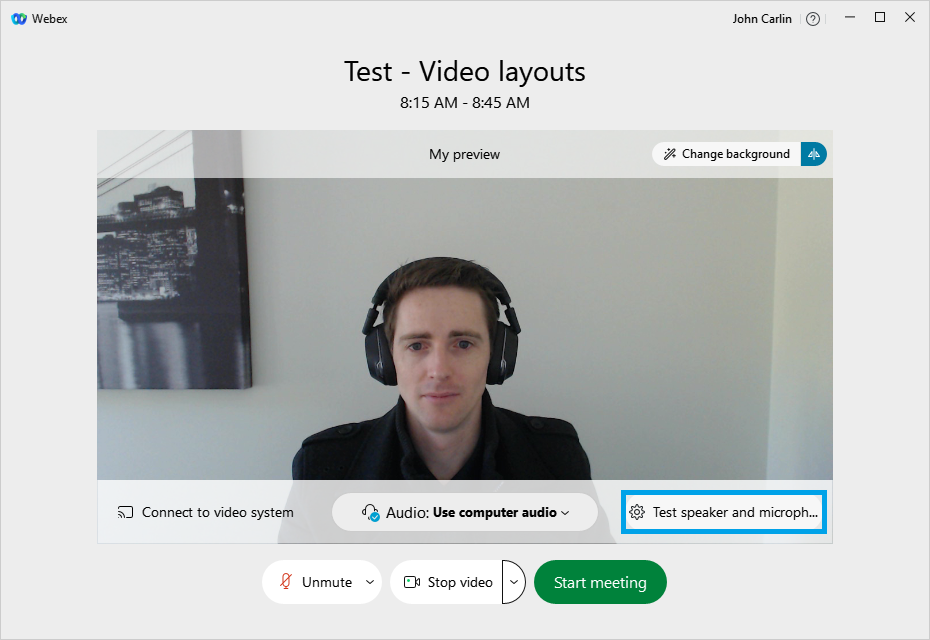
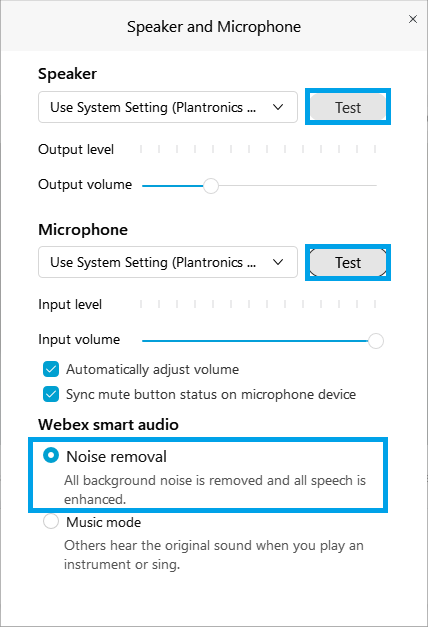
Webex Meetings can continue to be used in the normal manner when working from home. Just make sure when you're joining a Webex Meeting that your camera settings are correct, and if you're using Computer Audio, that your speaker and microphone settings are correct. To do so:
- Click the 'Test speaker and microphone' button on the pre-join screen.
-
Select the correct speaker and microphone from the drop-down lists.
- Tip: Click the 'Test' buttons next to the speaker and microphone lists. These tests will allow you to hear a sound to help correctly identify your speaker device, and record and playback your voice to help correctly identify your microphone device.
-
Tick the 'Noise removal' option to allow Webex Meetings to minimise any background noise from your microphone.
-
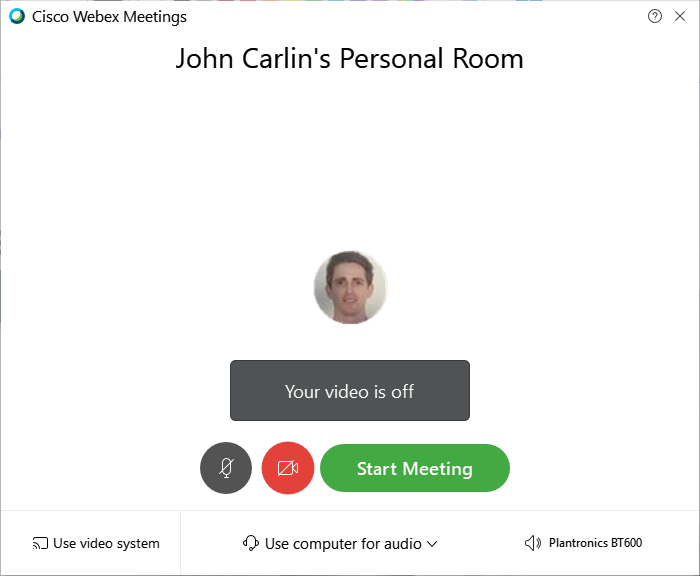
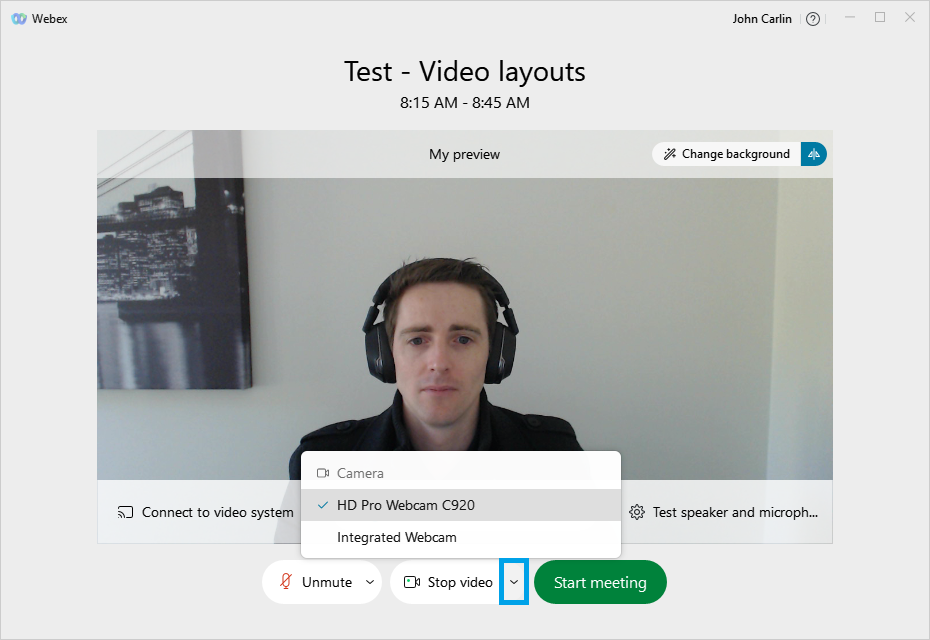
Your video is shown on the pre-join screen. To change cameras, click the down arrow attached to the 'Stop video' button and select a different device.
There are many keyboard shortcuts in Webex Meetings designed to improve your in-meeting experience; for example Ctrl + M can be used to mute/unmute, and Ctrl + Alt + D can be used to share your screen. To view the full list of keyboard shortcuts, please visit help.webex.com.
There are many keyboard shortcuts in Webex Meetings designed to improve your in-meeting experience; for example Option + Shift + M can be used to mute/unmute, and Option + Command + K can be used to share your screen. To view the full list of keyboard shortcuts, please visit help.webex.com.
You may wish to add additional security to your Webex Meeting if you are discussing confidential information, or commercial-in-confidence information, particularly when many staff are joining from offsite.
There are a few options when it comes to securing a Webex Meeting. Some measures can be put in place when scheduling a meeting, other measures can be activated after joining a Webex Meeting as Host.
Meeting passwords
All new Webex Meetings automatically have a password set on them. This password protects against people going to https://csiro.webex.com and joining a meeting by guessing the 9 digit meeting number. Passwords are not required when a participant connects by clicking the join link in their invite.
To check if a meeting you have organised has a password set:
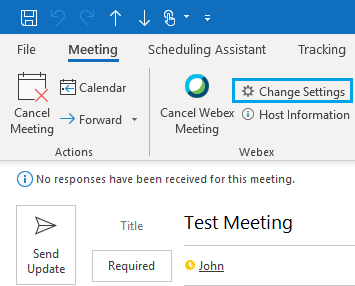
- Open the Webex Meeting in Outlook and click 'Change Settings'.
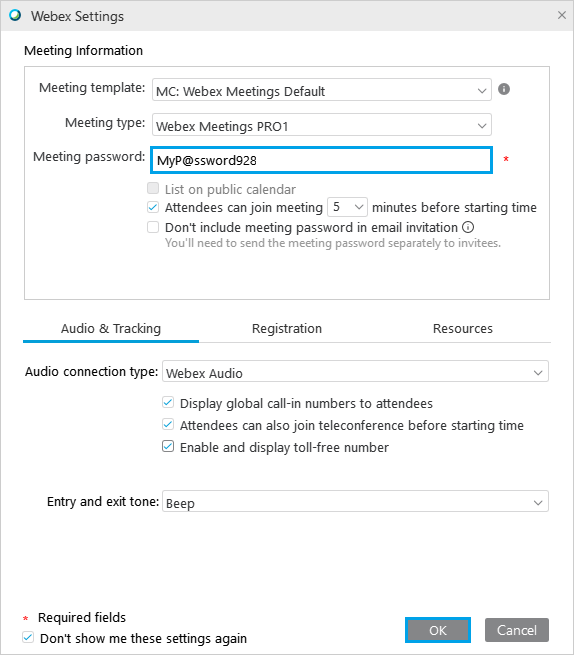
- Add a unique meeting password if this field is blank.
- To add an additional layer of security, tick the ‘Don't include meeting password in email invitation’ box. Make sure you send the meeting password separately, preferably using a different communication method such as SMS, or a private MS Teams channel.
- Click 'Send Update' to send the updated invite to participants.
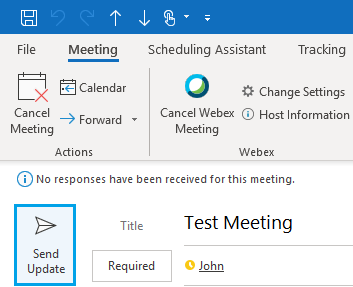
Enable the lobby room for an in-progress meeting
Webex Meetings lobby rooms are virtual waiting rooms that give Hosts the opportunity to review who is trying to join their meeting, before admitting them. To enable lobby rooms for a meeting, hosts simply need to lock the meeting - participants that join after this time will be automatically placed into the lobby. Hosts can also manually move a participant from the main meeting back into the lobby, and then re-admit them when ready.
To lock a meeting and enable the lobby:
- Click the 3 dots and then click 'Lock Meeting'.
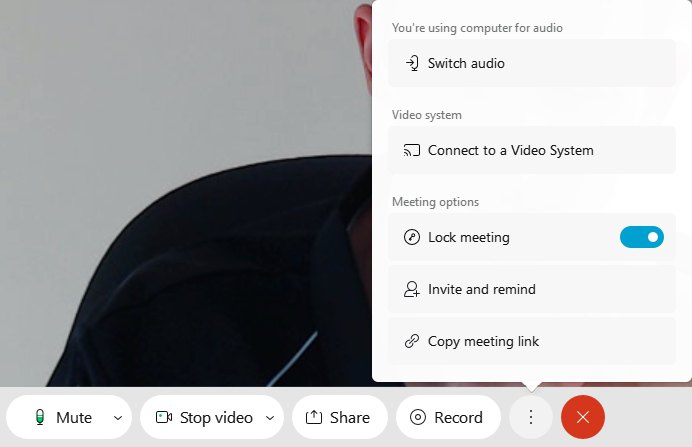
For details on how to move participants back into the lobby room, please refer to the Lobby Rooms section on this page.
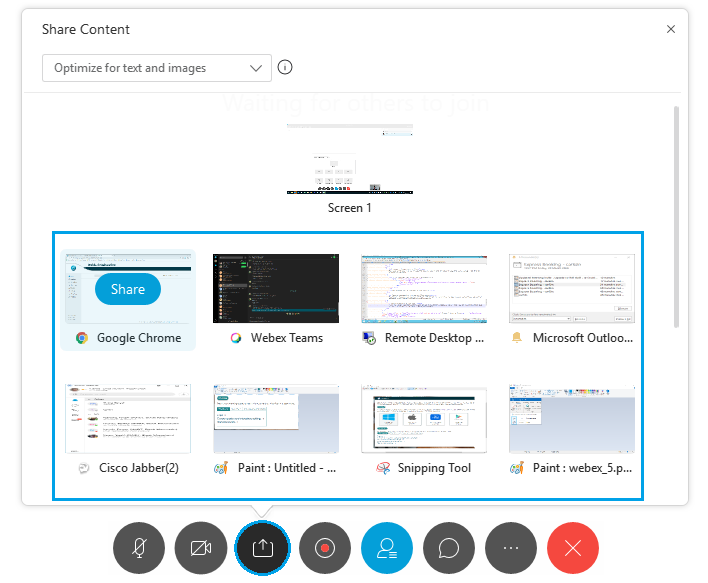
Share an application, not your entire screen
Use Share > Application instead of Share > My Screen to share specific applications and prevent accidental exposure of sensitive information on your screen.
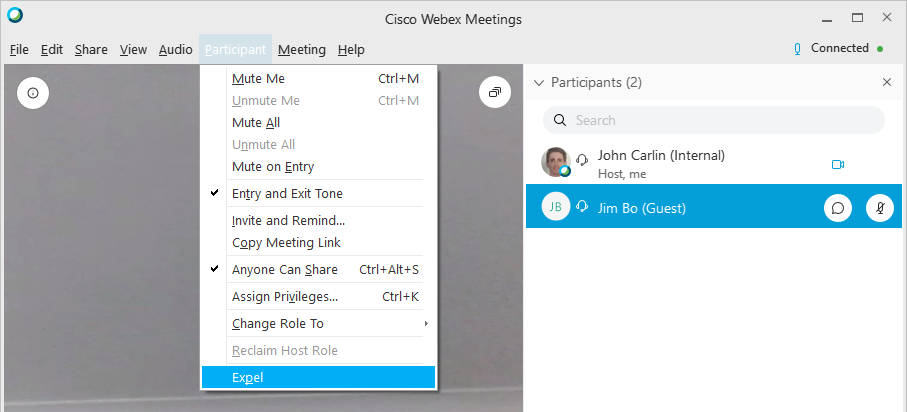
Expel unwanted participants
Hosts can expel unwanted participants at any time during a meeting. Select the name of the participant whom you want to remove, then click Participant > Expel.
Large Webex Meetings require a little more input from the Host than regular Webex Meetings to ensure that everything runs smoothly. If you're Hosting a large meeting, consider using the following Webex Meetings features. For information on how to find your Host key or reassign the Host role, please refer to https://conferencing.csiro.au/host.php?tab=key&meeting-number=.
Mute and mute all
Look for the ![]() icon in the 'Participants' pane
icon in the 'Participants' pane ![]() to identify who is making noise. If the identified participant doesn't need to be speaking, click the
to identify who is making noise. If the identified participant doesn't need to be speaking, click the ![]() button next to their name to mute their microphone. If multiple participants are making noise, right-click on the 'Participants' pane and click 'Mute All'.
button next to their name to mute their microphone. If multiple participants are making noise, right-click on the 'Participants' pane and click 'Mute All'.
Mute on entry
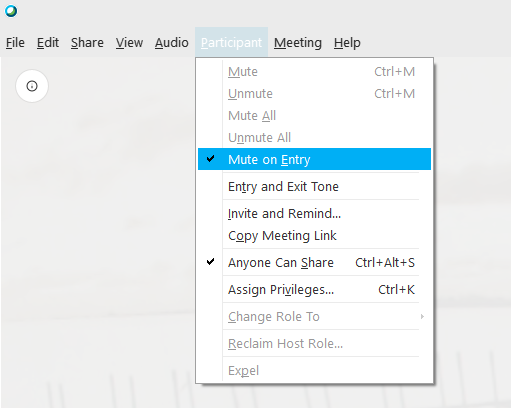
Enable mute on entry to automatically mute participants when they join (they can still unmute themselves by clicking the microphone icon). To do so, click the 'Participant' tab at the top of the window and tick 'Mute on Entry'.
Participants that use the 'Call In' option can unmute themselves by pressing *6 on their phone.
Allow attendees to unmute themselves
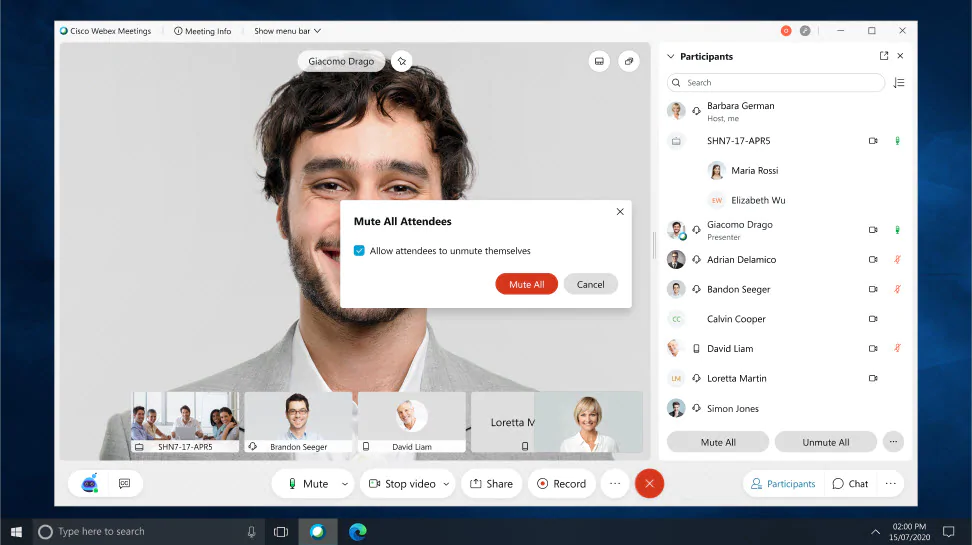
In meetings, by default, when a Host or Cohost mutes another attendee using the Mute, Mute all or Mute on Entry features, those attendees can manually unmute themselves. Hosts and Cohosts can change this setting by ticking or unticking the 'Allow attendees to unmute themselves' option that appears when using the Mute all or Mute on Entry features.
Tip: if you have prevented attendees from being able to unmute themselves but still require attendee interaction, consider reminding attendees of the chat and raise hand features.
Entry and exit tones
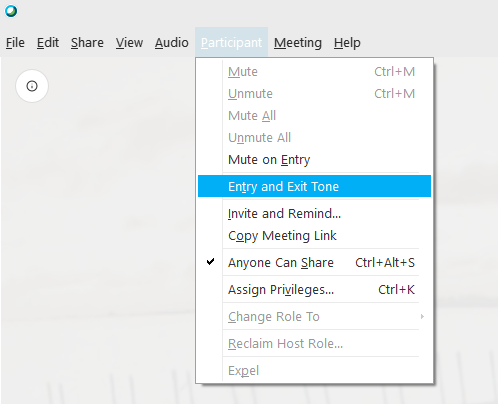
Turn off entry and exit tones if you don't want to hear the 'ding' every time a participant joins and leaves. To do so, click the 'Participant' tab at the top of the window and untick 'Entry and Exit Tone'.
Locking a meeting
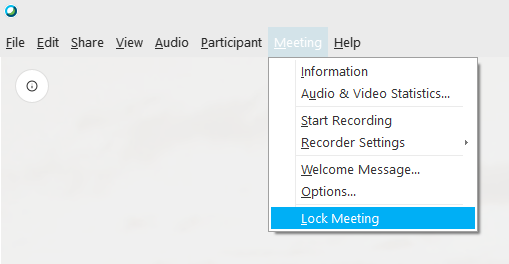
If you would like to lock your meeting to prevent any additional participants from joining, click the 'Meeting' tab at the top of the window and then click 'Lock Meeting'.
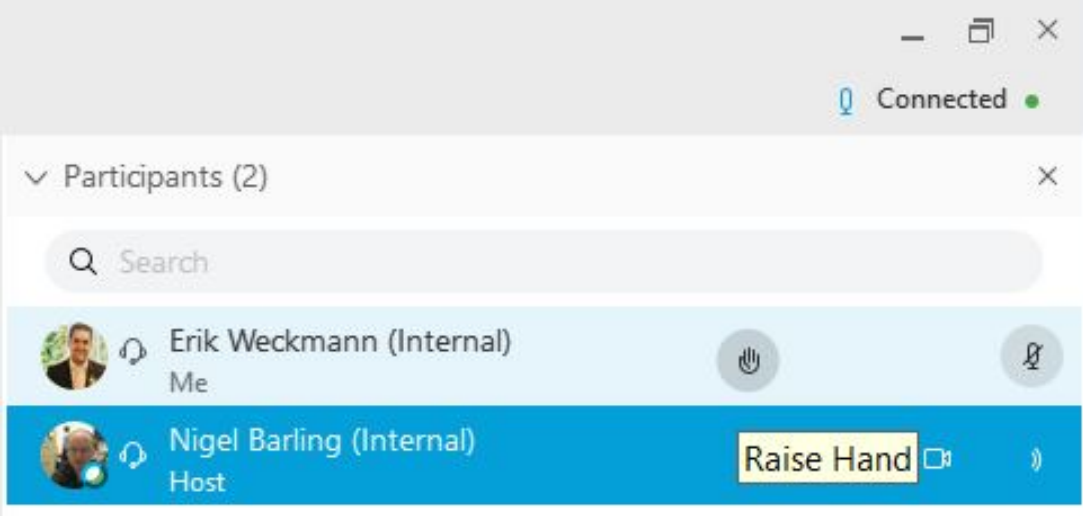
The raise hand feature
One way participants can get your attention or respond to an impromptu poll is to use the raise hand feature. Participants simply click the icon to raise their hand, or lower their hand. Let your participants know about this feature at the start of the meeting so that you can take advantage of it later on if required.
External collaborators can join and participate in Webex Meetings in the same way as CSIRO staff. Note however that some organisations do not allow staff to install applications (like Webex Meetings) on their machines. If your external collaborator is unable to install the Webex Meetings desktop application, kindly advise them that a web application is also available that does not require installation.
Refer to Joining a meeting using the web app for more information.
Information on how to connect from external video conferencing rooms can be found on https://conferencing.csiro.au/external-collaborators.php
External collaborators can use their SIP cable video conferencing rooms to dial into CSIRO hosted Webex Meetings. The number that needs to be dialled is included in the standard Webex Meetings invite - it will take the format meetingNumber@csiro.webex.com. Full details can be found on https://conferencing.csiro.au/external-collaborators.php
Note: Webex Meetings may have multiple Cohosts, but only one person will be the Host at any point in time.
The Host may be:
- The original Host i.e. the person who scheduled the meeting OR
- A Cohost who was automatically assigned the Host role in the original Host's absence.
Some features listed below are only available to the Host. Keep in mind who the Host is may change if the original Host joins a meeting late, thereby demoting the existing Host to Cohost status.
| Feature | Host | Cohost | Presenter | Attendee |
|---|---|---|---|---|
Join a meeting at the scheduled time with audio and video
|
✓ | ✓ | ✓ | ✓ |
| Share content | ✓ | ✓ | ✓ | ✓ |
| Start a meeting early | ✓ | ✓ | ||
Mute or unmute other attendees
|
✓ | ✓ | ||
| Record a meeting | ✓ | |||
| Create and open polls | ✓ | |||
| Respond to poll questions | ✓ | ✓ | ✓ | |
| View poll results | ✓ | ✓ | ✓ | |
| Permit or prevent attendees unmuting themselves after the Host or Cohost mutes them | ✓ | ✓ | ||
| Move attendees to and from the lobby | ✓ | ✓ | ||
| Expel attendees | ✓ | ✓ | ||
| Manage breakout sessions | ✓ | ✓ | ||
| Join breakout sessions to help attendees | ✓ | ✓ | ||
| End the meeting | ✓ | ✓ | ||
| Lock or unlock the meeting | ✓ | ✓ | ||
| Breakout Sessions | ||||
| Join or leave your assigned breakout session | ✓ | ✓ | ✓ | ✓ |
| Start or stop your video during a breakout session | ✓ | ✓ | ✓ | ✓ |
| Mute or unmute your audio during a breakout session | ✓ | ✓ | ✓ | ✓ |
| Share content during a breakout session | ✓ | ✓ | ✓ | ✓ |
| Use Chat to message others in your breakout session | ✓ | ✓ | ✓ | ✓ |
| Ask for help during a breakout session | ✓ | ✓ | ||
| Enable breakout sessions for a meeting | ✓ | |||
Create and start breakout sessions
|
✓ | ✓ | ||
| Add, rename, or delete a breakout session | ✓ | ✓ | ||
| Move or exchange attendees in breakout sessions | ✓ | ✓ | ||
| Remove a participant from a breakout session | ✓ | ✓ | ||
| Respond to a request for help in breakout sessions | ✓ | |||
| Broadcast a message in breakout sessions | ✓ | |||
| Ask all participants to return to the main meeting | ✓ | ✓ | ||
| End all breakout sessions | ✓ | ✓ | ||
Breakout sessions allow meeting Hosts to separate participants into several smaller groups, and then bring them back to the main meeting when ready. This is great when smaller groups need to discuss a particular topic without broadcasting that discussion into the main meeting; perfect for virtual-workshop-style events. Hosts can drop into breakout sessions to see how everyone is going, and when ready, bring everyone back into the main meeting or send a broadcast message requesting that everyone return to the main meeting.
Breakout sessions are enabled by default on all Webex Meetings. Up to 100 breakout sessions can be created per meeting, and participants can leave and join breakout sessions as many times as they want during a meeting. To understand the roles of Host, Cohosts and Attendees in breakout sessions, refer to Roles and Permissions.
In a hurry? Check out our Host and Attendee cheat sheets:
Important: Breakout sessions can't be joined from video conferencing rooms, the Webex Teams application, or by phone only attendees (including attendees who 'Call In' but don't enter their attendee ID). These attendees will remain in the main meeting. If you're using the desktop app and calling in, make sure you enter your attendee ID when prompted - to find your attendee ID, see Finding your call-in attendee ID.
Important: If an attendee joins a meeting after breakout sessions have started, or an attendee leaves and rejoins a meeting, they will be placed in the main meeting and will need to be assigned to a breakout session.
Show transcript
Webex Meetings breakout sessions are an exciting new feature that allow meeting Hosts to split attendees into several smaller groups to collaborate and share ideas, and then bring them back to the main meeting when ready. This is great for workshop style events, or for when smaller groups need to discuss particular topics separately to the main meeting.
Screen tip: Now available in all Webex Meetings.
As Host or cohost, all you need to do to enable breakout sessions is click the ‘Breakout’ menu at the top of the meeting window, and then click ‘Enable Breakout Sessions’. You’ll notice that the ‘Breakout sessions’ option will now appear alongside your main meeting controls, so you’re almost ready to start creating the sessions and assigning attendees. But before you do, it’s recommended that you take two preparatory steps. First, enable the ‘Participants’ panel so you have greater visibility of who is in the main meeting, and who is in the breakout sessions once they’re started. Attendees should also be encouraged to keep the ‘Participants’ panel open as important information will be displayed here during the sessions. Second, it’s recommended that you assign one or more Cohosts to help you manage the meeting. Cohosts are a new Webex Meetings role which has similar powers to the Host – so they can mute or unmute participants, and join and leave breakout sessions as they wish. To grant the Cohost role, simply right-click on an attendee’s name, click ‘Change Role To’ and then click ‘Cohost’.
Screen tip: Don’t worry about the Presenter role – this role is automatically assigned when someone shares their screen.
Screen tip: Cohosts replace the previous Alternate Host role. If you added Alternate Hosts to your meeting when scheduling, these people will now automatically become Cohosts.
Screen tip: Cohosts can be specified when scheduling a meeting from Outlook.
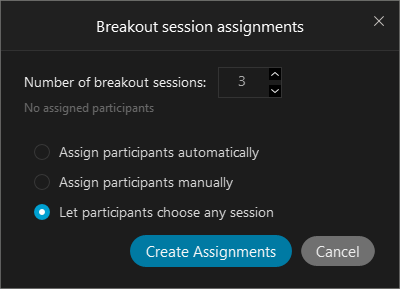
With the participants panel open and some cohosts assigned, you’re now ready to create the sessions and assign attendees. Click ‘Breakout sessions’ and enter the number of sessions you would like – in this case we’re opting for 3. Next, select how you would like the attendees to be assigned to the sessions, either ‘Automatically’ or ‘Manually’. We’ll manually assign attendees today, but if you selected ‘Automatically’ attendees would be evenly distributed across the number of sessions. When you’re ready, click ‘Create Assignments’.
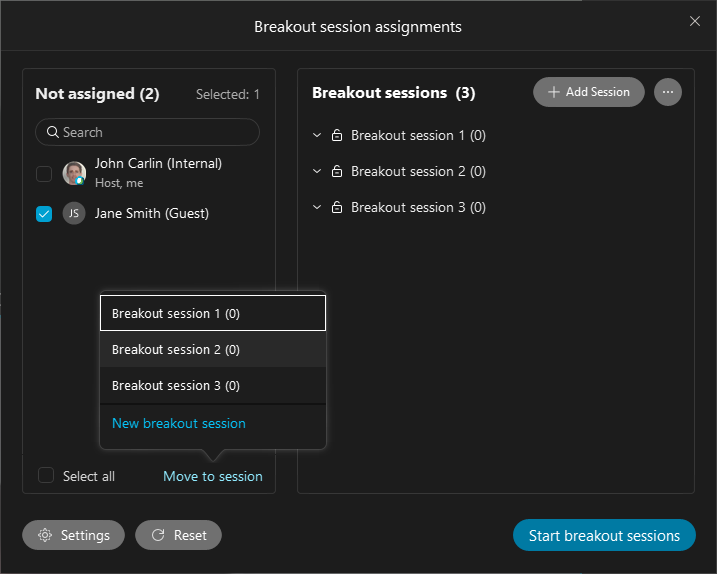
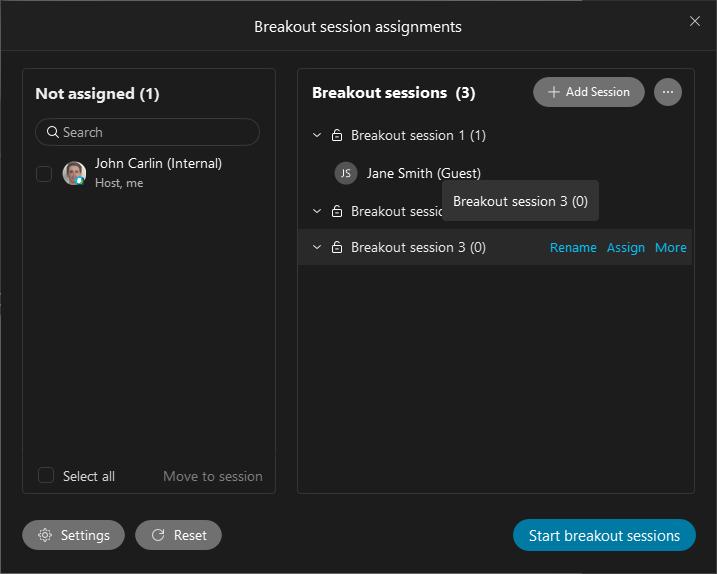
On the breakout session assignments screen you can add and remove sessions, or rename them to something more meaningful. In this case we’re going to use a fruit theme. To assign attendees to the different sessions, simply tick the names of the people you want to assign, and then click ‘Move to session’.
Screen tip: Breakout sessions can't be joined from a video conferencing rooms, the Webex Teams application, or by phone only participants (including attendees who have used ‘Call In’ but not entered their attendee ID). These attendees will remain in the main meeting.
Screen tip: Attendees can only join the breakout session they have been assigned to.
Screen tip: Hosts and Cohosts can join any breakout session they wish.
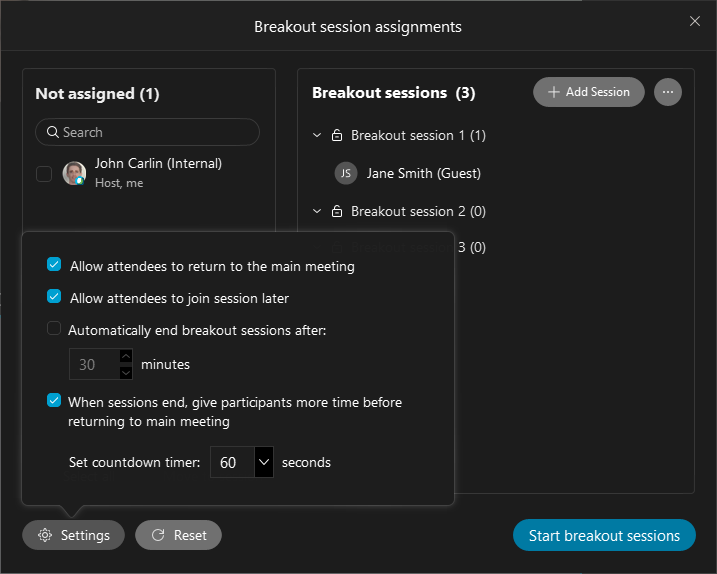
There are several settings that can be configured which control the way breakout sessions are managed - to access these, click ‘Settings’. For this demo we’re going to use the default settings. These give a good overall experience, but feel free to tweak these settings to suit your individual meeting needs.
Screen tip: explain the different settings and what they do.
Once you’re happy with everything and ready for attendees to join the breakout sessions, click ‘Start breakout sessions’.
#switch to attendee view
Attendees will receive a prompt on their screen asking them if they would like to join the session now or later. When they click ‘Join now’, they will be moved into the breakout session, with their audio and video connections automatically switching across. Breakout sessions function like a normal Webex Meeting, so attendees can see and hear each other, use the chat feature, and share their screens.
Screen tip: Breakout session chats are not shared to the main meeting.
Screen tip: Annotation, Whiteboarding, and Polling features are not yet available in breakout sessions.
If at any point an attendee would like help from the host or cohosts, they can reach out using the ‘Ask for help’ feature. This notifies the hosts and cohosts so they can join the appropriate breakout session and lend a hand.
#switch back to host view
In addition to responding to requests for help, hosts and cohosts can move, exchange, or remove attendees while the sessions are in progress. The ‘Remove’ feature is useful for moving an individual attendee back to the main meeting, while the exchange feature can be very useful in a guest speaker scenario. Rather than having to move all the attendees around, the guest speakers can simply be exchanged with one another to move them between the different breakout sessions.
Screen tip: Android and iPhone attendees can’t be moved once the breakout sessions have started.
Hosts and cohosts can also send broadcast messages with guiding questions for discussion, or to give everyone the heads up that the sessions will be closing soon. To send a broadcast message, click ‘Broadcast’, select which sessions you would like to send the message to, and specify if you would like to send the message to all attendees, or just cohosts and presenters. Type your message and then click ‘Send’ - attendees will see this come through as a pop up on their screen.
When you would like everyone to return to the main meeting, click ‘End all breakout sessions’. This will start the countdown timer for attendees – when the countdown reaches zero, they will be automatically moved back into the main meeting. Note that upon re-entering the main meeting, attendees are muted to prevent any breakout discussions from accidentally being broadcast to the whole group.
Screen tip: Cohosts and the Presenter are not automatically muted on re-entry.
With everyone back in the main meeting you can proceed as normal, noting that you can start and end the breakout sessions as many times as you like. And that’s it, you’ve just learnt how to use the breakout sessions feature to further enhance your Webex Meetings. Be sure to schedule a test meeting with some friends and try it out.
If the primary focus of my meeting is breakout spaces, is there anything I should add to the invite when booking the meeting?
Attendees that join a Webex Meeting using a video conferencing room, audio only, or 'Call In' without specifying their attendee ID will not be able to participate in breakout sessions. For this reason it's recommended that you include the following text when scheduling a meeting that is likely to use the breakout sessions feature. Simply copy the text below and paste it into the body of your Webex Meeting invite before sending it to attendees.
Please note:
This Webex Meeting will be using breakout sessions for group discussions.
Please connect using the 'Desktop or Mobile Devices' link from a desktop or mobile device (make sure your mobile app is updated to the latest 40.9 version). If using 'Call In' for audio, be sure to enter your attendee ID so that you can participate in breakout sessions -to find your attendee ID, see Finding your call-in attendee ID.
Attendees that join using a video conferencing room, the Webex Teams app, audio only, or 'Call In' without specifying their attendee ID will not be able to participate in the breakout sessions.
For further information, please refer to CSIRO's Working from Home site.
To create breakout sessions:
Note: If you want to pre-assign attendees to breakout sessions before a meeting starts, please refer to the Pre-assigning attendees to breakout sessions section below.
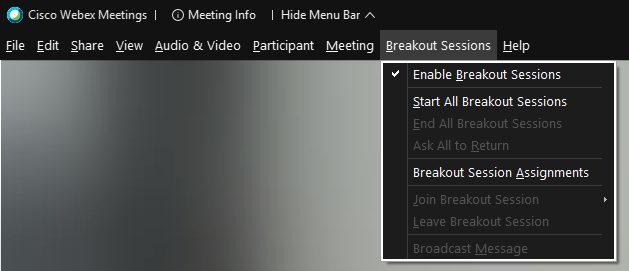
- From the menu bar click 'Breakout Sessions' -> 'Enable Breakout Session'.
- Select the number of breakout sessions you would like, and the assignment method.
-
Click 'Create assignments'.
- If you opted for manual assignment, click on an unassigned attendee's name and then click 'Move to' to assign them to the appropriate room.
- If required, rename, or add and remove rooms.
-
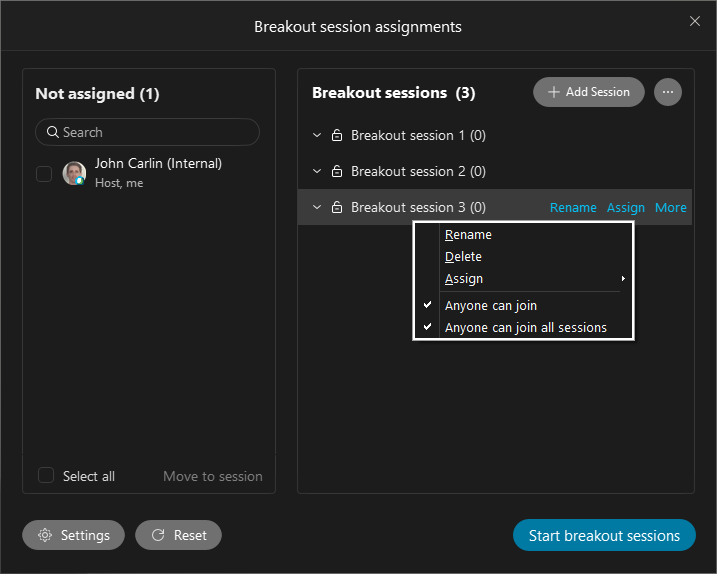
Allow participants to join any session or a specific session by right-clicking on the session name and ticking the appropriate option.
- Configure breakout session options such as automatically close rooms after X minutes, and display a countdown timer for X seconds before closing.
-
When ready, click 'Start Breakout Sessions'.
To join a breakout session:
- When prompted, click 'Join session'.
- You will be automatically connected to the breakout session with audio, video, and screen sharing capabilities.
- To leave a breakout session, simply click the red door icon.
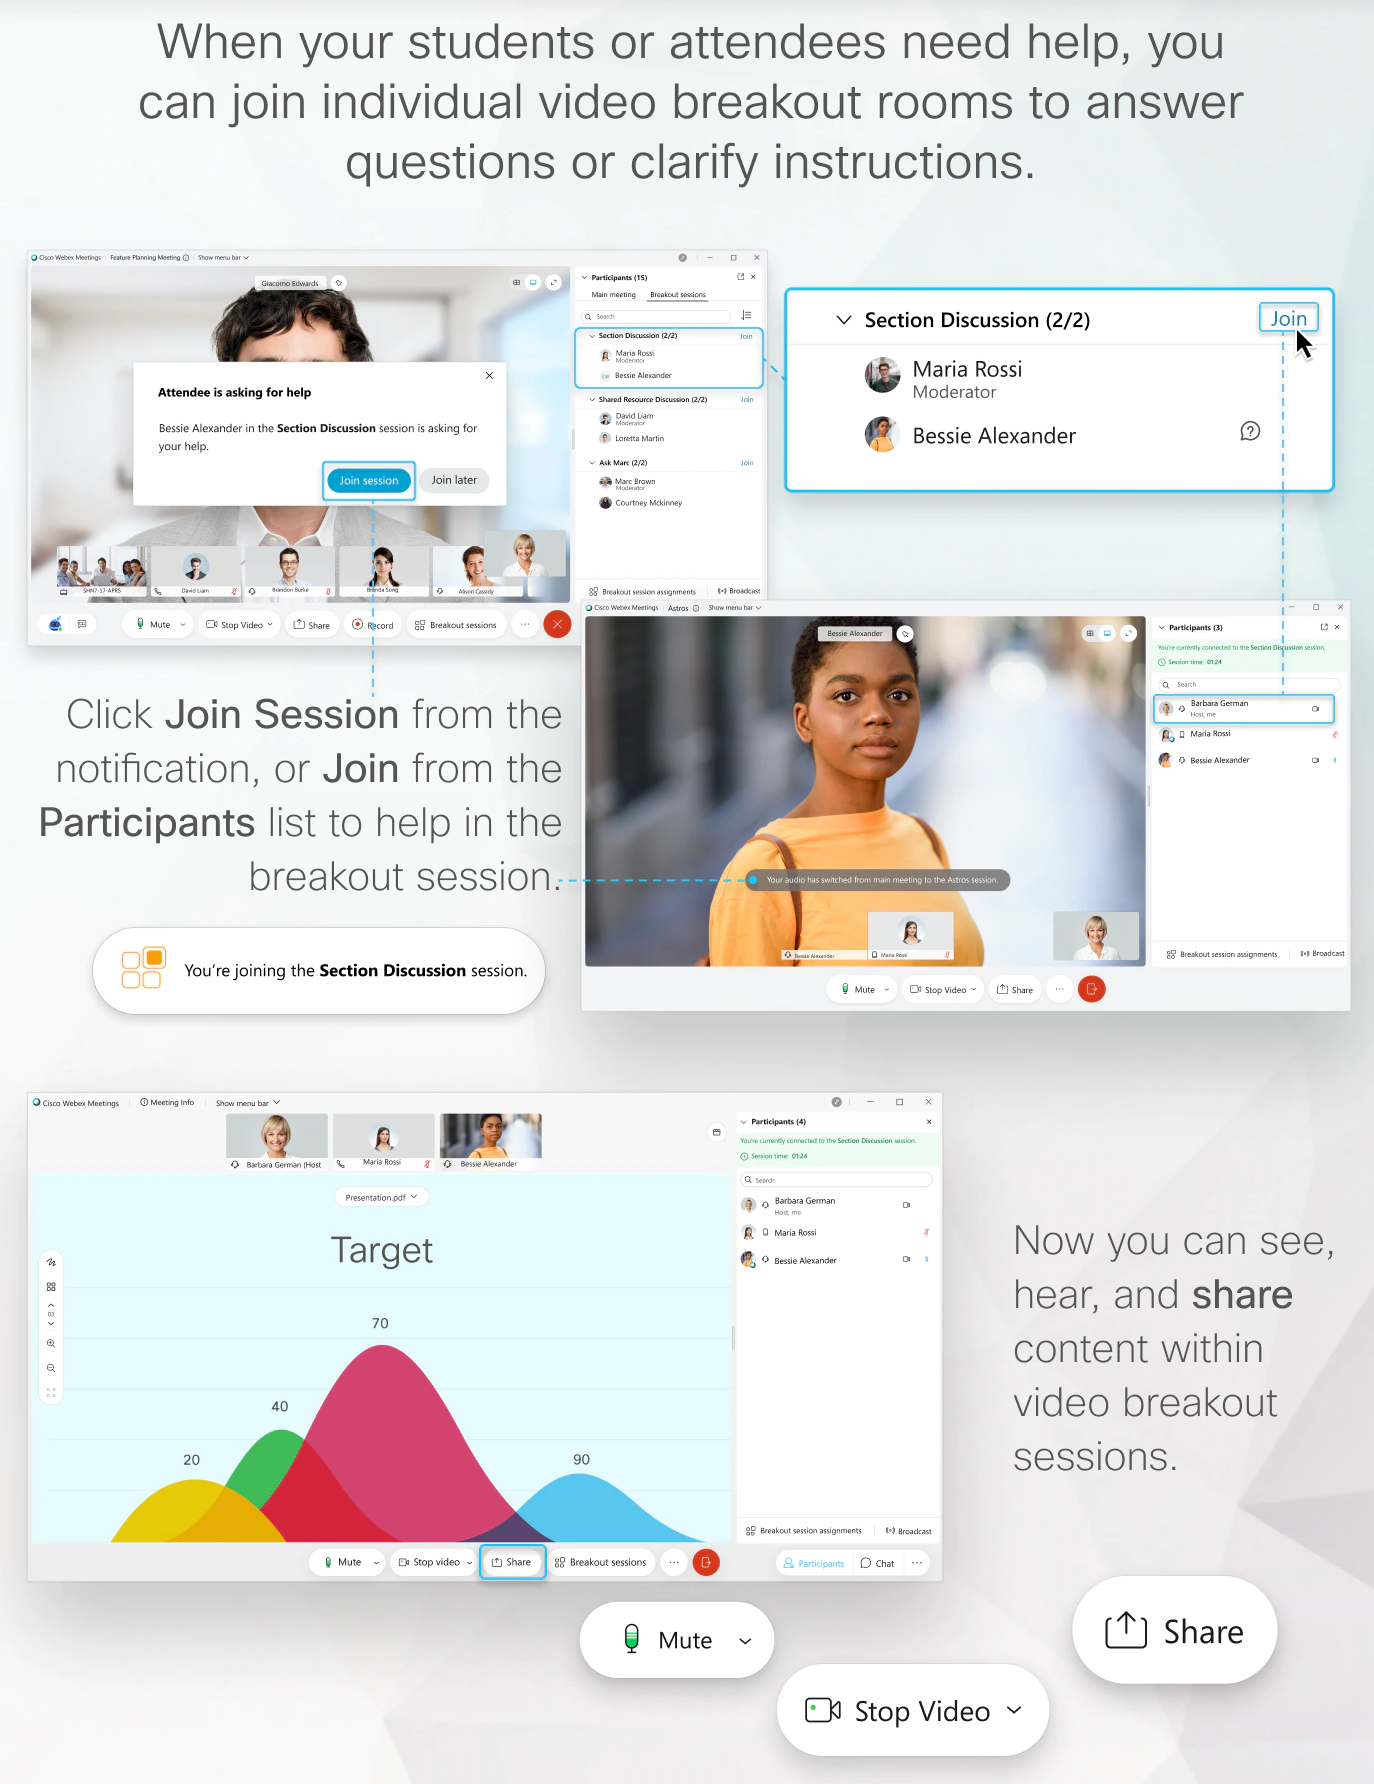
 Joining a breakout session.
To broadcast a message into breakout sessions:
- Click 'Broadcast'.
- Select which breakout sessions you would like to broadcast to.
- Type your message and click 'Send'.
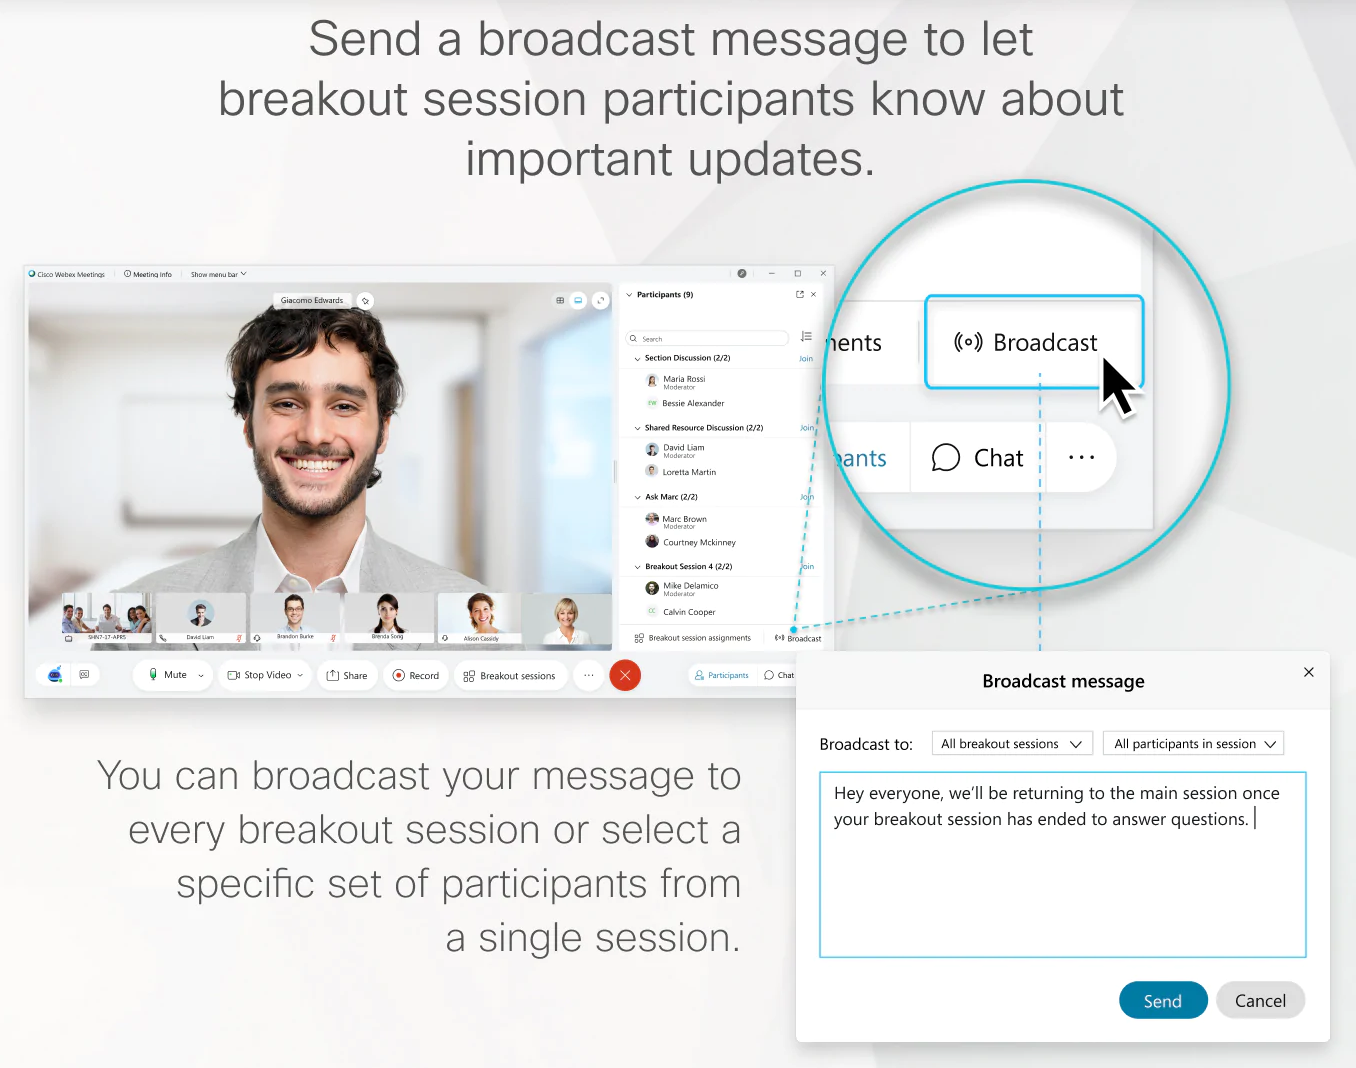
 Broadcasting a message into breakout sessions.
As the meeting scheduler you can pre-assign attendees to breakout sessions. However this can only be done when scheduling via csiro.webex.com, it can't be done when scheduling via Outlook. Once the meeting has been scheduled on csiro.webex.com you will need to create a separate Outlook meeting to have it appear in attendee calendars.
To pre-assign attendees to breakout sessions:
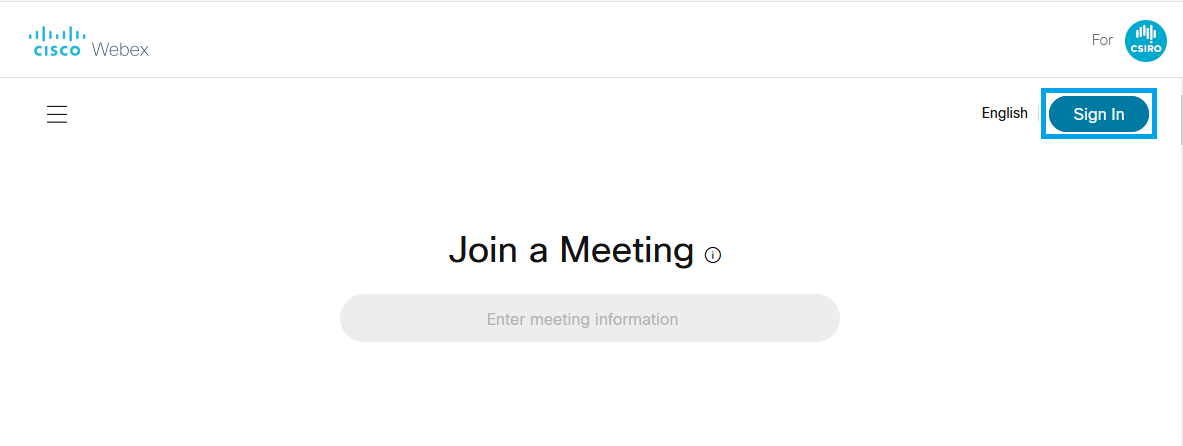
- Navigate to https://csiro.webex.com and click 'Sign In'.
- From the menu on the left click 'Meetings', and then click 'Schedule'.
- Set the meeting topic, date, time and add all attendees.
-
If you won't be attending the meeting yourself, assign one or more co-hosts so they can manage the breakout sessions. To do so, hover over an attendee's name and tick the 'Make this attendee as cohost' option.

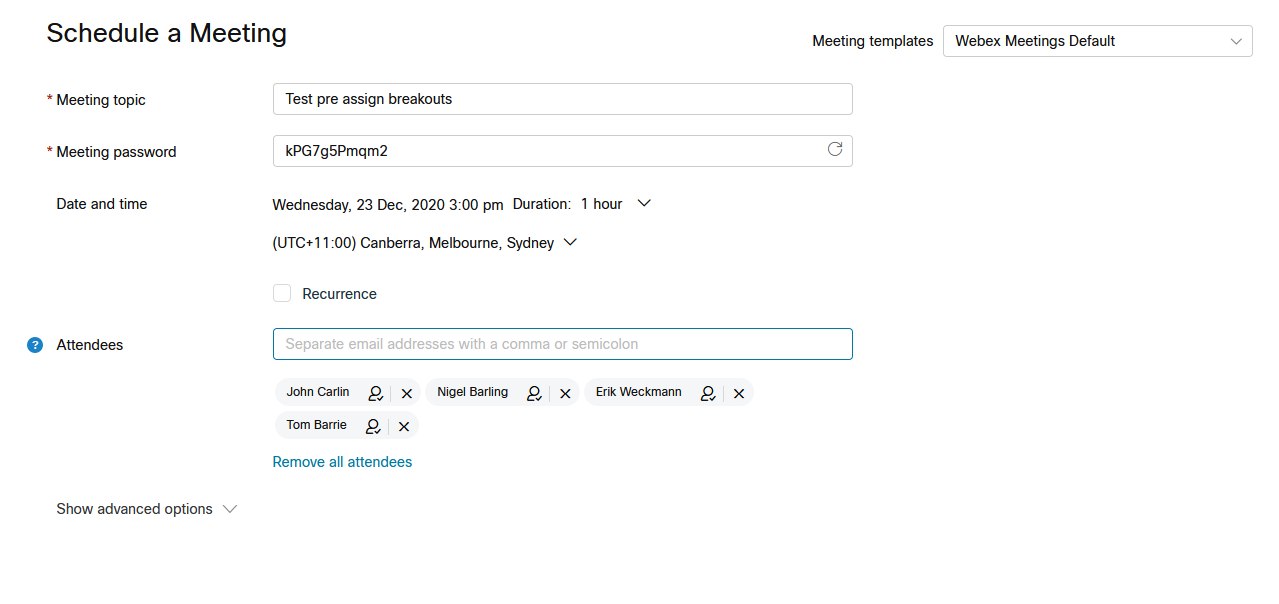

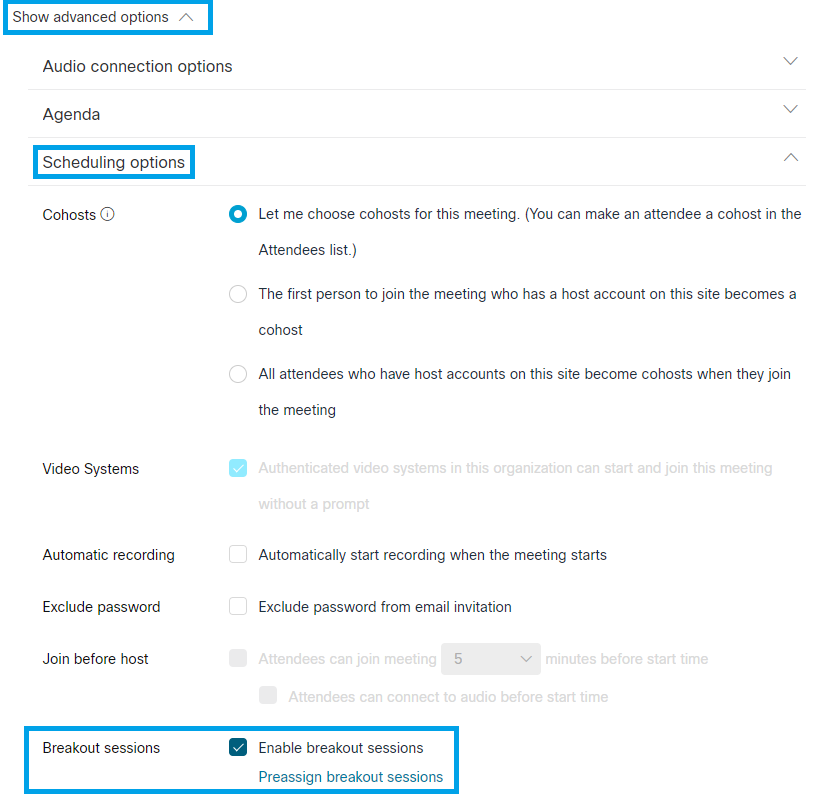
- Expand the 'Show advanced options' section, tick 'Enable breakout sessions', then click 'Preassign breakout sessions'.
- Choose how many breakout sessions you would like and whether you want to automatically or manually assign attendees, then click 'Create'.
- If you have a large number of attendees, you can prepare the pre-assignments using Excel. To do so, click 'Import from CSV', download the CSV format template, and then upload it when complete.
-
To assign attendees manually, tick the names of attendees you wish to assign, click 'Assign to' and select the appropriate breakout session.
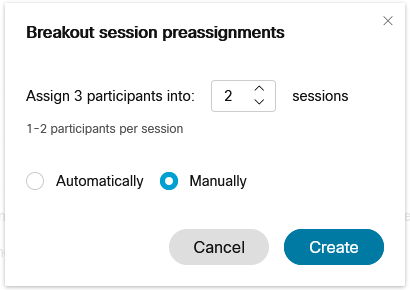
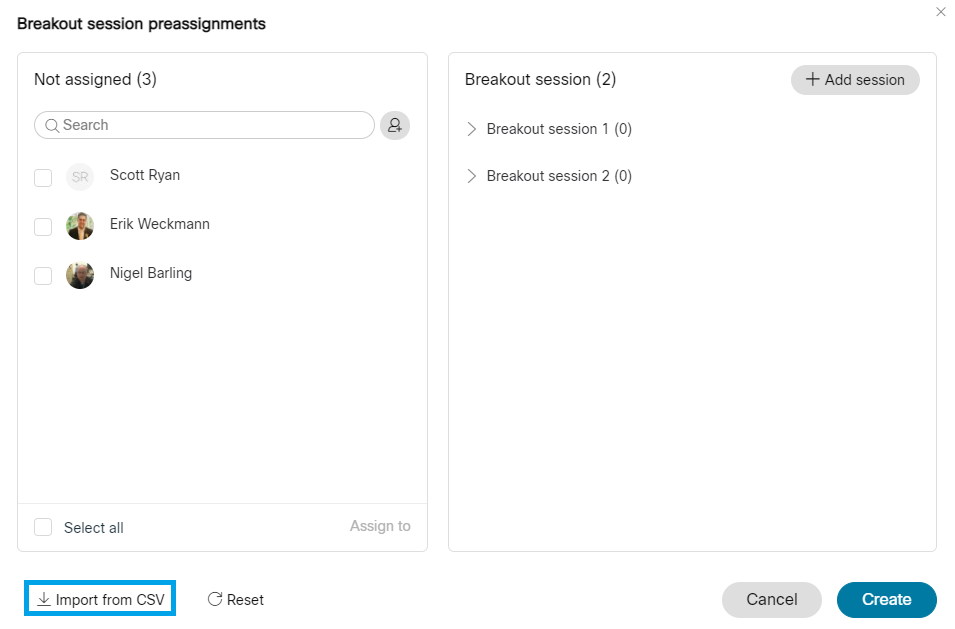
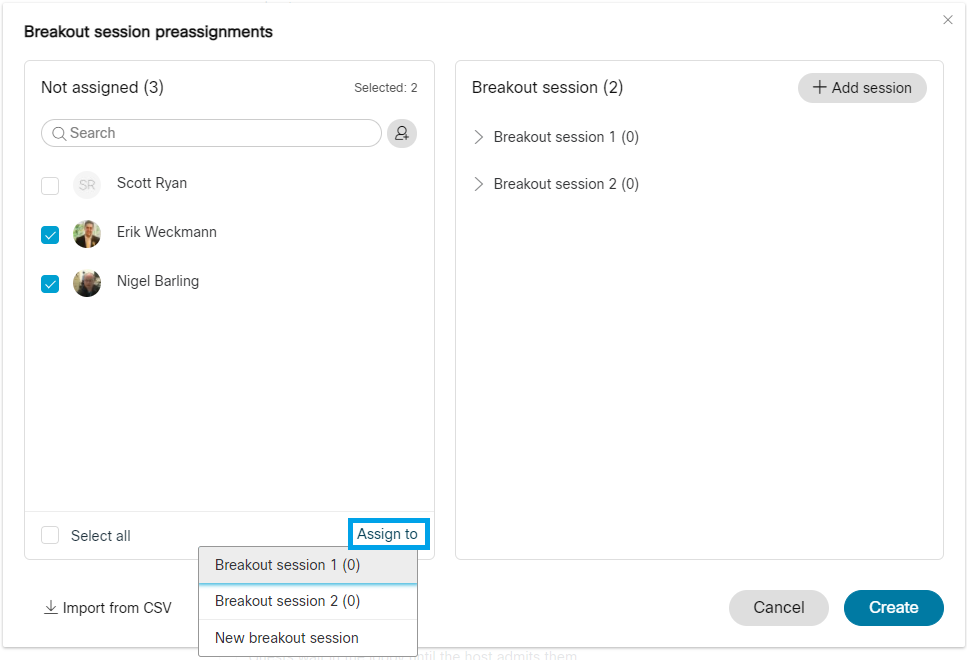
- Once all attendees have been assigned to a breakout session, click 'Create'.
-
Double check the meeting details and then click 'Schedule'. All attendees will receive an email with the meeting details, however they won't receive an Outlook calendar appointment. You will need to manually create a calendar appointment in Outlook and copy the details over.
Note: if you want to change any details of the meeting including the date or time, you will need to do so using csiro.webex.com and copy the updated details to the Outlook calendar appointment you originally created.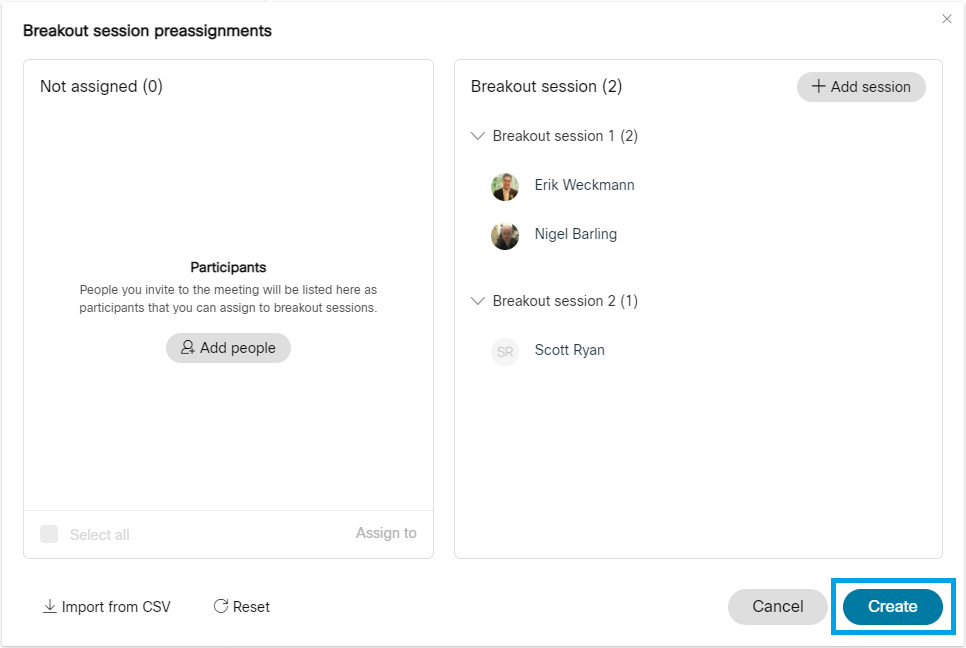
Webex Meetings lobby rooms are virtual waiting rooms that give Hosts the opportunity to review who is trying to join their meeting, before admitting them. This is very useful for Webex Meetings where people will be coming and going at different times during the day – Hosts can now ensure that only the appropriate people are connected at the appropriate time.
To enable lobby rooms for a meeting, hosts simply need to lock the meeting - participants who join after this time will be automatically placed into the lobby. Hosts can also manually move a participant from the main meeting back into the lobby, and then re-admit them when ready. To understand the roles of Host, Cohosts and Attendees with regards lobby rooms, refer to Roles and Permissions.
Note: Video conferencing rooms cannot be manually moved back into a lobby room once connected to the main meeting - this feature is coming soon.
To lock a meeting and enable the lobby:
- Click the 3 dots and then click 'Lock Meeting'.

 Locking a meeting to enable the lobby.
To admit a participant from the lobby into the meeting:
- Click the participants who are waiting in the lobby notification.
- Select an individual participant to admit, or click 'Signed In' or 'Guests' to admit all participants.
- Click 'Admit'.
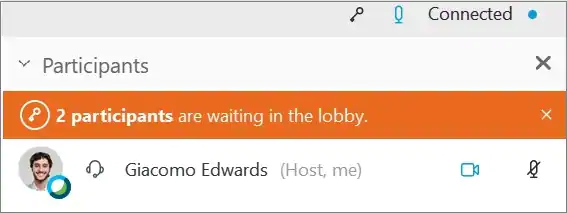
 Participants are waiting in the lobby notification.
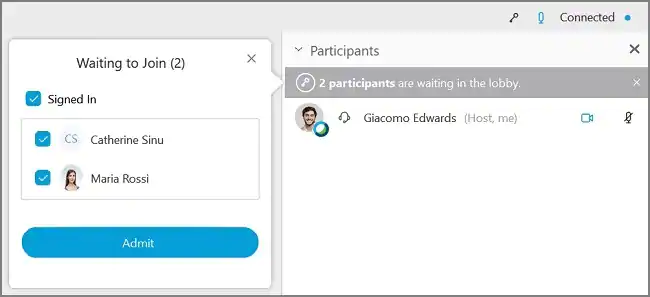
 Admitting lobby participants back into the meeting.
To move a participant back into the lobby:
- Make sure the 'Participants' panel is visible.
- Right-click on a participant and then click 'Move to Lobby'.
Note: When a participant is moved to the lobby, they can't hear or see any of the content being shared or interact with anyone in the meeting, or anyone else in the lobby.
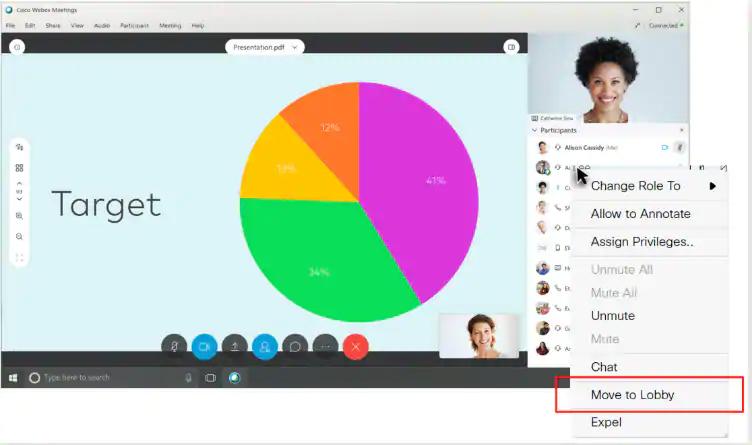
 Moving a participant into the lobby.
To help Hosts manage Webex Meetings including the breakout session and lobby room features, Hosts can now assign Cohosts. Cohosts have similar privileges as the original Host so they can mute participants, admit people from the lobby, and join and leave breakout sessions as required. For a full list of what Cohosts can do, refer to Roles and Permissions. As Host you can assign as many Cohosts as you like.
To assign a Cohost on the fly:
- Make sure the 'Participants' panel is visible.
- Right-click on a participant, hover over 'Change Role To' and click 'Cohost'.
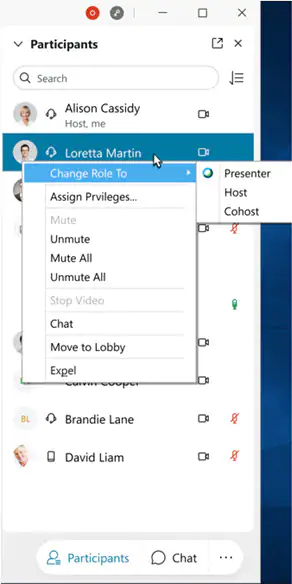
 Assigning the Cohost role to a participant.
What are Personal Meeting Rooms?
Personal Meeting Rooms or PMRs are persistent Webex Meetings dedicated to you. PMRs are available 24/7 and the connection details always remain the same, so they’re ideal for meetings that aren’t specific to a project or task. PMRs have all the same features of regular Webex Meetings and can be accessed from any device.
Some examples of when you might use your PMR:
- One on ones with your direct reports.
- Oops I forgot to add Webex Meetings...that's ok, we can just use my PMR today.
- It would be great if we could record this...jump into my PMR!
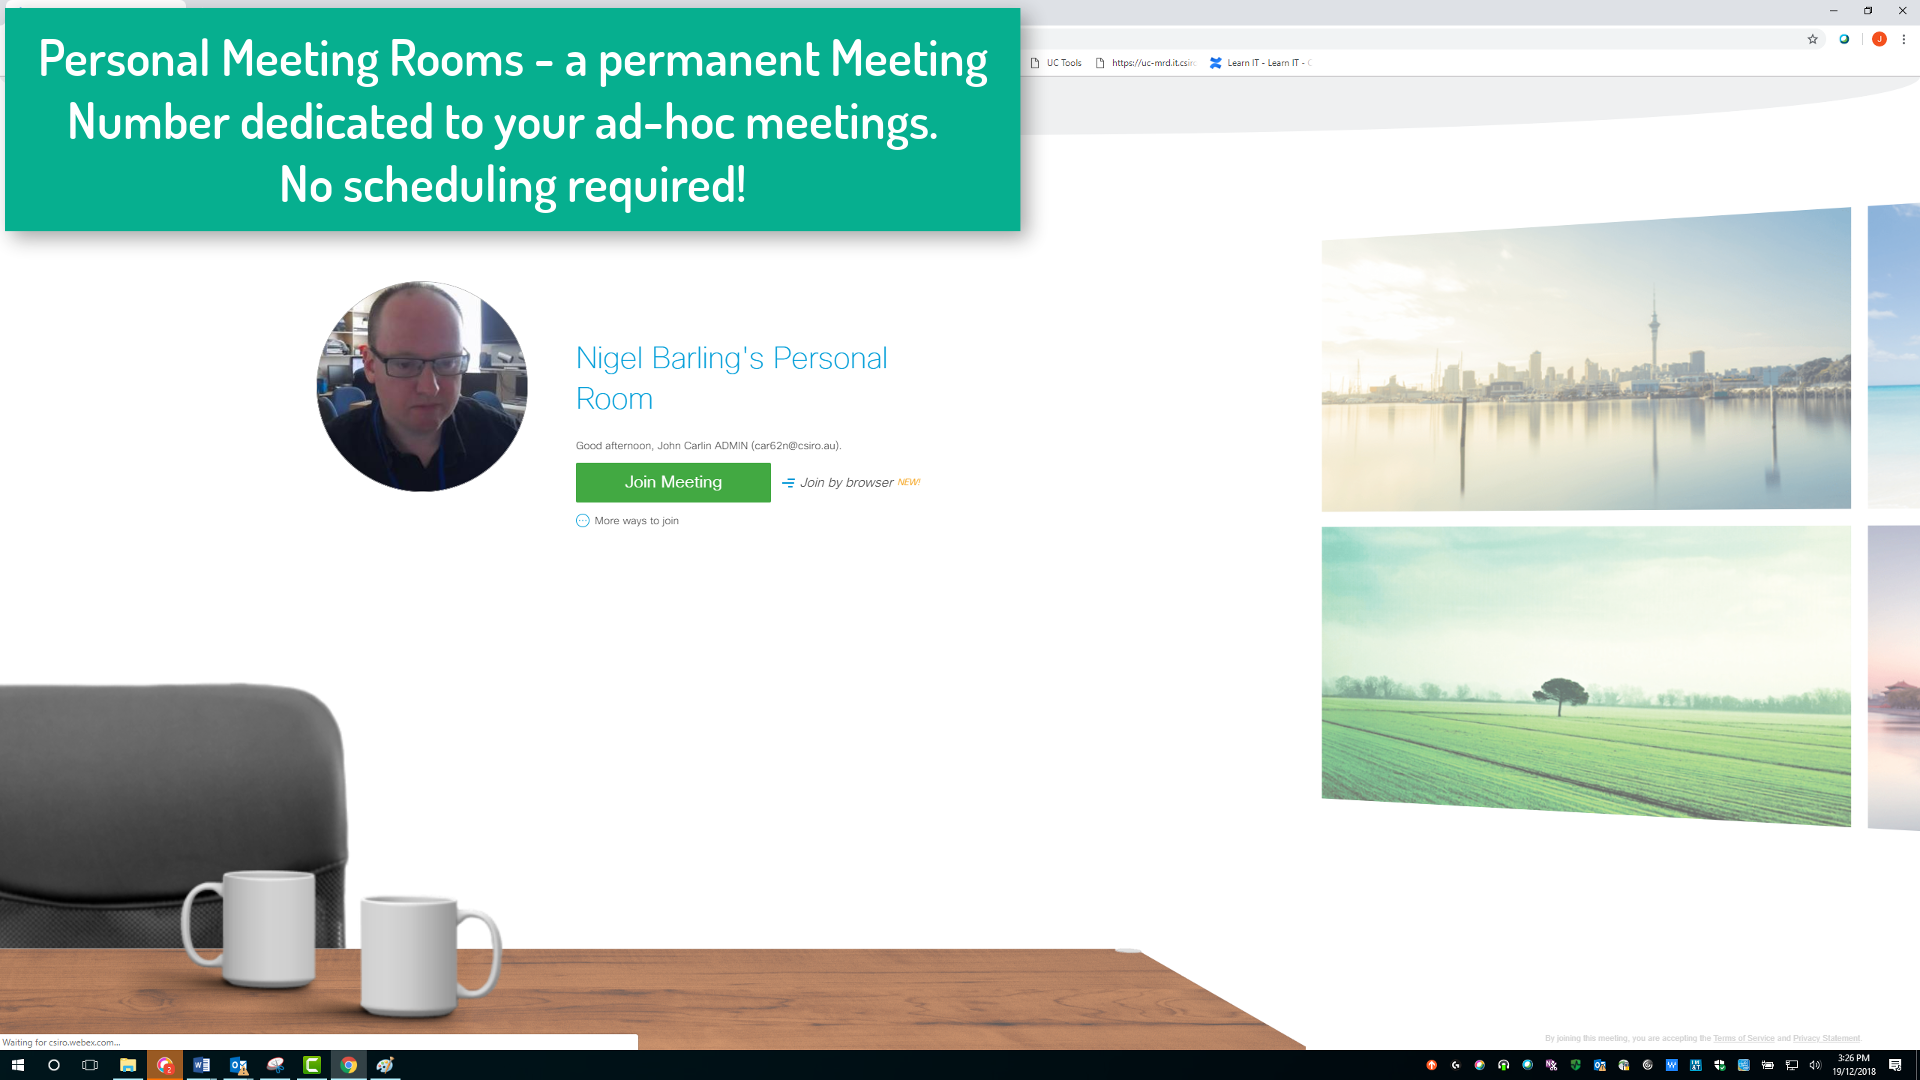
 Personal Meeting Rooms - lobby screen.
How are Personal Meeting Rooms different to regular Webex Meetings?
Personal Meeting Rooms are the same as normal Webex Meetings, so you can still connect from any device and access any feature. The only difference is that PMRs are available 24/7, so they don't need to be scheduled, and the connection details (meeting number and join link) always remain the same.
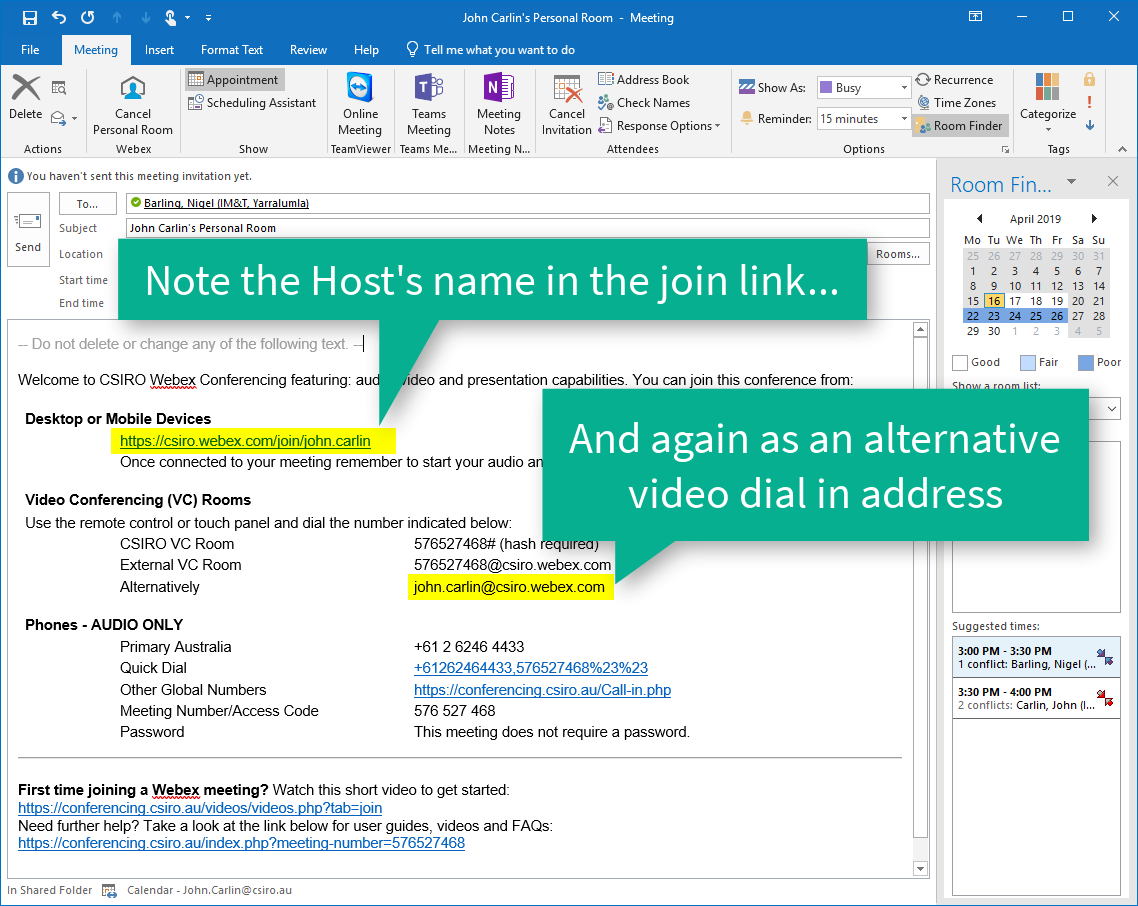
 Webex Meetings invite showing Personal Meeting Room differences.
How do I invite people to my Personal Meeting Room?
There are two main ways to invite people to your PMR; from Outlook or from Webex App. To invite people from Outlook, create a new meeting request, expand the ‘Add Webex Meeting’ tab and click ‘Add Personal Meeting Room’. Alternatively, you can click ‘Meet Now’ from Outlook to start the PMR on the spot, and then use Webex Meetings’s invite and remind feature to notify participants.
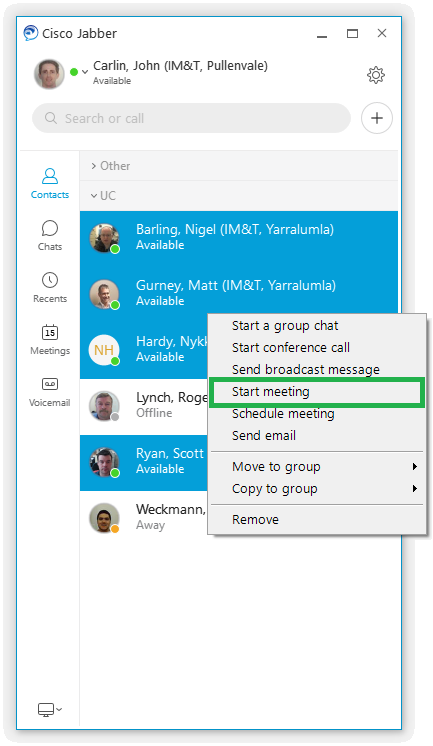
To invite people to your PMR from Webex App, right click on the person or group you would like to collaborate with and click ‘Start meeting’. Those invited will get a Webex App pop-up asking them to join the meeting.
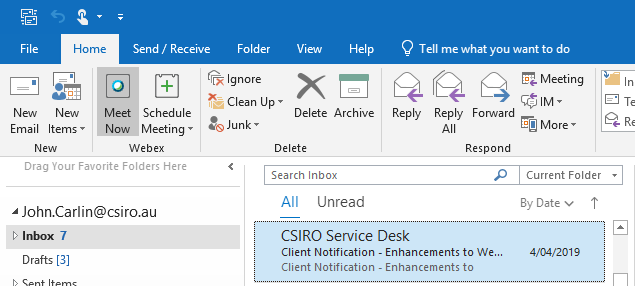
What should I be mindful of as Host of my Personal Meeting Room?
Personal Meeting Rooms are the same as normal Webex Meetings, but due to PMRs being available 24/7 there are some extra security controls. As Host of your PMR, be mindful of the items below to ensure a good experience for attendees.
- As Host, you must join your PMR before other attendees can join.
- If you're trying to join your PMR from a VC room, make sure you answer 'Yes' when asked 'Are you the Host?'. Your PMR Host PIN can be found on https://csiro.webex.com/cmr-settings.
- Attendees that try joining before you have joined as Host will be placed in the meeting lobby.
- PMRs auto lock after 15 minutes. Attendees that try joining while your meeting is locked will be placed in the meeting lobby.
-
You will be prompted when someone is waiting in the meeting lobby and will have to let them in. You may also choose to 'unlock' your meeting (Meeting -> Unlock Meeting) to prevent additional attendees from having to wait in the lobby.

Hosts can record Webex Meetings and capture audio, video, and screen sharing. Note that the Host role can be assigned to another participant (including external participants) but the recording will always be sent to the original Host - i.e. the person who originally scheduled the meeting.
Important: You must always advise participants before you start recording.
Show transcript
To record a Webex Meeting click the Recorder icon and then click Record. After the recording has started a notification will appear in the top right corner of the screen which is visible to all participants.
As Host you will also see the option to Pause or Stop the recording. Pausing and Resuming has the same effect as cropping a recording on the fly, only a single playback file will be generated. Stopping and starting on the other hand will generate multiple playback files so it’s best to use the Pause/Resume options until you’re ready to stop recording altogether.
If you are sharing your screen you can still manage a recording, just move your mouse to the top of the screen being shared and then click Recorder.
And that’s it, you’ve just successfully recorded a Webex Meeting.
To start recording, simply click the record icon and then click 'Record'. Use the pause and resume buttons to pause and resume recording - this has the same affect as cropping a recording on the fly and will generate a single playback file. When you've finished recording altogether, click the stop button.
Participants are automatically notified when recording has started, stopped, or been paused.
Recordings capture audio, video and screen sharing for viewing via a web browser.
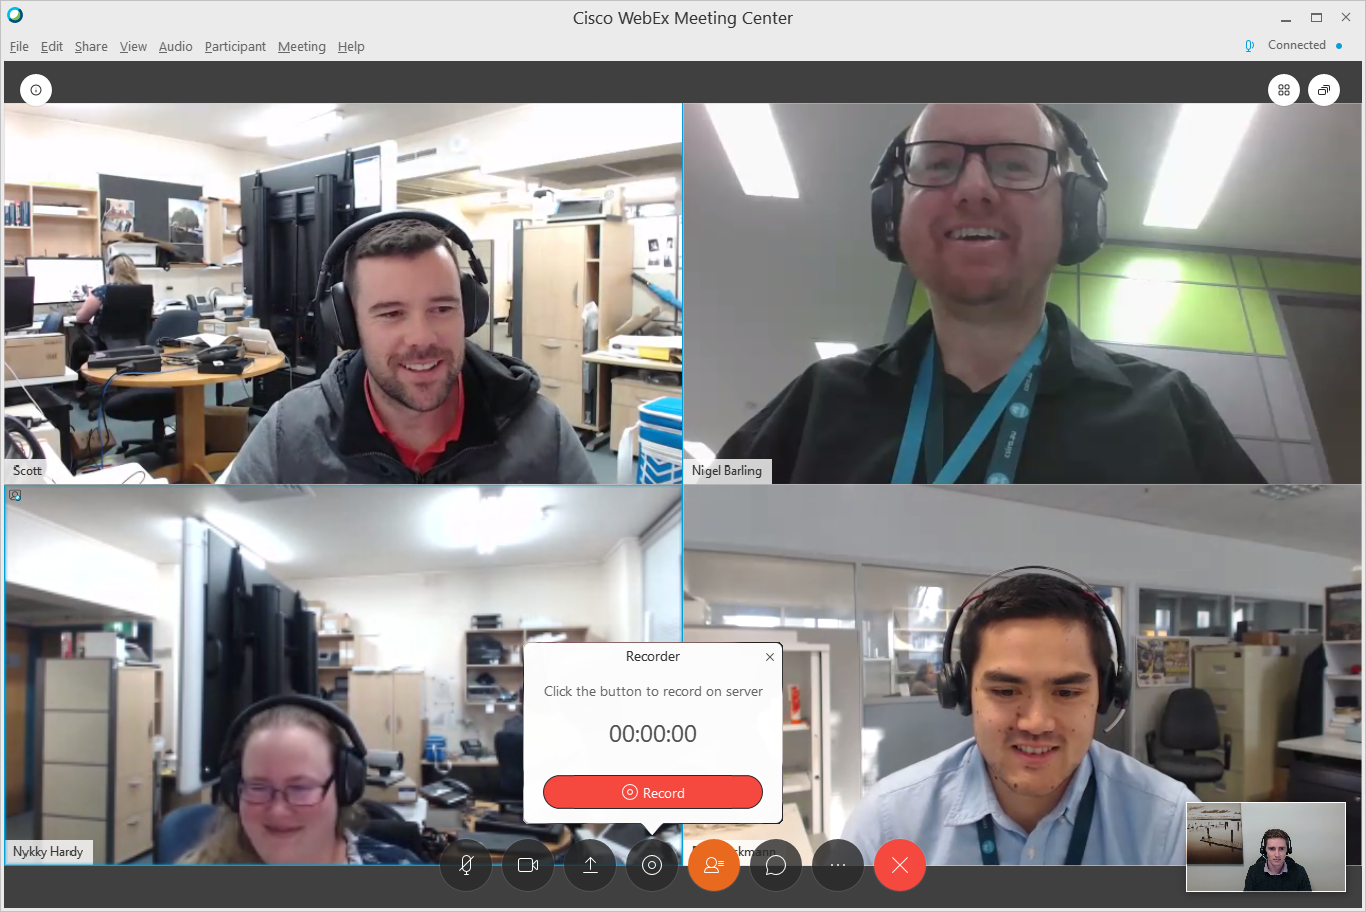
 Starting a Webex Meetings recording.
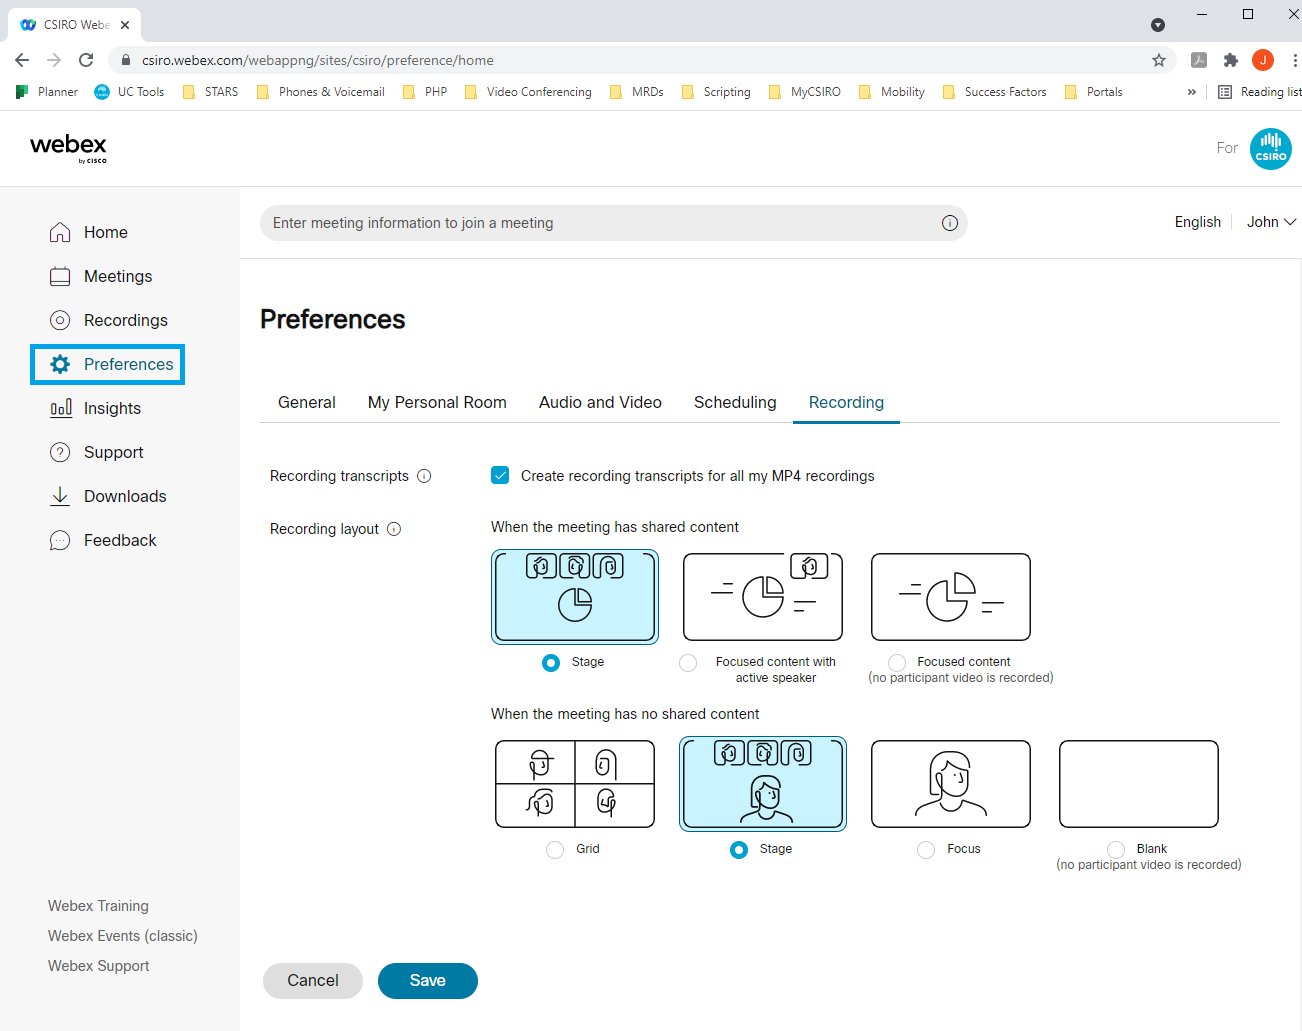
Meeting owners can choose from several different layouts for their Webex Meetings recordings. This only impacts new recordings, existing recordings keep their current layout. There are different layout options for meetings with video only and meetings with video and shared content.
To change your recording layouts:
- Open a web-browser and navigate to https://csiro.webex.com.
- Click 'Preferences'.
-
Select your preferred layouts and then click 'Save'.
All Webex Meetings recordings are accessed via the csiro.webex.com site. Only the recording owner (original Host) can view a recording unless he or she has sent out an email link to participants. To access a recording that you are the owner of:
- Open a web-browser and navigate to https://csiro.webex.com.
- Click 'Sign In' and then click 'Recordings' from the left menu.
- Click the recording title to play the recording, or hover over the icons to download, share, or edit the title of the recording.
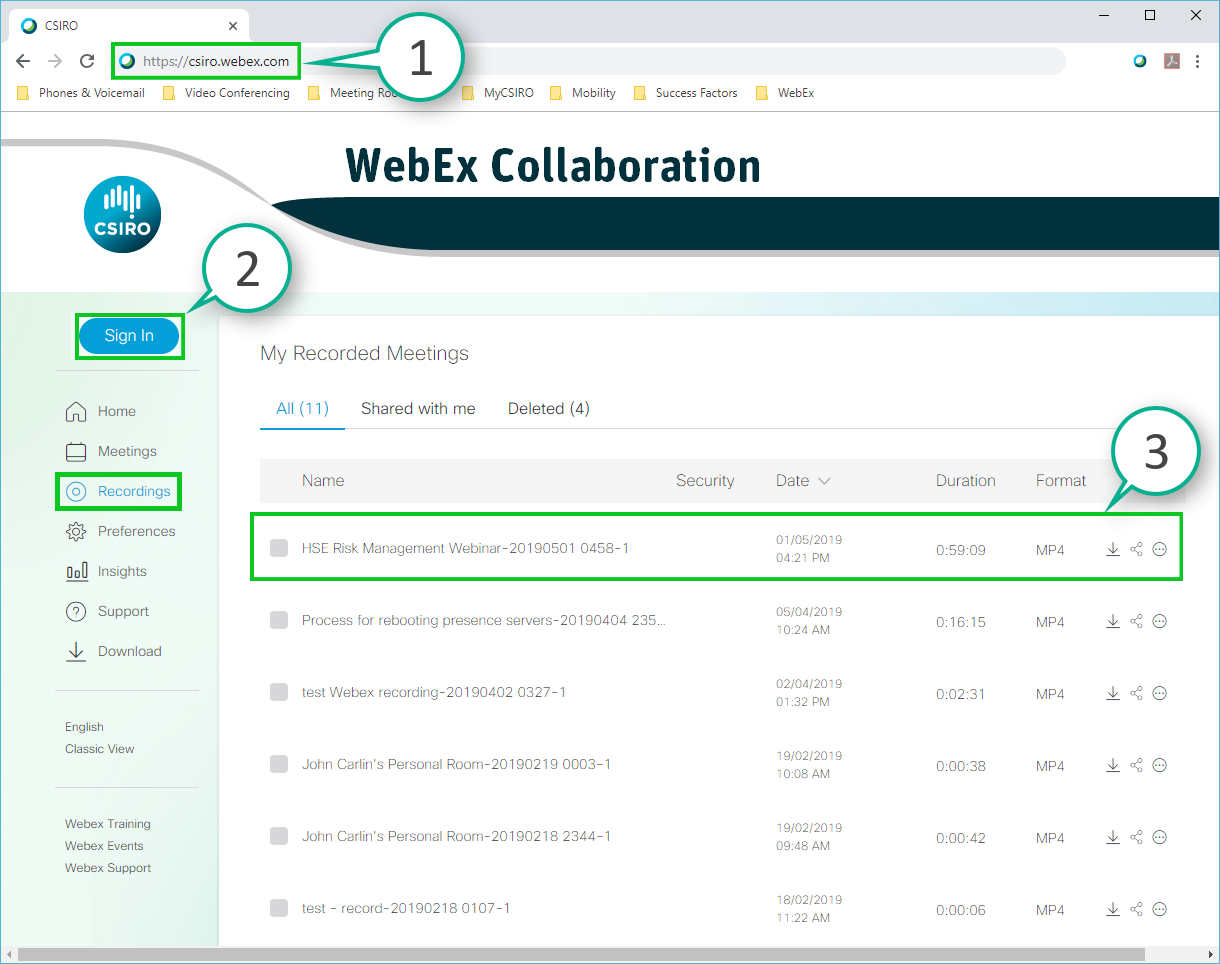
 Accessing a Webex recording.
Webex Meetings recordings can be trimmed to remove unwanted footage from the start and end of a meeting. To do so:
- Open a web-browser and navigate to https://csiro.webex.com.
- Click 'Sign In' and then click 'Recordings' from the left menu.
- Click the recording title to play the recording.
-
From the playback window, click settings and then click 'Edit playback range'.
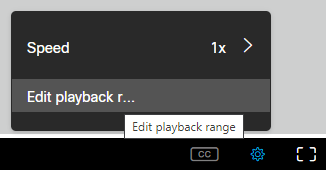
- Click and drag the 'playback start control' and 'playback end control' as required - you can test out the new range by playing the recording.
- When you're happy with the new range, click 'save playback range'.
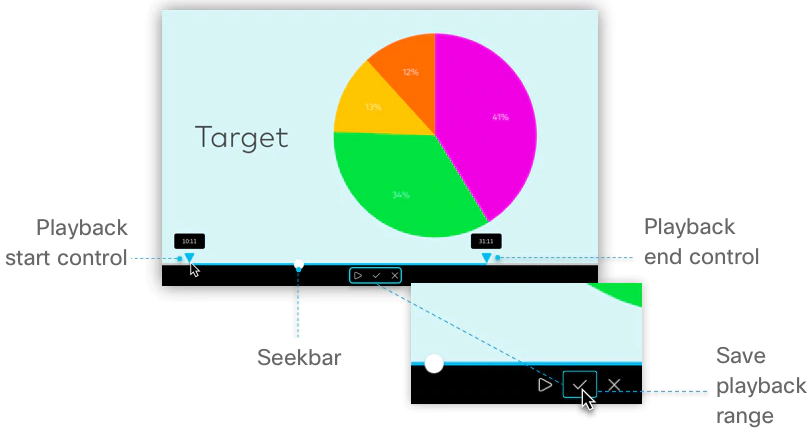
 Trimming a Webex Meetings recording.
Webex Meetings uses privileges to determine what participants can and cannot do. Hosts are granted the highest privileges available and are responsible for managing meetings.
When you schedule a Webex Meeting you (or the person you are booking on behalf of) are automatically designated the Host. If you cannot attend, you will need to arrange an alternate Host by updating your meeting booking or by sending the Host key to another participant. To find the Host key (you must already be Host to perform these steps):
- Open the meeting invite in Outlook.
- Click 'Host Information' found in the Webex Meetings tab; the Host key will be displayed.
-
If you're joining from a video conferencing room, enter this Host key when prompted to access Host-only features from the touch panel.
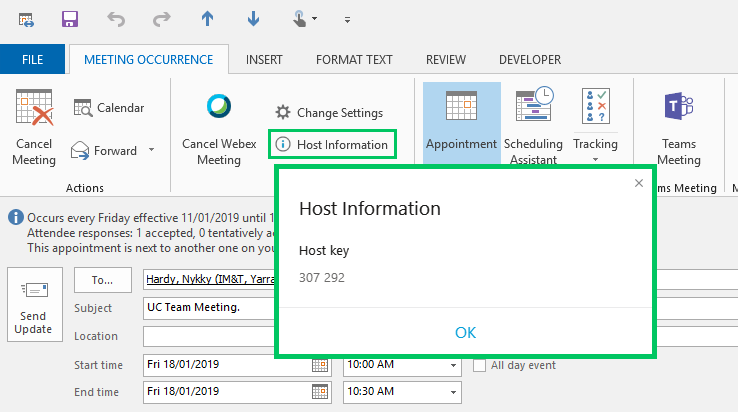
 Viewing Host information in Outlook.
From the participant's end:
- Join the meeting and click 'Participant' > 'Reclaim Host role'.
- Enter the 'Host key'.
-
Click 'OK'.
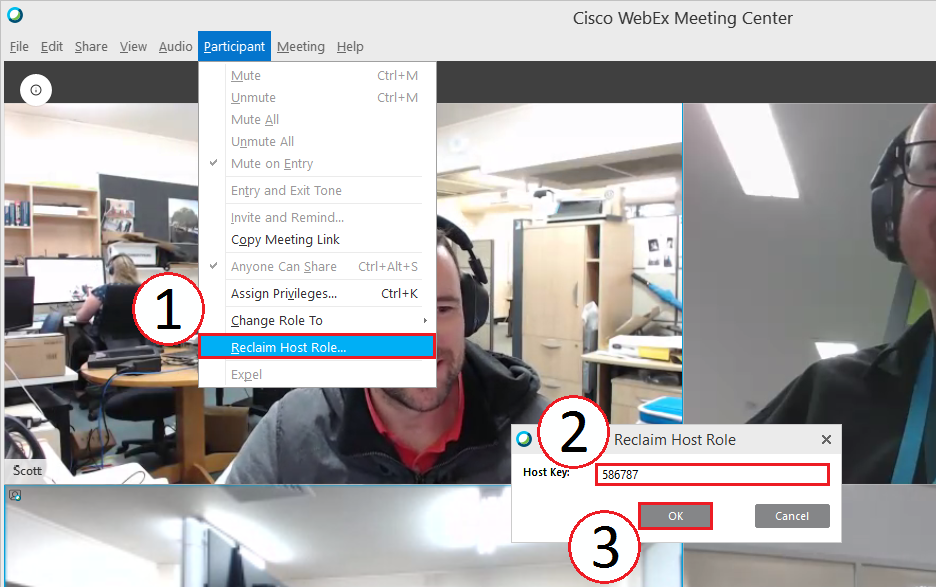
 Reclaiming the Host role in Webex Meetings.
On Windows and Mac you can now choose your own image for a custom virtual background, select a standard Webex Meetings image, or blur your actual background for privacy.
To use a custom background click the add new button (+) under 'Change Background' and select a jpg or png image. For best results, use an image that is greater than or equal to 1280 x 720 pixels. Note that if you just want to blur out your real background, you can do so by clicking 'Blur'.
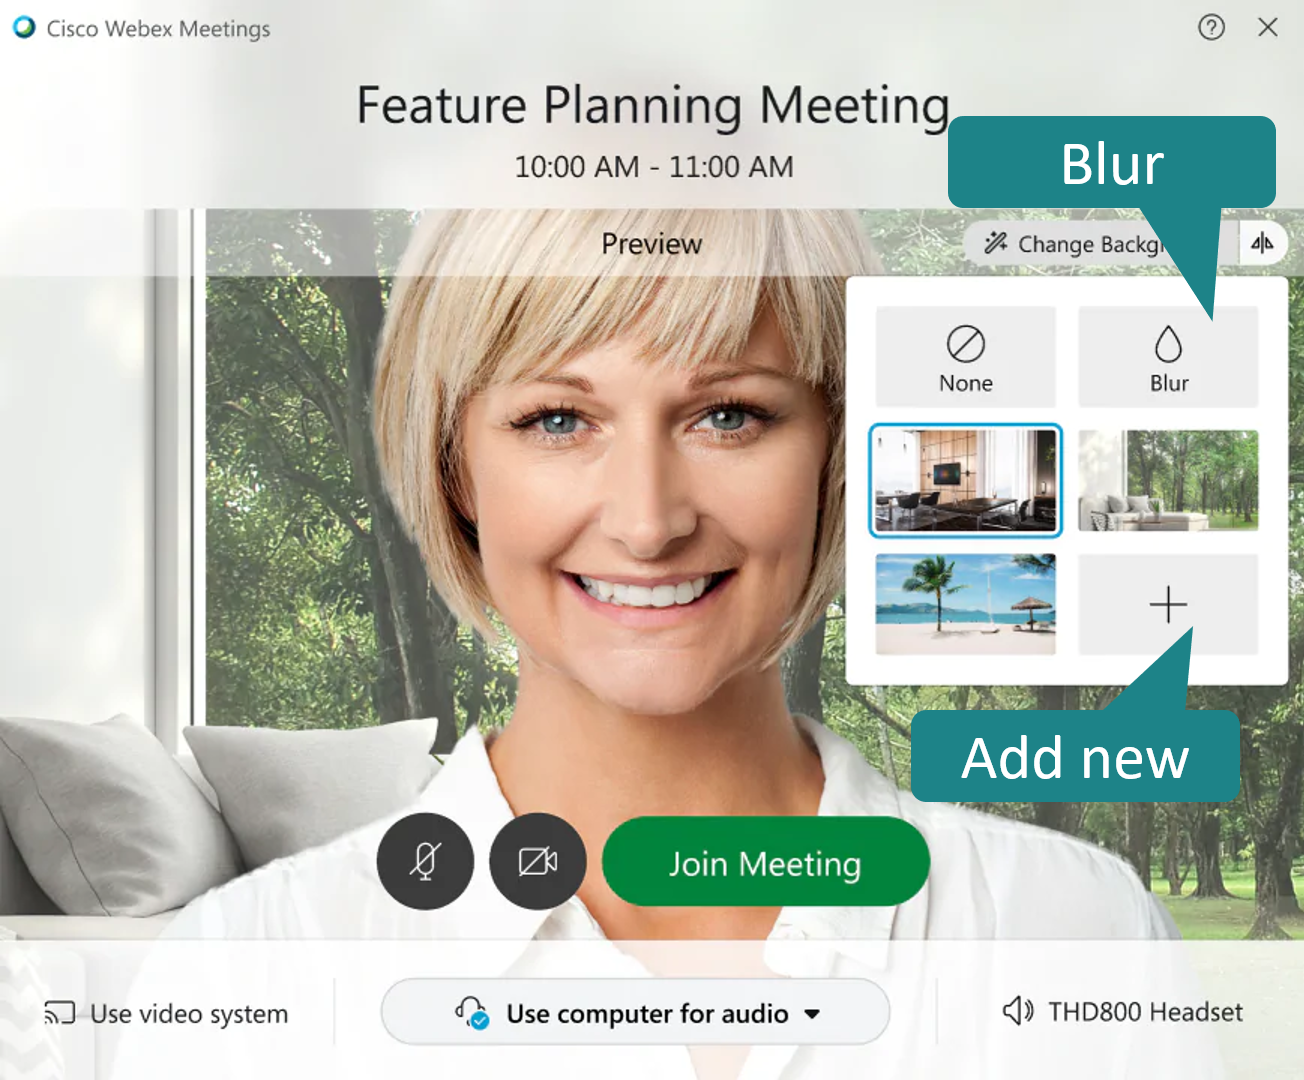
 Before joining a meeting - virtual background options including blur and add new custom background.
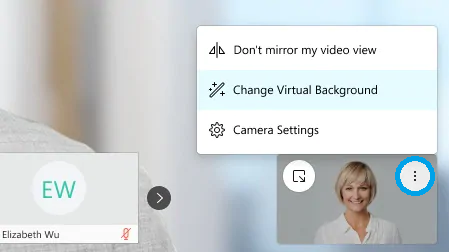
 During a meeting - accessing the virtual background controls.
Note: virtual backgrounds are CPU intensive, so if you receive an insufficient bandwidth or CPU warning, consider closing any unnecessary background applications. If Webex Meetings detects that a laptop or desktop is not a high enough specification to support virtual backgrounds the option will not be displayed.
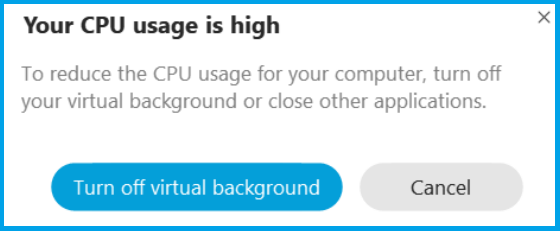
 'Your CPU usage is high' warning.
CSIRO Brand and Marketing has produced a collection of CSIRO images that can be used as virtual backgrounds - click the 'Download' link to save an image to your computer and then follow the instructions above to add the image to your Webex Meetings.
Note: CSIRO logo may appear blurry in grid view when used as a custom virtual background and should only be used when needed. Logo will appear reversed to you when mirror self view is enabled (default) but will appear correct to other participants.

 Antennas - Download

 Black Mountain - Download

 Corporate - Download

 Energy - Download

 Feather - Download

 Plants - Download

 Robot - Download

 Virus - Download

 Wheat - Download
Please Note: Logo's may appear blurry in grid view when used as a custom virtual background and should only be used when needed. Logo will appear reversed to you when mirror view is enabled (default) but will appear correct to other participants.
You can now share videos with audio into a Webex Meeting from your desktop. To do so:
- Click the share screen button.
- Select 'Optimize for motion and video' from the drop-down list.
- Tick 'Share your computer audio'.
- Click 'Share' on the screen or application you wish to share.
-
Play your video!

To create a new whiteboard:
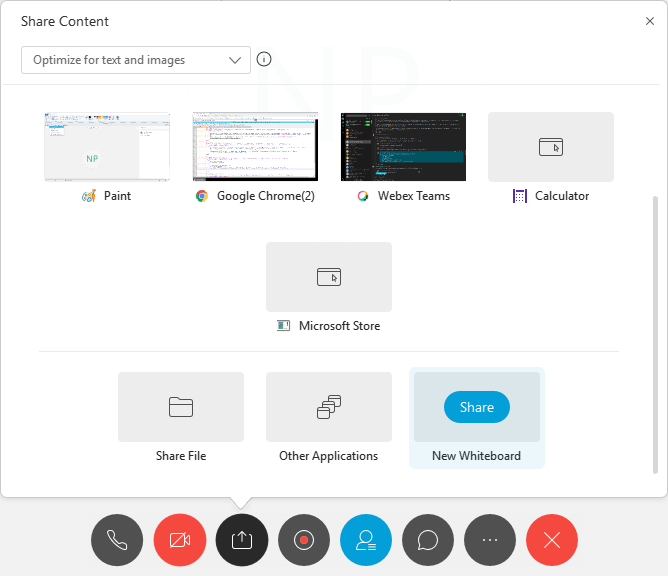
- Click 'Share' -> 'Share Content'.
- Click 'New Whiteboard'.
-
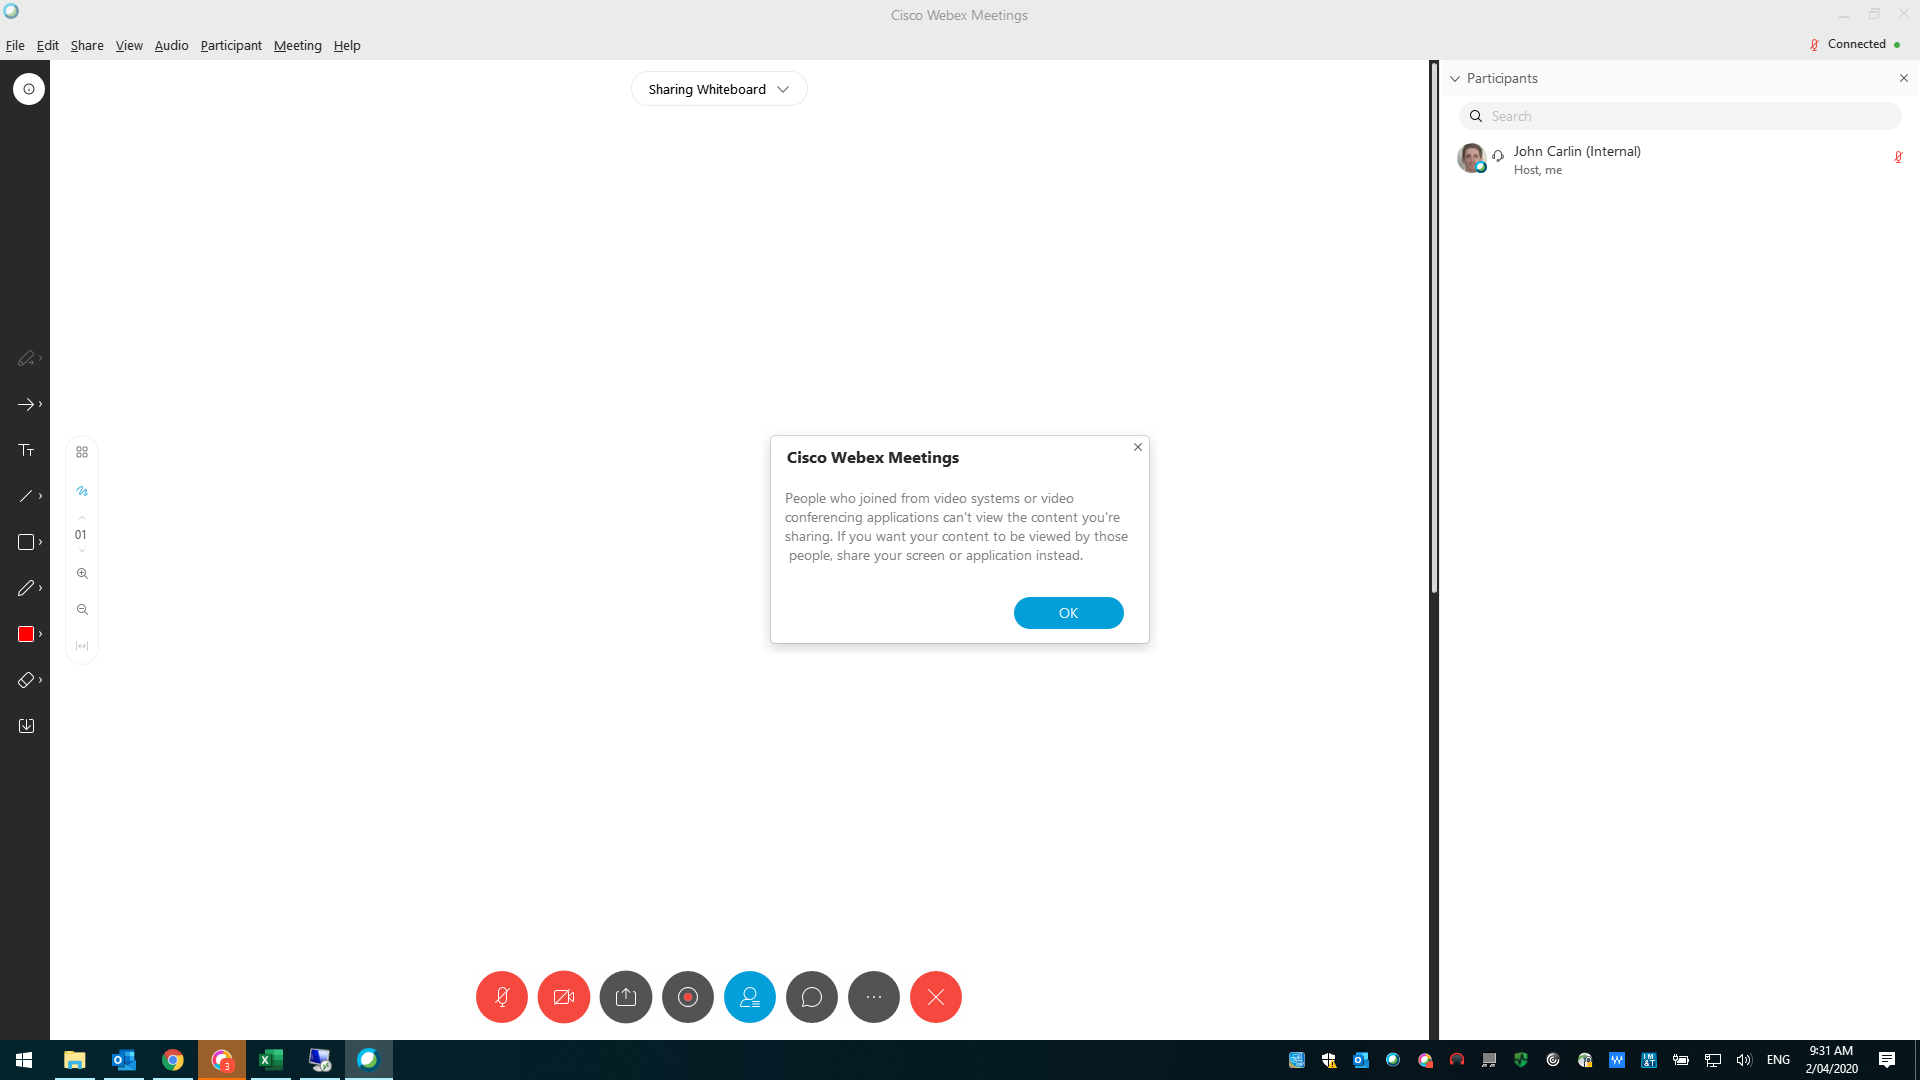
A prompt will appear advising that VC rooms will not be able to see the whiteboard - click 'OK'.
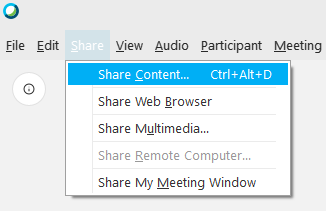
-
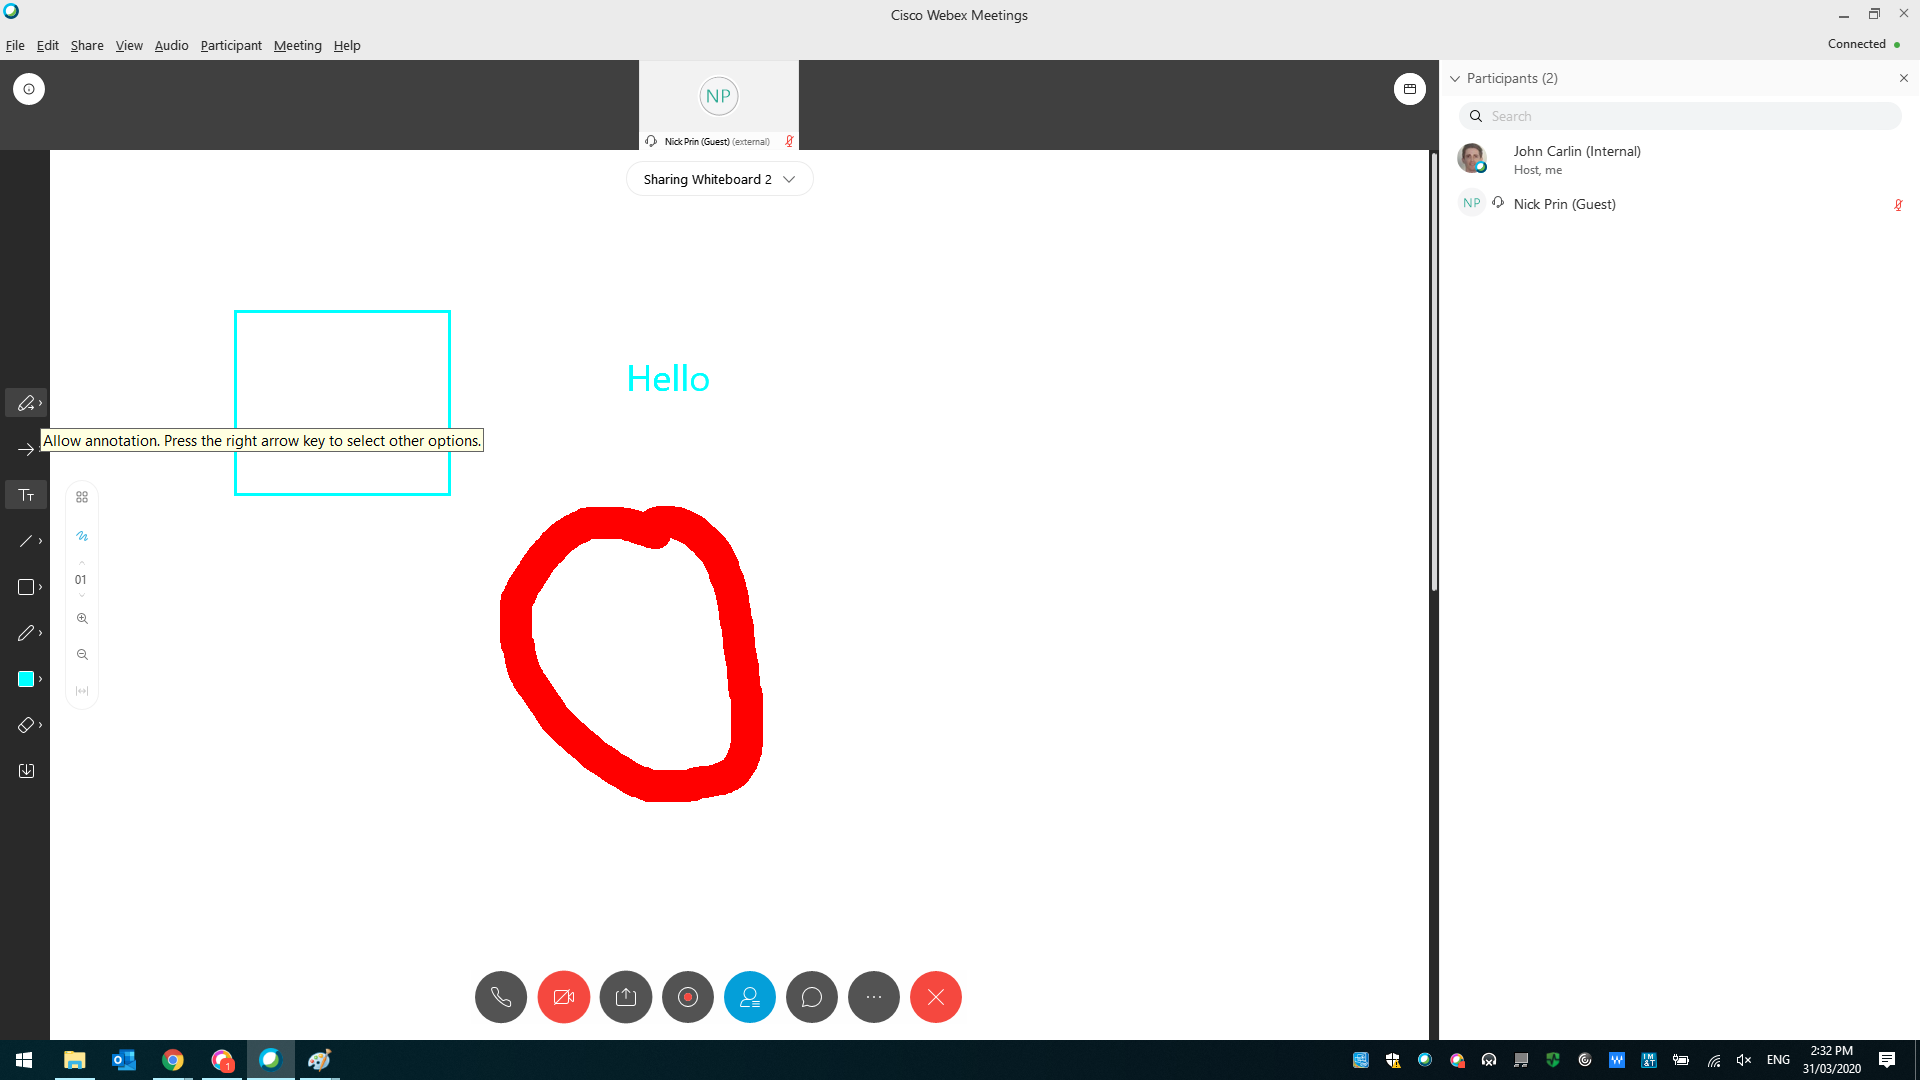
Use the toolbar on the left to draw, add shapes and add text.
-
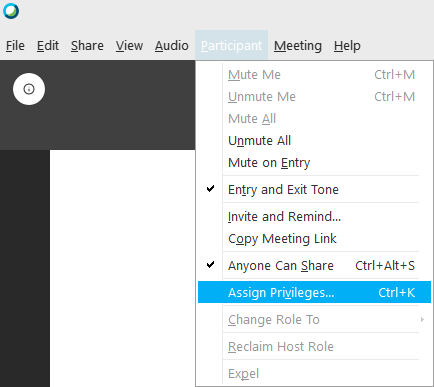
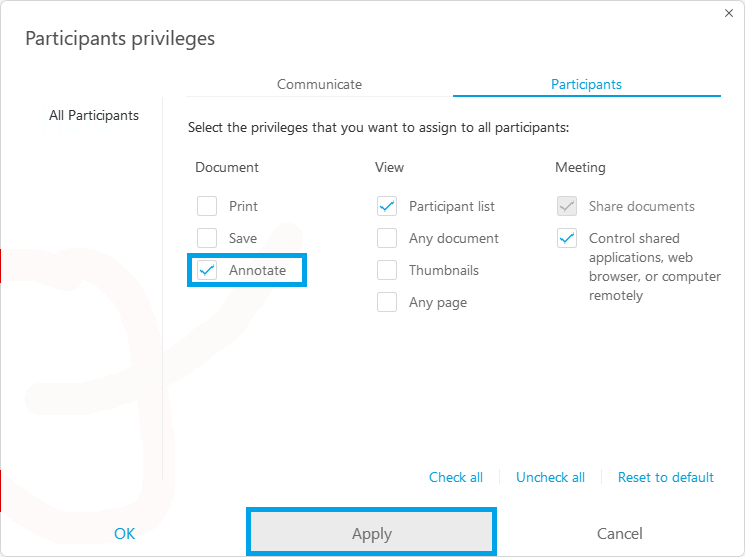
To allow other participants to annotate, click 'Participant' -> 'Assign Privileges'. Tick 'Annotate' and then click 'Apply'.
-
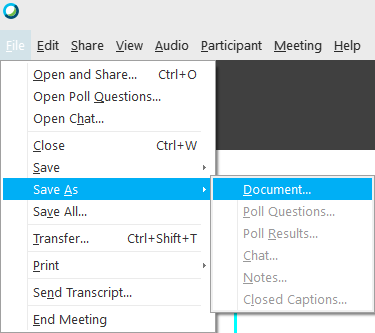
To save the whiteboard, click 'File' -> 'Save As' -> 'Document'.
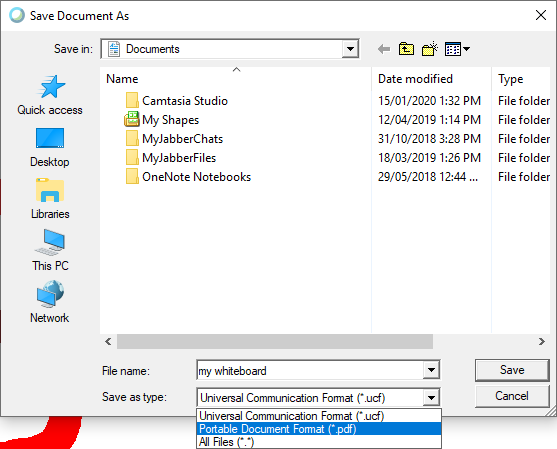
- If you want to continue working on the whiteboard in a future meeting, keep the 'Save as type' set to 'Universal Communication Format'.
- If you want to send participants a copy of the whiteboard, change the 'Save as type' to 'Portable Document Format'.
- Click 'Save'.
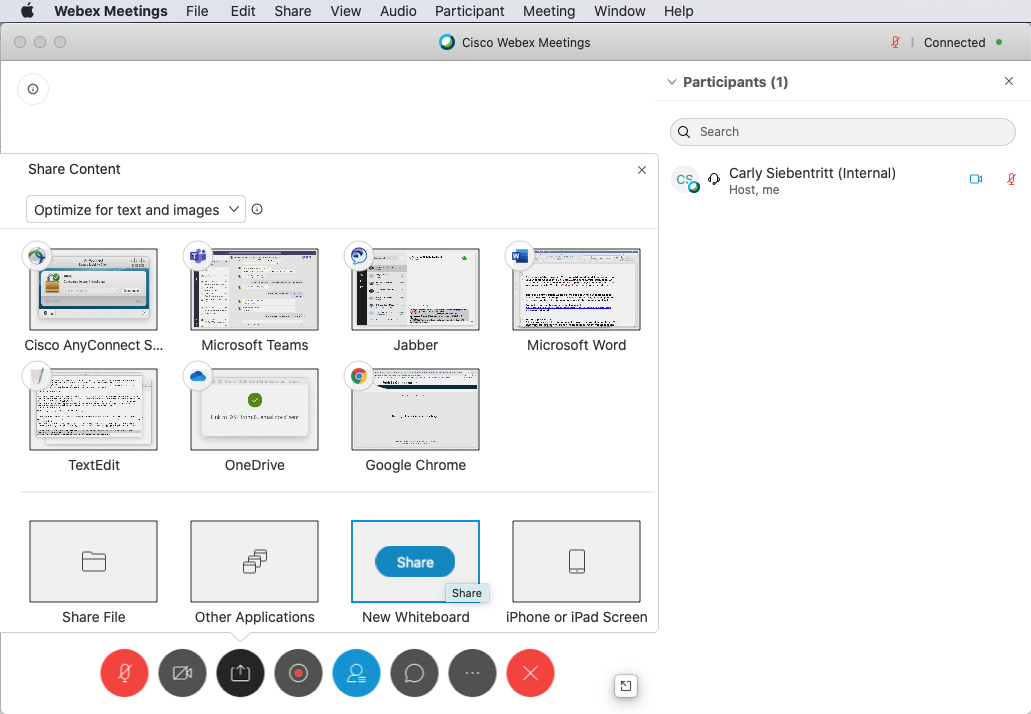
To create a new whiteboard:
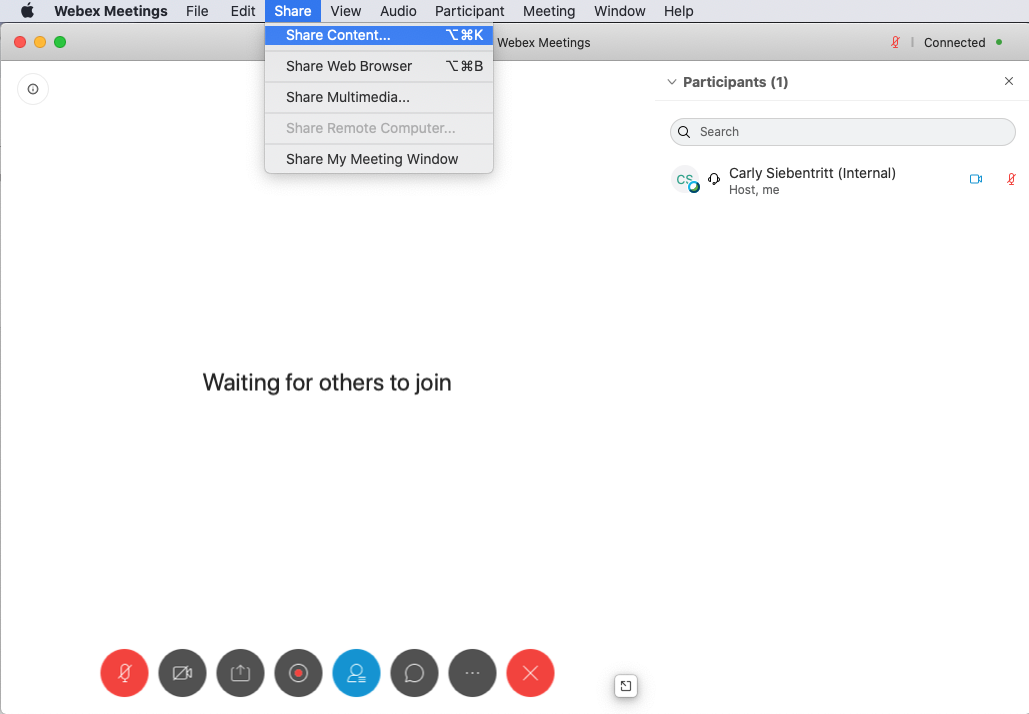
- Click 'Share' -> 'Share Content'.
- Click 'New Whiteboard'.
- A prompt will appear advising that VC rooms will not be able to see the whiteboard - click 'OK'.
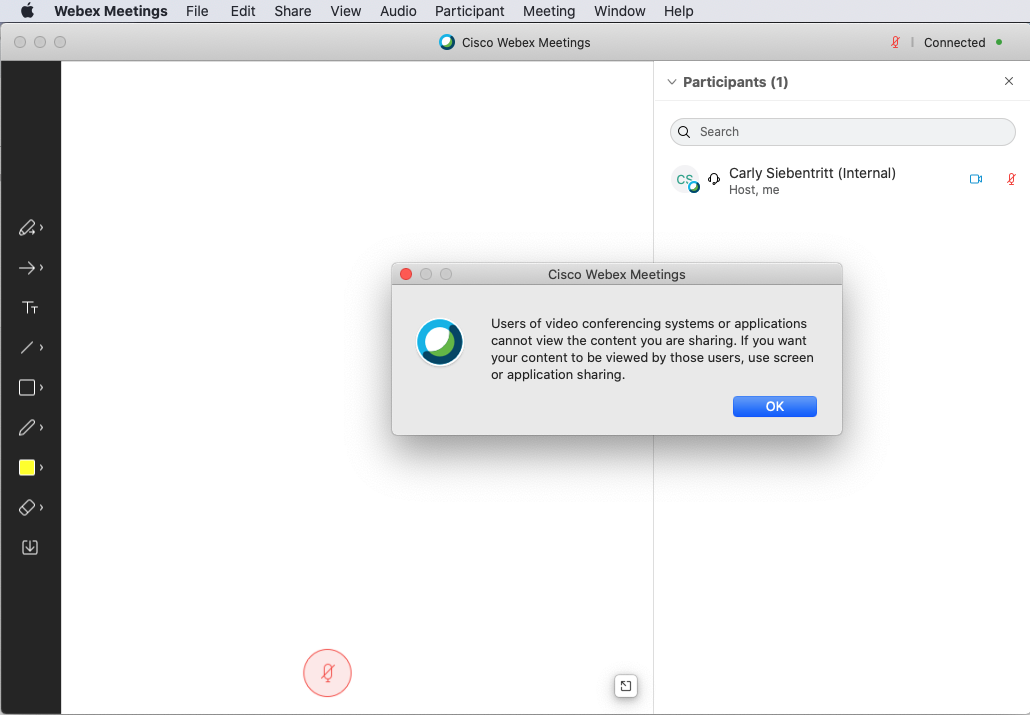
-
Use the toolbar on the left to draw, add shapes and add text.
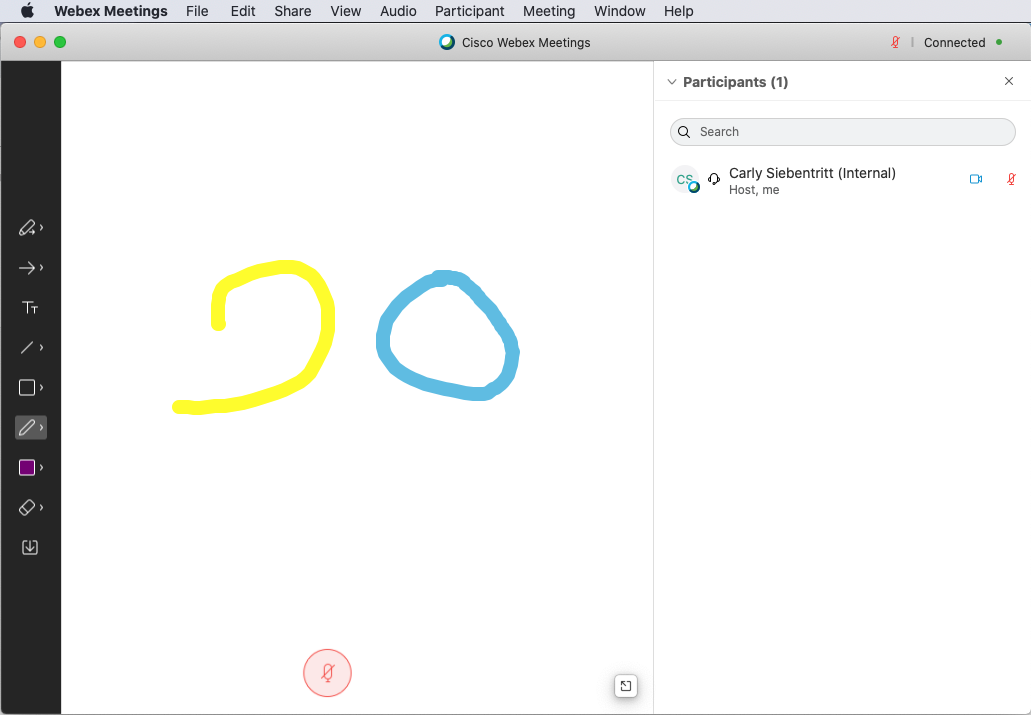
-
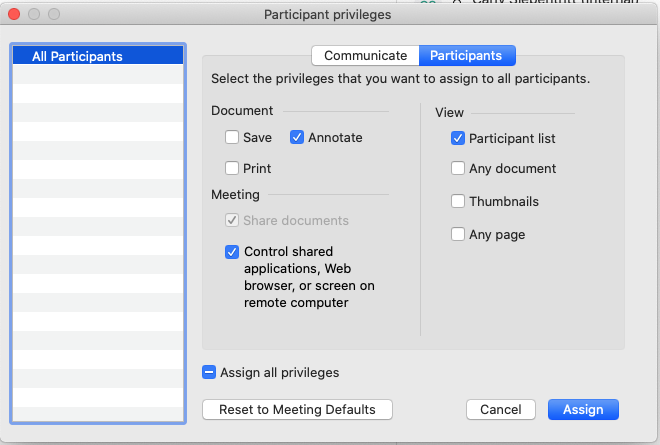
To allow other participants to annotate, click 'Participant' -> 'Assign Privileges'. Tick 'Annotate' and then click 'Apply'.
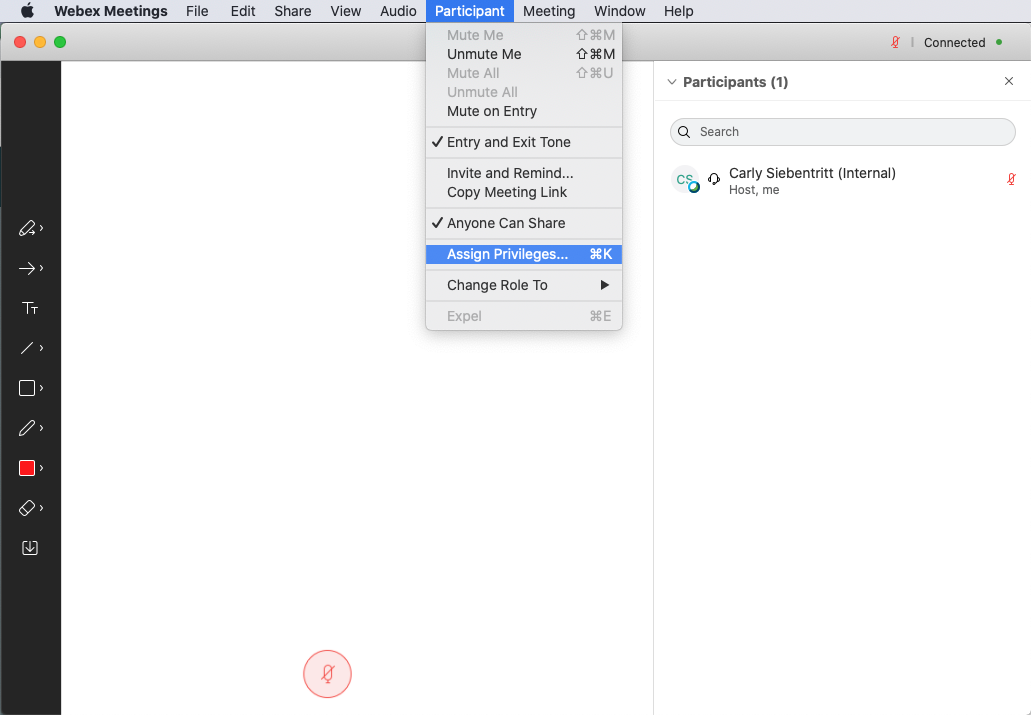
-
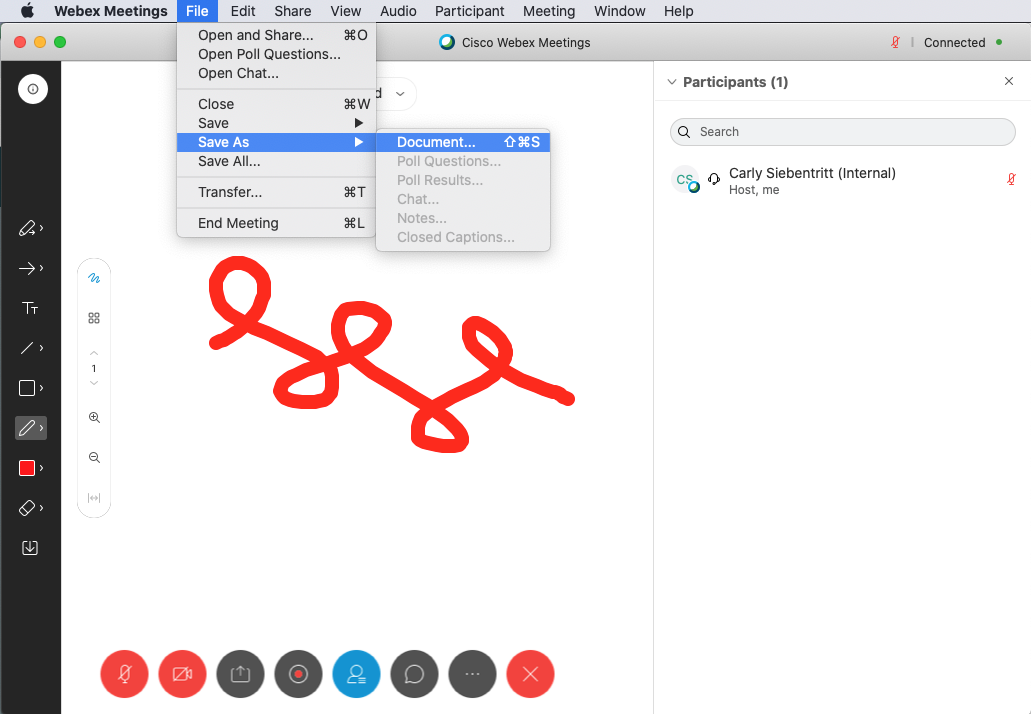
To save the whiteboard, click 'File' -> 'Save As' -> 'Document'.
- If you want to continue working on the whiteboard in a future meeting, keep the 'Save as type' set to 'Universal Communication Format'.
- If you want to send participants a copy of the whiteboard, change the 'Save as type' to 'Portable Document Format'.
Unfortunately it is not possible to participate in whiteboarding from Linux devices using the web application at this point in time, whiteboards can only be viewed.
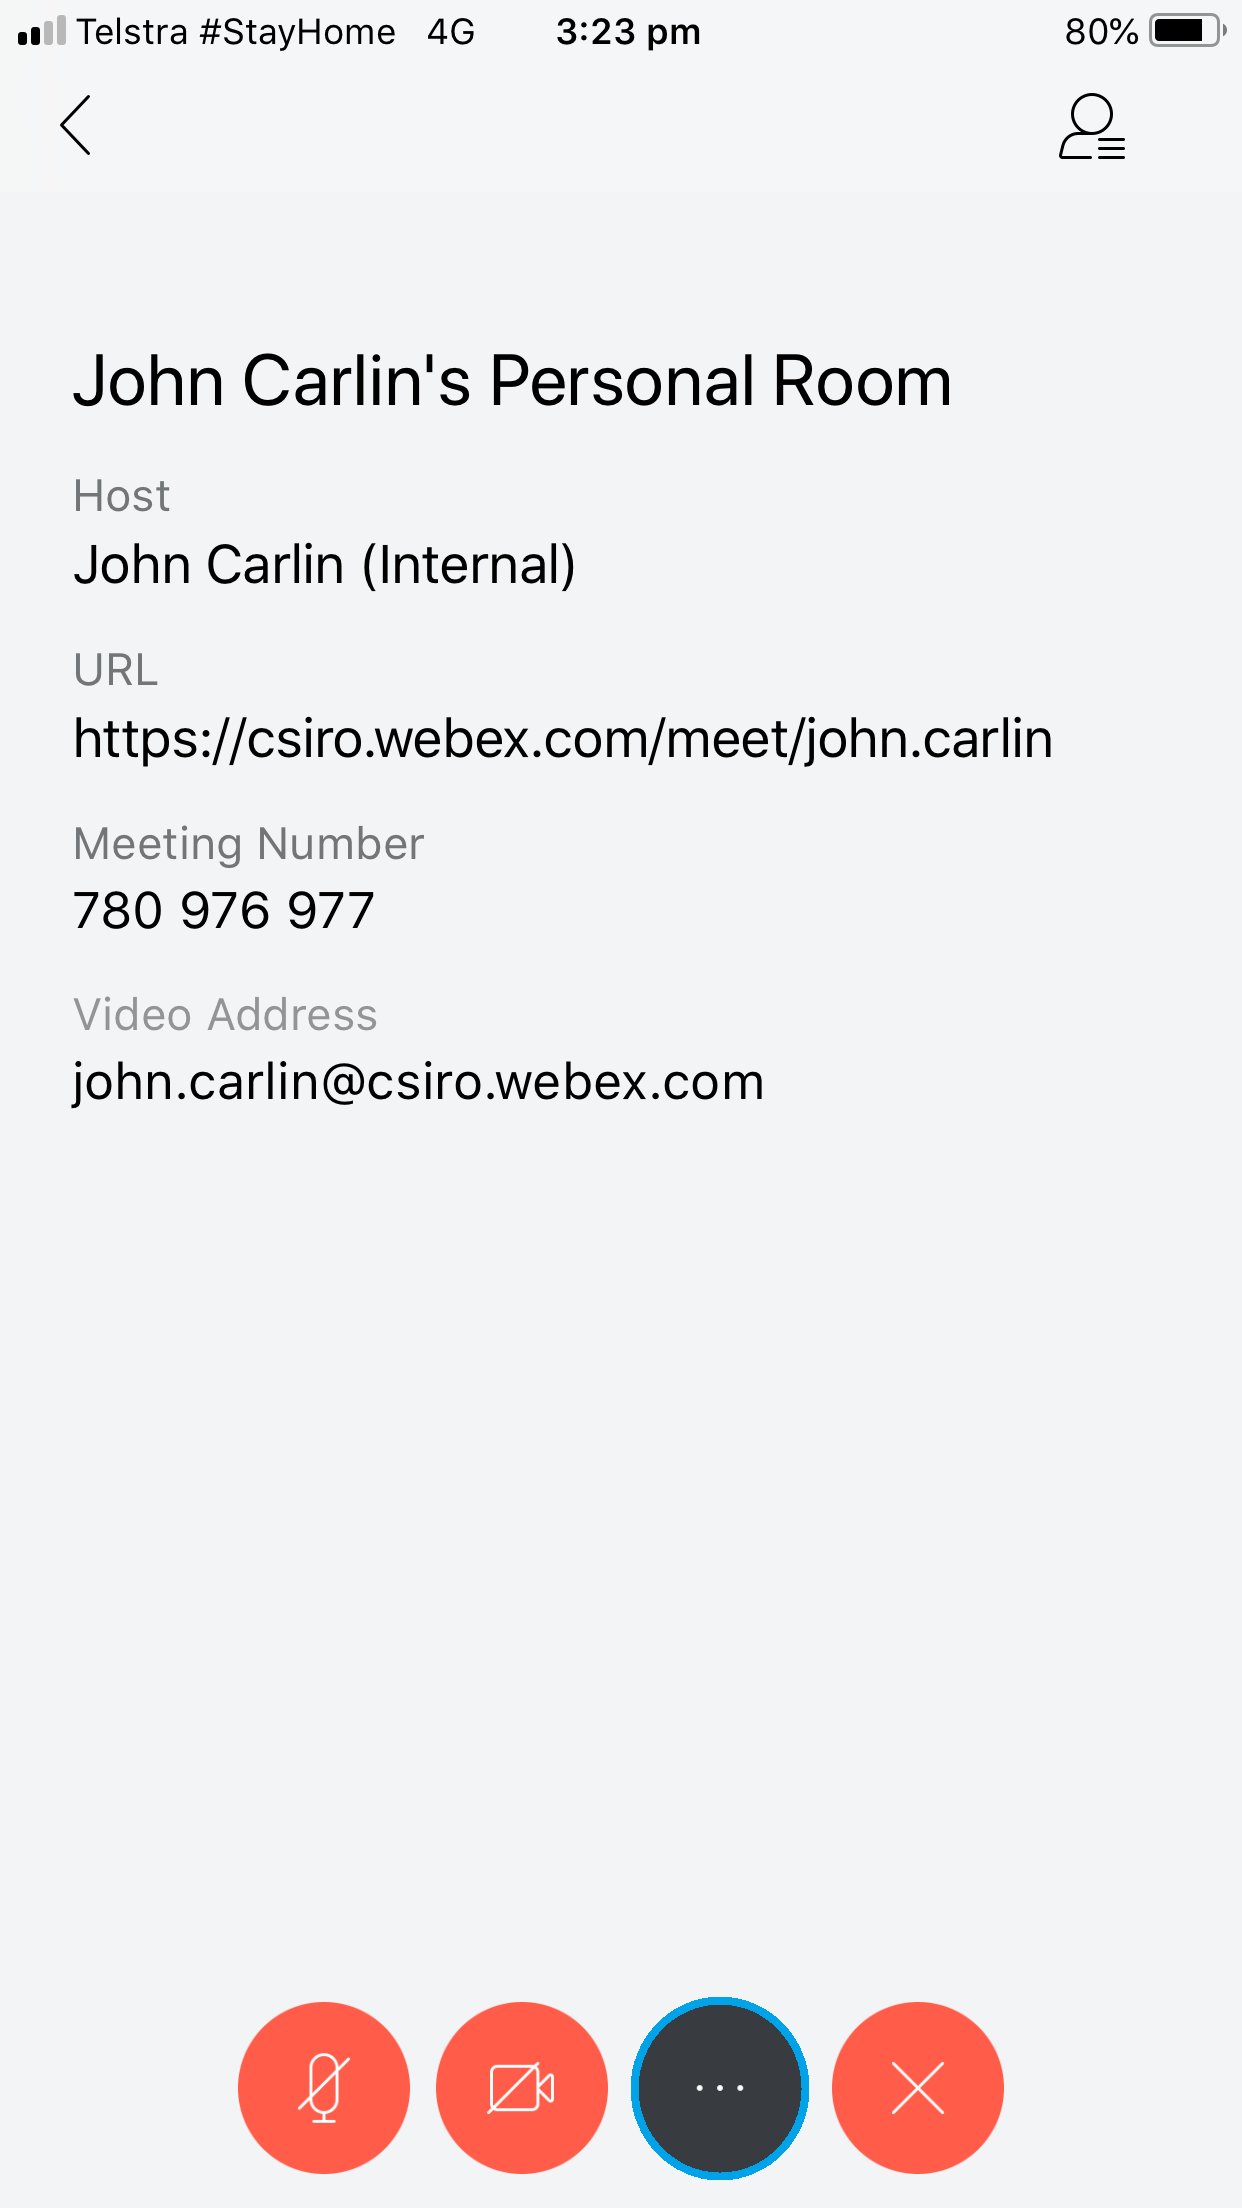
To create a new whiteboard:
- Join a Webex Meeting and tap the three dots.
-
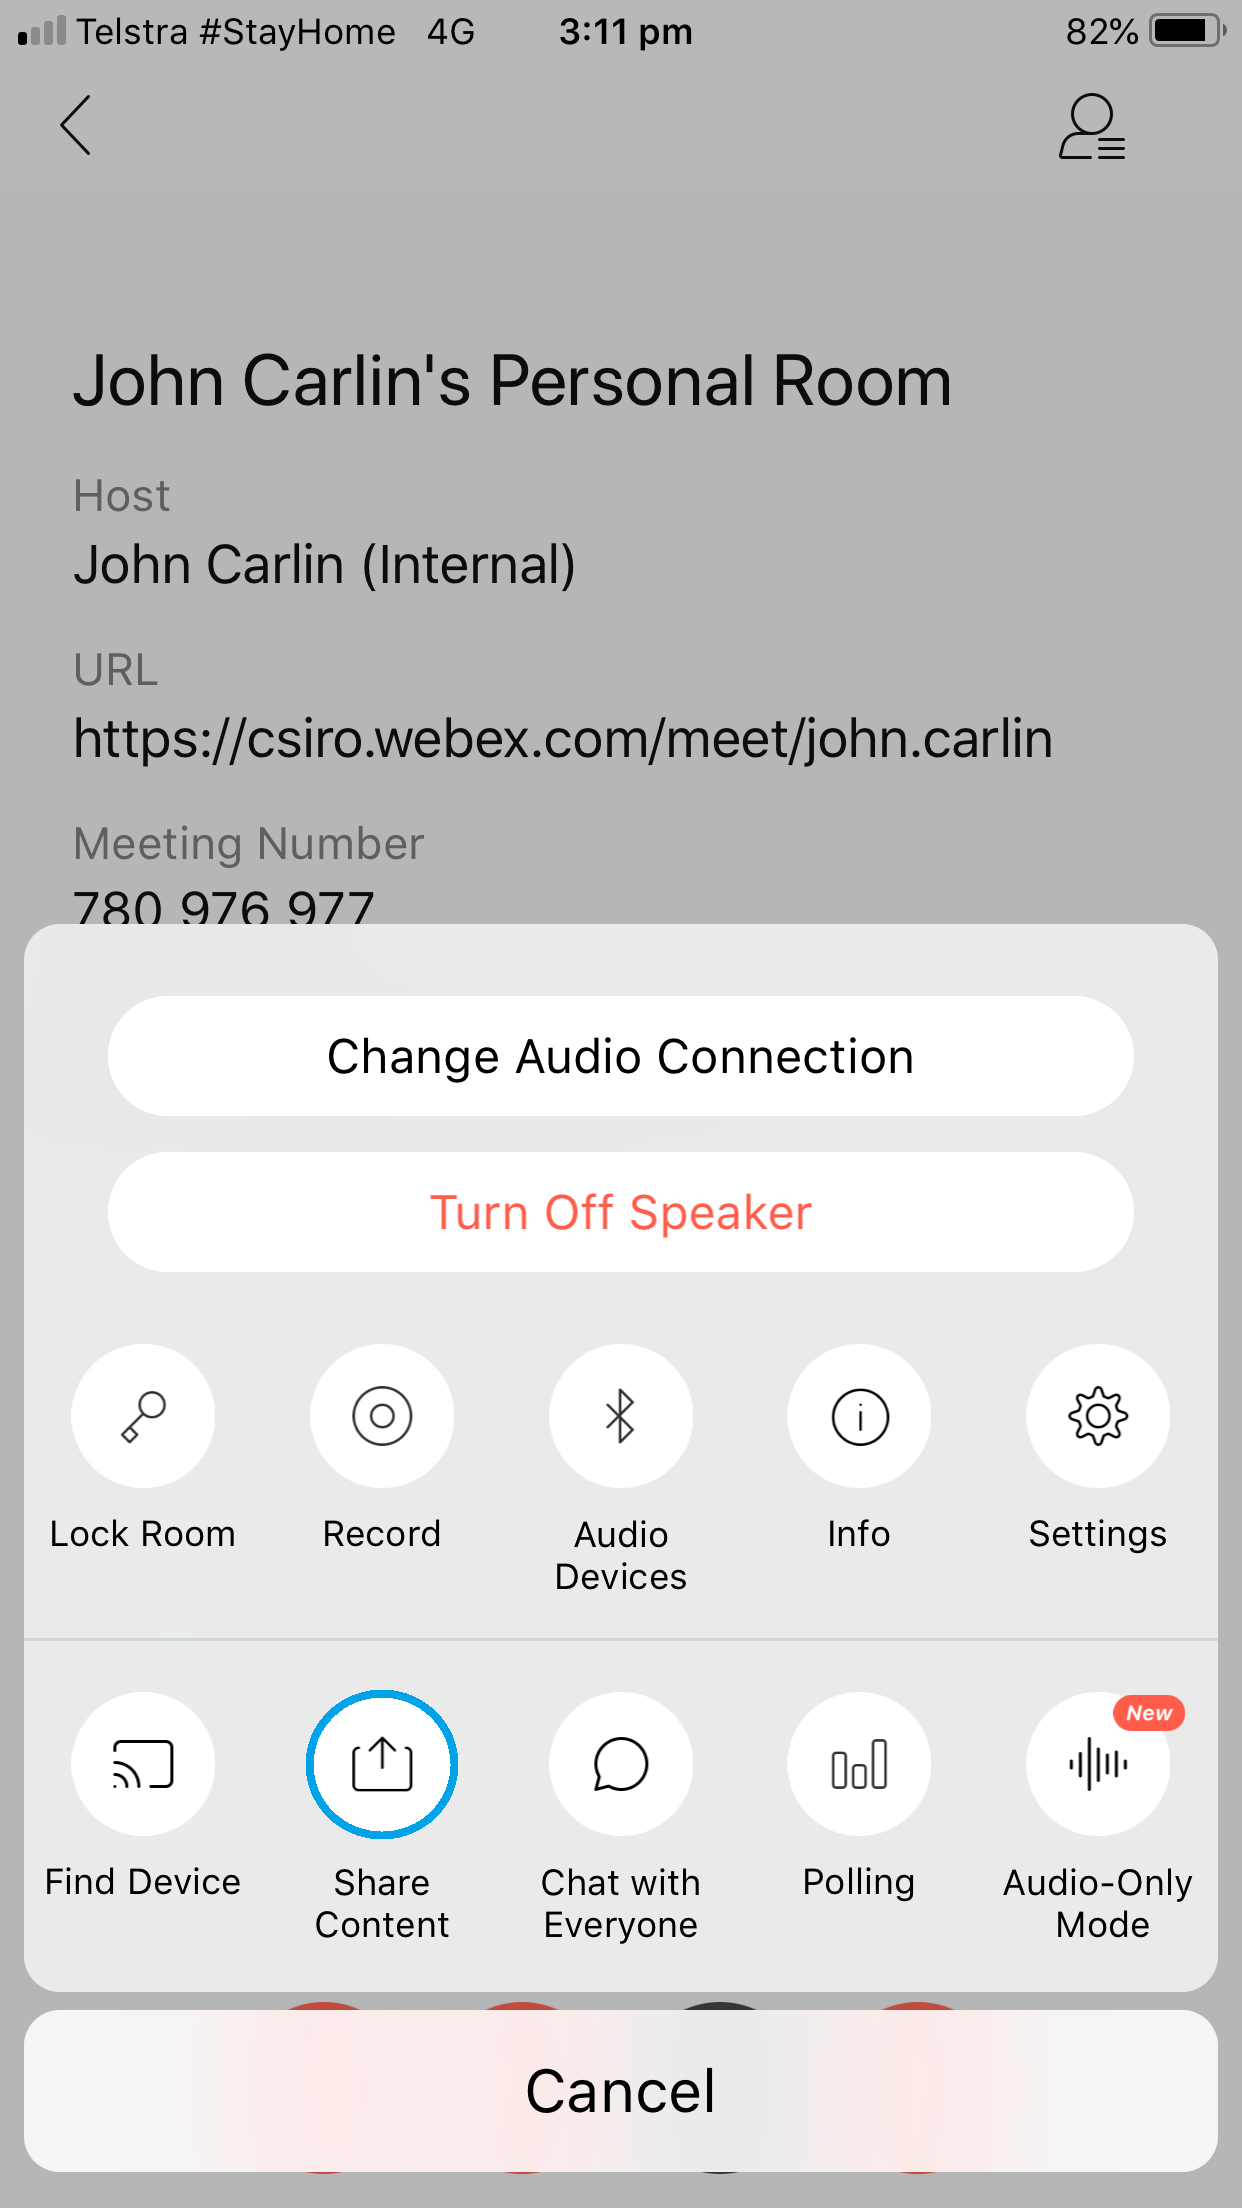
Tap 'Share' and then tap 'Whiteboard'.
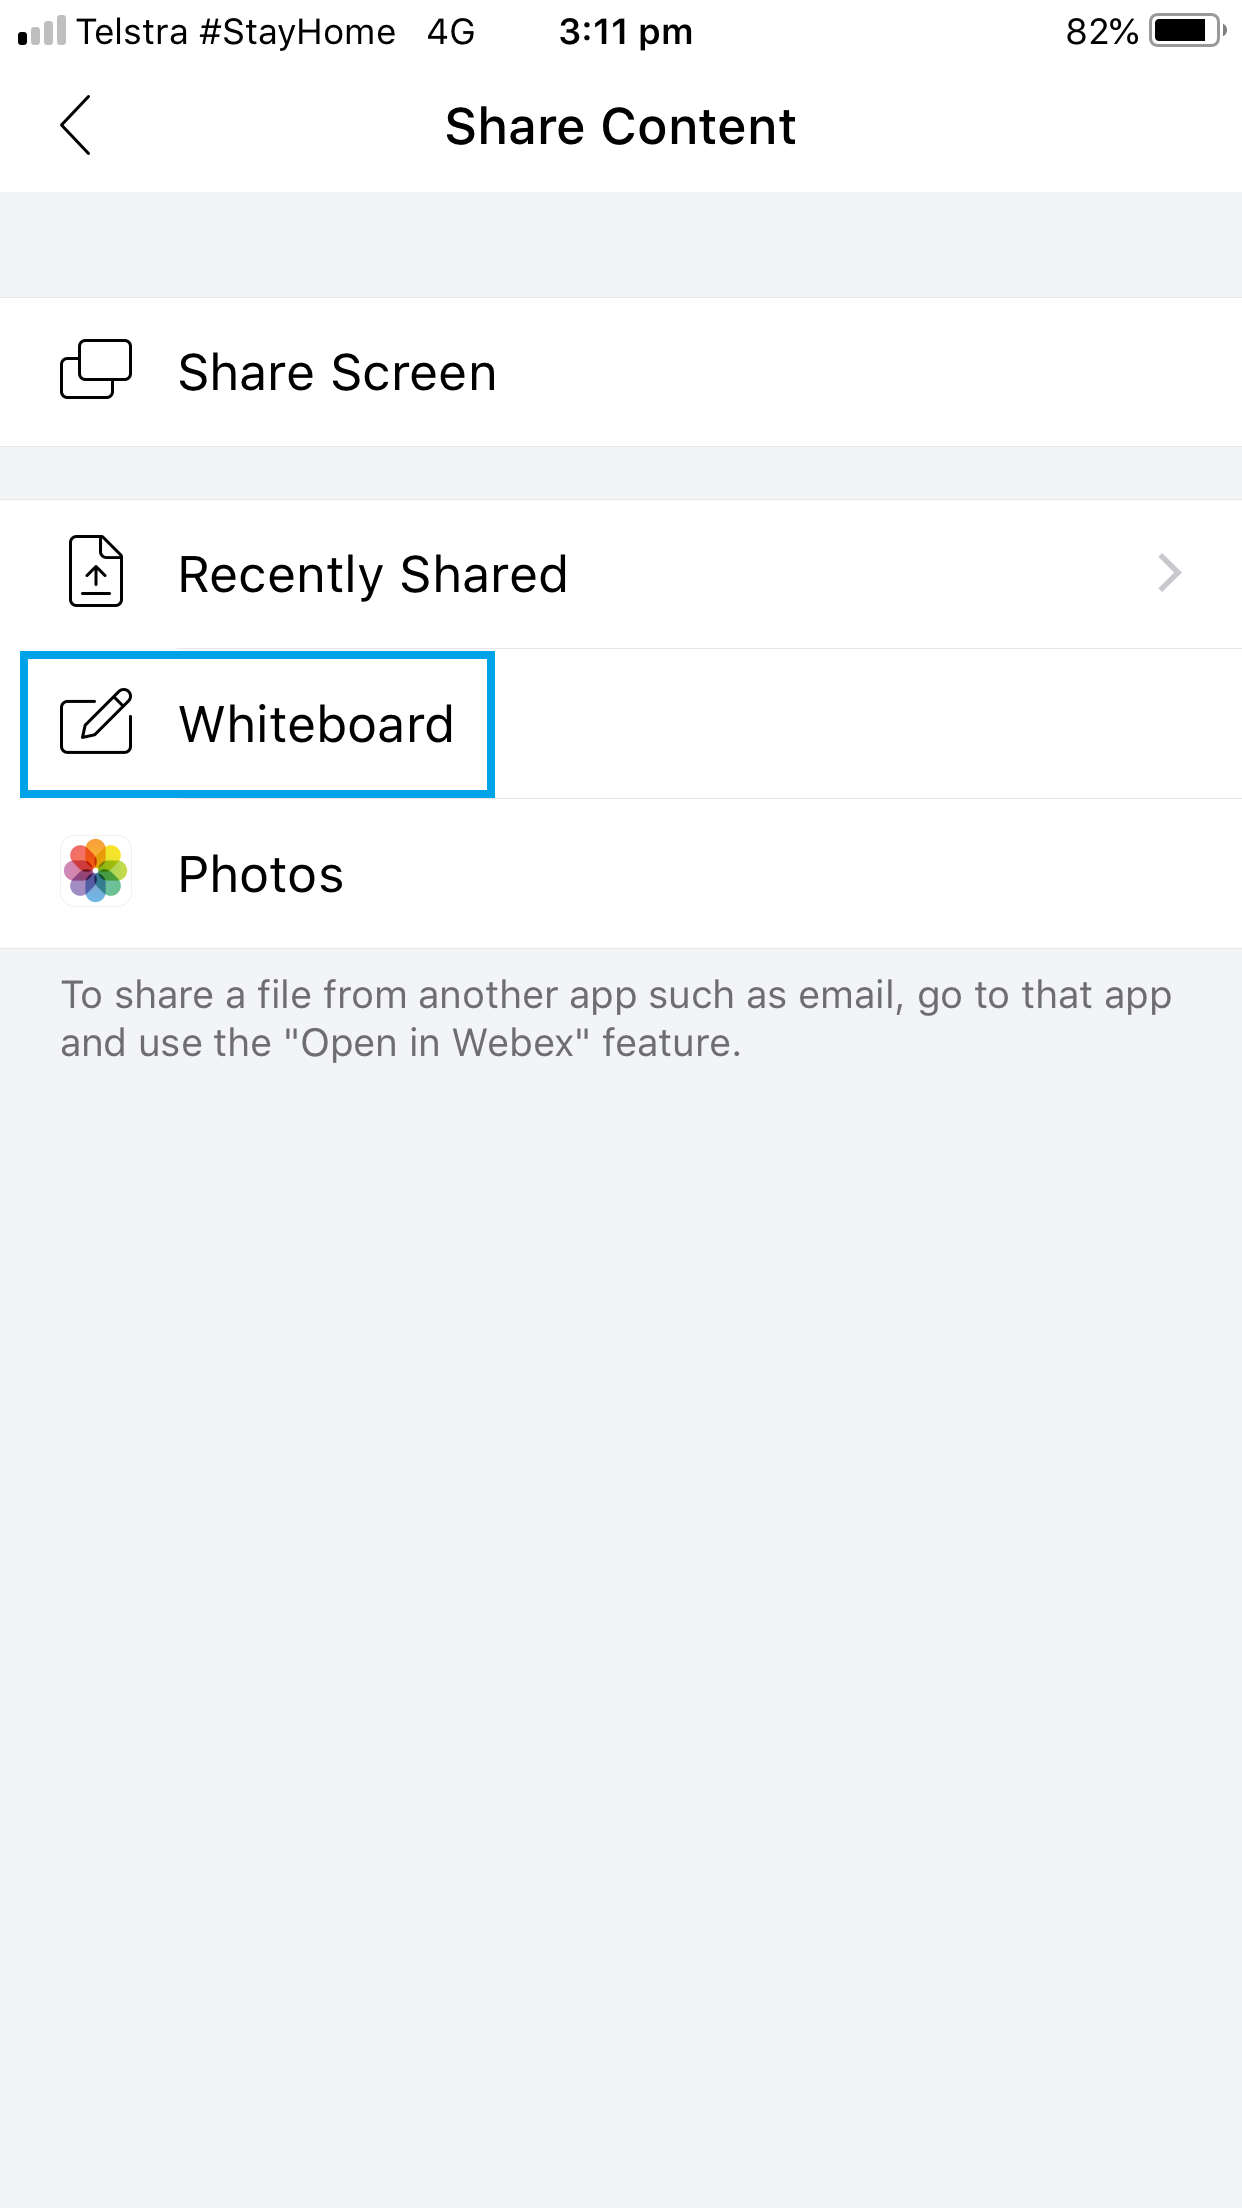
-
Use the toolbar at the bottom of the screen to draw and add text.
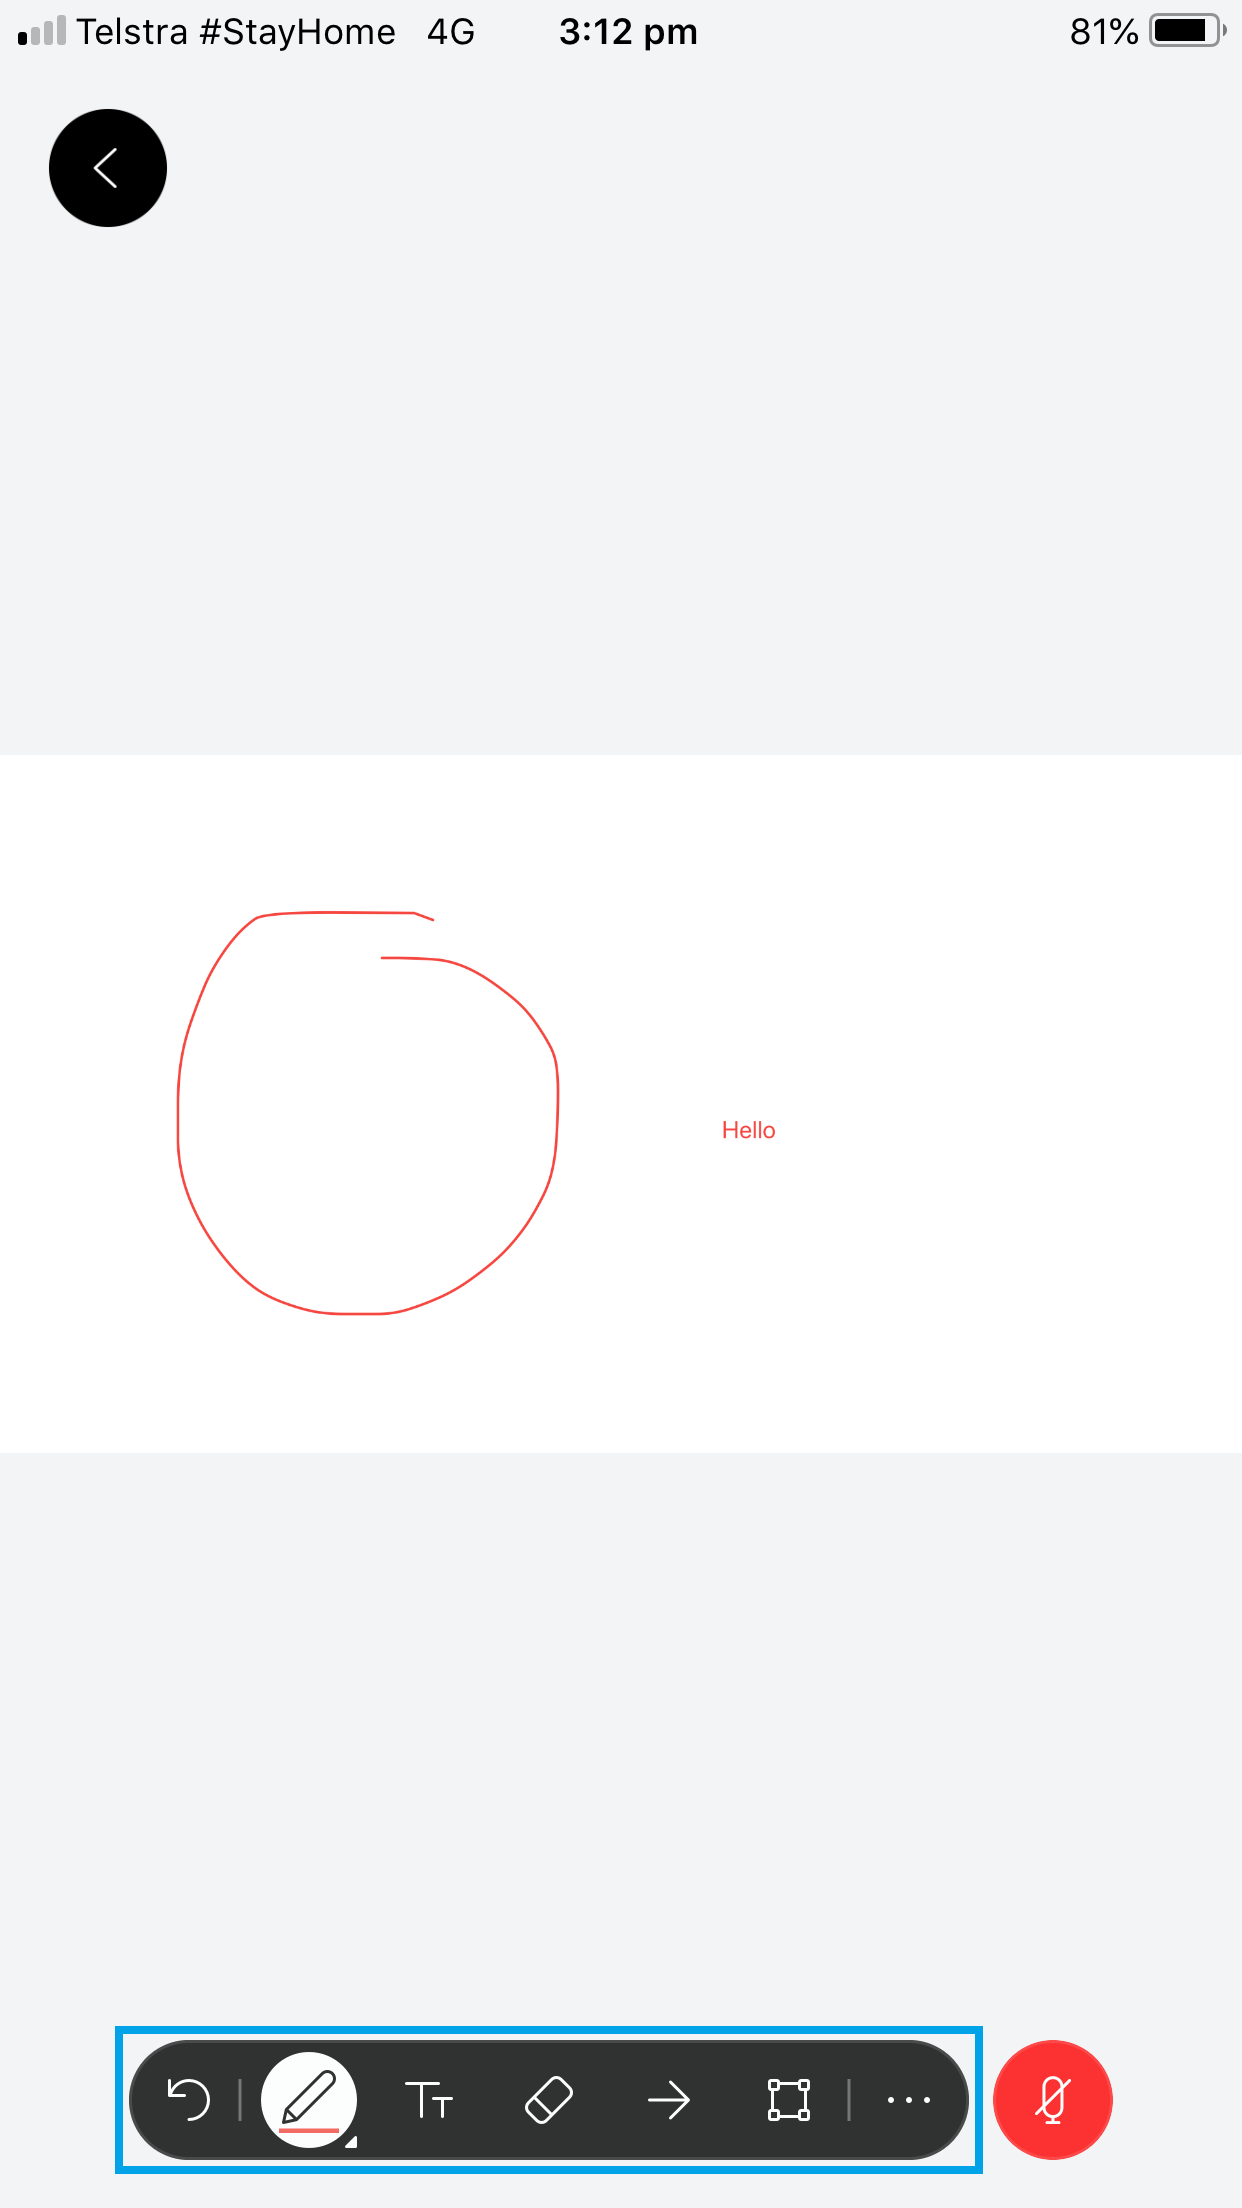
-
To save the whiteboard, tap the three dots and then tap 'Save'.
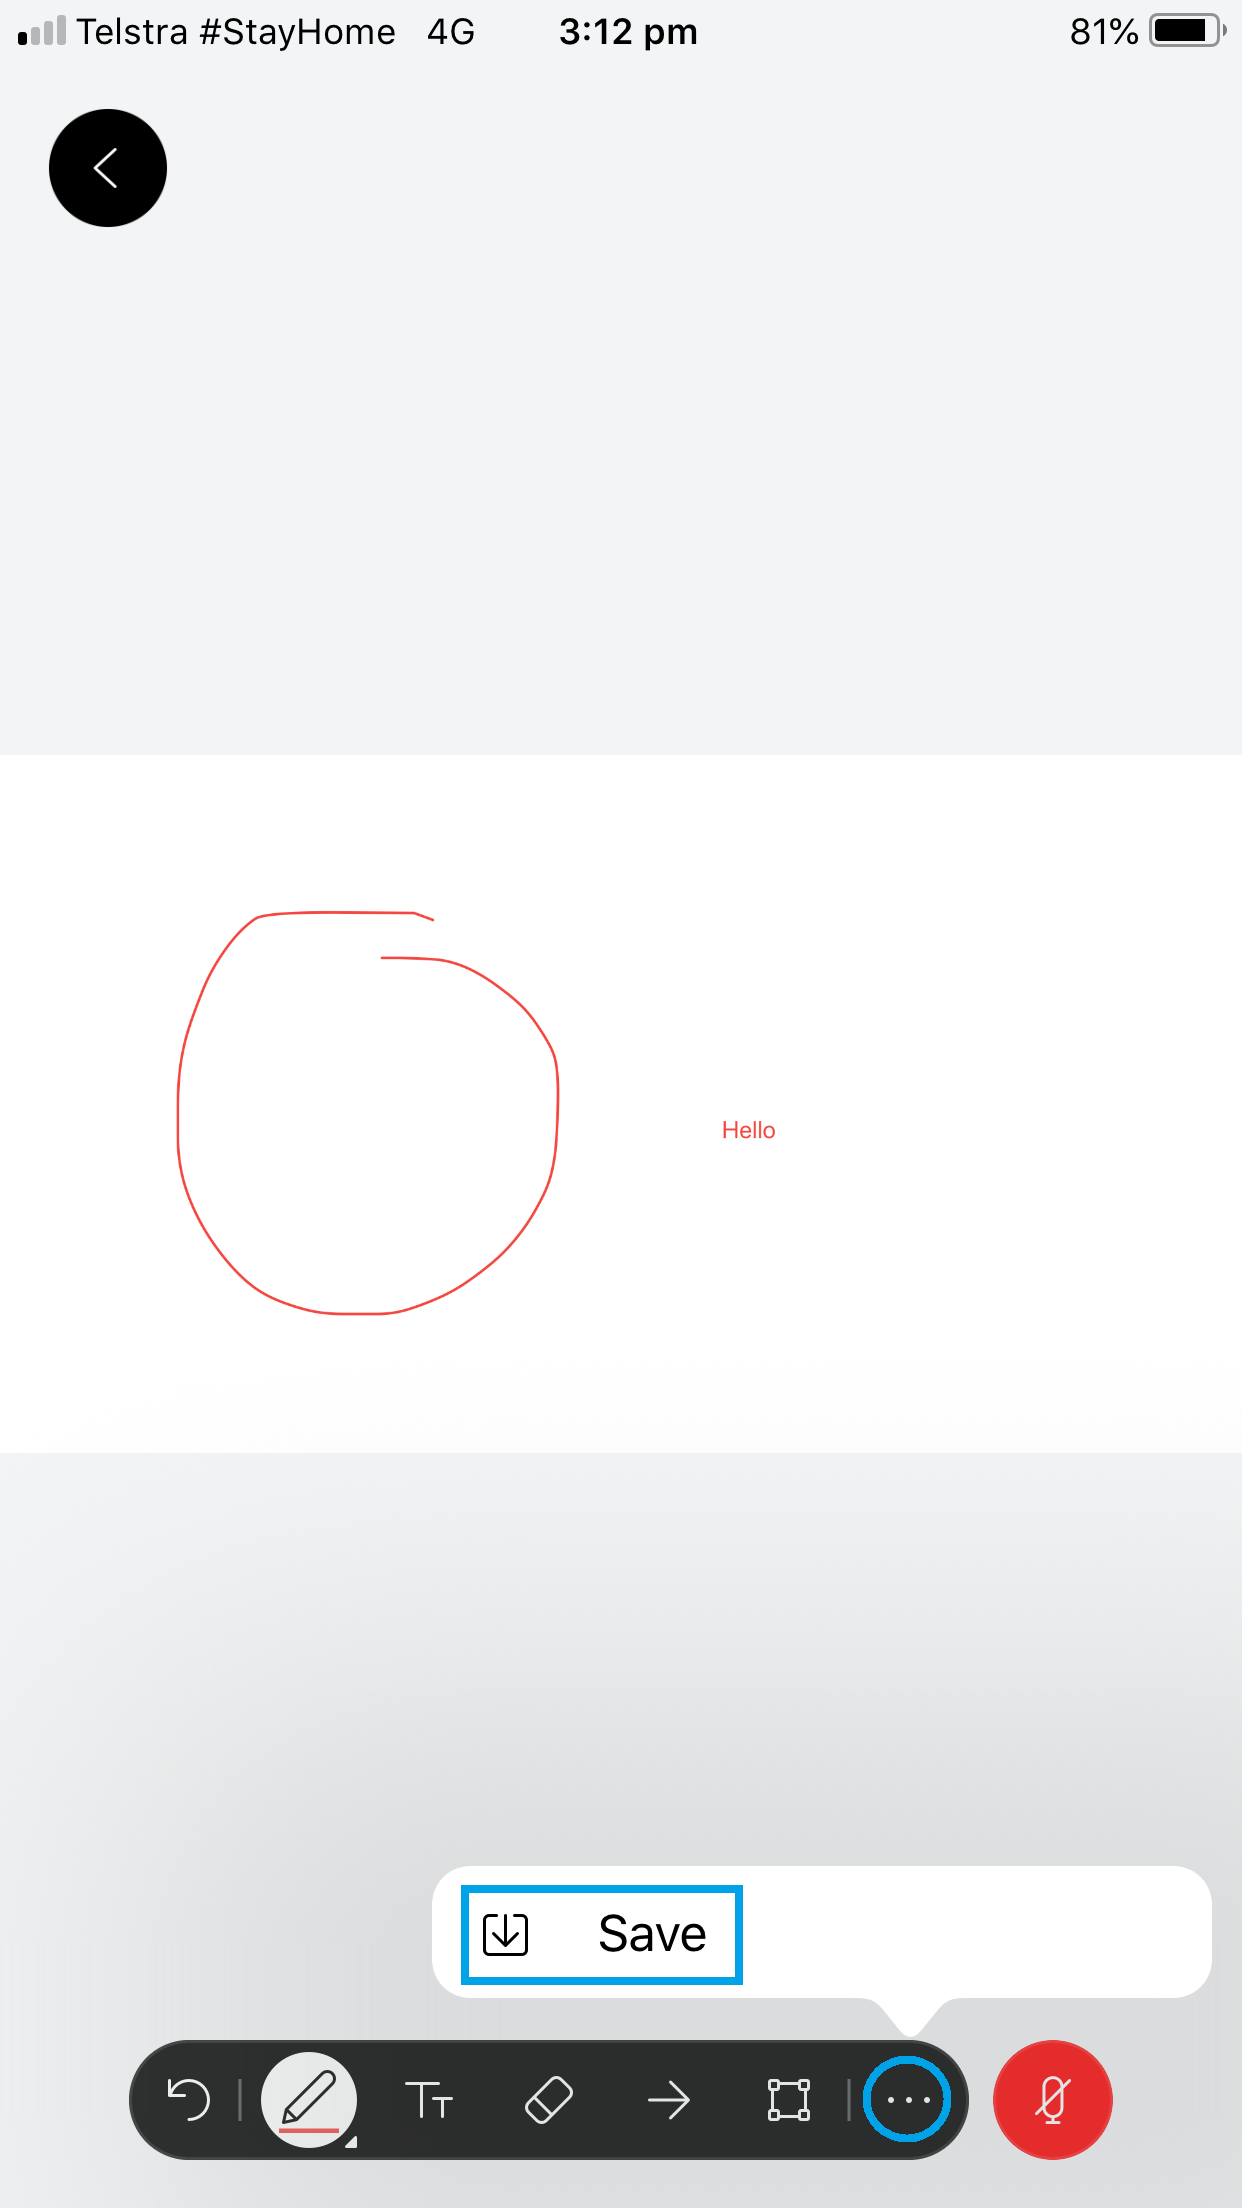
Note: The polling feature can only be configured by the Presenter (the attendee with the Webex Meetings icon next to their name). The Presenter role is automatically assigned to the person who last shares their screen, but it can also be manually assigned by the Host or a Cohost. Hosts can Cohosts can see the poll questions and results, but cannot create or start the polls unless they are also the Presenter.
To create a new poll in Webex Meetings:
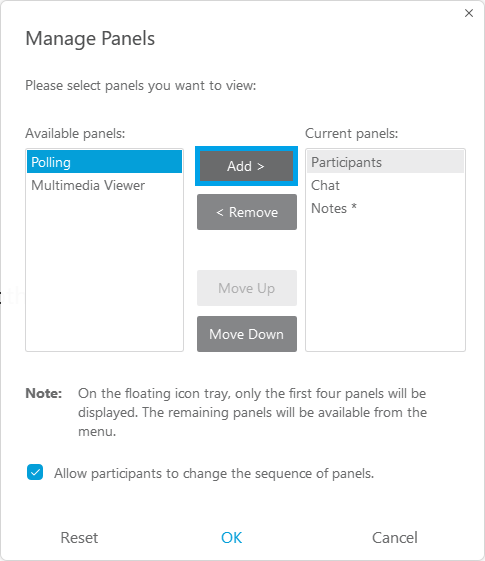
- Click 'View' -> 'Panels' -> 'Manage Panels'.
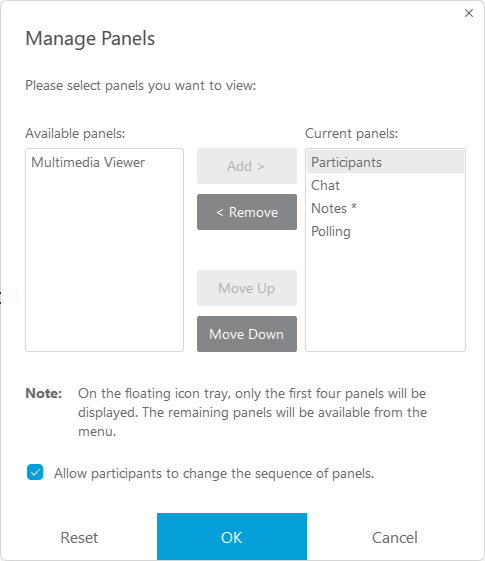
- Click 'Polling' in the 'Available panels' column, then click 'Add'.
-
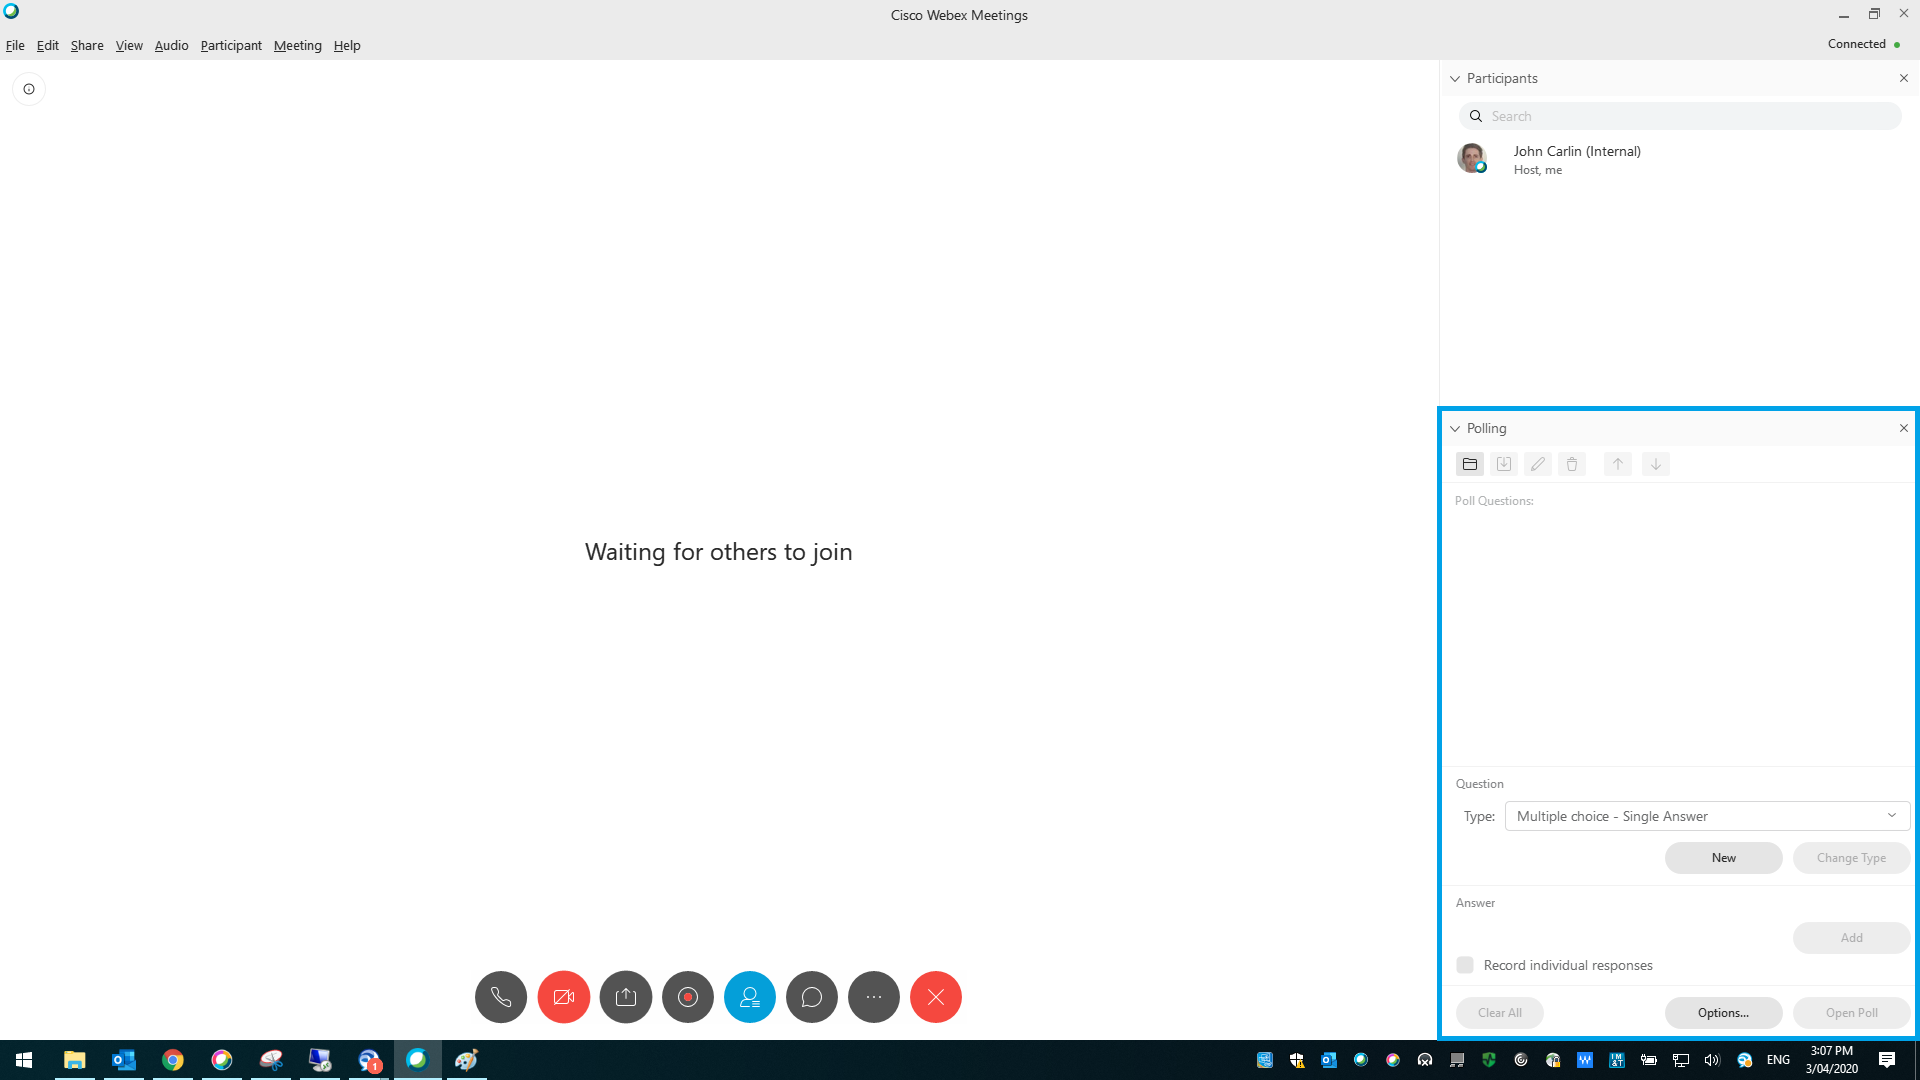
Click 'OK' - the Polling panel will now be visible.
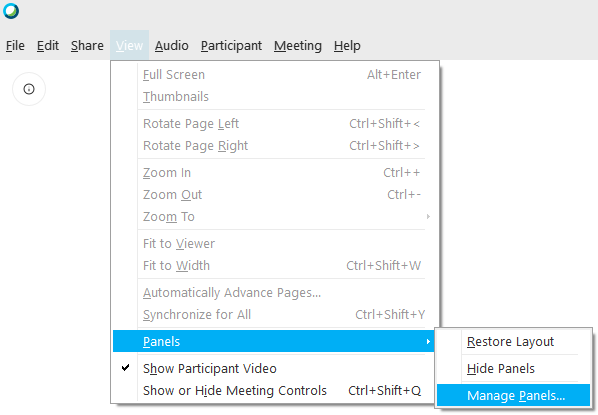
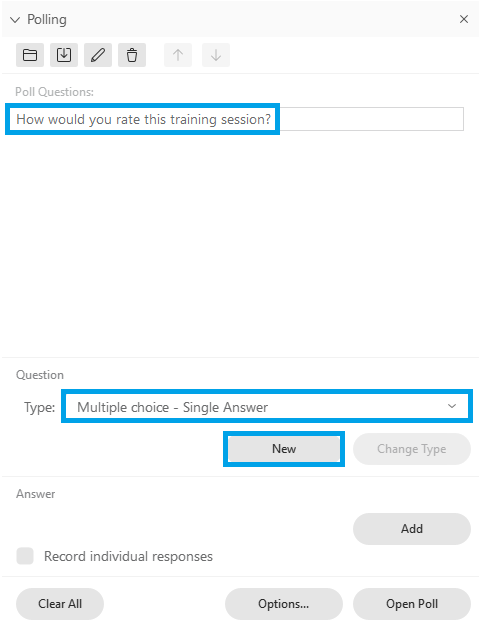
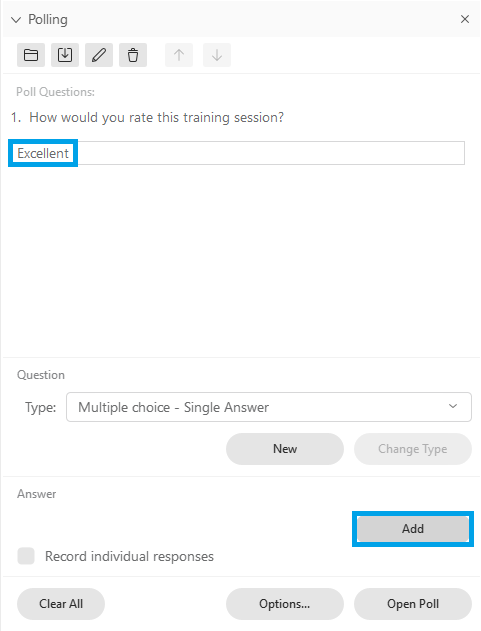
- Select the appropriate poll question type, click 'New', then type in the poll question.
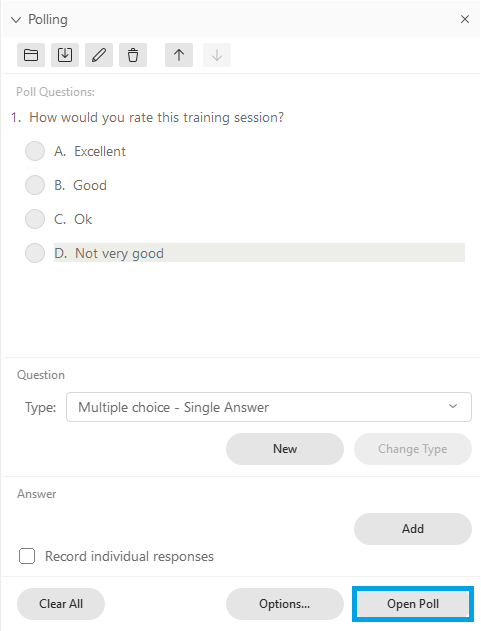
- To add acceptable poll responses (if applicable), click 'Add' and type in a response. Continue to do this for all responses.
-
When ready for attendees to respond, click 'Open Poll'. When warned that VC rooms will not be able to see the poll, click 'Ok'.
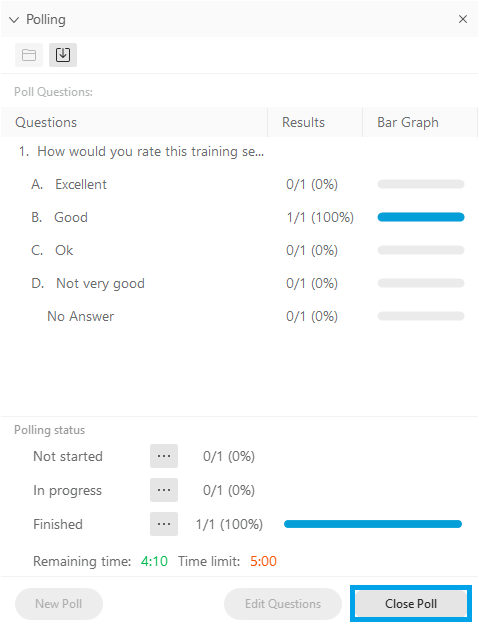
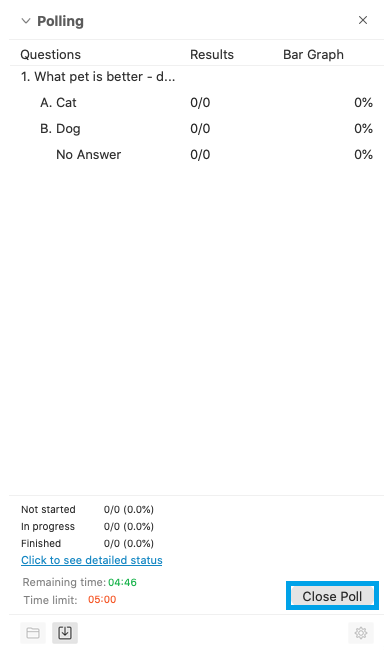
- You can see how many participants are still in the process of completing the poll, along with the response counts. When ready, click 'Close Poll'.
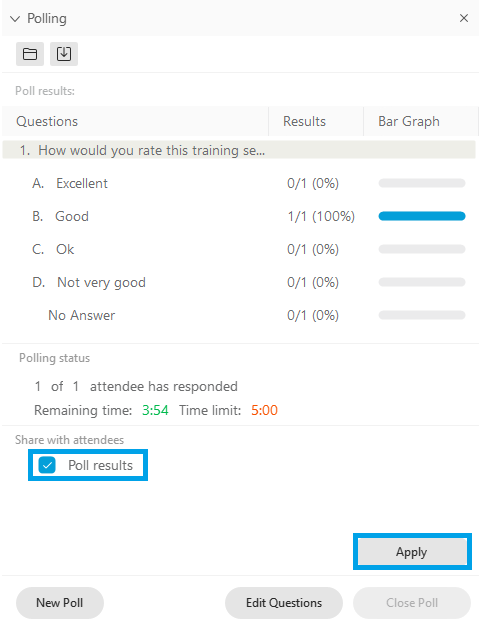
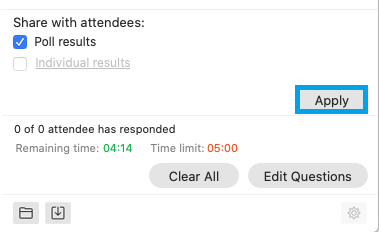
- If you would like to share the poll results with participants, tick 'Poll results' and then click 'Apply'.
-
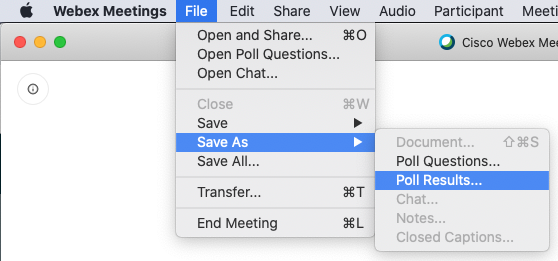
To save the poll results, click 'File' -> 'Save As' -> 'Poll Results'.
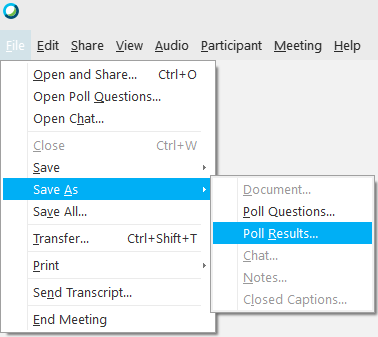
To create a new poll in Webex Meetings:
- Click 'View' -> 'Panels' -> 'Manage Panels'.
- Click 'Polling' in the 'Available panels' column, then click 'Add'.
-
Click 'OK' - the Polling panel will now be visible.
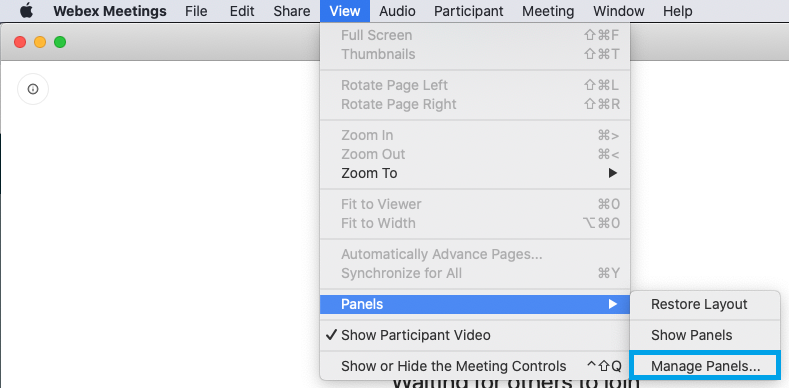
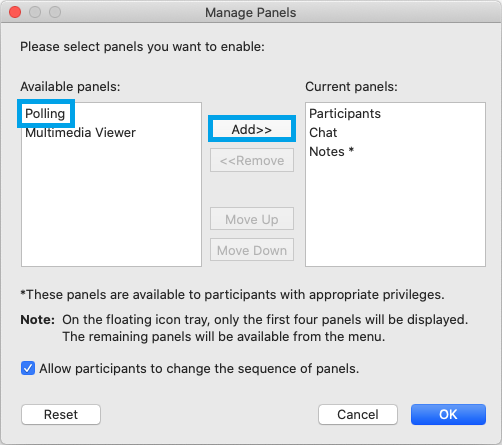
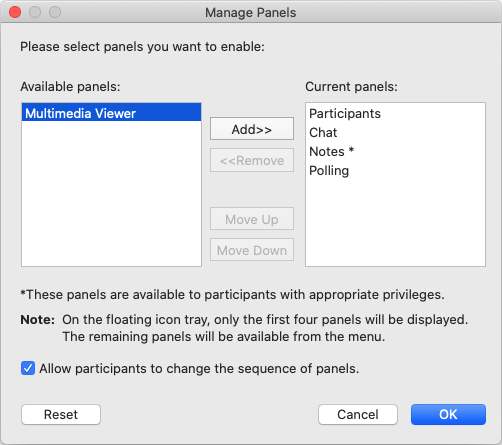
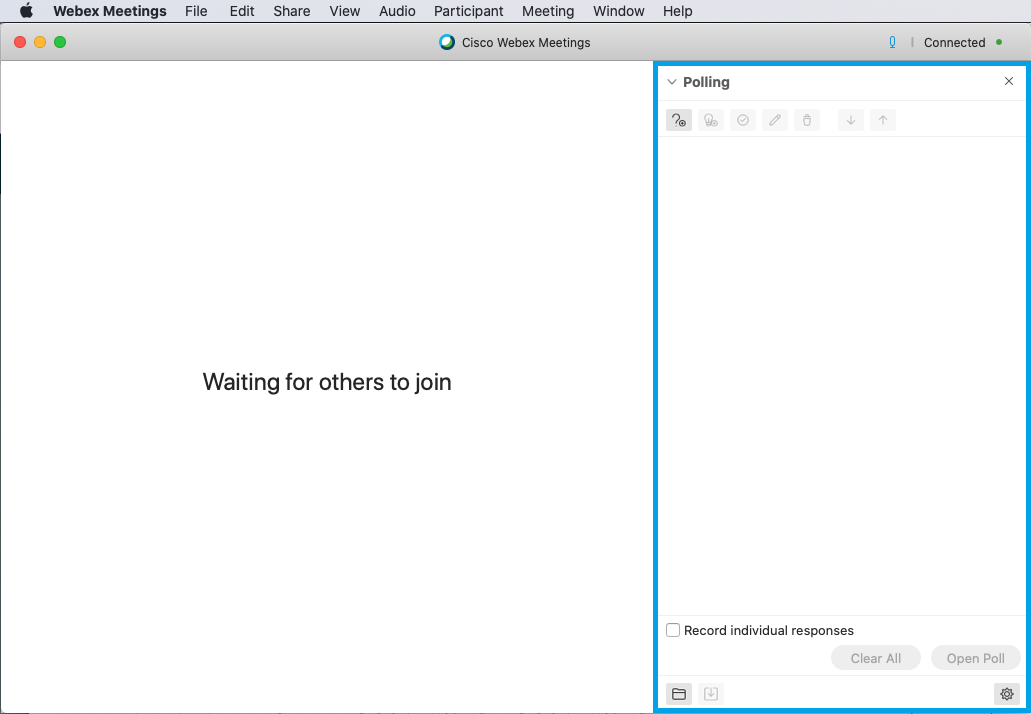
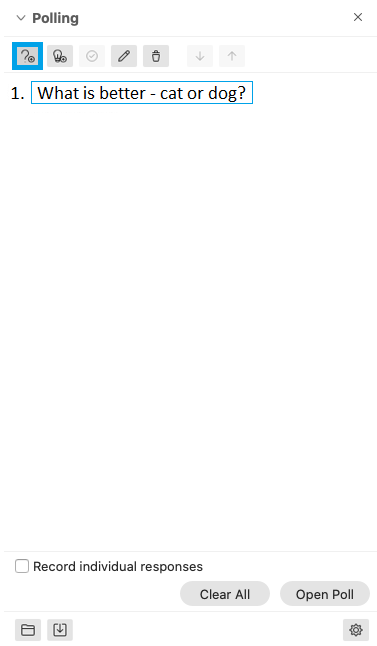
- Click the new poll question button and type in the poll question.
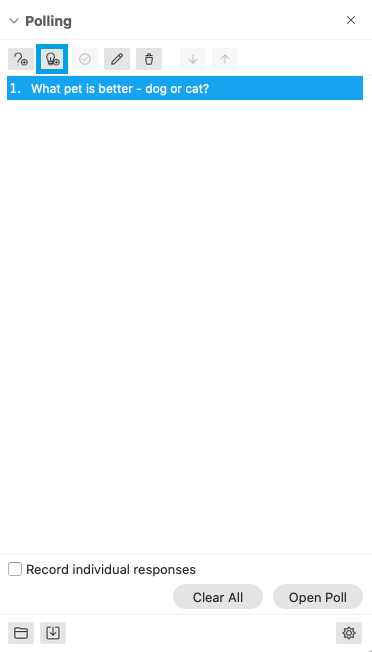
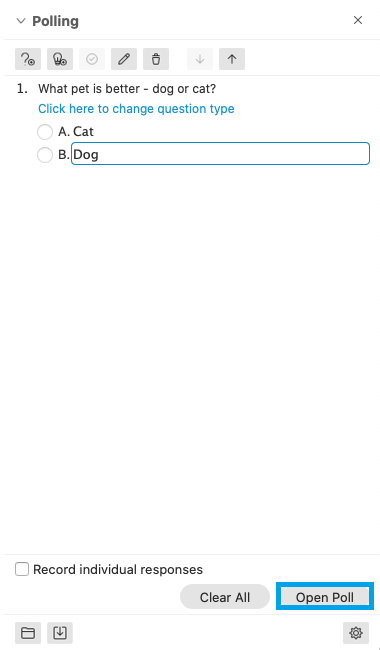
- To add acceptable poll responses, click the add poll response button and type in a response. Continue to do this for all responses.
-
When ready for attendees to respond, click 'Open Poll'. When warned that VC rooms will not be able to see the poll, click 'Ok'.
- You can see how many participants are still in the process of completing the poll, along with the response counts. When ready, click 'Close Poll'.
- If you would like to share the poll results with participants, tick 'Poll results' and then click 'Apply'.
-
To save the poll results, click 'File' -> 'Save As' -> 'Poll Results'.
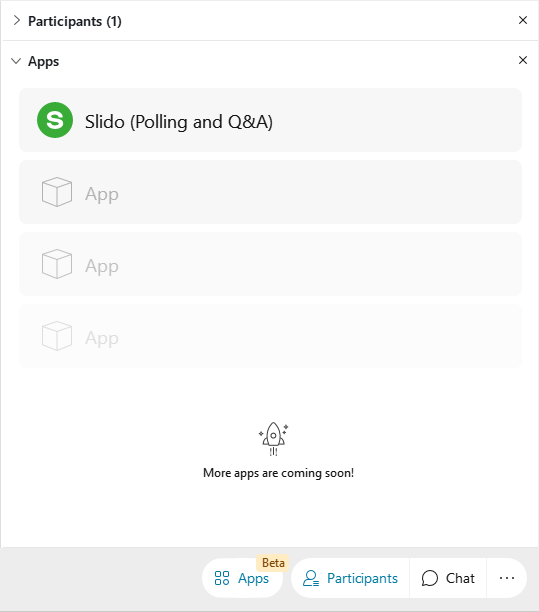
Slido is an easy to use audience engagement tool that brings additional polling, Q&A, and quiz functionality to Webex Meetings. Hosts can now enable Slido in any Webex Meeting by clicking the 'Apps (Beta)' tab and selecting Slido from the list.
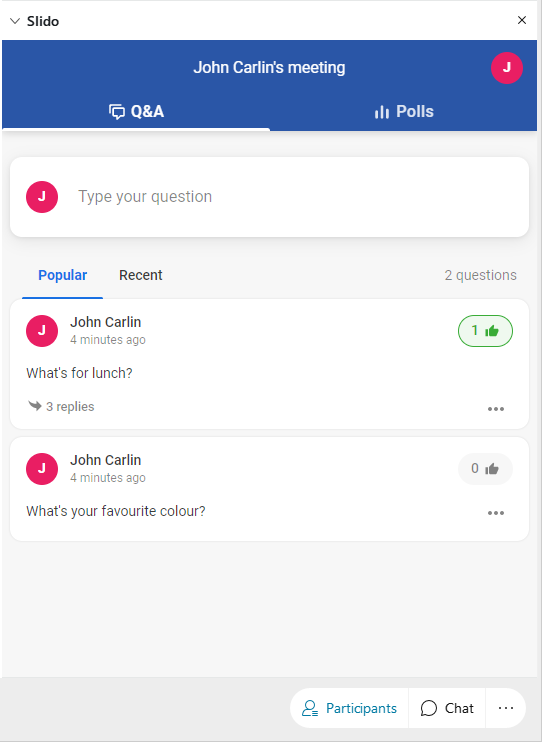
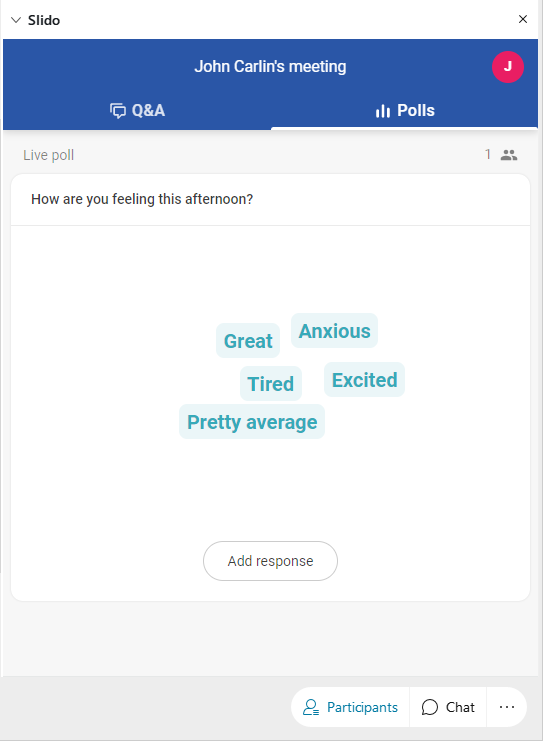
Slido is feature rich so it's recommended that you read the Slido overview for Webex Meetings or watch the introduction video below to get started. Then book a meeting with your colleagues and spend some time exploring all the features.
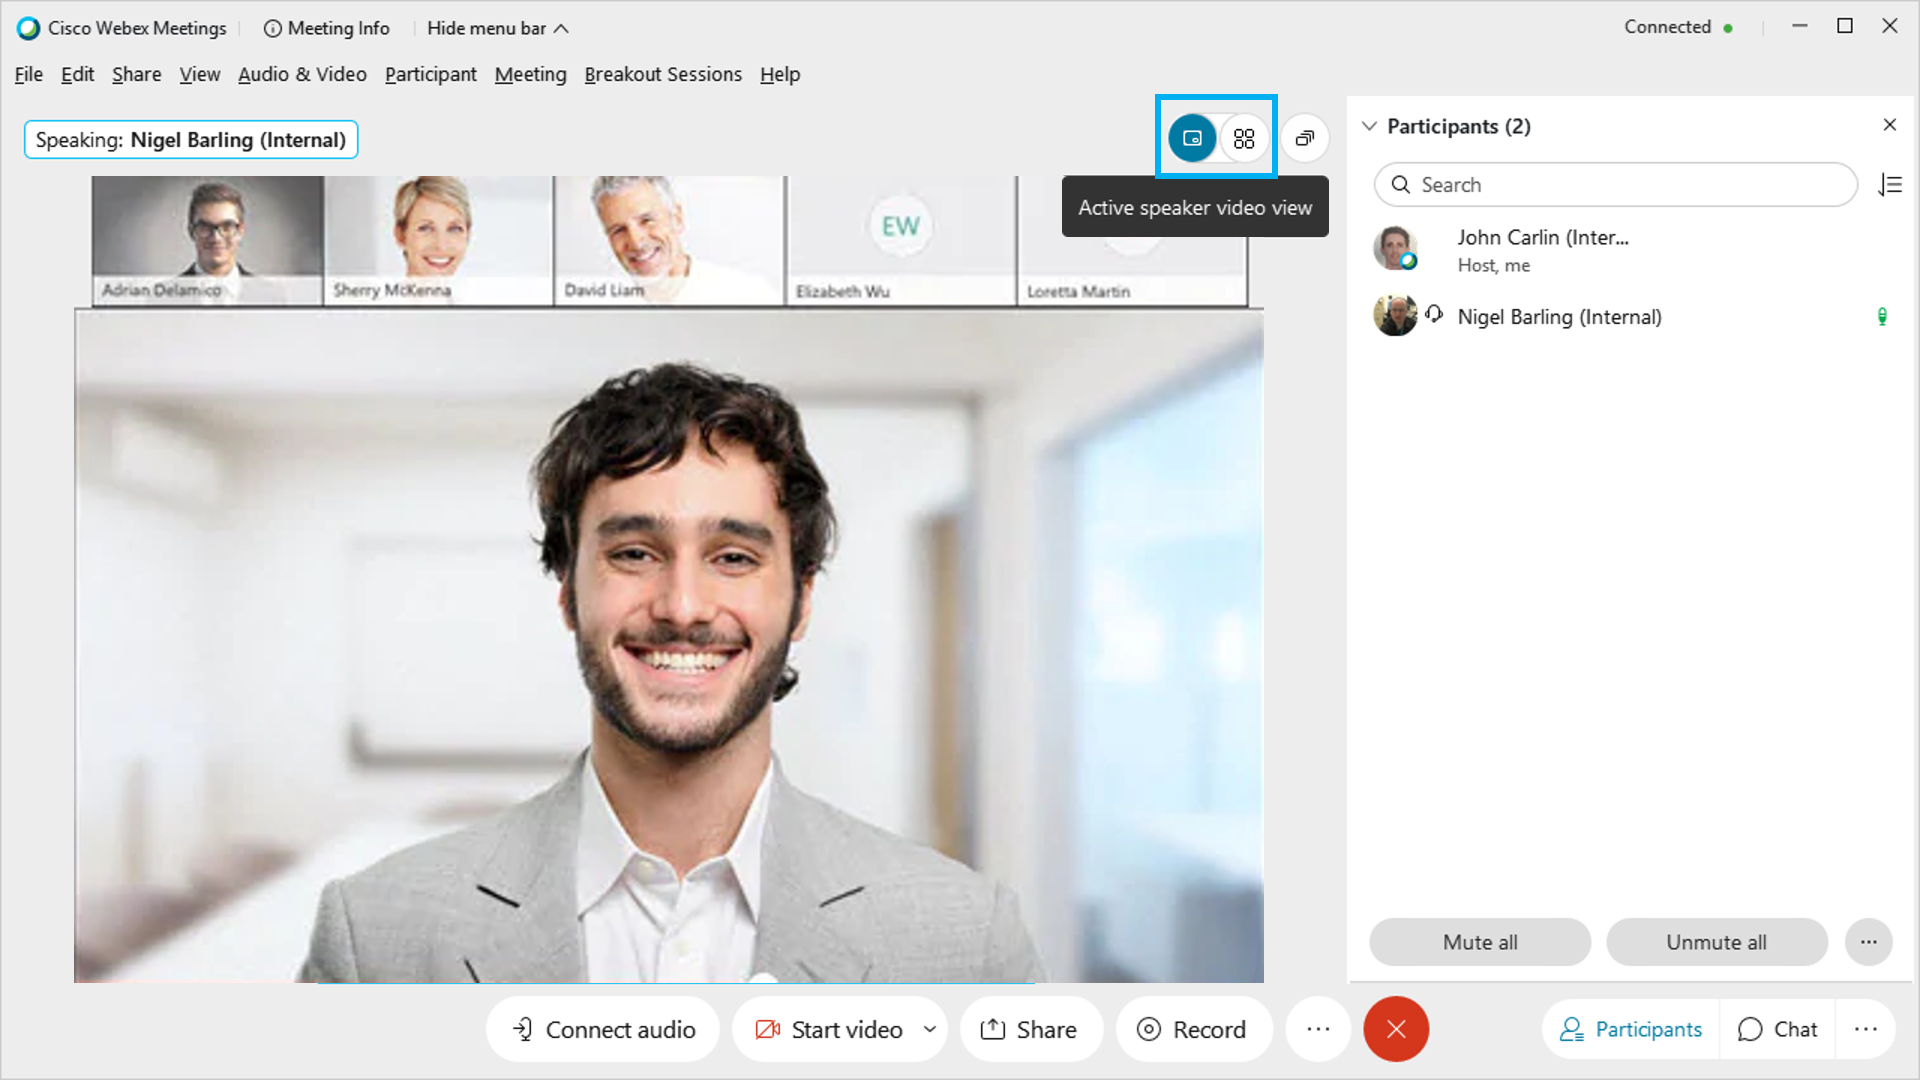
Did you know you can choose from a number of video layouts in Webex Meetings? To do so, just look for the video layout button located at the top right of screen.
TIP: For the best performance, it's recommened that the 'Active speaker video view' be used.
Webex Meetings Assistant is a closed captioning and interactive voice assistant designed to make your meetings more inclusive. If you would like to enable Webex Meetings Assistant for your Webex Meetings, contact the IMT Service Desk to log a job with the Unified Communications team.
Dual screen support
When a Cisco dual screen video conference unit connects to a Webex Meeting, video of up to 32 other participants will be shown at the same time resulting in a more immersive meeting experience. A participant count is also shown in the bottom right corner of the left screen. When someone shares their screen, the shared content will automatically be displayed on the right screen.

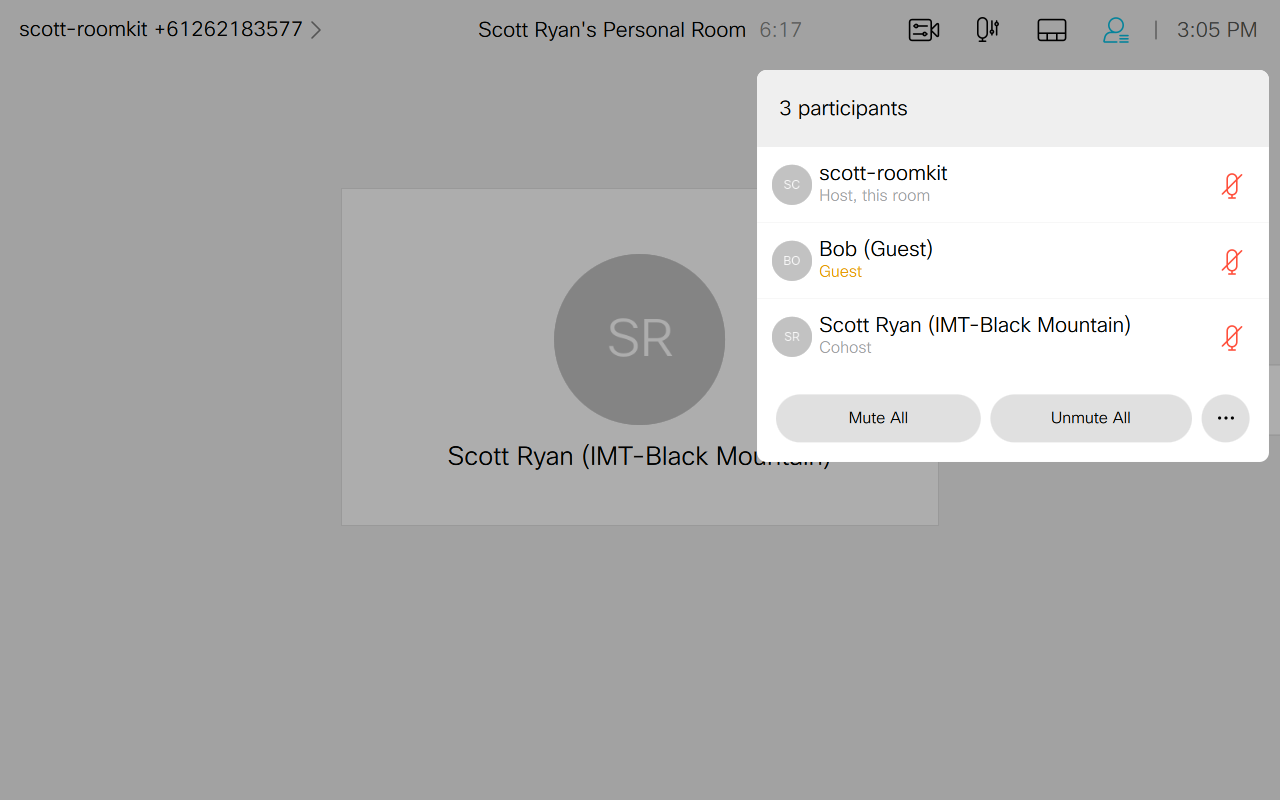
Host control using the touch panel
When a CSIRO video conferencing unit is connected to a Webex Meeting as Host, the following meeting controls are available:
- Mute all
- Mute individual participants
- Mute participants on entry
- Allow attendees to unmute themselves
- Start/stop recording
- Lock/unlock the meeting
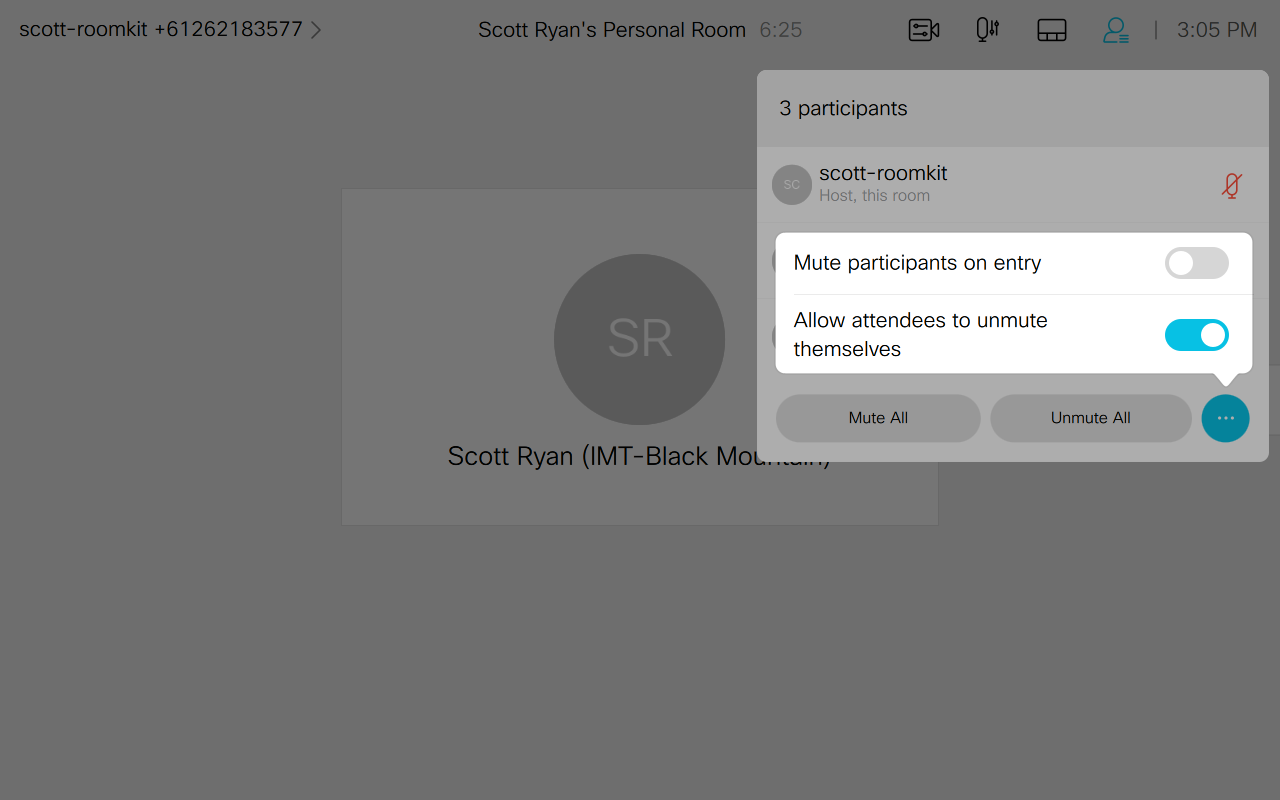
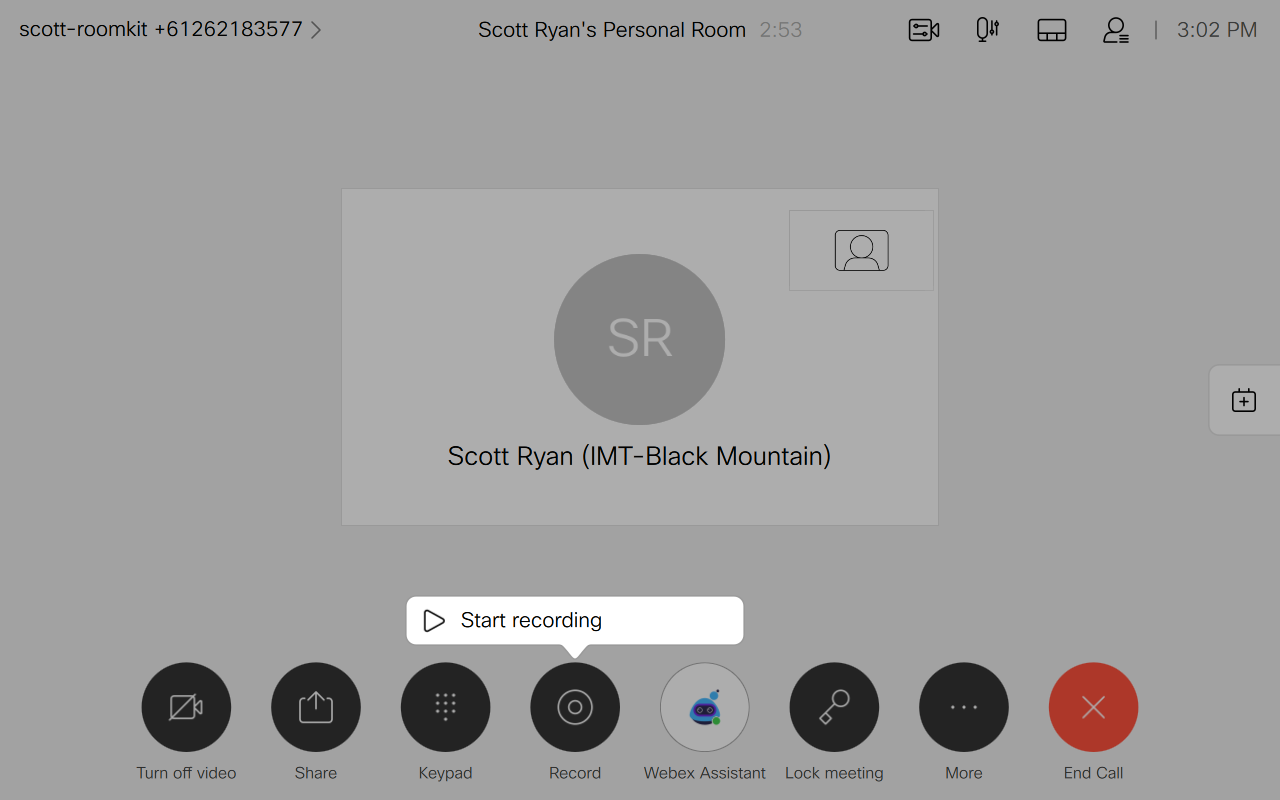
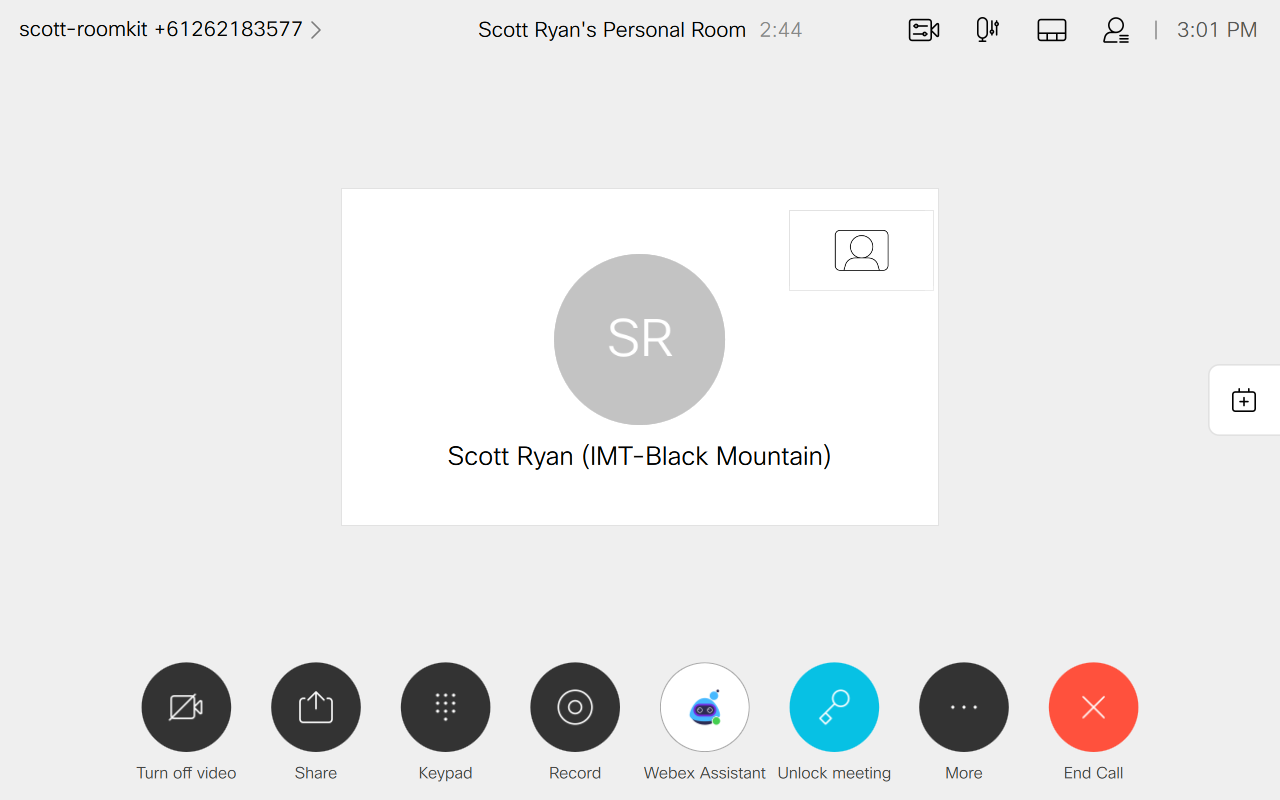
Raise hand using the touch panel
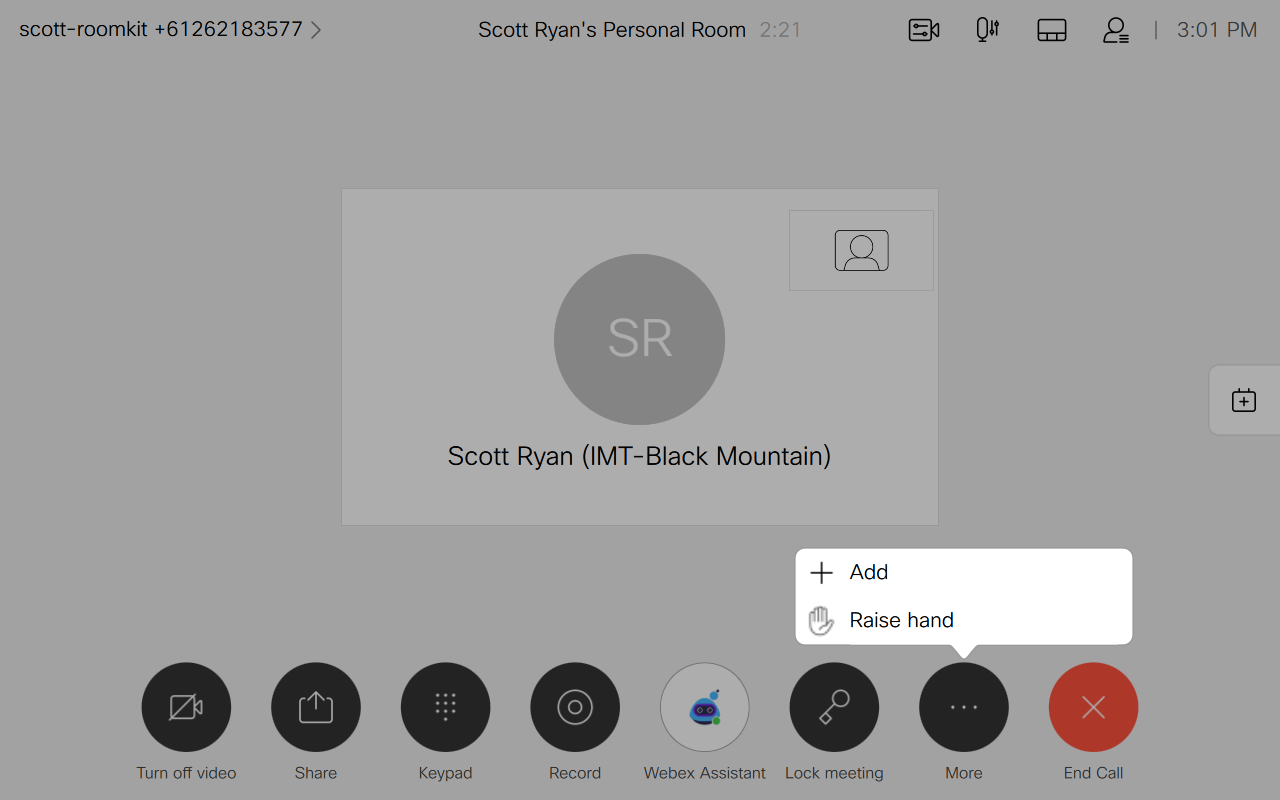
Access the ‘raise hand’ feature from the touch panel to get the presenter’s attention. The ‘raise hand’ feature is also visible by other participants in the meeting - see Managing large numbers of participants for more information.
Background noise suppression
Advanced Background noise suppression is being deployed to Webex Meetings during December 2020 – this allows a CSIRO Video Conference Room dialled into Webex Meetings to have the best AI-based noise suppression available for when background/unwanted noise levels are high.
Use the Cisco Webex Meetings desktop or mobile app to get Webex Meetings to call the room you're currently in. Once connected, you can use the app to mute/unmute the video conferencing unit as required.
Webex Boards
Webex Boards can be used to whiteboard and co-edit whiteboard sessions during Webex Meetings. To find your nearest Webex Board, see https://conferencing.csiro.au/Webex-boards/locations.php.
Breakout Sessions
From February 2021 (tentative date) video conferencing rooms will be able to participate in Webex Meetings breakout sessions.
Webex Meetings Assistant
Webex Meetings Assistant is a closed captioning and interactive voice assistant designed to make your meetings more inclusive. If you would like to enable Webex Meetings Assistant for your Webex Meetings, contact the IMT Service Desk to log a job with the Unified Communications team.
For more information on Webex Meetings, please visit the Webex Meetings Collaboration site:
